
- SAP Community
- Products and Technology
- Product Lifecycle Management
- PLM Blogs by SAP
- Create your own custom Quick Financial Application
Product Lifecycle Management Blogs by SAP
Dive into product lifecycle management news, learn about digitalizing PLM for the digital supply chain, and stay informed with product updates from SAP.
Turn on suggestions
Auto-suggest helps you quickly narrow down your search results by suggesting possible matches as you type.
Showing results for
Product and Topic Expert
Options
- Subscribe to RSS Feed
- Mark as New
- Mark as Read
- Bookmark
- Subscribe
- Printer Friendly Page
- Report Inappropriate Content
08-02-2023
4:53 PM
In the previous blog Quick Financial Plan – The new planning tool of CPM, which explains about the features offered in Quick Financial Plan (QFP). This blog will help you to create your own quick financial planning application which will allow you to extend the application based on your own business scenario.
Introduction
SAP Commercial Project management is a Project Management solution provided by SAP which addresses a company’s core business process requirements in ECO (Engineering Construction & Operations) industry to manage their projects and handle their large financial and non-financial data. CPM handles multiple processes in an end-to-end scenario spanning the selling, planning, execution, monitoring, and controlling of projects.
Most of the customers tend to customise the application based on their business requirements and when it comes to customisation, it is remarkably simple and easy to customise QFP. As discussed in the earlier blog, QFP is a Web Dynpro based planning tool offered by SAP CPM from S/4HANA 2021 FPS01 onwards, but this blog focuses on the latest version of QFP planning page which is available from S/4HANA 2022 FPS03 and S/4 HANA 2023 FPS00 onwards.
Prerequisite: ABAP and Web Dynpro FPM (Floor Plan Manager).
Quick Financial Plan Standard Design:
The QFP application page is divided in 4 sections:
- Page Header Area - Form UIBB (User Interface Building Blocks)
- Section 1 - Search, Tree, & Chart - Search UIBB, Tree UIBB, & Chart UIBB
- Section 2 - Resource Type Summary - LIST ALV (ABAP List Viewer)
- Section 3 - Planning Area - List UIBB
Steps to create your own QFP application:
Step 1: Create custom feeder class
There are following classes involved in the application. Copy and create the custom classes based on the business requirement which requires custom enhancement.
| Class used | Class Name |
| APCC | /CPD/CL_QFP_PLAN_APCC |
| Area Feeder | /CPD/CL_QFP_PLAN_AREA_FEEDER |
| Page Header Area | /CPD/CL_QFP_PAGE_HEADER |
| Copy Form | /CPD/CL_QFP_PLAN_COPY_FORM |
| Copy List | /CPD/CL_QFP_PLAN_COPY_LIST |
| Distribute | /CPD/CL_QFP_PLAN_DISTRIBUTION |
Step 2: Create OVP FPM Floorplan Configurations
Create your own OVP page similar to the standard OVP page '/CPD/APP_CFG_PFP_QUICK_FP_OVP'. You can find standard configuration by following the path:
Go to transaction SE80. Select Package in dropdown and pass package as '/CPD/PFP_UI' and hit enter. Navigate to /CPD/PFP_UI-> Web Dynpro -> FPM Floorplan Configurations and double click on '/CPD/APP_CFG_PFP_QUICK_FP_OVP'.

/CPD/APP_CFG_PFP_QUICK_FP_OVP
Right click on 'FPM Floorplan Configurations ' and click on create. Provide component name and configuration ID:
Component Name : FPM_OVP_COMPONENT
Configuration ID : (Custom Configuration Name)
Create and Save the page.
Step 3: Create FPM Application Configuration
Create your Application page similar to the standard Application page '/CPD/APP_CFG_QUICK_FIN_PLAN'. You can find standard configuration by following the path:
Go to transaction SE80. Select Package in dropdown and pass package as '/CPD/PFP_UI' and hit enter. Once the all the object tree loads, go to path /CPD/PFP_UI-> Web Dynpro -> FPM Application Configurations and double click on /CPD/APP_CFG_QUICK_FIN_PLAN.
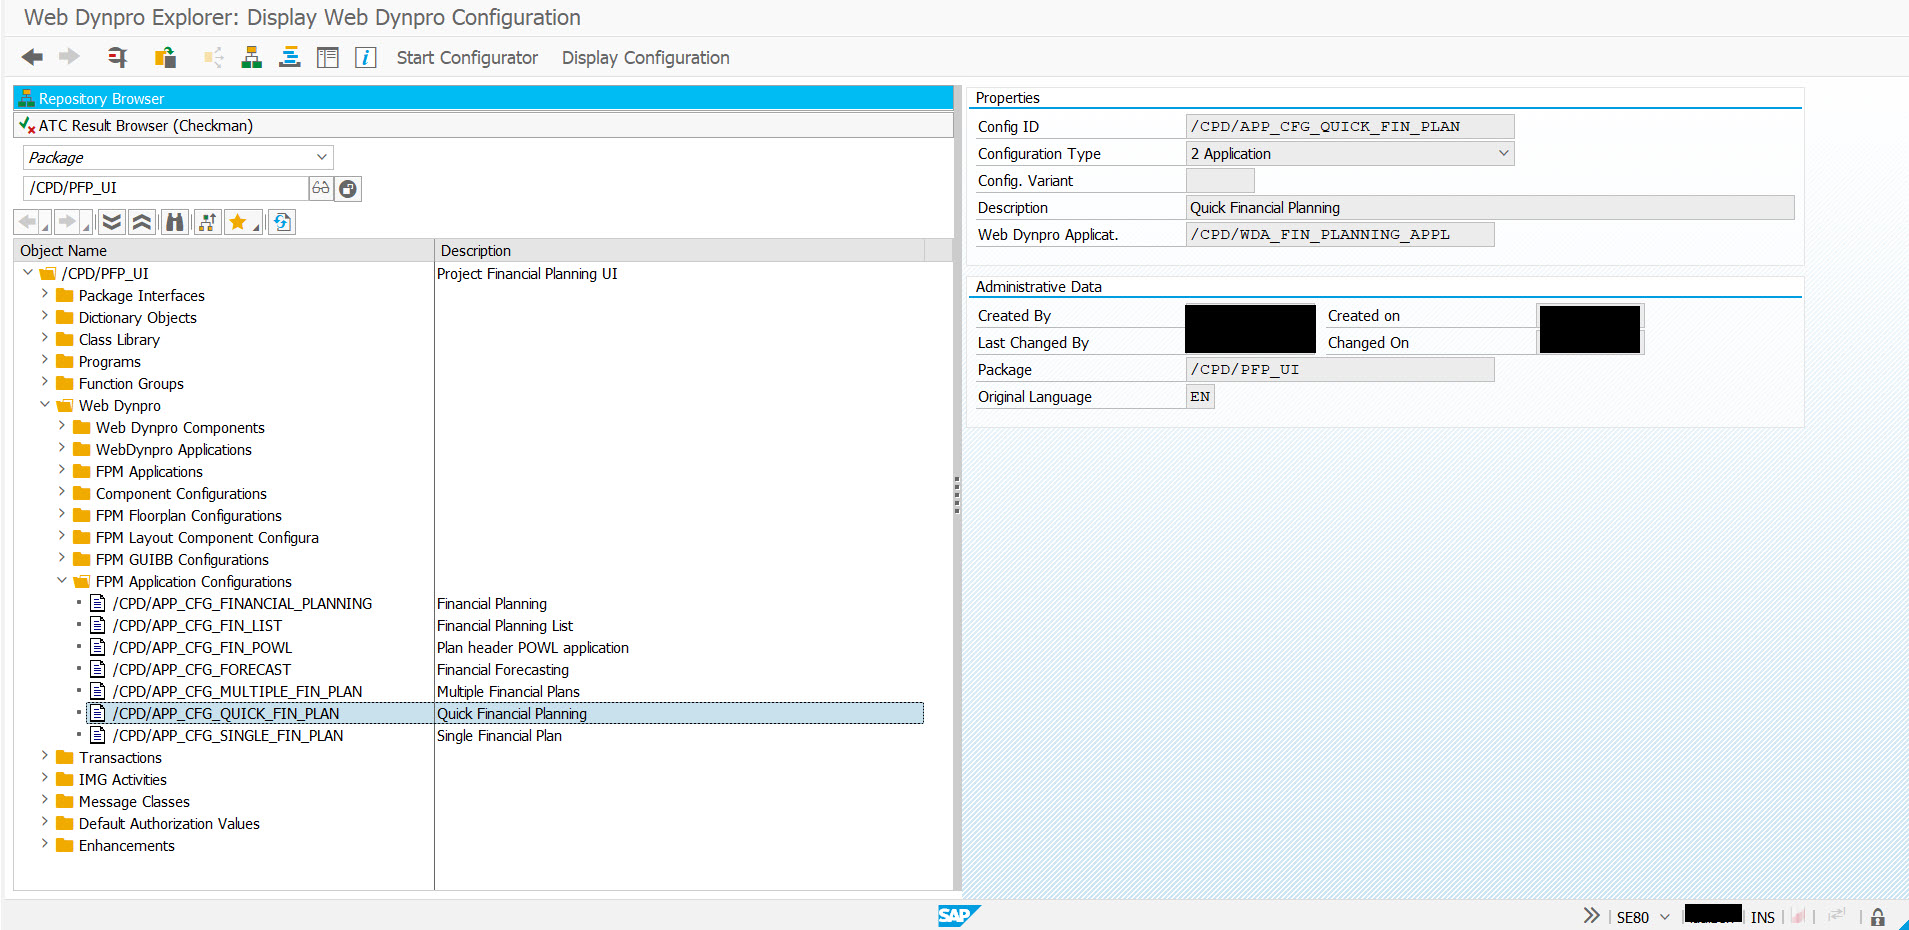
/CPD/APP_CFG_QUICK_FIN_PLAN
Right click on 'FPM Application Configurations' and click on create. Provide application name and configuration ID.
Application name : '/CPD/WDA_FIN_PLANNING_APPL
Configuration ID : (Custom Configuration Name)
Create and save the page.

Assign OVP configuration name created in step 2 and save.

Assign the APCC class from the step 1.
Step 4: Create all the required UIIBs
There are following UIBBs involved in the application. Copy and create the custom UIBBs based on the business requirement which requires custom enhancement.
To create FPM GUIBB Configuration, Go to path /CPD/PFP_UI -> Web Dynpro -> FPM GUIBB Configurations.

Overview Page Schema
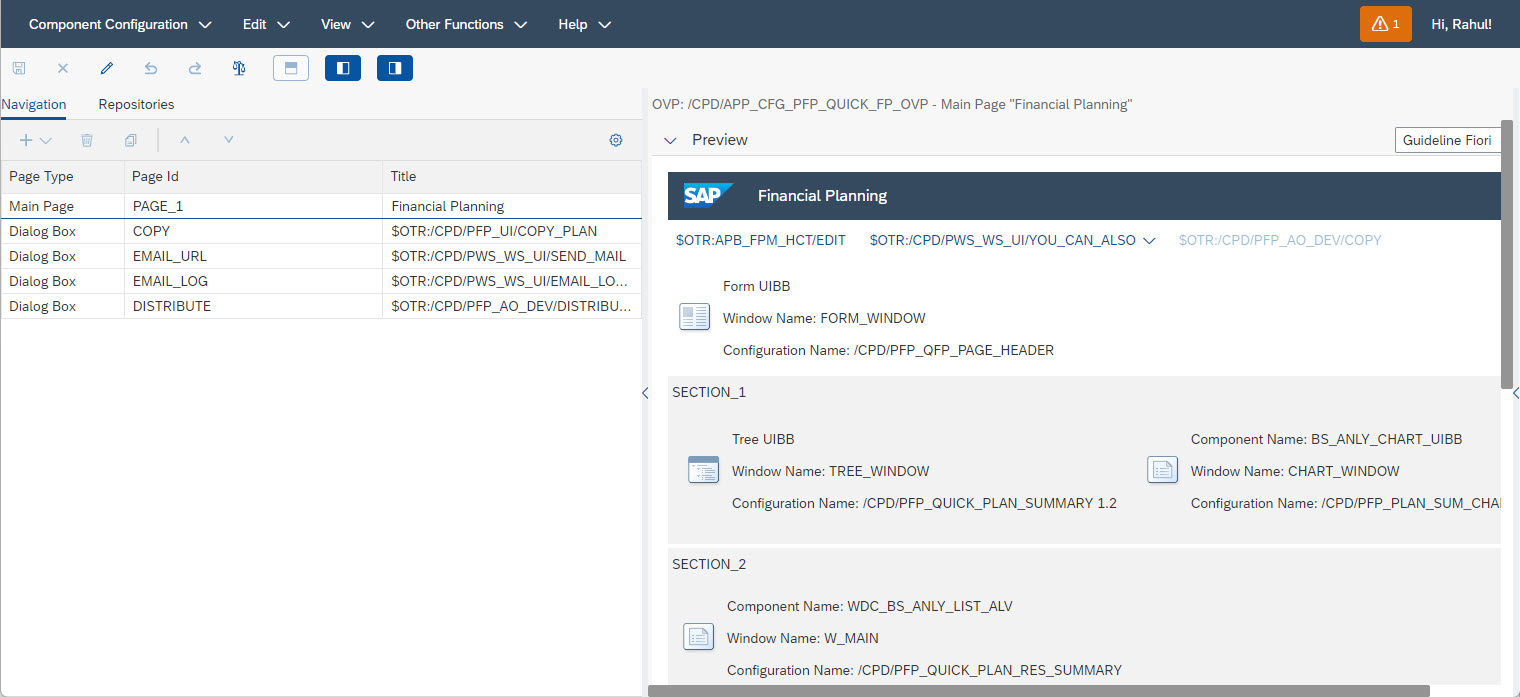
Step 5: Create the page and section on the OVP Component Configuration
Open the Configurator for OVP Component created in step 2.
As shown in the below snippet, all the sections and UIBBs must be added in the configuration. Refer standard configuration for any clarification.

The toolbar buttons also need to be added as per below snippet. The button IDs and event IDs can be referred in standard.

Toolbar Schema
The dialog boxes 'COPY', 'EMAIL_URL', 'EMAIL_LOG' and 'DISTRIBUTE' can be copied as it is from standard.
Added Page Type
Key points to remember while copying:
- The Wire Schema must be defined and linked with Search UIBB for linking the search UIBB to other UIBBs.
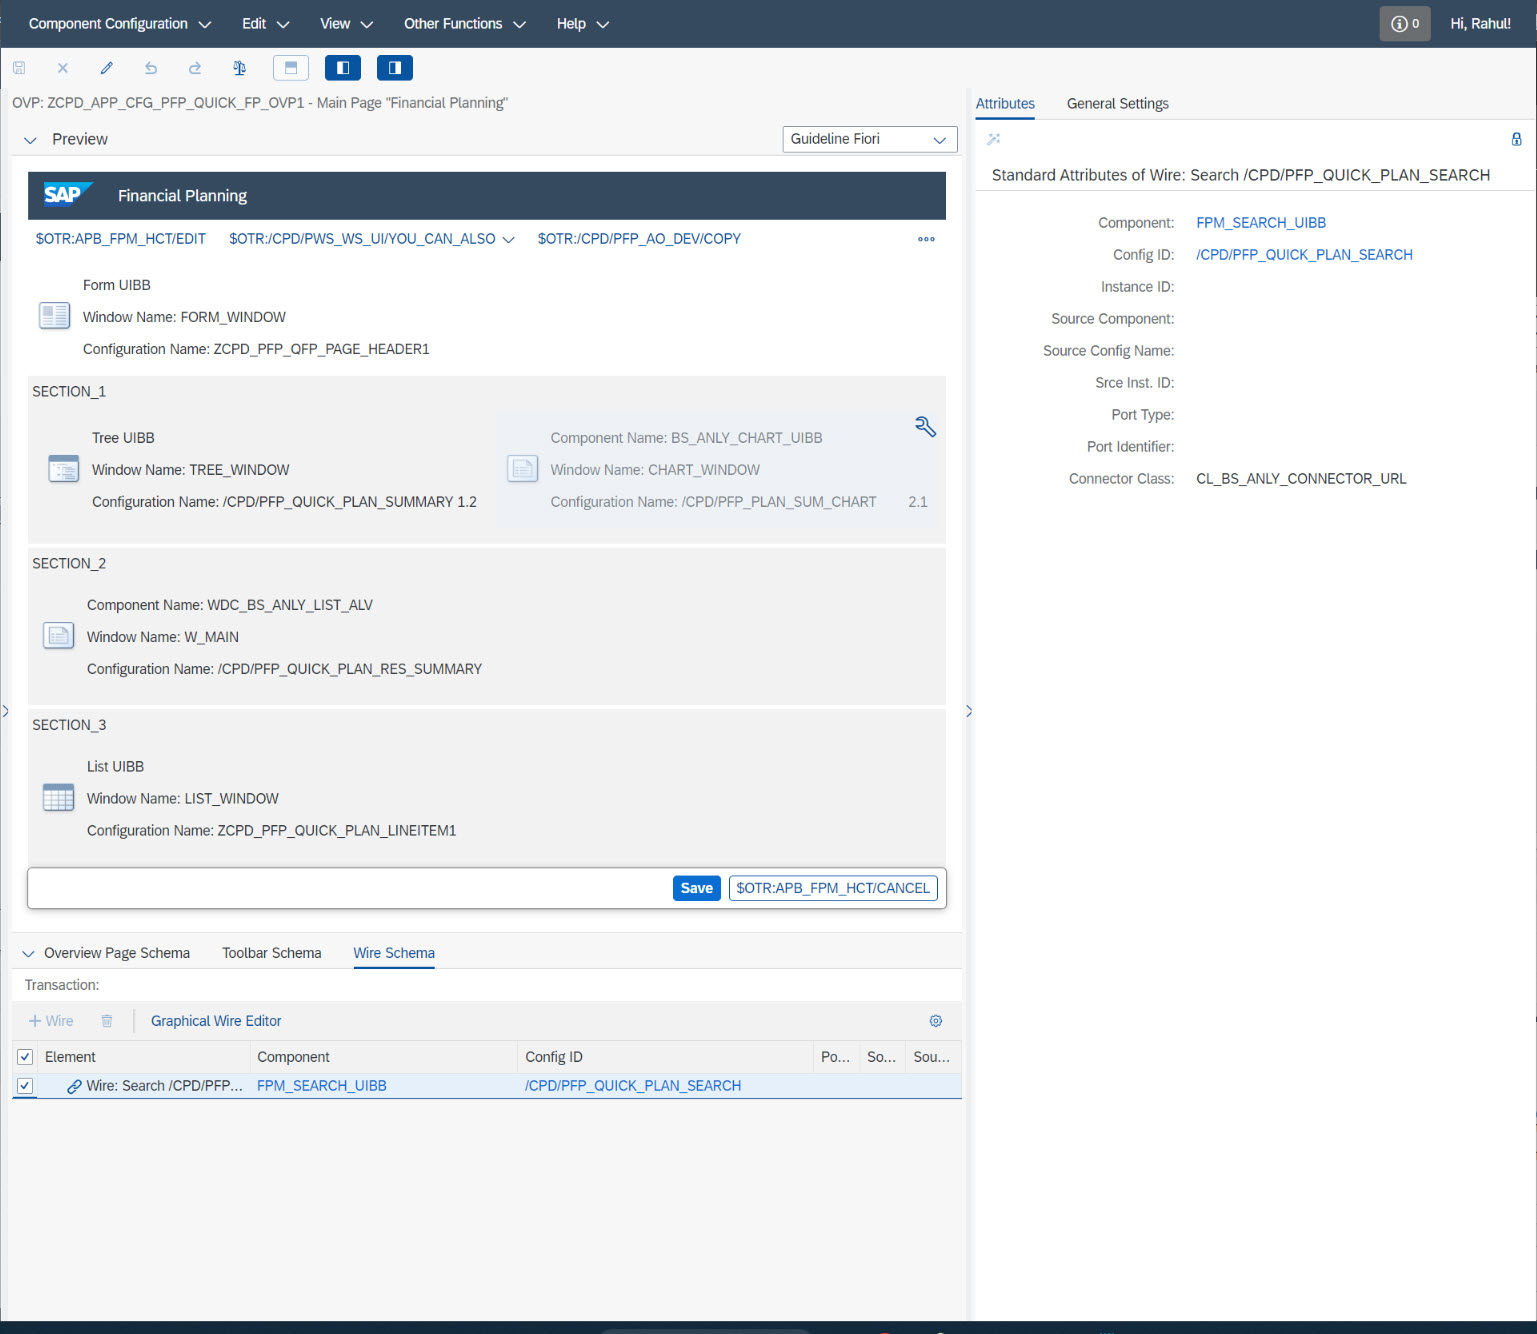
Wire Schema
- UIBB Processing Mode for all the custom UIBBs should exactly match with that of standard UIBBs.

UIBB Processing Mode
Make sure that under no condition, the properties for 'UIBB Processing Mode' defined under General settings could be different from the standard application, otherwise the error 'Specify a value for variable Financial Plan' or any other errors may occur.
Page Header Area
Form UIBB
This section of page contains details related to Financial Plan. Once the standard config id is copied to custom config id, elements can be added, changed, or removed. For any logic changes, the custom feeder class corresponding to standard feeder class '/CPD/CL_QFP_PAGE_HEADER' can be modified accordingly.

Form UIBB: /CPD/PFP_QFP_PAGE_HEADER
Section 1
Search UIBB
Under configuration ID for search UIBB, three major technical details are defined:
- Hidden Element property should be set to Hidden but Processed in Event Loop (Technical)
- Analytic Query under feeder class parameters
- Search Criteria
During the copy of custom config id from standard, the feeder class 'CL_BS_ANLY_LIST_SEARCH_FEEDER' should used as in standard. Add the BW queries as available in the standard search UIBB and replace these queries with your own custom queries (If any).
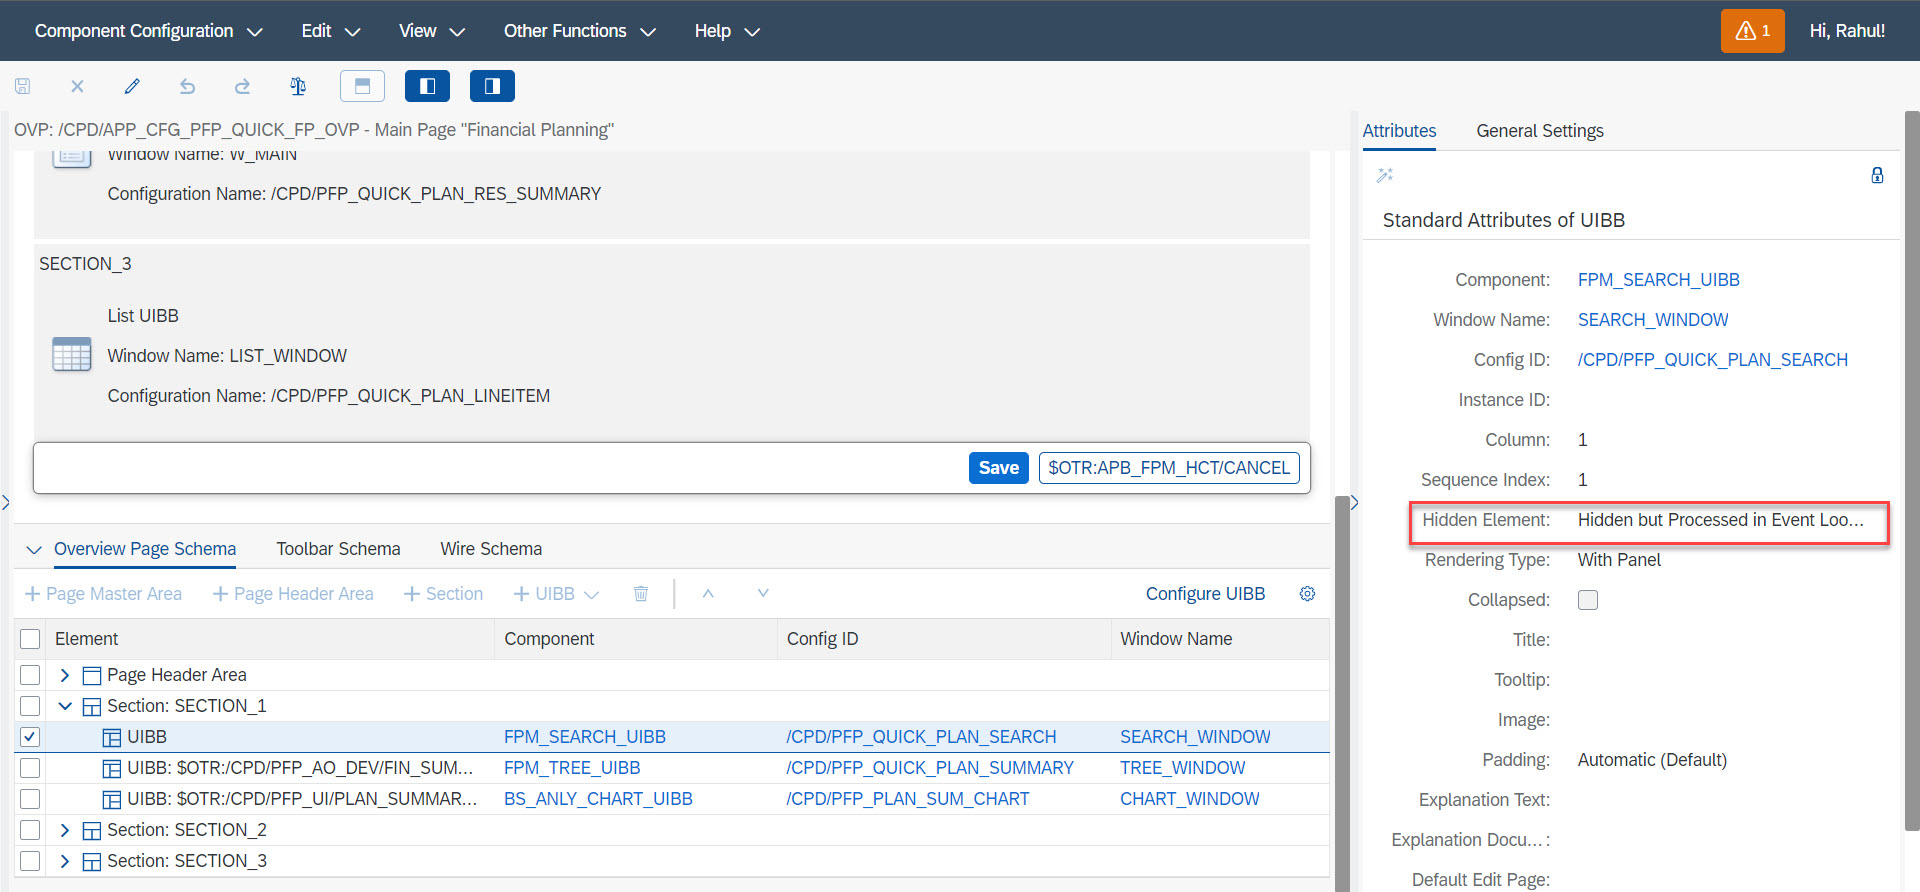
Hidden Element Property
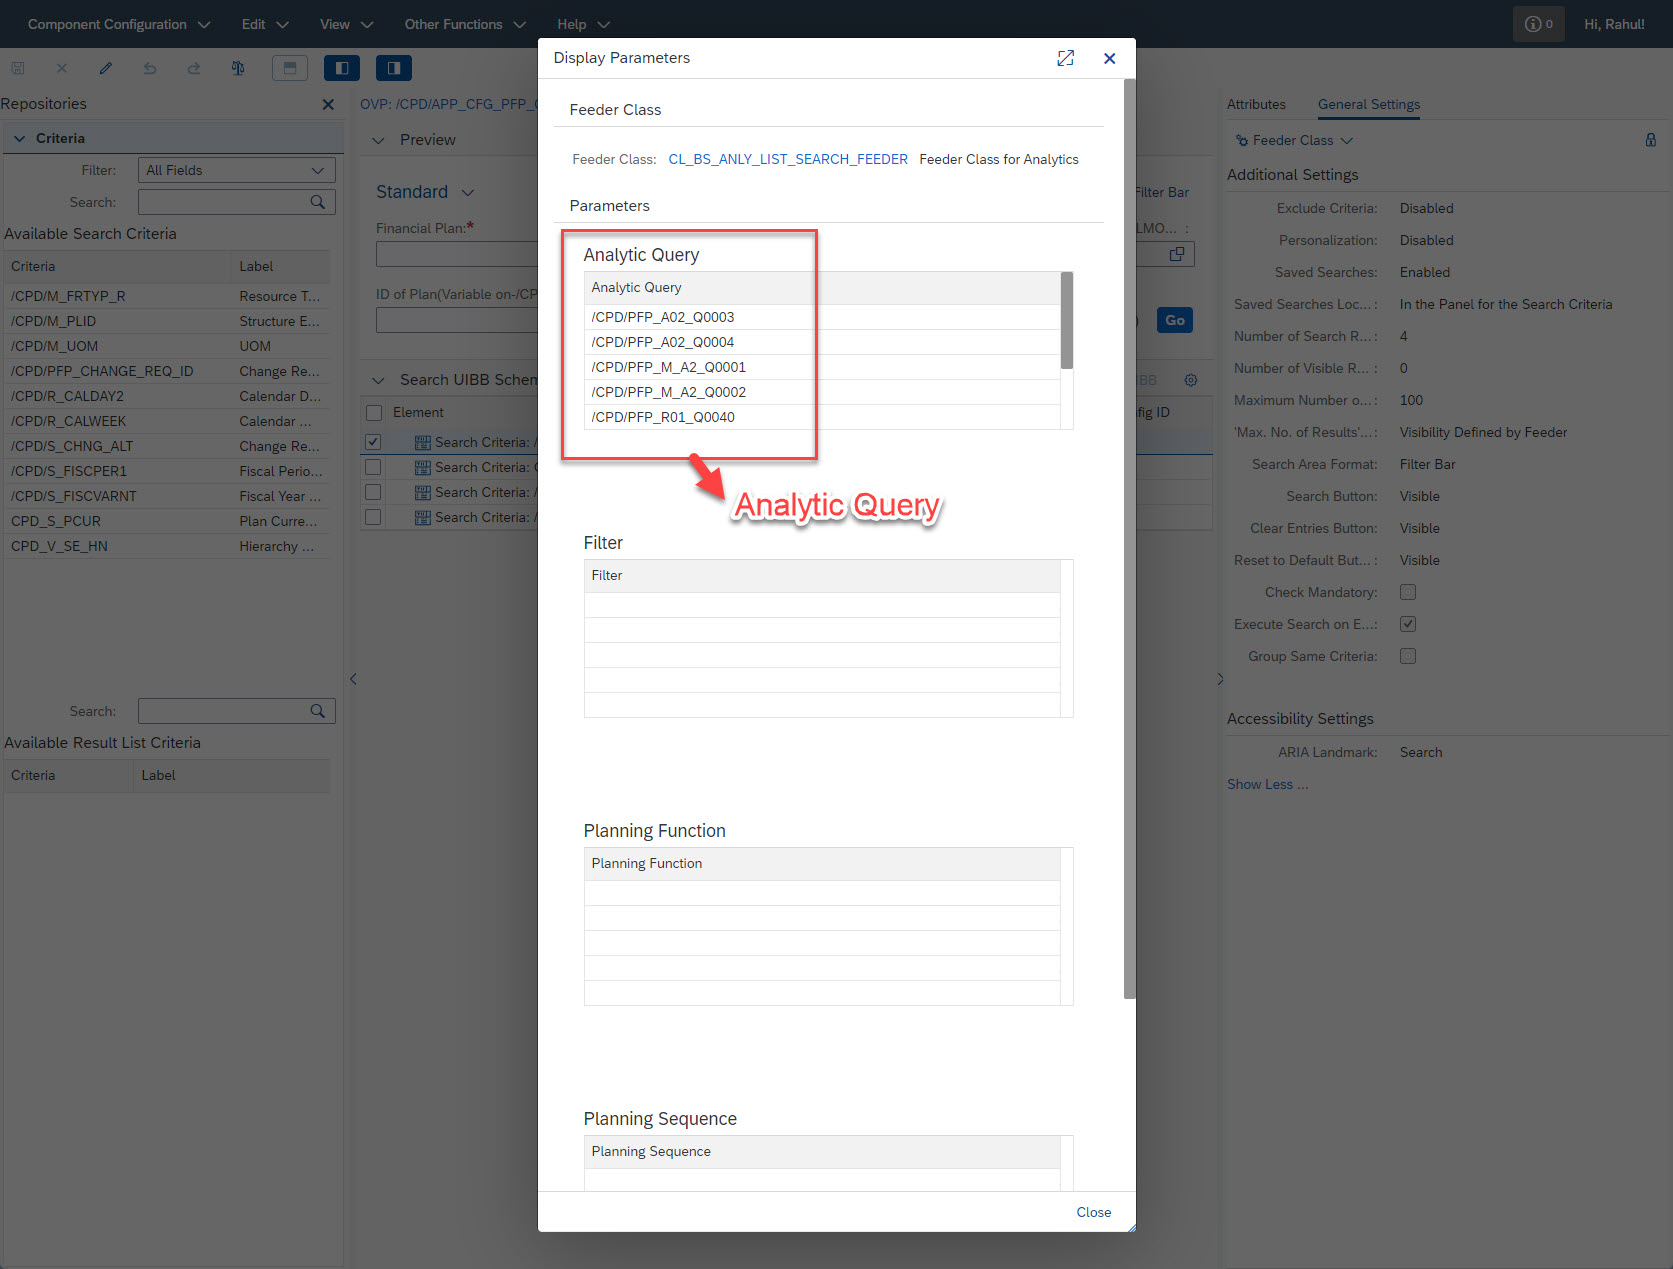
Analytic Query in Feeder Class Parameters
From the available search criteria list, add the required search criteria in the search UIBB schema. Added search criteria will be used further for the selection of data. If there is any change in search variable, set it's value in the method 'INITIALZE_DATA' of class '/CPD/CL_QFP_PLAN_APCC' with prefix 'BSA_VARIABLE_'. Example variable name - 'BSA_VARIABLE_/CPD/F_V13'.

Search UIBB Config ID
Tree UIBB
Consume the standard Tree UIBB as it is in the OVP. (It's corresponding query is derived from the APCC class.
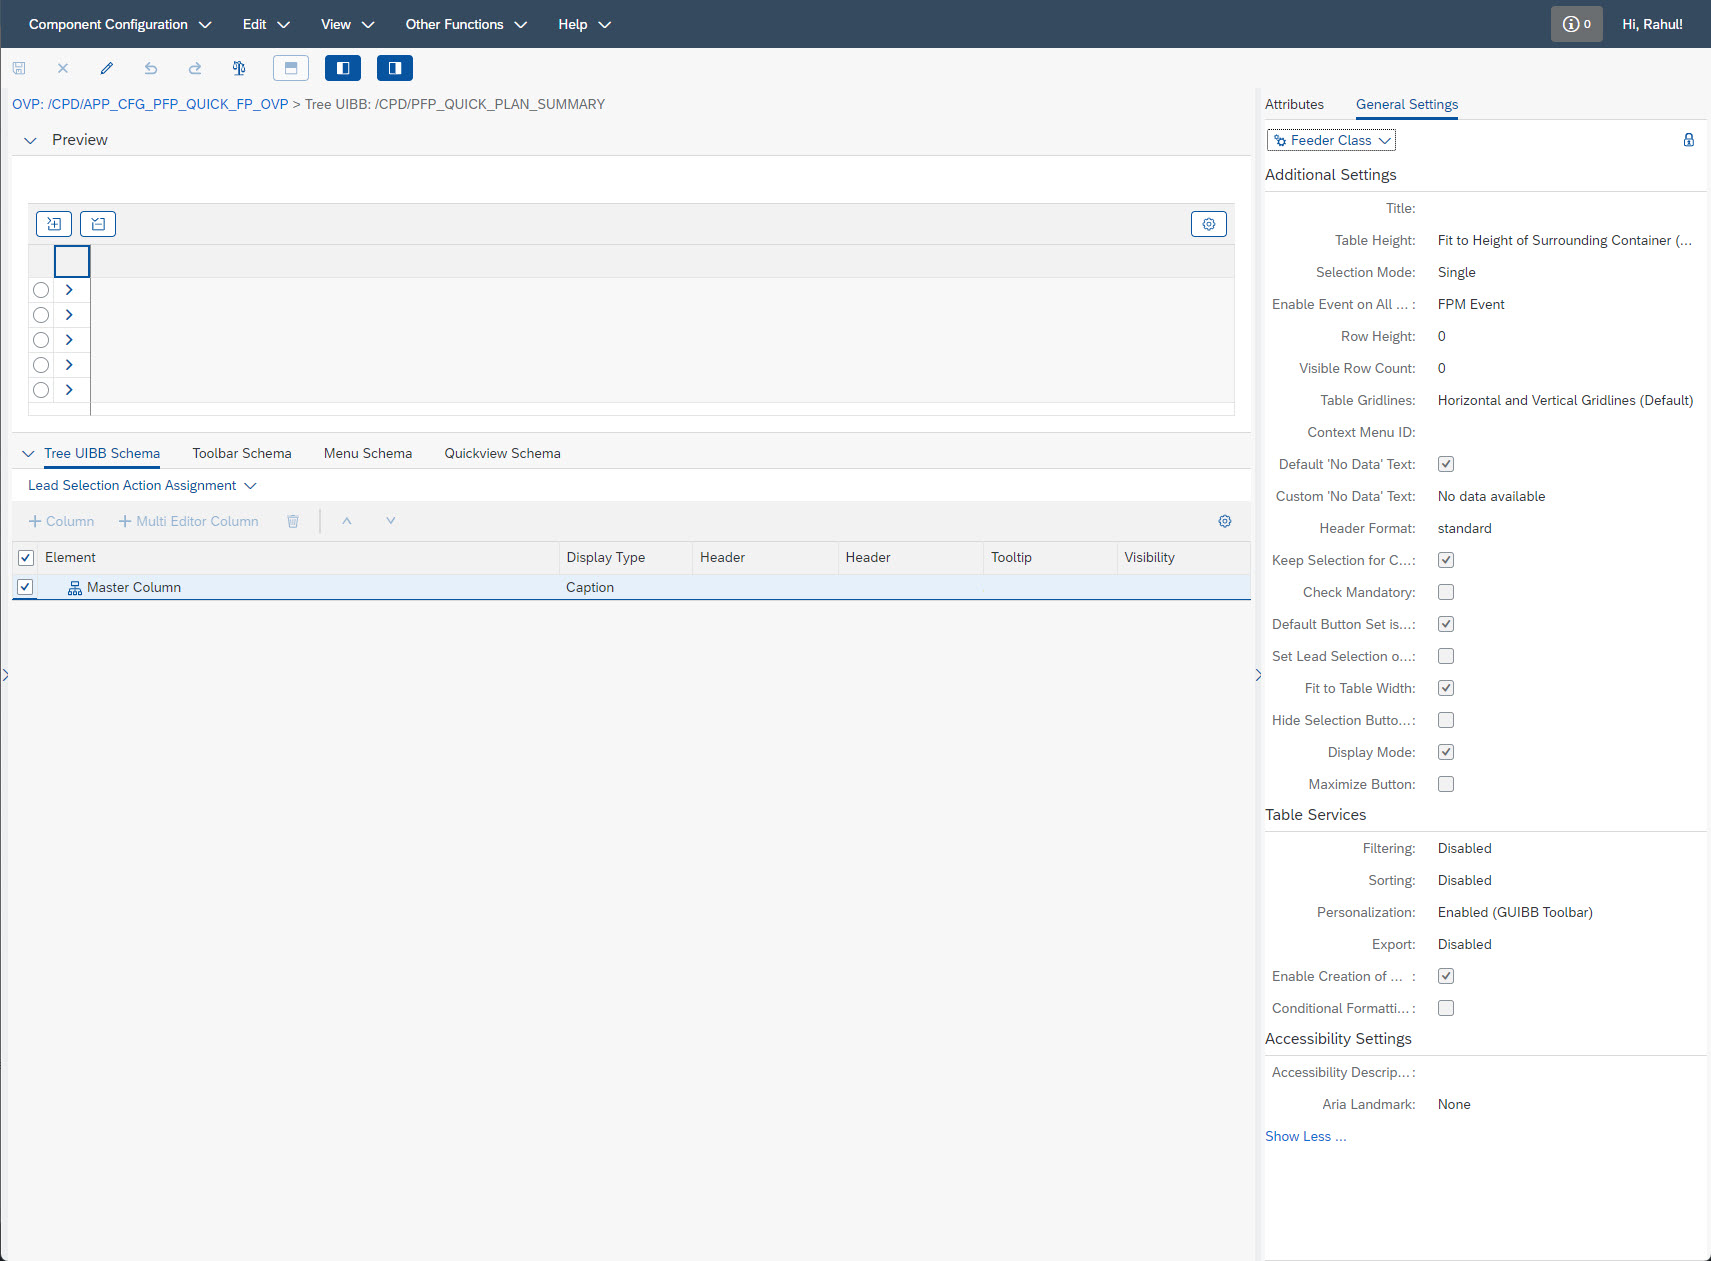
Tree UIBB: /CPD/PFP_QUICK_PLAN_SUMMARY
Chart UIBB
Consume the standard Chart UIBB as it is in the OVP. (It's corresponding query is derived from the APCC class.

Component Configuration: /CPD/PFP_PLAN_SUM_CHART
Section 2
Resource Type Summary
Consume the standard Resource Type Summary as it is in the OVP. (It's corresponding query is derived from the APCC class.

Component Configuration: /CPD/PFP_QUICK_PLAN_RES_SUMMARY
Section 3
Planning Area
Create a Planning Area comparing the standard configuration '/CPD/PFP_QUICK_PLAN_LINEITEM' and replace the feeder class with the custom class, if any.

List UIBB: /CPD/PFP_QUICK_PLAN_LINEITEM
Relevant methods for custom changes:
- IF_FPM_GUIBB~INITIALIZE
- Define the infoprovider - In the variable 'GV_INFOPROVIDER', pass the aggregation name to read the data from it.
- Add/Remove filters - Currently there are Resource Type, Resource, Transaction Currency, and UoM in the standard screen. If you wish to have additional filter, add the characteristics in the internal table 'GT_INIT_DATA' and set the field 'Enabled' to true.
- Add/Remove button in the Planning Area - Currently there are 'Calculate', 'Delete', 'Distribute' and 'Valuate' buttons. If you wish to add/remove any button, or modify the existing button, Modify the internal table 'GT_BUTTON_DATA' accordingly. Note that the planning function/sequence or filter should belong to aggregation defined in the global variable 'GV_INFOPROVIDER'. Do not change the button ID 'BSA_SELECT' in the table 'GT_BUTTON_DATA'.
- IF_FPM_GUIBB_LIST~GET_DEFAULT_CONFIG
- Change property of row, column or button - For example, the dropdown for Resource type can be changed to F4 search help by changing the display property from dropdown to input field and attaching the search help in the method 'IF_FPM_GUIBB_LIST~GET_DEFINITION' passing search help name in 'IS_FIELD_DESCRIPTION-DDIC_SHLP_NAME'.
- ENABLE_DISABLE_COLUMN
- Currently the columns are enabled for editing based on Resource type driver. To make any custom column enabled for editing, enhance the method 'ENABLE_DISABLE_COLUMN' accordingly.
APCC Class
Relevant methods for custom changes:
- 'INITIALIZE_DATA'
- Change the standard query - Below is a snippet of logic written in APCC for changing the query. Once the query name is passed in the method 'INITIALIZE_DATA', the method 'cl_bs_anly_tree_feeder=>set_query' is called to set the same in frontend.
- Set the search variable as mentioned above in section 1 - search UIBB.

/CPD/CL_QFP_PLAN_APCC~INITIALIZE_DATA
- IF_FPM_OVP_CONF_EXIT~OVERRIDE_EVENT_OVP
- Add or change validation - Most of the event based validations are written in this methods, it could be enhanced according to custom requirement.
Once the custom page for QFP is ready, the application configuration can be attached to Target mapping and Launchpad customising. To handle custom navigation, a custom implementation for BAdI '/CPD/PFP_BADI_LAUNCH_PLAN_APPL' can be created accordingly.
Conclusion
For making your own QFP page, Only the Component Configuration '/CPD/APP_CFG_PFP_QUICK_FP_OVP', Application Controller Class (APCC), Search UIBB, Planning Area config id and feeder class needs to be copied and rest can be reused by referring the standard objects.
Similarly PICM planning and Forecasting application can be created comparing the standard configuration.
Labels:
You must be a registered user to add a comment. If you've already registered, sign in. Otherwise, register and sign in.
Labels in this area
Related Content
- Consumption of an API within a Custom POD Plugin in SAP DMC in Product Lifecycle Management Q&A
- Custom POD Plugin creation error. Plugin not visible on POD pugins list. in Product Lifecycle Management Q&A
- SAP Digital Manufacturing: Embed Digital Manufacturing in Custom Web Apps in Product Lifecycle Management Q&A
- Extending SAP Digital Manufacturing with Azure, Part II: Applying the reference architecture to a visual inspection scenario in Product Lifecycle Management Blogs by Members
- Extending SAP Digital Manufacturing with Azure, Part I: Reference architecture in Product Lifecycle Management Blogs by Members
Top kudoed authors
| User | Count |
|---|---|
| 2 | |
| 2 | |
| 2 | |
| 2 | |
| 1 | |
| 1 | |
| 1 |