


- SAP Community
- Products and Technology
- Technology
- Technology Blogs by SAP
- How to Install SAP Data Intelligence on-premise v3...
Technology Blogs by SAP
Learn how to extend and personalize SAP applications. Follow the SAP technology blog for insights into SAP BTP, ABAP, SAP Analytics Cloud, SAP HANA, and more.
Turn on suggestions
Auto-suggest helps you quickly narrow down your search results by suggesting possible matches as you type.
Showing results for
Advisor
Options
- Subscribe to RSS Feed
- Mark as New
- Mark as Read
- Bookmark
- Subscribe
- Printer Friendly Page
- Report Inappropriate Content
12-29-2020
7:39 PM
Introduction:
This is Part-2 of a 3-part blog post series on detailed a step-by-step installation of SAP Data Intelligence on-premise v3.0/3.1 on Microsoft Azure. This blog post series has been co-authored by my colleague skugan.venkatesan .This post will cover the preparations on the Kubernetes cluster and the SLCB tool(Software Lifecycle Container Bridge).
The Part-1 blog post covers the system setup required to start with SAP Data Intelligence installation.
The Part-3 blog post explains the steps needed to expose SAP Data Intelligence for end user access.
Prepare Kubernetes Cluster For Installation
The az aks get-credentials command accesses credentials for an AKS cluster and merges them into the kubeconfig file. You can use Azure role-based access control (Azure Role Based Access Control or RBAC) to control access to these credentials. These Azure RBAC roles let you define who can retrieve the kubeconfig file, and what permissions they then have within the cluster. (Courtesy – Microsoft)
az aks get-credentials --resource-group <Resource Group Name> --name <AKS Cluster Name>


az aks get-credentials --resource-group aksdifinal --name aksdifinal![]()
You can verify the connection by displaying active services:
kubectl get services
Helm and Tiller setup:
Let’s install helm and tiller in our Jumpbox.
Helm is a package manager for Kubernetes that allows developers and operators to more easily package, configure, and deploy applications and services on Kubernetes clusters.
Tiller is a server component that listens for commands from helm, and handles the configuration and deployment of software releases on the Kubernetes cluster.
Let us first add a service account to the tiller. As a prerequisite, we will have to create a role binding which specifies a role and a service account name that have been set up in advance. We need to perform the following steps
- Create an helm-rbac.yaml file with following content:
Vim helm-rbac.yamlThe vim command shall open the YAML file in edit mode, please enter the below content.
apiVersion: v1

kind: ServiceAccount

metadata:

  name: tiller

  namespace: kube-system

---

apiVersion: rbac.authorization.k8s.io/v1

kind: ClusterRoleBinding

metadata:

  name: tiller

roleRef:

  apiGroup: rbac.authorization.k8s.io

  kind: ClusterRole

  name: cluster-admin

subjects:

  - kind: ServiceAccount

    name: tiller

    namespace: kube-system
Exit the editor, and for confirmation, view the file with cat command.

Here Tiller is given admin access to the entire cluster. Giving admin access is optional- Instead of specifying a ClusterRole or a ClusterRoleBinding, you can also specify a Role and RoleBinding to limit Tiller’s scope to a namespace.
Now let’s apply this configuration file to the required resource using the below mentioned command
kubectl apply -f <filename>


kubectl apply -f helm-rbac.yaml
Once pre-requisites are satisfied, and have a service account with the correct permissions, let's initiate helm with the below command:
helm init --service-account tillerTo verify that everything went well you can execute the “helm ls” command and check- it should not return any error message.
helm ls![]()
You can also display the deployed pods in the kube-system namespace:
kubectl get pods -n kube-system
Attach the Azure container registry to the Kubernetes cluster:
When you're using Azure Container Registry (ACR) with Azure Kubernetes Service (AKS), an authentication mechanism needs to be established. You can set up the AKS to ACR integration in a few simple commands with the Azure CLI. Setting up the Azure CLI on the jumpbox is covered in part-1 of this blog post series. This integration assigns the AcrPull role to the service principal associated to the AKS Cluster. (Courtesy - Microsoft)
az aks update -n <AKS Cluster Name> -g <Resource Group Name> --attach-acr <ACR Name>


az aks update -n aksdifinal -g aksdifinal-agl --attach-acr dataintelligencefinal
Software LifeCycle Container Bridge Tool:
Now that the jumpbox is ready, let’s proceed with the Software LifeCycle Container Bridge (SLCB) Installation.
Software Lifecycle Container Bridge 1.0 is a tool for installing, upgrading, and uninstalling container-based applications. SAP Data Intelligence introduces an additional option to install the images on the Hyperscaler, i.e. Azure AKS with an own Installation Pod now.
The Setup of the SAP Hostagent is not necessary anymore, and the images will be written from the SAP Repository directly into the Container Registry of the connected AKS Cluster. For in-depth details, please refer to the help guide here
Unlike other SAP installers, you will not find SLCB Installer in the Service Market Place. Latest SLCB Plugins (Installer) can be downloaded from SAP Note 2589449
Let's do a pre-requisite check to check whether all the criteria have been met before starting with the SLCB installation
SLCB Prerequisites:
- Kubernetes cluster Minimum is 1.14v
- A private Docker container registry for mirroring images – Azure Container Registry has been created
- A workstation (Linux or Windows) with following components installed:
- kubectl v1.14 or higher – Kubectl is installed in the jump box with version 1.14 and above
- helm to deploy nginx ingress controller after completing the installation (Optional) – Helm and tiller already deployed
For a complete list of prerequisites please refer to the official SAP Data Intelligence Installation Guide
Downloading SLCB
Sometimes we have access to web browsers on Linux machines. But in case if we are connecting to the machines via PUTTY/SSH and do not have GUI access, then you can perform the following steps to move your SLCB installer to your Linux based machines
- Download the SLCB installer to your local machine (Download from the SAP Note mentioned previously)
- Install any file transfer tool like winscp or filezilla
- Open winscp and give the required details

Hostname: IP address or FQDN of your Linux Machine. Username & Password: Appropriate username and password. Port number: Typical SSH port is 22.
- Once you log on- you can easily drag and drop the installer from the LEFT PANE to the RIGHT PANE. Your LEFT PANE is your local machine and RIGHT PANE is the Linux Machine. Just drag and drop the installer to the required directory (For ex: /root)
SLCB Installer configuration
- Navigate to the directory where SLCB installer is available (For ex: /slcb)
- Execute the following commands
- To move installer to SLCB directory:
mv SLCB01_45-70003322.exe slcb
Give appropriate permissions to the SLCB executable
chmod a+x slcb


- Now let's initialize or start the installer
./slcb init

- If everything has been setup correctly then you will be asked for Container registry input. If any issue occurs, please check appropriate permissions (chmod a+x slcb) for executing the installer.
- Give the appropriate registry name. In our case, we have created an azure container registry. Creating azure container registry is an easy process. Please follow the link on how to create an azure container registry.
- Now the next step is to enter the username and access key for the registry. Now, since we have admin access, we are directly getting inside the Azure Containter Registry and enabling admin user and access key is already available. As next step, enter the username and access key in the SLCB installation which asks for username and password.

In another scenario wherein admin access is not provided, please ask the respective admin or the appropriate user for Service Principal ID and key which would have been created on behalf of you for accessing the registry. Please enter the service principal name and key which can be used to access the registry. Concepts of Azure service principal are covered in part 1 of this blog post series.
- Once the credentials are validated, Initial images required to install SLCB will be copied to Azure container registry from SAP Repository. Once the images are copied, you can also log on to the azure container registry and check the images which had been copied.
- SLCB will perform the pre-requisite checks (Such as checking Kubernetes version, and kubeconfig file). Let us go with the default values.
- Path to kubeconfig file: <Default Value> (unless you explicitly specified a different path)


- Now that the pre-requisites have passed, let’s proceed with the SLCB installation. Here we have 2 installation modes, typical and expert. As of now, at the time of writing this blog, we do not have any difference between both the modes but in the future, there might be some additional parameters included in the expert mode. We choose TYPICAL Mode for our installation. Select the value 1
- Enter the Kubernetes namespace for SLCB Bridge: we have given sap-slcbridge. Namespaces are a way to divide cluster resources via resource quota

- Please note down the username. By default, the username is always admin (in typical mode). You will be able to change it in case if you are using Expert mode
- Now for the service type, you can choose “LoadBalancer”. Usually for all public deployments (AWS, Azure, GCP etc.,) we can go with the type “LoadBalancer”. For other platforms such as- RedHat Open Shift Container Platform we have to choose NodePort.
- Choosing LoadBalancer will create an external loadbalancer in your Cloud environment(Azure for this case). For example: You can navigate to Azure Portal -> Load balancer: you will be able to see the Loadbalancer created and this is for the SLCB.
- NodePort Service Type is exposing one of your Kubernetes Nodes IP address for communication. The Kubernetes control plane allocates a port from a range specified by --service-node-port-range flag (default: 30000-32767)
- By default, the SLCB service Port is 9000
- Type ‘n’ and proceed with the next step.

- Now the installation would be successful.
- Please note the SLCB URL that has been generated as depicted in the screenshot below. You will be accessing this URL to install SAP Data Intelligence. This URL can also be obtained by navigating through Azure Portal -> Load balancer. And select the SLCB load balancer. The IP address of the Load Balancer will be displayed. Please note this URL down.

- In case of any installation based feedback, you can fill out the questionnaire and send it to SAP or else select 3: for No feedback and close the installation. Remember t

Go to the browser and open the URL displayed in point #15.

- SLC bridge has been setup successfully.

- If you are able to view the above screen, then your SLCB installation is successful. Now let's prepare for the next phase of SAP Data Intelligence Installation.
SAP Maintenance Planner Setup
The SAP Maintenance planner is used to deploy the selected SAP Data Intelligence Container based stack on the Azure Kubernetes Services.
- Log on to SAP Maintenance Planner
- Select “Plan a new system” as we are planning to install a new SAP Data Intelligence system.

SAP Maintenance Planner
- Select “Plan”

- On the left menu, select “Container Based” -> “SAP Data Intelligence 3” -> 3.0 (03/2020), or the recently released 3.1(11/2020)

- SAP Data Intelligence offers 3 installation stacks. Select any one of the Installation Pack and hit “Confirm Selection” button. Please see the latest latest guidance from SAP as to what functionalities each installation pack offers.
- Platform Stack
- Platform extended
- Platform Full


- Select “linux on X86_64 64 bit” as SLCB is installed on a Linux Jumphost. In case if it had been a windows Jumphost, you need to download Windows SLCB Installer.

- Select the SLCB Version that was installed in the Jumpbox and hit “next” and hit “execute plan” directly.

- Please note, you will also be able to download the stack.xml file and keep it later for future reference. In case if you have any trouble during the deployment of XML file and you want to do it again, you simply upload the downloaded XML file and redeploy it again without having to start from scratch again.

- Before proceeding, it is mandatory to log on to the SLCB tool in other to obtain an authentication token. Without this the SAP Maintenance Planner will not be able to upload the stack.xml file. Go to the below link to complete authentication:
https://<SLCB IP address>:<Port>/docs/index.html
- Verify the hostname (SLCB IP Address) before deployment. Also, please ensure you have opened the SLCB URL in another browser or so for token authentication. Click on “Deploy”. In our scenario, we are NOT explicitly uploading the stack.xml.


SAP Data Intelligence Installation
- Go to the SLC Bridge URL. You will be able to see the stack.xml file uploaded message which indicates the deployment is successful. Please click on “OK”.

- Enter appropriate S-USERNAME and PASSWORD. For internal users (SAP Users), you can enter your internal username and password. This is required to access the SAP Data Intelligence images from SAP Repository. (repositories.sap.ondemand.com
- Once username and password is entered, the system will check for authorizations and if everything is OK it shall start checking the images available in the SAP Image repositories.
- Now based on the stack.xml (the installation stack that was chosen chose in Maintenance planner) the selected stack will be displayed. Since, in our scenario we have selected DI platform stack, the DI platform is displayed. Select the “DI Platform” stack and click on “Next".
- Pre-checks will happen. Please wait for it to get completed. Only if the pre-checks are successful, you will be able to proceed further. The pre-checks will be done to confirm the supported OS, Kubernetes version and the Shell. If either of this is not supported, then you must rectify it and then come back again and proceed with the steps. For Example: if the Kubernetes version is not supported then, you must redeploy the Kubernetes correct version and then upload the same stack.xml and do a pre-check again to proceed further.

- Give the required Kubernetes namespace (Any name can be given). Namespaces are a logical partitioning capability that enable one Kubernetes cluster to be used by multiple users, teams of users, or a single user without concern for undesired interaction. Each user, team of users, or application may exist within its Namespace, isolated from every other user of the cluster and operating as if it were the sole user of the cluster. (Furthermore, Resource Quotas provide the ability to allocate a subset of a Kubernetes cluster’s resources to a Namespace.) For more information on Kubernetes namespaces please refer to this link

- Please note the Kubernetes namespace that you are providing here, as this will be later used in the NGINX Ingress controller setup.
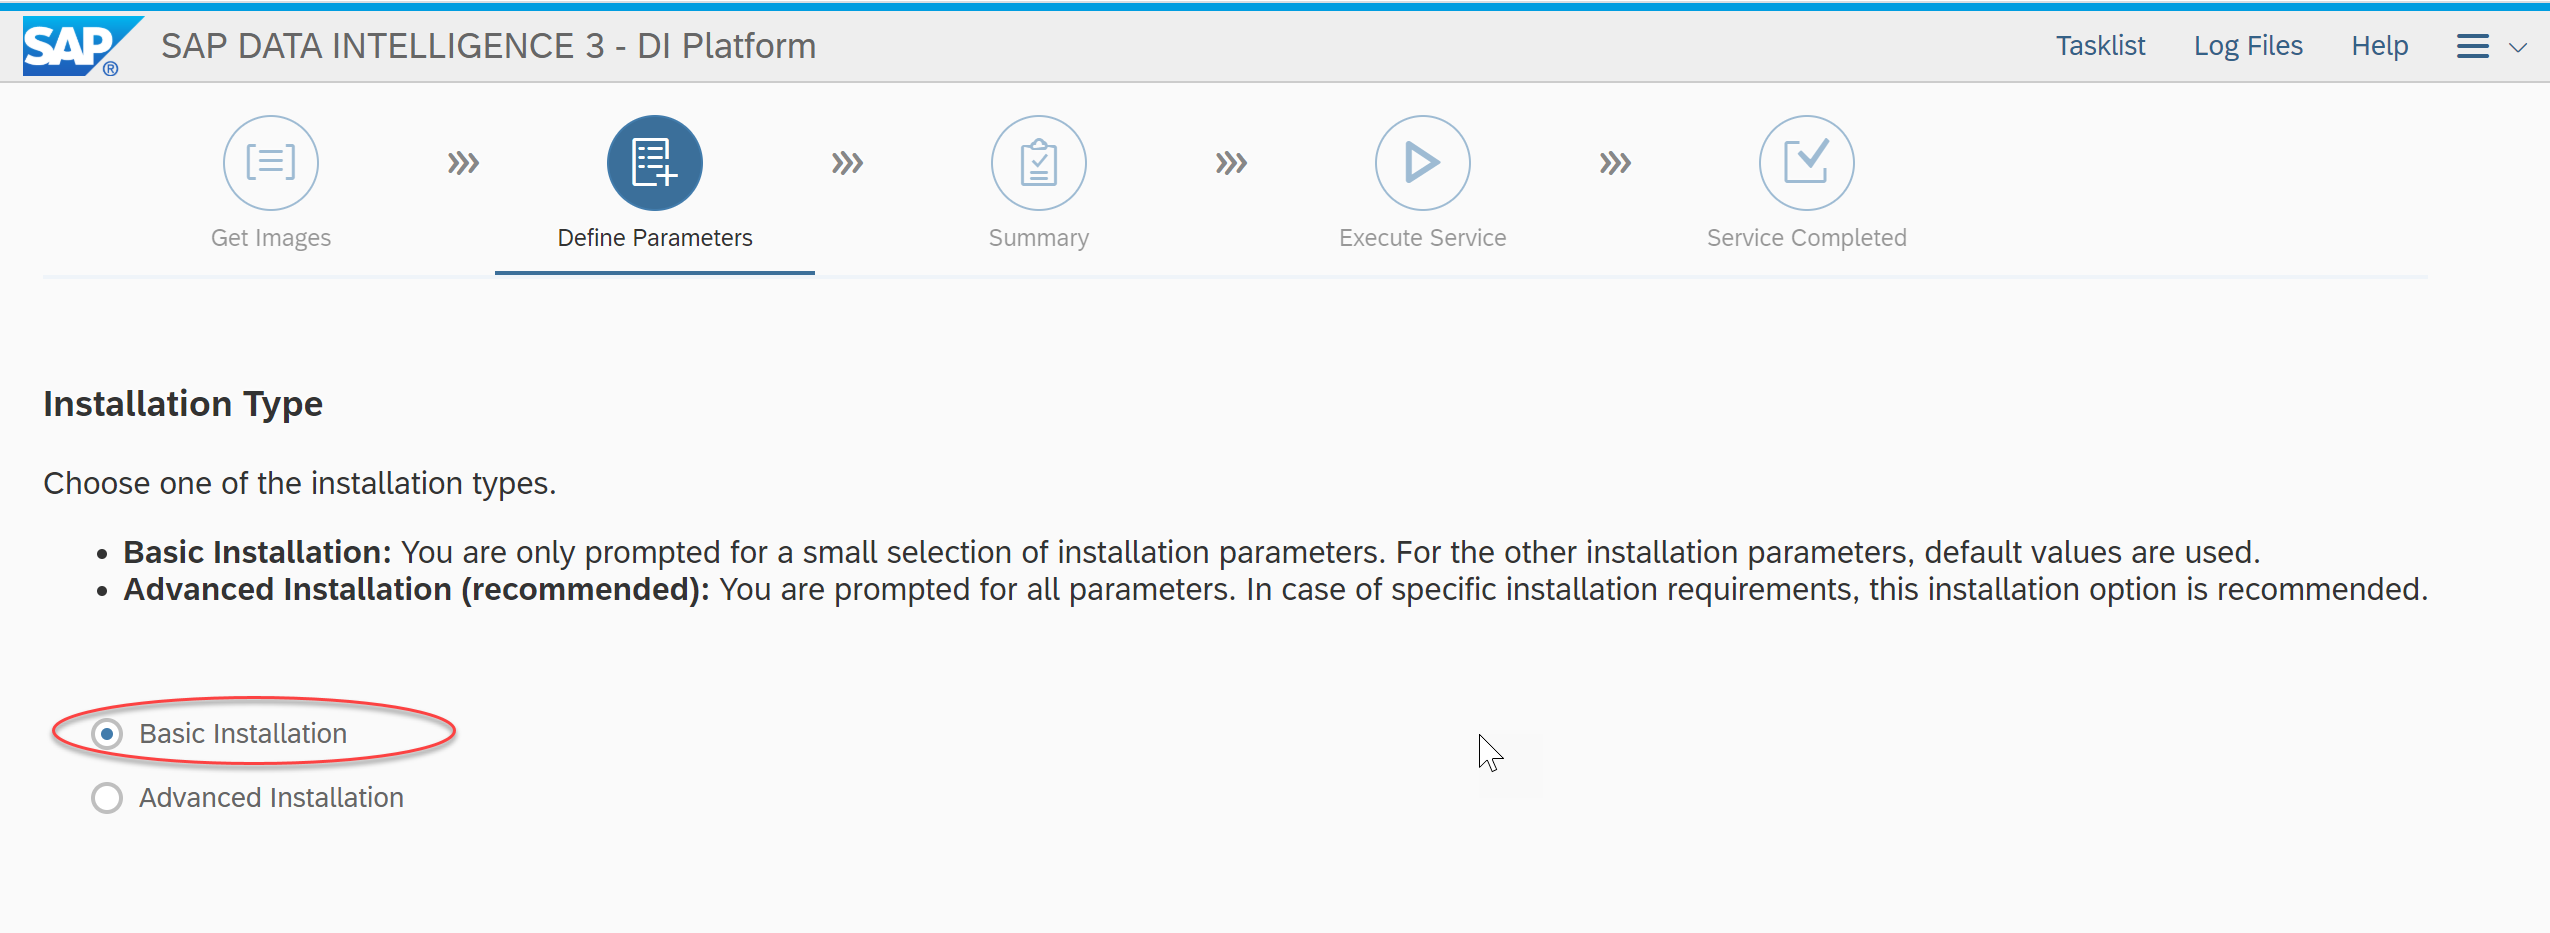
- Typically for SAP Data Intelligence Installation on Public Cloud (Like AKS, EKS , GCP etc.,), basic installation will suffice.
- Please give the container registry address here. Few important points to be noted
- If you want to use the same registry that was used for SLCB, you can give the same registry address here.
- If you want your DI images to be stored in different registry, then please give that registry address here and ensure that Kubernetes has access to that registry to access the images
- In our scenario, since we have already created an azure container registry, we will use the same registry here. This is the registry that was used for SLCB as well. Please note that there is NO impact even if you use the same/different registry for both SLCB and DI. It is just for segregation depending on the requirement.

- Once again you can provide your S/I-USER credentials for authenticating access to the SAP repository and click on “next”. This will take some time to load. So Please wait for some time.
- Please enter the SYSTEM tenant password. Please note: the credentials here are for SYSTEM tenant. TENANT: System, username: SYSTEM, Password: <Custom password>
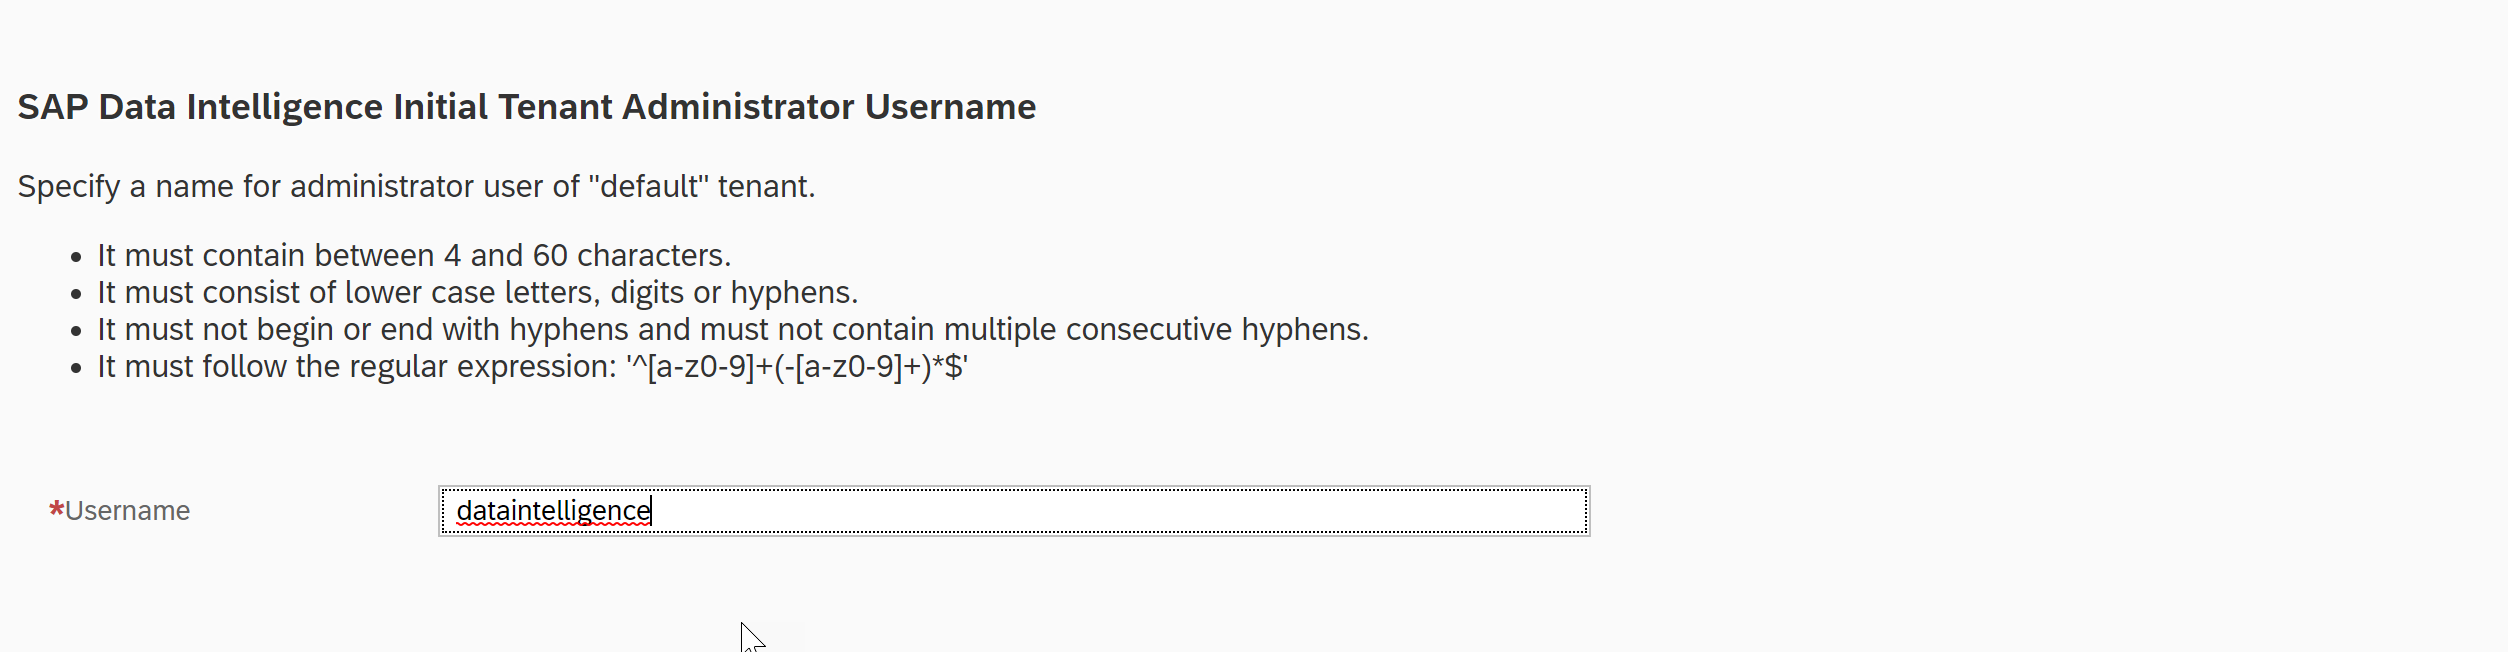
- Please provide the required DEFAULT Tenant username. We have provided the username as dataintelligence for the “default” tenant
- Set the password for “Default” tenant.
- Now, the credentials will look like this. You can either of the below to log on to the SAP Data Intelligence installation:
- Tenant: System, Username: System, Password: <Custom>
- Tenant: default, Username: Dataintelligence, Password: <custom>
- Please enter the S-USERNAME and password again
- Please validate all the data before starting with the copying of images from SAP repository to the container registry and deploy it on Kubernetes.
- If everything is OK, please click on OK and start the process. Depending on the compute power (Kubernetes Nodes) this will take some time to complete.
- All the docker images are pulled from the SAP repositories and pushed to Azure Container Registry. Once the Installation is started, the images are copied directly to the selected Container Registry without storing them to the Installation host.
- Now you can see our DI installation is successful.
You might encounter some common issues while installation, please follow the below recommendations to resolve the same.
Troubleshooting:
- Check the memory capacity of the Kubernetes nodes. Please refer to the sizing guide for minimum recommendations. Here are some example scenarios:
- Issue #1- Due to insufficient Memory
- Run the following command to check for memory issues. Here you can see that the pod scheduling fails due to insufficient memory.
# kubectl describe pod hana-0 --namespace <your_namespace>

kubectl describe pod hana-0 --namespace dik8s

- Action taken is to resize the kubernetes cluster and proceed with reinstallation.
- Issue #1- Due to insufficient Memory
- If any other pod fails to start, please refer to the respective log files to dig deeper into the issue at hand.
Thank you for coming this far! In the next and final part-3 of the blog, you will learn how to expose SAP Data Intelligence to the internet for user access.
Questions? Post as comment.
Useful? Give a like and share on social media. Thanks!
- SAP Managed Tags:
- SAP Data Intelligence
Labels:
21 Comments
You must be a registered user to add a comment. If you've already registered, sign in. Otherwise, register and sign in.
Labels in this area
-
ABAP CDS Views - CDC (Change Data Capture)
2 -
AI
1 -
Analyze Workload Data
1 -
BTP
1 -
Business and IT Integration
2 -
Business application stu
1 -
Business Technology Platform
1 -
Business Trends
1,658 -
Business Trends
95 -
CAP
1 -
cf
1 -
Cloud Foundry
1 -
Confluent
1 -
Customer COE Basics and Fundamentals
1 -
Customer COE Latest and Greatest
3 -
Customer Data Browser app
1 -
Data Analysis Tool
1 -
data migration
1 -
data transfer
1 -
Datasphere
2 -
Event Information
1,400 -
Event Information
67 -
Expert
1 -
Expert Insights
177 -
Expert Insights
310 -
General
1 -
Google cloud
1 -
Google Next'24
1 -
GraphQL
1 -
Kafka
1 -
Life at SAP
780 -
Life at SAP
13 -
Migrate your Data App
1 -
MTA
1 -
Network Performance Analysis
1 -
NodeJS
1 -
PDF
1 -
POC
1 -
Product Updates
4,576 -
Product Updates
353 -
Replication Flow
1 -
REST API
1 -
RisewithSAP
1 -
SAP BTP
1 -
SAP BTP Cloud Foundry
1 -
SAP Cloud ALM
1 -
SAP Cloud Application Programming Model
1 -
SAP Datasphere
2 -
SAP S4HANA Cloud
1 -
SAP S4HANA Migration Cockpit
1 -
Technology Updates
6,873 -
Technology Updates
441 -
Workload Fluctuations
1
Related Content
- UNVEILING THE INNOVATIONS OF ARTIFICIAL INTELLIGENCE in Technology Q&A
- AI Engineering in Technology Q&A
- Deliver Real-World Results with SAP Business AI: Q4 2023 & Q1 2024 Release Highlights in Technology Blogs by SAP
- Augmenting SAP BTP Use Cases with AI Foundation: A Deep Dive into the Generative AI Hub in Technology Blogs by SAP
- Recap — SAP Data Unleashed 2024 in Technology Blogs by Members
Top kudoed authors
| User | Count |
|---|---|
| 21 | |
| 14 | |
| 13 | |
| 11 | |
| 10 | |
| 10 | |
| 9 | |
| 9 | |
| 8 | |
| 7 |