- SAP Community
- Products and Technology
- Technology
- Technology Blogs by SAP
- Creation of an Action Project from Scratch, Custom...
Technology Blogs by SAP
Learn how to extend and personalize SAP applications. Follow the SAP technology blog for insights into SAP BTP, ABAP, SAP Analytics Cloud, SAP HANA, and more.
Turn on suggestions
Auto-suggest helps you quickly narrow down your search results by suggesting possible matches as you type.
Showing results for
Product and Topic Expert
Options
- Subscribe to RSS Feed
- Mark as New
- Mark as Read
- Bookmark
- Subscribe
- Printer Friendly Page
- Report Inappropriate Content
02-02-2024
12:09 PM
Parent Blog: https://blogs.sap.com/2022/10/21/actions-editor-feature-list-usage-and-maintenance-of-actions-projec...
The motivation behind this is to empower the Action Designer to create and maintain Actions within an Action Project even when the Specification is not already known. The Action Designer can maintain the project by adding and manipulating custom Actions.
- Creation of an Action Project from Scratch:
- The Action Designer can use the “Create” button within the lobby to create a new Actions Project.
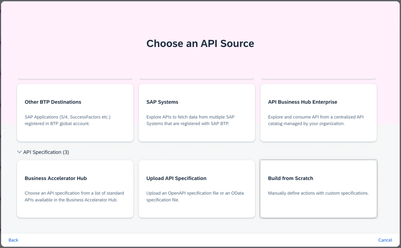
- From the list of sources, the Action Designer can choose the Build from Scratch Card.
- The Action Designer must provide details for the Project Name, Description. Following this, the Action Designer should click the Create button to commence the creation of the Actions Project.
- After successful creation, the project is seen in the Lobby. It would automatically open in the Actions Editor without any user intervention.
- The Action Designer can use the “Create” button within the lobby to create a new Actions Project.
- Creation of Custom Action:
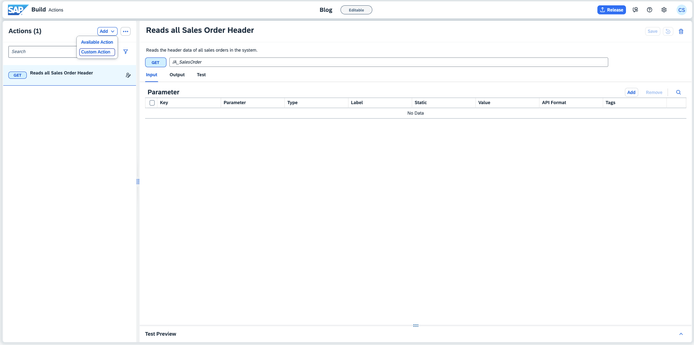
On opening of an Action Project with no Actions previously added the Add Custom Action dialog is automatically displayed. This dialog can also be accessed by pressing on the Add button and then selecting the Custom Action option from the drop down, as shown below:- The Action Designer must provide details for the Operation, Name, Description and Endpoint of the action and then press on the Add button.
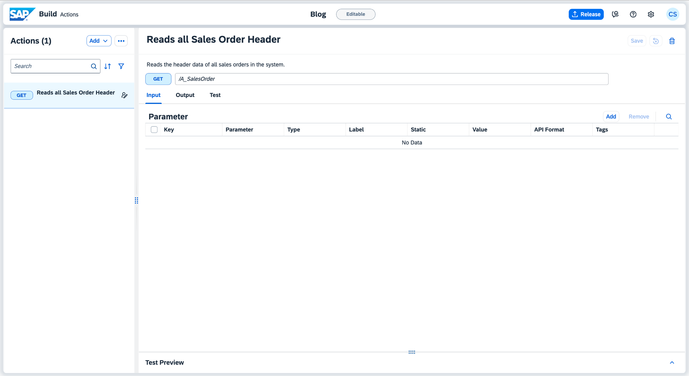
- Once the Action Designer clicks on the Add button, the Action is added to the list of Actions. The Action Designer can then edit and modify the action by adding/removing parameters to either the Input or Output according to the API’s definition. For this example, we are adding an INPUT parameter by pressing on the Add button of the Parameter table.
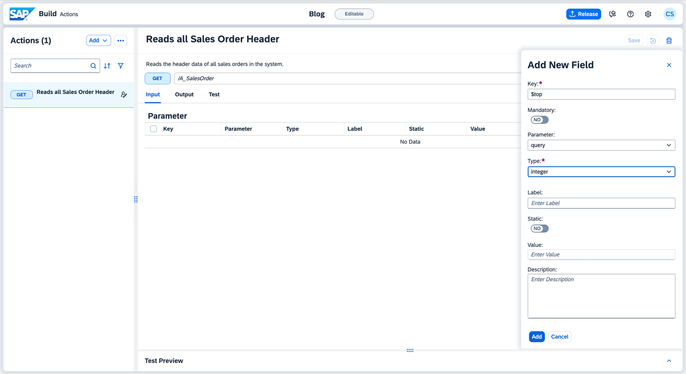
- The Action Designer can then enter the Parameter details and press on the Add button as shown below.
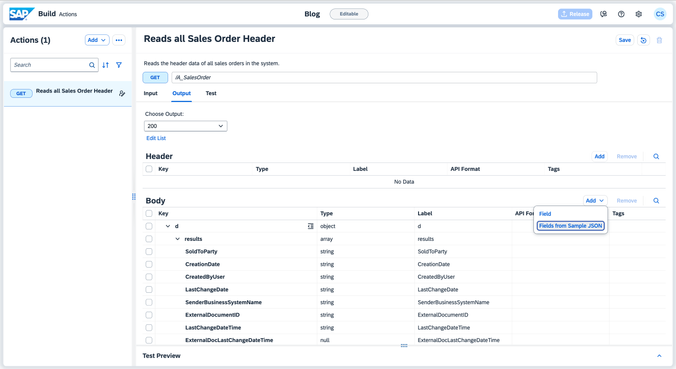
- Another method for adding parameters to both the Input and Output sections is through the Add Fields from Sample JSON approach. This method enables the Action Designer to add parameters by uploading JSON files. It can be accessed by clicking on the Add button in the respective body table and then selecting the Fields from Sample JSON option from the dropdown, as illustrated below:
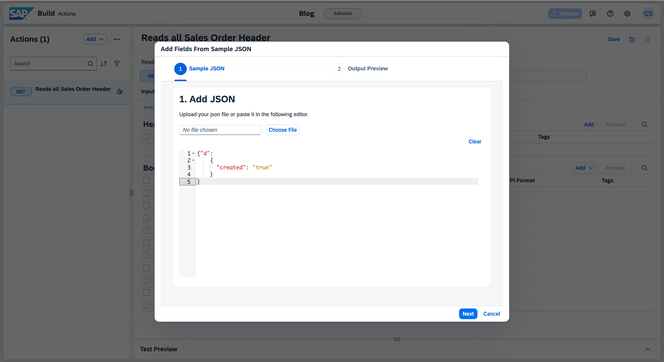
- A dialog is displayed containing a wizard with two steps. The first step involves the uploading and editing of JSON files. Upon clicking Next, the preview of the Input/Output section resulting from the addition of new parameters in the previous step is displayed, as shown below:
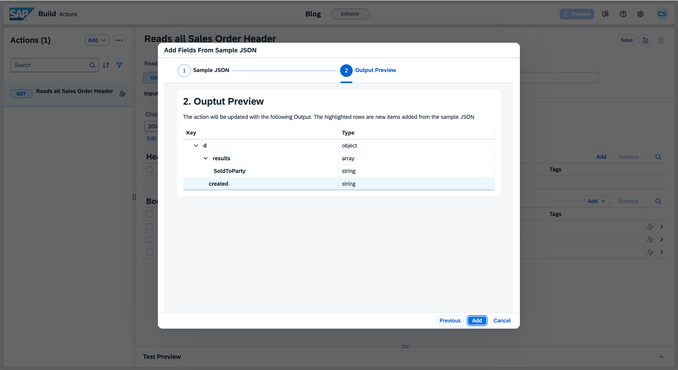
- The Preview step would highlight the new parameters that is newly added as shown below. On clicking the Add button, the parameters will be merged with the Input/ Output section.
- The Action Designer must provide details for the Operation, Name, Description and Endpoint of the action and then press on the Add button.
- Generate Output from Response:
- After navigating to the Test Tab in the Action Details section, the Action Designer can then choose the connectivity configurations. Upon entering the values for the parameters, they can click the Test button.
- Upon receiving the response, the Action Designer can then click the "Generate Output" button to automatically populate the output schema for the corresponding HTTP code. This process merges the existing output schema (if present) with the schema generated from the API response.
- The Generate Output Dialog is displayed, providing a preview of how the output section would appear if the "Add Output" button is pressed. The highlighted parameters represent the new parameters extracted from the API response.
If there are any conflicts in the two schemas that we are attempting to merge using the "Generate Output" button, the "Conflicts Found" table is displayed below, showing all parameters that cannot be added due to a conflict.
Upon clicking the "Add Output" button, a toast message indicating the successful generation of the output is displayed. The Action Designer can then navigate to the Output section to view or edit the parameters. - The Action Designer can navigate to the output section to view the new parameters added by first selecting the response code obtained in the previous step. In this example, the response code of the API from the previous step is 200; hence, we select 200 from the dropdown, as shown below:
- The parameters are added to the body of the Output section as shown below:
- After navigating to the Test Tab in the Action Details section, the Action Designer can then choose the connectivity configurations. Upon entering the values for the parameters, they can click the Test button.
Thanks for reading, and I would really appreciate your feedback. Please feel free to leave a comment in this blog post.
- SAP Managed Tags:
- SAP Build Process Automation,
- SAP Business Technology Platform
Labels:
1 Comment
You must be a registered user to add a comment. If you've already registered, sign in. Otherwise, register and sign in.
Labels in this area
-
ABAP CDS Views - CDC (Change Data Capture)
2 -
AI
1 -
Analyze Workload Data
1 -
BTP
1 -
Business and IT Integration
2 -
Business application stu
1 -
Business Technology Platform
1 -
Business Trends
1,658 -
Business Trends
93 -
CAP
1 -
cf
1 -
Cloud Foundry
1 -
Confluent
1 -
Customer COE Basics and Fundamentals
1 -
Customer COE Latest and Greatest
3 -
Customer Data Browser app
1 -
Data Analysis Tool
1 -
data migration
1 -
data transfer
1 -
Datasphere
2 -
Event Information
1,400 -
Event Information
67 -
Expert
1 -
Expert Insights
177 -
Expert Insights
301 -
General
1 -
Google cloud
1 -
Google Next'24
1 -
GraphQL
1 -
Kafka
1 -
Life at SAP
780 -
Life at SAP
13 -
Migrate your Data App
1 -
MTA
1 -
Network Performance Analysis
1 -
NodeJS
1 -
PDF
1 -
POC
1 -
Product Updates
4,577 -
Product Updates
346 -
Replication Flow
1 -
REST API
1 -
RisewithSAP
1 -
SAP BTP
1 -
SAP BTP Cloud Foundry
1 -
SAP Cloud ALM
1 -
SAP Cloud Application Programming Model
1 -
SAP Datasphere
2 -
SAP S4HANA Cloud
1 -
SAP S4HANA Migration Cockpit
1 -
Technology Updates
6,873 -
Technology Updates
429 -
Workload Fluctuations
1
Related Content
- Hack2Build on Business AI – Highlighted Use Cases in Technology Blogs by SAP
- SAP Document and Reporting Compliance - 'Colombia' - Contingency Process in Technology Blogs by SAP
- How to generate a Hyperlink to another Story within a custom Widget in SAC? in Technology Q&A
- Generate Custom Legal Certificates in SAP DRC in Technology Blogs by SAP
- Augmenting SAP BTP Use Cases with AI Foundation: A Deep Dive into the Generative AI Hub in Technology Blogs by SAP
Top kudoed authors
| User | Count |
|---|---|
| 32 | |
| 17 | |
| 15 | |
| 14 | |
| 11 | |
| 9 | |
| 8 | |
| 8 | |
| 8 | |
| 7 |

