
- SAP Community
- Products and Technology
- Technology
- Technology Blogs by SAP
- Cloud Integration: Fine-Tuning Authorization Check...
Technology Blogs by SAP
Learn how to extend and personalize SAP applications. Follow the SAP technology blog for insights into SAP BTP, ABAP, SAP Analytics Cloud, SAP HANA, and more.
Turn on suggestions
Auto-suggest helps you quickly narrow down your search results by suggesting possible matches as you type.
Showing results for
Product and Topic Expert
Options
- Subscribe to RSS Feed
- Mark as New
- Mark as Read
- Bookmark
- Subscribe
- Printer Friendly Page
- Report Inappropriate Content
08-10-2023
1:38 PM
With other words:
How to access
Roles and User Attributes
in Groovy Script
SAP Cloud Integration (aka CPI) allows to call an integration flow via HTTP request from an external application (HTTP Sender adapter).
The iFlow endpoint is protected with one role that can be assigned to users.
This blog post covers an enhanced scenario:
The iFlow is supposed to evaluate a second user role plus user attributes.
The scenario includes IAS, Node-app and Groovy script.
Technologies covered:
SAP Business Technology Platform (BTP), Cloud Foundry
SAP Cloud Integration (CPI)
Identity Authentication Service (IAS)
XSUAA - OAuth 2.0
Node.js - Groovy
Quicklinks:
Quick Guide
Sample Code
Content
1. PRE: Prerequisites and -paration
2. INT: Introduction
3. DEV: Create Frontend Application
4. CPI: Create Roles and iFlow
5. IAS: Create User and Group
6. BTP: Configure Authorization Settings
7. RUN: Run scenario
8. CUP: Clean Up
9. APX: Appendix: Sample Application Code
0. EOD: End of Document
1. PRE: Prerequisites and -paration 👋
Before starting with the tutorial, the following should be considered.
Prerequisites
- Access to BTP and admin permissions in subaccount
- Access to a Cloud Integration tenant.
- Access to IAS
- Familiar with Node.js, although the tutorial can be followed without local Node.js installation.
Preparation
The following should be available before starting:
Create Project
In the course of the tutorial we're going to create a Node.js application, so we need a project folder on file system.
In my example, the structure looks as follows:

The file content can be found in the appendix.
Configure Trust
To run this tutorial, we need a custom Identity Provider connected to our BTP subaccount.
As usual, we’re using IAS for this purpose.
We connect the IAS tenant to our subaccount, because we want to enable users of IAS to access our app in BTP.
Connecting IAS to the subaccount is just one click on “Establish Trust” in BTP at
Security->Trust Configuration.
More detailed description can be fount in this blog post section.
Open IAS
We login with admin user to the IAS at e.g.
https://abc.accounts400.ondemand.com/admin/
2. INT: Introduction 📃
We're creating a scenario where our iFlow should be called from an application in BPT Cloud Foundry.
Our iFlow is protected with OAuth 2.0 as usual.
In addition, we create a user role and we require that this role is available when the iFlow is called.
We configure the HTTPS adapter accordingly.

That’s nothing new and all fine and understood 🥱 and we can relax on the sofa and switch on the television and let the blog post be another blog post and peace for all and grab a glass of….
Stop stop stop.
We’re not satisfied with this setup, as our scenario has more sophisticated requirements:
1) We have fine-granular roles.
We define a general role as main restriction in the sender adapter
During the iFlow, we want to check for additional roles of the user – and dependent on the additional role, we compose the call to the backend system.
ABAP-systems can have very complex role structures...🙄
Whatever, we just want to implement dynamic role checks in the iFlow.
2) Users have attributes
During the iFlow, we want to read some attributes of the user and model the flow depending on the values.
For instance, users from Germany should only get data of German systems.
Or whatever
Users are stored in IAS or any other custom IdP
3) Custom attributes in JWT token
Some backend systems have the requirement of getting additional custom user info in the JWT token, e.g. the ABAP-name of the user.
Please, it is time to get up from sofa, replace the glass of red liquid with a mug of coffee and view the extended diagram:

Cool, but let’s have some detailed description of the scenario.
Scenario
Users are maintained in IAS that is connected to BTP (Trust Config).
In BTP there’s an application that is accessed by users and that calls an iFlow.
The iFlow evaluates the incoming user-identity before calling a connected backend.
The connected backend is not part of this tutorial.
Why do we need a tutorial for that?
Challenge
In the iFlow, we want to do enhanced evaluation of end-user-attributes.
In particular:
One Role is required to access iFlow.
An additional role is required to get access to restricted backend data.
The attribute “country” is used to choose the matching backend system.
Only the first requirement can be configured in iFlow Designer, the other ones have to be implemented in Groovy script.
Security Configuration
IAS: user group is created for users to access our scenario.
CPI: 2 user roles are created to restrict access to iFlow and to backend.
BTP: Mapping of user role to role collection is configured.
Mapping of user attribute to role collection is configured.
Mapping of user attributes to role attributes is configured.
Role Collection for app role is created.
Authorization Model
- Normal users:
In IAS, a normal user is added to the user group "AttriGroup".
In BTP, The group is mapped to role collection "Attri_CPI_Read_RC", so he gets the CPI-Role "BackendRead".
With this role, the normal user can access the iFlow and read normal backend data. - Important users:
In IAS, a very important user has attribute "vip".
The attribute is mapped to role collection "Attri_CPI_Admin_RC", so he gets the CPI-Role "BackendReadAdmin".
With this role, the "important" user can read sensitive backend data.
The important user is added to the user group "AttriGroup" as well.
(Note that this could be modelled different)
Additional authorization Info:
- Country:
In IAS, the country of a user is maintained as user attribute.
In iFlow, the country is evaluated to restrict the backend data to matching country.
Below table attempts to give a structured view on the 3 aspects of authorization and the according locations of handling:
| IAS | APP | BTP | CPI | iFlow |
| User is in group "AttriGroup" | - | User gets Role Collection "Attri_CPI_Read_RC" | Role "BackendRead" | Allow access to iFlow, configured in Adapter |
| User has attribute "vip" | - | User gets Role Collection "Attri_CPI_Admin_RC" | Role "BackendReadAdmin" | Script: allow access to sensitive data |
| user has attribute "country" | security descriptor defines role and attribute | Role Collection "Attri_RC" with dynamic role and attribute mapping | - | Script: allow access to country specific data |
This table looks as boring as those tables of the documentation.
And is same impossible to understand.
So let’s try some explanation.
Configuration
A major part for understanding the scenario and getting it running: configuration.
Configuration needs to be done in CPI, IAS and BTP.
CPI: Roles:
In the CPI dashboard, we define 2 roles which are used to protect the access to the iFlow endpoint and to fine-tune the flow.
IAS: Users:
Users are maintained with e.g. following attributes:
Country: this is a standard attribute.
Status: here we want to store if the user is important or not.
We can use a custom attribute.
Custom attributes have static name like “custom_attribute_1”.
Note:
Currently, IAS doesn’t support customizing the names of this custom attribute.
IAS: Groups:
We create a group to which the users are assigned.
This group is meant for users who will have to access our Attri-scenario.
BTP: CPI-roles:
In the BTP cockpit, we create 2 role collections, one for each CPI-role.
The roles are assigned dynamically to users who have the IAS-Group, or the "Status"-attribute.
BTP: Attributes:
We have a user-centric application which brings its own security configuration.
It defines a role (scope) which is required for accessing our application.
This role defines 2 attributes: country, status.
They are mapped against the IAS-attributes.
The values of these attributes are filled during runtime, depending on the logged-in user.
With other words:
An IAS-user from Germany logs in to our app.
As a result, the access token will carry the information: country=DE
BTP: App-role:
As our application is protected as well, we create another role collection.
It is mapped against the IAS group as well.
This is the usual way, as no admin wants to assign every single user to a role collection in BTP.

Lifecycle of Attribute Name
You might have wondered about my erratic naming of attributes?
Of course
Sorry, this is intended:
To better illustrate the various mappings, I feel it helps to point out the differences.
So I’m inventing extra different names, it helps avoiding errors.
Let's see the different names for the same attribute, in different systems:
IAS: Dashboard:
The name that is used as human-readable label in the IAS cockpit:
Country/Region
IAS: Assertion:
After login, IAS issues an assertion that uses a technical name:
country_region
BTP: Role config:
In BTP cockpit we see the name when configuring the role.
This name for country was defined in the xs-security.json file:
Origin
APP: JWT-property:
In our application code, we add the country as additional property to the JWT token. Here we choose another different name:
user_country
iFlow: query-param:
In the Groovy script, we might need to use the country to compose a URL (not part of tutorial).
This would have a query param with a name as defined in the backend, e.g.
cntry
OK
The designtime-overview is fine now.
Ehem
The designtime-overview should be somehow sufficient now.
But how is the flow in reality?
Runtime
Joe Cool is a user from Germany who is maintained in IAS with "vip" status.
He is added to the "AttriGroup" in IAS.
As such, when he logs into our BTP-app, he is automatically equipped with 3 Role Collections (thanks to our config).
So it is possible for our app to call the iFlow while propagating this user.
The iFlow in turn is enabled to fetch sensitive data from German system.
Second example:
Bill Uncool, a normal "nonvip" user from Spain, is enabled to run the expected flow, gets data from Spain, but only normal (boring) data.
Summary
We map user group and user attributes to role collections and roles in BTP.
As a result, the information is stored in the JWT that is issued when the user logs in to our app in BTP.
This is required to allow our app to call the iFlow and to carry the desired information.
OK.
The intro is fin…. should be somehow sufficient now.
Time to start with hands-on.
Disclaimer:
The present blog is based on this famous post.
Please refer to it for more detailed description of the configuration tasks, so we can reduce explanations today.
Disclaimer:
Below code and design is not an official recommendation.
It is just my personal learning which I like to share with the community.
3. DEV: Create Frontend Application 💻
We want to create a very simple frontend application that is protected with OAuth via XSUAA.
In addition, access to the app endpoint is controlled with a user role.
The login is handled by Approuter.
The app does nothing than calling the iFlow endpoint.
However, there are 3 challenges:
🔹The iFlow is protected with a different instance of XSUAA, so we cannot just forward the existing JWT token.
🔹The iFlow requires a user role, so we need to get the required scope into the token.
🔹In addition, we want to send additional user info to the iFlow. This should be done by adding a custom property to the JWT token
Before we start with implementation. we create 2 required service instances.
3.1. Create Service Instances
Our app needs an instance of XSUAA, for OAuth protection, as well as an instance of CPI, to get the credentials for calling the iFlow.
3.1.1. Create XSUAA Service Instance
We create the instance of xsuaa which is used to protect our frontend app.
In the config file, we define the scope and the role template which we require for accessing our app
Furthermore, we define the user attributes that are configured for the role.
🔷 xs-security.json
    "xsappname": "attrixsappname",

    "scopes": [{

            "name": "$XSAPPNAME.scopeforfrontend"

        }

    ],

    "attributes" : [ {

            "name" : "Origin",

            "valueType" : "string"

        },{

            "name" : "Level",

            "valueType" : "string",

            "valueRequired" : "false"

        }

    ],

    "role-templates": [{

            "name": "FrontendRoleTemplate",

            "scope-references": ["$XSAPPNAME.scopeforfrontend"],

            "attribute-references": [

                {"name" : "Origin"},

                { "name": "Level"}
🔸attributes
The attributes defined here will be visible when manually creating a role in the BTP Cockpit.
The admin can assign a static value (can also be defined here in the file), but the normal procedure would be to map the attribute to an attribute coming from the identity provider.
That’s what we are going to do.
E.g. a user from Germany will be issued a JWT token that will contain this value in the “Origin” attribute.
The type of the value that is assigned to this attribute can be string or int or date.
We can specify that a value can be even empty.
OK.
To create the service instance, we run the following command from our project directory:
cf cs xsuaa application attriXsuaa -c xs-security.json
3.1.2. Create XSUAA Service Instance
We need to create an instance of “Process Integration Runtime” because it provides us with access to the iFlow endpoint.
Creating an instance of cpi-runtime will lead to creation of an instance of XSUAA under the hood.
The hidden XSUAA instance is configured with the settings that we provide for the cpi-runtime.
These are the settings:
🔷 config-cpi.json
  "grant-types":[

     "urn:ietf:params:oauth:grant-type:jwt-bearer"

  ],

  "roles":[

     "BackendRead",

     "BackendReadAdmin"
🔸grant-types
This is a kind of filter.
The iFlow is called with a jwt token, and the jwt token contains a property (claim) which carries the information about how it was obtained.
In our example, if the jwt token was fetched by using the client-credentials flow, then the access to the iFlow will be denied.
We allow only tokens that were fetched with token exchange (jwt-bearer).
🔸roles
The roles specified here will be added to the JWT token.
However, the roles must have been created beforehand in the CPI dashboard.
OK.
To create the instance:
cf cs it-rt integration-flow attriIflow -c config-cpi.json
3.2. Create Application
Our application consists of 2 modules: Approuter and the application itself
3.2.1. Approuter
Approuter is typically used by people-centric applications.
It handles the OAuth flow for user login.
Approuter is an existing node module provided by SAP.
It only needs to be configured.
During deployment, it is downloaded and started by Cloud Foundry.
When a user wants to open our application, he won't call the app URL directly, but he will call the URL of Approuter.
After login, Approuter will forward to app endpoint, according to a route which is described in xs-app.json.
Our task is to define a route from Approuter to our app:
🔷 xs-app.json:
  "authenticationMethod": "route",

  "routes": [{

      "source": "^/route-me-to/(.*)$",

      "target": "$1",

      "destination": "destination_attriapp",

      "authenticationType": "xsuaa"
The snippet shows:
Approuter will handle the login with XSUAA.
The user will type an entry url following this scheme:
<approuterURL>/route-me-to/<serviceEndpoint>
The serviceEndpoint is looked up at the destination which is created in the cockpit or simply defined in our manifest (favorite approach for POCs and tutorials).
Personally, I like to know what I’m doing, so I like to use silly names and explicit statements, even though I don’t recommend it for productive code, for obvious reasons.
So I’m adding a route segment with silly name “route-me-to”.
This name is chosen to make clear that we’re invoking a “route”, not a real endpoint-URL
3.2.2. Application
Our application has only one job to do: call the iFlow endpoint.
Afterwards, it just displays some interesting information about JWT-internals.
Our app is accessed via a REST endpoint.
🔷 server.js
First of all, we check if the user who is accessing our app, has the required user role assigned.
The check is performed with the help of a convenience method, which internally validates the incoming JWT token.
We have to copy the scope name which we defined in the xs-security.json file.
const isScopeAvailable = req.authInfo.checkScope(CREDENTIALS_UAA.xsappname + '.scopeforfrontend')

if (! isScopeAvailable) {

   res.status(403).end('Forbidden. Missing authorization.')
Note:
A similar check is performed by CPI under the hood, when we call the iFlow endpoint.
After the security-check we’re doing the actual work:
🔹Perform token exchange
🔹Call the iFlow endpoint
🔹Print some info to the browser
const cpiToken = await _doTokenExchange(req.tokenInfo.getTokenValue())

const cpiResult = await _callCPI(cpiToken)


const htmlUser = _formatClaims(userToken)

const htmlExchanged = _formatClaims(cpiToken)

res.send(`  <h4>JWT after user login</h4>${htmlUser}
The usage of token exchange as prerequisite for calling CPI from BTP was explained in a previous blog post.
Today, we’re focusing on user attributes.
What we’ve learned so far:
The attributes for a user are maintained in the Identity Provider, in IAS.
During user login, the IdP is asked to authenticate the user.
The IdP issues an assertion.
This is a piece of information which contains info about the user, including some attributes (as configured above).
It is sent to BTP.
BTP is a different world.
After successful authentication, XSUAA issues a JWT-token.
But even though the XSUAA receives all user info, it doesn't add everything to the JWT token.
The content of JWT token depends on the configuration of the OAuth client, which is specified in the xs-security.json file.
And it depends on the assignment of role collections to the user.
If the role collection contains a role that contains (mapped) attributes, then the JWT token will contain these user-attributes as well.
So that’s why we’ve specified the required entries in the xs-security.json file?
Yes....
However…..
(... I hate when he says "however"....)
The only consequence is that we get the attributes in our Frontend application.
But not in iFlow.
Because CPI uses a different OAuth client, means a different instance of XSUAA.
That one doesn’t have the attributes definition.
As such, when we fetch a JWT token for CPI, we don’t get the attributes anymore.
We’re using token-exchange to preserve user info and to get the required scope, but attributes cannot be handled by CPI.
However....
...sounds like a good "however"...
...we can do a little trick:
👉We add the desired info manually to the JWT token👈
How does it work?
It works as follows:
When requesting a JWT token, we can add a parameter to the request URL which specifies the properties that should be added to the JWT token:
grant_type=abc&response_type=token&authorities=xyzThis special URL-parameter authorities has to contain the data as JSON string with a special property as root:
"az_attr": {

   "property": value

}
As such, in our application code, we have to do:
🔹read the desired user attributes from the incoming user-JWT-token
🔹compose a JSON structure
🔹convert it to a string that can be added to a URL
const jwtDecodedJson = new xssec.TokenInfo(jwt).getPayload()

const userAttributes = jwtDecodedJson['xs.user.attributes']

const customProp = {

   "az_attr": {

      "user_country": `${userAttributes.Origin}`,

      "user_status": `${userAttributes.Level}`,

   }

}

encodeURIComponent(JSON.stringify(customProp))🔹Then we can go ahead, compose the full request URL
🔹Send the request to XSUAA to fetch a token via jwt-bearer flow (token exchange)
const grant = 'urn:ietf:params:oauth:grant-type:jwt-bearer'

const options = {

   url: CREDENTIALS_CPI.tokenurl,

   headers: {

      Authorization: "Basic " + Buffer.from(CREDENTIALS_CPI.clientid + ':' + CREDENTIALS_CPI.clientsecret).toString("base64"),

      'Content-Type': 'application/x-www-form-urlencoded'

   },

   method: 'POST',

   data : `grant_type=${grant}&response_type=token&assertion=${jwt}&authorities=${props}`

}

const response = await axios(options)
See previous blog post for some more detailed explanations
In the response we get a JWT-token which we send along with the call to the iFlow endpoint.
This token is accepted by CPI because it contains the scope that corresponds to the user role required by the HTTP adapter (We’ll configure it below).
Furthermore, this JWT token contains the second scope/role and also the 2 added properties.
We’ll read them later in the Groovy script.
The full code can be found in the appendix.
3.3. Deploy
We deploy the app to Cloud Foundry with
cf push
After deploy, we cannot open the app, as the all security configuration has to be done beforehand – and even the target is not yet created, hihi, so let’s move on.
4. CPI: Create Roles and iFlow 🌍
We go to our CPI tenant for creating a simple iFlow that can be called by our Frontend app.
The iFlow should be protected by a user role .
4.1. Create User Roles
First of all, we create some user roles in CPI -> Monitor Artifacts -> Manage Security -> User Roles
We “Add” 2 roles like:
🔹BackendRead
🔹BackendReadAdmin

The dashboard allows to download or copy the roles in json format, which is useful for the next step.
I recommend this little chapter for understanding Roles in BTP.
4.2. Create iFlow
Our integration flow is very simple:
It should be called via HTTP request
It should contain a Groovy script which analyzes the incoming JWT token
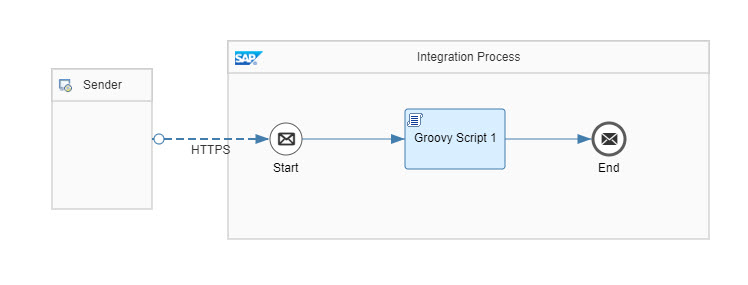
Let’s quickly go through the configuration.
🔸 HTTPS adapter
Address: /attri
Note that this endpoint name must match the endpoint used in our node app
Authorization: "User Role"
User Role: "BackendRead"
CSRF: Checkbox disabled
🔸Groovy Script
Code copied from Appendix

As usual, CPI makes life easy for us: we don’t need to care much about the protection of our iFlow.
We just create a user role and configure it in the HTTPS adapter.
Done.
Whoever wants to call us, needs to obtain credentials (service instance) and assign the user role.
Done.
No need to care about JWT token and its properties.
Done, no need for blog post.
But what, if we want to fine-tune the authorization model and want to check more role assignments?
And if we want to extract more user-information from the JWT token?
Fortunately, we have the chance to get hold of the JWT token from inside our iFlow.
Let’s go through the Groovy script to show how we can achieve it.
Done...?
Not yet
🔷 Script
First, we have to know that there’s a property called SAP_AuthHeaderValue which contains the desired JWT token.
To access the token, we first need to read the property value:
IToken authObject = message.getProperties().get("SAP_AuthHeaderValue");

String serializedToken = authObject.serializeToken();
The value is a JSON string with this structure:
{

   "USER_TOKEN":null,

   "APP_TOKEN":"eyJ...”

}
So now we parse it and get the JWT token.
def jsonSlurper = new JsonSlurper();

def authObjectJson = jsonSlurper.parseText(serializedToken)

String appToken = authObjectJson.APP_TOKEN;
The full JWT token is not what we want, as it consists of 3 segments.
We only need the second part, which is the actual payload.
It is Base64-encoded, so we need to decode it
String[] parts = appToken.split(\\.);

byte[] tokenDecoded = Base64.getDecoder().decode(parts[1]);
The result is another JSON string which we’re happy to parse:
def jwtToken = jsonSlurper.parseText(new String(tokenDecoded))Now we can read the claims (properties) which we’re interested in:
the scopes and the 2 additional properties (country + status):
ArrayList scopeList = jwtToken.scope;

def attrObject = jwtToken.get("az_attr");

def country = attrObject.get("user_country")

def status = attrObject.get("user_status")
Note:
The type of "attrObject" is groovy.json.internal.LazyMap
According to our authorization model:
- Only users with "BackendRead" role are allowed to access the iFlow at all
-> this role is configured in the HTTPS adapter - If a user has the "BackendReadAdmin" role, he is allowed to read sensitive backend data
-> we have to implement it here in the Groovy script as follows
The JWT token carries the list of scopes, which depends on the Roles assigned to the user.
We can now check if the "BackendReadAdmin" role is contained in the list of scopes.
boolean isAdmin = hasScope("BackendReadAdmin", scopeList);We’ve implemented a helper method (current groovy version still not supports stream API)
def boolean hasScope(String scopeName, ArrayList scopeList){

   for(String scope : scopeList){

      if(scope.contains(scopeName)){

      return true;
Now we have collected the desired information.
Depending on the iFlow design, we can write iFlow-properties or headers that can be used by subsequent iFlow steps.
Or we call a backend-OData-service with a query that contains the restriction collected above.
E.g.
“…odata-service/…/customers?ctry=”+country+”&sensitive=”+isAdmin
Or whatever.
As for our tutorial, in our example we just write the values that have reached our groovy script to the iFlow message body.
So it can be returned to the caller which is our Frontend application.
Hence we can read it in the browser.
The full code can be found in the appendix.
We’re done with designtime implementation, we can save and deploy the iFlow.
But we still cannot run our scenario, as we need to do configure authorization in IAS and BTP.
5. IAS: Create User and Group 🛗
In this chapter we maintain a user in our IAS tenant.
5.1. Create User
We create an end user at
Users & Authorizations -> User Management
We press “Add User” button in the right bottom corner and enter some data of our choice.
We choose to set an “initial password” because like that we don’t need a real eMail for verification.

Afterwards we should enter the details page of the user, press the pencil icon for edit more, then enable the checkbox “email verified”.
Note that the user will need to change password upon first login.
Maintain attributes
We edit the section “Personal Information” and enter
Country/Region = Germany
We edit the section “Custom Attributes” and enter
Custom Attribute 1 = vip
Press “Save”.
5.2. Create Group
To create a user group, we navigate to
Users & Authorizations -> User Groups -> Create
We name the new group as "AttriGroup".

5.3. Add user to group
Finally, we add our new user to the new group.
We select the group in the list, then press “Add”.
From the list, we select our new user and press “Save”.
5.4. Configure attribute settings
We go to Applications & Resources
We select the application that was generated when trust between IAS and BTP-subaccount was established.
It has a name as “XSUAA_<subaccountname>"
🔹Subject Name Identifier
While our application is still selected, we choose “Subject Name Identifier”:
It should be set to “Basic Configuration” and “Email”.-
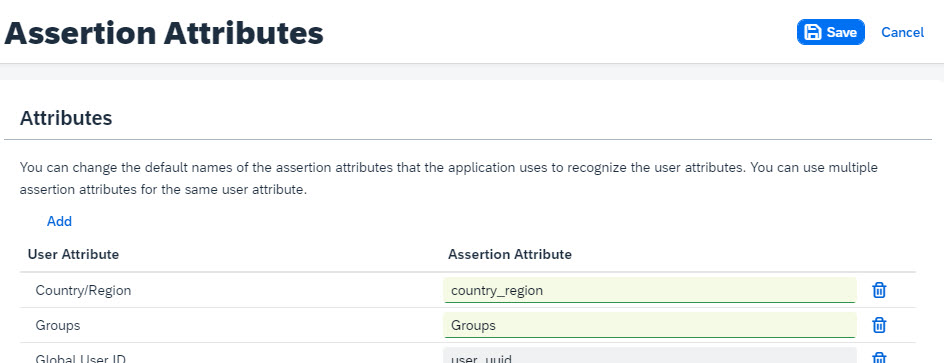
🔹Assertion Attributes
We go back and select “Assertion Attributes”:
We need to make sure the values for the following 2 attributes should be set as follows:
| User Attribute | Assertion Attribute |
| Country/Region | country_region |
| Groups | Groups |
Note that it is case sensitive.
🔹Default Attributes
We go back and select “Default Attributes”:
We add attributes and values as follows (without quotes):
| Attribute | Value |
| default_attribute_custom_1 | ${customAttribute1} |

What have we done?
We’ve decided which attributes should be contained in the token that is issued when the user logs in.
A special attribute is “Groups”, which is responsible (under the hood) for mapping the role collection to IAS-group.
Same is done for custom attributes, but with a strange workaround (in my eyes).
This is a short summary, please refer to this fantastic blog post for detailed explanation.
6. BTP: Configure Authorization Settings 🎛️
Basically, what we’re doing here is to connect the 2 worlds, IAS and BTP.
In IAS we have a user group, in BTP we have a matching role collection.
Now we need to specify, which group matches which role collection.
We can distinguish 2 tasks:
🔹take care of the CPI user roles
🔹take care of the role which we declared in our xs-security.json file
OK.
So let’s start with connecting IAS and CPI.
6.1. CPI User Roles
This has nothing to do with our Frontend application nor xs-security.json.
What we want to achieve:
Users that are maintained in IAS should be enabled to access the iFlow.
So they need to somehow get the roles.
6.1.1. CPI User Role "BackendRead"
In BTP, Roles are assigned via “Role Collections”.
We go to
Subaccount -> Security -> Role Collections -> Press big blue ➕
We create a Role Collection with a name of our choice, e.g. “Attri_CPI_Read_RC”.
We open the role collection and press the “Edit” Button.
The list of roles that are contained in this role collection is maintained in the first section.
We add the "BackendRead" role.
We ignore the “Users” section as we don’t want to assign each single user.
Instead, we edit the “User Groups” section.
Here we choose our trusted Identity Provider and enter the name of the user group which we created in IAS: “AttriGroup”.
Finally we press “Save”.

What we’ve done:
All users who are members of "AttriGroup" in IAS, will get the "BackendRead" role, when they fetch a JWT token for our CPI-tenant.
6.1.1. CPI User Role "BackendReadAdmin"
We repeat the steps, but with slightly different mechanism.
We create a role collection “Attri_CPI_Admin_RC” and add the role “BackendReadAdmin”.
We ignore the sections for adding single users or groups.
Instead, we define an “Attribute Mapping”:
We choose our IdP and enter the custom attribute name “default_attribute_custom_1”
The value must be equal to “vip”.
Then save.

What we’ve done here:
All users who have the first custom attribute specified as “vip” will get the role “BackendReadAdmin”.
With other words: VIP-users get Admin permissions.
Might sound silly, but as usual, I want to use different namings in different worlds, to make clear what is happening.
In our example, the user Joe is both vip and group member.
So we model the iFlow access in IAS and keep the role collections separated.
That can be modeled differently, no prob.
6.2. App Role
Now we configure access to our protected Frontend application.
Remember that we defined a role template that contains dynamic attributes (means no static value defined).
When creating the service instance, a default role was generated, but incomplete.
Obviously: how could the generator know how to fill the attributes?
So now we need to manually create a role.
6.2.1. Create Role
We go to Subaccount -> Security -> Roles
We find our Application Name "attrixsappname" and our role template “FrontendRoleTemplate”.
I’ve added the suffix “Template” to the name, to make clear:
The default role with name “FrontendRoleTemplate” that we can see, is just a default, generated by the system based on the template.
Now we manually create a serious role.
The “Create Role” Button is enabled only for such “incomplete” default roles.
We press “Create Role” and enter a name like “FrontendRole”.
The next wizard page is the interesting one.
For the Attribute “Level” we define “Identity Provider” as Source and enter “default_attribute_custom_1” (without quotes).
For “Origin” we define “Identity Provider” and “country_region”.
Values can be copied from IAS.
The next wizard page allows to select a role collection, but we don’t have it yet, so we click next and finish the wizard.

Now we’ve mapped our app-attribute to the IAS-attribute
With other words: our “origin” attribute will be filled with value coming from the “country_region” attribute of IAS, when a user logs in.
6.2.2. Create Role Collection
We create a role collection “Attri_RC” and add the Role “FrontendRole”.
This role collection is mapped to the IAS user group “AttriGroup” (as in 6.1.1.).

In IAS, we defined the “AttriGroup” as a group for running the “Attri”-scenario.
So we don’t have separated groups for accessing the Frontend app and CPI.
Can be done differently?
Yes.
At least, while going through this tutorial, everybody has learned all required options.
6.3. Optional: View
For the sake or curiosity, let’s have a view on the result of our configurations.
Roles:
We can go back to the Roles screen of BTP Cockpit.
We can see that after manually creating a role, the previous default role name, which was identical to the template name, has disappeared and has been replaced with the manually created role.

Mappings:
We go to
Security->Trust Configuration,
click on our trusted IAS, then on Role Collection Mappings on the left navigation bar.
We can see all mappings are listed here:
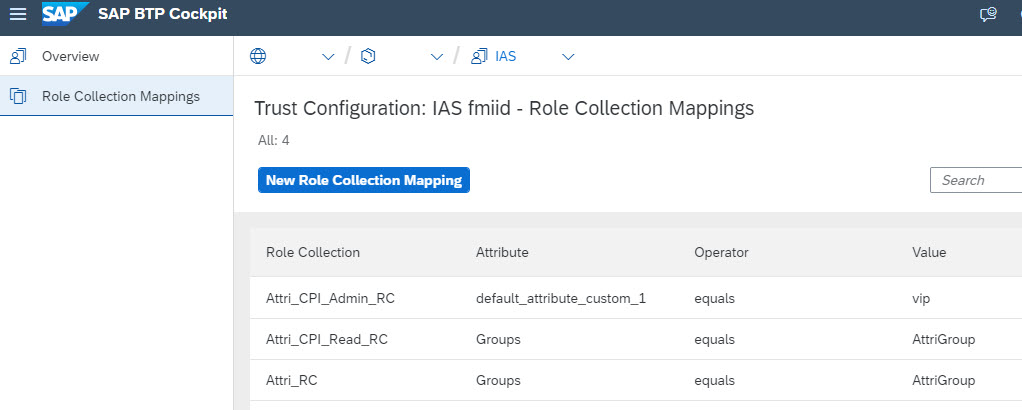
Interesting to see that here, other than in the Role Collection screen, the group mapping is done via the Assertion-Attribute name “Groups”.
7. RUN: Run scenario 💨
Up to now, we’ve created an app and an iFlow, and we’ve configured authorization settings in BTP.
We’re ready to run our scenario.
To run our scenario, we invoke our app which will then trigger the iFlow and print the response of the iFlow in the browser window.
In my example, the app has the following url:
https://attrirouter.cfapps.eu12.hana.ondemand.com/route-me-to/homepage
First, we’re presented a selection screen where we have to choose our trusted IAS.
Then we get the login screen sent by IAS.
We enter the email and password of Joe Cool, as configured above.
The initial password might to be changed on first login
As a result, we see the interesting screen of our application.

We can see the content of the JWT token that was issued based on the login of the user Joe Cool.
Boring.
It is all interesting, but let me point out the result of our effort:
We can see that the attribute mapping has worked fine:
the values of both attributes (defined in xs-security) have been added to the claim xs.user.attributes.
We can also see that there are no custom attributes in this token.
Now the second token:

We can see that we managed to get the additional properties into the JWT token.
As mentioned above, during token exchange the user info is preserved, but attributes are not existing in CPI-client.
And the response from iFlow is relevant for us, to see if things have worked as expected:

We can see that the Groovy script managed to read the custom attributes and the second user role.
Optional: Second User
I want to skip
To do a second test, we create a second user, this time he is not vip and he’s originated in Spain.
The result:

We can see that our design has worked as expected. The user is allowed to call our app, call the iFlow, get data from his country. But no sensitive data.
All fine for this user.
Note:
Our settings work fine as well, if the user has no custom attribute maintained in IAS at all.
Note:
In case that a user is vip, but not assigned to the group in IAS, then the call to iFlow is rejected.
8. CUP: Clean Up 🧼
Housekeeping is even more boring than the blog.....
🔹 Delete app and approuter
cf d attriapp -r -f
cf d attrirouter -r -f
🔹 Delete service instances
cf ds attriXsuaa -f
cf ds attriIflow -f
🔹 Delete Role Collections in BTP
🔹 Delete User Roles in CPI (this deletes also the roles in BTP)
🔹 Delete iFlow
Summary
In this tutorial, we’ve learned how to access content of a JWT token from Groovy script in iFlow.
We’ve learned how to add additional custom properties to a JWT token.
We’ve learned how to map an IAS-user-group to a role collection.
We’ve learned how to map an IAS-user-attribute to a role collection.
We’ve learned how to configure role attributes by mapping them to IAS -attributes.
Key Takeaways
How to add custom properties to JWT token: use authorities parameter
const customProp = {

   "az_attr": {"prop": "hello"}

}

encodeURIComponent(JSON.stringify(customProp))


// then fetch token with "authorities":

`grant_type=${grant}&response_type=token&authorities=${props}`
How to access JWT token in Groovy script: use property SAP_AuthHeaderValue
IToken authObject = message.getProperties().get("SAP_AuthHeaderValue");

String serializedToken = authObject.serializeToken() // returns json: {"USER_TOKEN":null,"APP_TOKEN":"eyJ

def authObjectJson = jsonSlurper.parseText(serializedToken)

String appToken = authObjectJson.APP_TOKEN;
Links 🔗🔗
SAP Help Portal
CPI
Creating Service instance and Key for Inbound Authentication
Examples for Service Instance and Key Parameters.
XSUAA
Reference for xs-security.json parameters
SAP Cloud Identity Services - Identity Authentication:
Entry in Discovery Center
IAS Landing Page
IAS User Management
IAS: getting a tenant
Establish trust
Blog Posts
Mandys blog post about inbound connection.
My blog post about XSUAA user attributes.
My blog post for attributes scenario with IAS.
Security Glossary Blog
Other
SAP Approuter
JWT specification: rfc7519
IANA JWT Claims.
Cloud Foundry UAA docu: introspect token
Cloud Foundry CLI Installation guide
Appendix: Sample Code
Please find below the script code of the iFlow and all files that are required for the Node.js application.
Groovy Script
Note: you might need to adapt the names of the custom JWT-properties
import com.sap.gateway.ip.core.customdev.util.Message;

import groovy.json.*

import com.sap.it.rt.scc.connectivity.security.IToken


def Message processData(Message message) {

    def messageBody = message.getBody(java.lang.String);


    //get auth object from property

    IToken authObject = message.getProperties().get("SAP_AuthHeaderValue");

    String serializedToken = authObject.serializeToken() // returns json: {"USER_TOKEN":null,"APP_TOKEN":"eyJ


    // parse the auth object to get the JWT token

    def jsonSlurper = new JsonSlurper();

    def authObjectJson = jsonSlurper.parseText(serializedToken)

    String appToken = authObjectJson.APP_TOKEN;

    String[] parts = appToken.split("\\.");


    // decode the Base64-encoded token

    byte[] tokenDecoded = Base64.getDecoder().decode(parts[1]); // the payload


    // parse the JWT token

    def jwtToken = jsonSlurper.parseText(new String(tokenDecoded))


    // access the claims of the token

    ArrayList scopeList = jwtToken.scope;

    boolean isAdmin = hasScope("BackendReadAdmin", scopeList);


    // access the custom properties which we added in node application

    def attrObject = jwtToken.get("az_attr"); // returns a groovy.json.internal.LazyMap

    def country = attrObject.get("user_country")

    def status = attrObject.get("user_status")


    // continue here with your logic. As for us, we just return the info back to caller

    messageBody = messageBody.concat(".<br/>").concat("Propagated User Info: <br/>Country: ").concat(country).concat("<br/>Status: ").concat(status).concat("<br/>Role 'BackendReadAdmin': ").concat(String.valueOf(isAdmin))

    message.setBody(messageBody)


    return message;

}


// Helper

def boolean hasScope(String scopeName, ArrayList scopeList){

    for(String scope : scopeList){

        if(scope.contains(scopeName)){

            return true;

        }

    }

}
Frontend Application
Project Structure:

Note:
You might need to adapt the app names in manifest and the domain of the routes.
Also, if you changed the name of the target endpoint, make sure to adapt.
root
config-cpi.json
{

	"grant-types":[

        "urn:ietf:params:oauth:grant-type:jwt-bearer"

	],

	"roles":[

		"BackendRead",

		"BackendReadAdmin"

	]

}xs-security.json
{

    "xsappname": "attrixsappname",

    "tenant-mode": "dedicated",

    "scopes": [{

            "name": "$XSAPPNAME.scopeforfrontend"

        }

    ],

    "attributes" : [ {

            "name" : "Origin",

            "valueType" : "string"

        },{

            "name" : "Level",

            "valueType" : "string",

            "valueRequired" : "false"

        }

    ],

    "role-templates": [{

            "name": "FrontendRoleTemplate",

            "scope-references": ["$XSAPPNAME.scopeforfrontend"],

            "attribute-references": [

                {"name" : "Origin"},

                { "name": "Level"}

            ]

        }

    ]

}
manifest.yml
---

applications:

  - name: attriapp

    path: app

    memory: 64M

    routes:

    - route: attriapp.cfapps.eu12.hana.ondemand.com

    buildpacks:

      - nodejs_buildpack

    services:

      - attriXsuaa

      - attriIflow

  - name: attrirouter

    path: approuter

    memory: 128M

    routes:

    - route: attrirouter.cfapps.eu12.hana.ondemand.com

    buildpacks:

      - nodejs_buildpack

    env:

      destinations: >

        [

          {

            "name":"destination_attriapp",

            "url":"https://attriapp.cfapps.eu12.hana.ondemand.com",

            "forwardAuthToken": true

          }

        ]

    services:

      - attriXsuaa
app
package.json
{

    "dependencies": {

        "@sap/xsenv": "latest",

        "@sap/xssec": "latest",

        "express": "^4.16.2",

        "axios": "0.24.0",

        "passport": "^0.4.0"

    }

}
server.js
const xsenv = require('@sap/xsenv')


const INSTANCES = xsenv.getServices({

   myXsuaa: {tag: 'xsuaa'},

   myCpi:  {name: 'attriIflow'}

})

const CREDENTIALS_UAA = INSTANCES.myXsuaa

const CREDENTIALS_CPI = INSTANCES.myCpi.oauth


const axios = require('axios')

const express = require('express')

const app = express()

const xssec = require('@sap/xssec')

const passport = require('passport')

const JWTStrategy = xssec.JWTStrategy

passport.use('JWT', new JWTStrategy(CREDENTIALS_UAA))

app.use(passport.initialize())

app.use(passport.authenticate('JWT', {session: false}))

app.use(express.json())


/* App server */

app.listen(process.env.PORT)


/* App endpoint */

app.get('/homepage', async (req, res) => {

   // check if user has required role

   const isScopeAvailable = req.authInfo.checkScope(CREDENTIALS_UAA.xsappname + '.scopeforfrontend')

   if (! isScopeAvailable) {

       res.status(403).end('Forbidden. Missing authorization.')

   }


   // exchange app-user-token for CPI-token

   const userToken = req.tokenInfo.getTokenValue()

   const cpiToken = await _doTokenExchange(userToken)


   // call iFlow

   const cpiResult = await _callCPI(cpiToken)


   // print token info to browser

   const htmlUser = _formatClaims(userToken)

   const htmlExchanged = _formatClaims(cpiToken)


   res.send(`  <h4>JWT after user login</h4>${htmlUser}

               <h4>JWT after token exchange</h4>${htmlExchanged}

               <h4>Response from iFlow</h4>${cpiResult}`)

})


/* HELPER */

async function  _doTokenExchange(jwt) {

   const props = composeCustomProps(jwt)

   const grant = 'urn:ietf:params:oauth:grant-type:jwt-bearer'

   const options = {

       url: CREDENTIALS_CPI.tokenurl,

       headers: {

           Authorization: "Basic " + Buffer.from(CREDENTIALS_CPI.clientid + ':' + CREDENTIALS_CPI.clientsecret).toString("base64"),

           'Content-Type': 'application/x-www-form-urlencoded'

       },

       method: 'POST',

       data : `grant_type=${grant}&response_type=token&assertion=${jwt}&authorities=${props}`

   }


   const response = await axios(options)

   return response.data.access_token

}


async function _callCPI(jwt) {

   const options = {

       url: `${CREDENTIALS_CPI.url}/http/attri`,

       headers: {

          'Content-Type': 'application/text',

          'Authorization': 'Bearer ' + jwt

       },

       method: 'POST',

       data : "Sending some Data from node application in BTP Cloud to iFlow endpoint"

   }


   const response = await axios(options)

   return response.data

}


function _formatClaims(jwtEncoded){

   const jwtDecodedJson = new xssec.TokenInfo(jwtEncoded).getPayload()


   const claims = new Array()

    claims.push(`issuer: ${jwtDecodedJson.iss}`)

    claims.push(`<br>client_id: ${jwtDecodedJson.client_id}</br>`)

    claims.push(`grant_type: ${jwtDecodedJson.grant_type}`)

    claims.push(`<br>scopes: ${jwtDecodedJson.scope}</br>`)

    claims.push(`ext_attr: ${JSON.stringify(jwtDecodedJson.ext_attr)}`)

    claims.push(`<br>aud: ${jwtDecodedJson.aud}</br>`)

    claims.push(`origin: ${jwtDecodedJson.origin}`)

    claims.push(`<br>name: ${jwtDecodedJson.given_name}</br>`)

    claims.push(`xs.system.attributes: ${JSON.stringify(jwtDecodedJson['xs.system.attributes'])}`)

    claims.push(`<br>xs.user.attributes: ${JSON.stringify(jwtDecodedJson['xs.user.attributes'])}</br>`)

    claims.push(`custom attributes: ${JSON.stringify(jwtDecodedJson['az_attr'])}`)


    return claims.join('')

}


function composeCustomProps(jwt){

   const jwtDecodedJson = new xssec.TokenInfo(jwt).getPayload()

   const userAttributes = jwtDecodedJson['xs.user.attributes']

   const customProp = {

      "az_attr": {

         "user_country": `${userAttributes.Origin}`,

         "user_status": `${userAttributes.Level}`,

      }

   }

   return encodeURIComponent(JSON.stringify(customProp))

}
approuter
package.json
{

    "dependencies": {

        "@sap/approuter": "latest"

    },

    "scripts": {

        "start": "node node_modules/@sap/approuter/approuter.js"

    }

}
xs-app.json
{

  "authenticationMethod": "route",

  "routes": [

    {

      "source": "^/route-me-to/(.*)$",

      "target": "$1",

      "destination": "destination_attriapp",

      "authenticationType": "xsuaa"

    }

  ]

}
- SAP Managed Tags:
- Cloud Integration
Labels:
You must be a registered user to add a comment. If you've already registered, sign in. Otherwise, register and sign in.
Labels in this area
-
ABAP CDS Views - CDC (Change Data Capture)
2 -
AI
1 -
Analyze Workload Data
1 -
BTP
1 -
Business and IT Integration
2 -
Business application stu
1 -
Business Technology Platform
1 -
Business Trends
1,658 -
Business Trends
93 -
CAP
1 -
cf
1 -
Cloud Foundry
1 -
Confluent
1 -
Customer COE Basics and Fundamentals
1 -
Customer COE Latest and Greatest
3 -
Customer Data Browser app
1 -
Data Analysis Tool
1 -
data migration
1 -
data transfer
1 -
Datasphere
2 -
Event Information
1,400 -
Event Information
67 -
Expert
1 -
Expert Insights
177 -
Expert Insights
301 -
General
1 -
Google cloud
1 -
Google Next'24
1 -
GraphQL
1 -
Kafka
1 -
Life at SAP
780 -
Life at SAP
13 -
Migrate your Data App
1 -
MTA
1 -
Network Performance Analysis
1 -
NodeJS
1 -
PDF
1 -
POC
1 -
Product Updates
4,577 -
Product Updates
346 -
Replication Flow
1 -
REST API
1 -
RisewithSAP
1 -
SAP BTP
1 -
SAP BTP Cloud Foundry
1 -
SAP Cloud ALM
1 -
SAP Cloud Application Programming Model
1 -
SAP Datasphere
2 -
SAP S4HANA Cloud
1 -
SAP S4HANA Migration Cockpit
1 -
Technology Updates
6,873 -
Technology Updates
429 -
Workload Fluctuations
1
Related Content
- Consuming SAP with SAP Build Apps - Mobile Apps for iOS and Android in Technology Blogs by SAP
- Real time access management with SAP BTP Kyma serverless workloads in Technology Blogs by SAP
- Convert multiple xml's into single Xlsx(MS Excel) using groovy script in Technology Blogs by Members
- Consuming SAP with SAP Build Apps - Connectivity options for low-code development - part 2 in Technology Blogs by SAP
- Consuming CAPM Application's OData service into SAP Fiori Application in Business Application Studio in Technology Blogs by Members
Top kudoed authors
| User | Count |
|---|---|
| 32 | |
| 17 | |
| 15 | |
| 13 | |
| 11 | |
| 9 | |
| 8 | |
| 8 | |
| 8 | |
| 7 |