
- SAP Community
- Products and Technology
- Technology
- Technology Blogs by SAP
- A Step-by-Step Guide to deploying the Automatic Cr...
Technology Blogs by SAP
Learn how to extend and personalize SAP applications. Follow the SAP technology blog for insights into SAP BTP, ABAP, SAP Analytics Cloud, SAP HANA, and more.
Turn on suggestions
Auto-suggest helps you quickly narrow down your search results by suggesting possible matches as you type.
Showing results for
Advisor
Options
- Subscribe to RSS Feed
- Mark as New
- Mark as Read
- Bookmark
- Subscribe
- Printer Friendly Page
- Report Inappropriate Content
01-04-2024
12:38 AM
SAP Build Process Automation provides a simpler and faster way to automate business processes by enabling business users to automate processes and tasks with drag-and-drop simplicity. SAP Build Process Automation combines workflow management, RPA functionality, decision management, process visibility, and embedded AI capabilities into one intuitive low-code experience. The solution enables business users to create automations and/or contribute their process expertise to projects to deliver the solutions they need without having to write code.
You can jumpstart automation projects with hundreds of process content packages, RPA bots and connectors designed specifically to enhance the capabilities of your SAP applications. From the built-in content store, you can easily browse and access line-of-business and industry-specific content designed specifically to enhance the capabilities of your SAP applications such as SAP S/4HANA, SAP Ariba, SAP SuccessFactors and more. In this blog post I am going to show how you can deploy a standard bot available in built-in content store and execute it in attended mode. For this exercise we are going to deploy Automatic Creation of Sales Orders from Excel (4G5) bot for your S/4HANA on-prem system. .
The Automatic Creation of Sales Orders from Excel template bot automates the sales order creation process, allowing companies to create a larger volume of sales orders in less time with reduced error in their system.
The bot monitors a specified base folder with Excel files and/or scans unread emails with the keyword Sales Order in the subject line and having the Excel files as attachments. The bot transforms the Excel files to a structure that can be used by the sales order creation API. The bot then creates the sales orders in the system based on the details in the Excel file. The bot notifies relevant stakeholders with details of sales orders created in the system.
Table of Contents:
https://hub.sap.com/package/6de1912ac31d4f54b3fbea4e66086731/documents
Similarly, you can deploy other standard bots from the content store and automate processes in your system. Every bot has specific requirements and dependencies. All these details are provided in form of documents and links with the bot itself in the content library. You can also customize the pre-built content once you download it in your Application Development Lobby.
You can jumpstart automation projects with hundreds of process content packages, RPA bots and connectors designed specifically to enhance the capabilities of your SAP applications. From the built-in content store, you can easily browse and access line-of-business and industry-specific content designed specifically to enhance the capabilities of your SAP applications such as SAP S/4HANA, SAP Ariba, SAP SuccessFactors and more. In this blog post I am going to show how you can deploy a standard bot available in built-in content store and execute it in attended mode. For this exercise we are going to deploy Automatic Creation of Sales Orders from Excel (4G5) bot for your S/4HANA on-prem system. .
The Automatic Creation of Sales Orders from Excel template bot automates the sales order creation process, allowing companies to create a larger volume of sales orders in less time with reduced error in their system.
The bot monitors a specified base folder with Excel files and/or scans unread emails with the keyword Sales Order in the subject line and having the Excel files as attachments. The bot transforms the Excel files to a structure that can be used by the sales order creation API. The bot then creates the sales orders in the system based on the details in the Excel file. The bot notifies relevant stakeholders with details of sales orders created in the system.
Table of Contents:
- Subscribing to SAP Build Process Automation
- Install and Set Up the Desktop Agent
- Create Agent Attributes
- Prepare Sample Input File
- Activate Sample OData Service in your backend system
- Deploy the “Automatic Sales Order Creation” bot package from the store
- Launching the bot and validating the results
- Subscribing to SAP Build Process Automation: Follow this tutorial to subscribe to SAP Build Process Automation - Subscribe to SAP Build Process Automation using Booster in SAP BTP Free Tier | Tutorials for SAP Dev...
- Install and Set Up the Desktop Agent | Tutorials for SAP Developers
- Create Agent Attributes
- In your development Lobby go to the Control Tower, click Agent Attributes and create attribute.
- Click Type drop-down field and select Predefined option. Give a unique name (>=25 characters) and some value and click Create button to create the attribute.

- Prepare Sample Input File
- Download MS Excel Sample Input Template from this link
https://hub.sap.com/package/6de1912ac31d4f54b3fbea4e66086731/documents
- In your Desktop, create a new folder and paste your recently copied excel file to this folder. Rename this file to Input_4G5.xls

- In your Desktop, create a new folder and paste your recently copied excel file to this folder. Rename this file to Input_4G5.xls
- Activate Sample OData Service in your backend system
For On-premise systems, this service needs to be added in the Activate and Maintain Services using the transaction /n/IWFND/MAINT_SERVICE. The bot will be able to use the services only when its added in the system.
SN
API Details
Comments
1
API_SALES_ORDER_SRV/A_SalesOrder
This is an SAP white listed API which is used for creation of sales order
- Deploying the Automatic Sales Order Creation bot package from the store: In this section you will deploy the package for the bot and setup additional configurations to ensure correct deployment to your on-premise agent.
- Launch the SAP Build Process Automation Application through your SAP BTP subaccount and go to Store inside your Application Development Lobby

- On the Filter By panel, under Line of Business, Select “Sales”
- Input the selected bot name “Automatic Creation of Sales Order from Excel (4G5)” into the search field and Enter.

- Click the Open drop-down menu and click Create from Template option.

- Click Create button to save the project.

- Go back to Lobby and Open your newly created project from the list of available projects.
- Once project is opened click settings option at the top.

- On Settings screen go to Dependencies and click Update all SDK button (if its enabled).

- Go to Configure Agent Version screen and select your Agent version from the drop-down list and click Save to save the agent version.

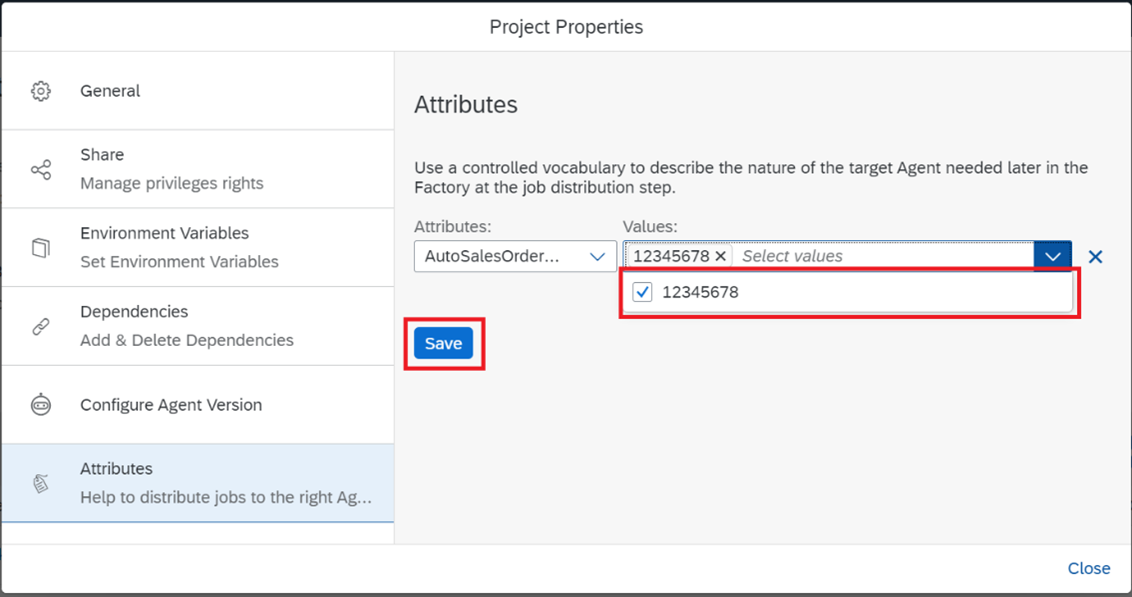
- Go to Attributes screen. Click Attributes drop-down list and select the attribute that we created in the step “Create Attribute”.
- Select the value from Values field and click Save and close the screen.
- On project screen click Release button to release the project now.

- Click Deploy button to start deploying the bot.

- On Overview page click Next to navigate to Run Time Variables page.
- Set the values for the following variables:
Name
Type
Value (Sample)
SYSTEMURL_ODATA
String
http://cloudl000373.internal.sde.cloud.sap:50080/sap/opu/odata/sap
S4H_USER_AUTH_4G5
Credential
<Your User, for example IRPA_TECH> Password <Your password>
EMAIL_RECIPIENTS_4G5
String
<your email>
BASE_FOLDER_PATH_4G5
String
C:\Users\<Your_User>\Desktop\IRPA
EMAIL_READ_4G5
Boolean
False (Switch Off)
BUSINESS_DECISION_FASHION_4G5
Boolean
False (Switch Off)
SAP_CLIENT
String
<your client, for example

- Click Next to navigate to Triggers page. Click Deploy to finally deploy the bot.
- You will see a success message on final screen. Click on Go To Monitor > Triggers button.

- On Triggers screen click Add Trigger button.
- From the list of deployed bots select Automatic Creation of Sales Order from Excel (4G5) bot and click Next.

- Select “Attended” trigger type and click Next.

- Specify name of your Trigger, date and time range when the trigger will be available to run. Click Create.

- Launch the SAP Build Process Automation Application through your SAP BTP subaccount and go to Store inside your Application Development Lobby
- Launching the bot and validating the results
- If not running, launch the Desktop Agent from the Start Menu
Note – You can check if Desktop Agent is already running by looking for the bot icon in your system tray.
- If you have a previous instance of the agent running, restart the agent.

- Go to Projects tab. You will see Automatic Creation of Sales Order from Excel (4G5) bot listed there.
- Before you begin to run the bot, make sure that the excel test file is available in the folder in your Desktop.
- Click Activate button to activate the bot.

- To run the bot, simply click on the name of the bot Create Sales Orders.
Note – Be aware that by running the bot you will be creating data in your system. Make sure that the data in your excel file is valid to avoid any data inconsistencies.
- As soon as the bot execution start you will notice your excel file is opened automatically and Agent status is set to In-Process.

- Bot will run and all errors will be added to a new folder called Error. Note that once bot finishes running the original Excel file will be deleted.

- In your first execution you will receive several errors related to functional configurations.
Note – This is a functional error which means for the selected customer, Account Group configuration for Sold to party has not been assigned. Note that this error text is only available in your excel file as this is the output from the OData service.
- These errors were caused by data in the template not considering the valid or non- existing Business Partners and Customer details.
Note – Valid data was identified by manually creating a Sales Order in the system via transaction VA03 - Once you get the valid data in your input Excel file and execute your bot your sales orders will be created successfully.

- To validate your results, you can now login to your Fiori Launchpad and run app Manage Sales Orders.
- In this App, click on the help values for Sold-to-Party.
- Select the customer number for which the Sales Orders were created.
- Compare the list of Sales Orders in the app to the list of sales orders created by the bot in the excel file.

- Navigate to the detail view of the Sales Order and check that the Items have been added correctly.

- Congratulations! You have now successfully deployed a bot for your SAP S/4HANA system.
- If not running, launch the Desktop Agent from the Start Menu
Similarly, you can deploy other standard bots from the content store and automate processes in your system. Every bot has specific requirements and dependencies. All these details are provided in form of documents and links with the bot itself in the content library. You can also customize the pre-built content once you download it in your Application Development Lobby.
- SAP Managed Tags:
- SAP Intelligent Robotic Process Automation,
- SAP Build
Labels:
5 Comments
You must be a registered user to add a comment. If you've already registered, sign in. Otherwise, register and sign in.
Labels in this area
-
ABAP CDS Views - CDC (Change Data Capture)
2 -
AI
1 -
Analyze Workload Data
1 -
BTP
1 -
Business and IT Integration
2 -
Business application stu
1 -
Business Technology Platform
1 -
Business Trends
1,658 -
Business Trends
93 -
CAP
1 -
cf
1 -
Cloud Foundry
1 -
Confluent
1 -
Customer COE Basics and Fundamentals
1 -
Customer COE Latest and Greatest
3 -
Customer Data Browser app
1 -
Data Analysis Tool
1 -
data migration
1 -
data transfer
1 -
Datasphere
2 -
Event Information
1,400 -
Event Information
67 -
Expert
1 -
Expert Insights
177 -
Expert Insights
301 -
General
1 -
Google cloud
1 -
Google Next'24
1 -
GraphQL
1 -
Kafka
1 -
Life at SAP
780 -
Life at SAP
13 -
Migrate your Data App
1 -
MTA
1 -
Network Performance Analysis
1 -
NodeJS
1 -
PDF
1 -
POC
1 -
Product Updates
4,577 -
Product Updates
346 -
Replication Flow
1 -
REST API
1 -
RisewithSAP
1 -
SAP BTP
1 -
SAP BTP Cloud Foundry
1 -
SAP Cloud ALM
1 -
SAP Cloud Application Programming Model
1 -
SAP Datasphere
2 -
SAP S4HANA Cloud
1 -
SAP S4HANA Migration Cockpit
1 -
Technology Updates
6,873 -
Technology Updates
430 -
Workload Fluctuations
1
Related Content
- Deployment of Seamless M4T v2 models on SAP AI Core in Technology Blogs by SAP
- SAP SABRIX UPGRADE in Technology Blogs by Members
- Create sales order automatic extraction -Maximize the value of SAP Business AI for SAP S/4HANA in Technology Blogs by SAP
- Rise with SAP and SAP BTP and Cloud foundry: The Future for SAP Consultants in Technology Q&A
- Azure AI Studio - Explore Speech AI feature. in Technology Blogs by Members
Top kudoed authors
| User | Count |
|---|---|
| 26 | |
| 17 | |
| 15 | |
| 13 | |
| 11 | |
| 9 | |
| 8 | |
| 8 | |
| 8 | |
| 7 |