


- SAP Community
- Products and Technology
- Technology
- Technology Blogs by Members
- Building a Knowledge-Based Chatbot with OpenAI’s A...
Technology Blogs by Members
Explore a vibrant mix of technical expertise, industry insights, and tech buzz in member blogs covering SAP products, technology, and events. Get in the mix!
Turn on suggestions
Auto-suggest helps you quickly narrow down your search results by suggesting possible matches as you type.
Showing results for
SurajitNeogi
Explorer
Options
- Subscribe to RSS Feed
- Mark as New
- Mark as Read
- Bookmark
- Subscribe
- Printer Friendly Page
- Report Inappropriate Content
01-01-2024
4:42 PM
Introduction
OpenAI's Dev Day on November 6th, 2023, marked a significant milestone in the field of artificial intelligence. The event introduced a suite of groundbreaking AI services, such as GPTs, the GPTs App Store, GPT-4 Turbo, and the Assistants API. In my opinion, the most exciting revelation at the developer conference was the Assistants API. If you’re interested, you can watch the Dev Day event that focuses on the Assistants API by following this link.
"We believe that if you give people better tools, they will do amazing things. We know that people want AI that is smarter, more personal, more customizable, can do more on your behalf. Eventually, you'll just ask the computer for what you need, and it’ll do all of these tasks for you." - Sam Altman - CEO, OpenAI
An Overview of the Assistants API
The Assistants API is a powerful tool that enables developers to build AI assistants within their apps. An Assistant has instructions and can leverage models, tools, and knowledge to respond to user queries. The API currently supports three types of tools: Code Interpreter, Retrieval, and Function calling. It is designed to help developers create their own assistive AI apps that have goals and can call models and tools. Explore further in the OpenAI documentation.
In this blog post, I will guide you on how to build AI agents with OpenAI’s new Assistants API on the Retrieval tool. This tool simplifies the process of setting up a Q&A system based on a custom knowledge base, making it remarkably user-friendly. With the Retrieval tool, you can effortlessly retrieve information, answer questions, provide recommendations, and more.
To quote the OpenAI documentation:
Retrieval augments the Assistant with knowledge from outside its model, such as proprietary product information or documents provided by your users. Once a file is uploaded and passed to the Assistant, OpenAI will automatically chunk your documents, index and store the embeddings, and implement vector search to retrieve relevant content to answer user queries.
The beauty of the Assistants API retrieval tool lies in its simplicity – no chunking, embeddings, or vector database handling is required. With this tool, you won't need to write anything for these intricate processes; everything is seamlessly abstracted via a user-friendly Assistant API.
It’s a great way to integrate AI into various business processes, allowing them to enhance efficiency, automate tasks, and provide faster and more accurate responses to users’ queries.
Lastly, addressing Data and Privacy concerns related to the Assistants API.
As Sam Altman said at DevDay...
We don’t train on your data from the API, or ChatGPT Enterprise, ever
How does Assistants API work?
Before we dive into the code, let’s first take a high-level overview of building on the Assistants API. There are several new components to understand:

- Assistants:
An Assistant is a purpose-built AI that leverage OpenAI’s models and invoke tools. They operate based on a customized set of instructions, defining the range of actions they can perform to respond to user queries. - Tools:
OpenAI-hosted tools such as Code Interpreter and Knowledge Retrieval, or the option to construct your own tools through Function calling. - Threads:
A Thread is a conversation session between an Assistant and a user, to which messages can be added, creating an interactive session. Threads store Messages and automatically handle truncation to ensure content fits within a model’s context. - Messages:
Collections of messages within threads, each message assigned a role (user/assistant) and content. Messages contain the text input by the user and can include text, files, and images. - Running the Assistant:
Finally, we run the Assistant to process the Thread, call certain tools if necessary, and generate the appropriate response.
The Assistants API is in beta and the OpenAI team is actively working on adding more functionality. You can explore the capabilities of the Assistants API using the Assistants playground or by building a step-by-step integration outlined in this blog.
Motivation:
This blog post showcases how to integrate OpenAI’s Assistants API into SAP Cloud Integration. While numerous codes and blogs on this subject predominantly use Python or Node.js, I aim to offer an alternative approach. As in my previous blogs, I strive to explore unconventional ways to harness the inherent capabilities of SAP Cloud Integration, pushing the boundaries of what can be achieved within this framework. With this goal in mind, I embark on the same journey once again.
Hands-On: Getting Started with OpenAI’s Assistants API and SAP Cloud Integration
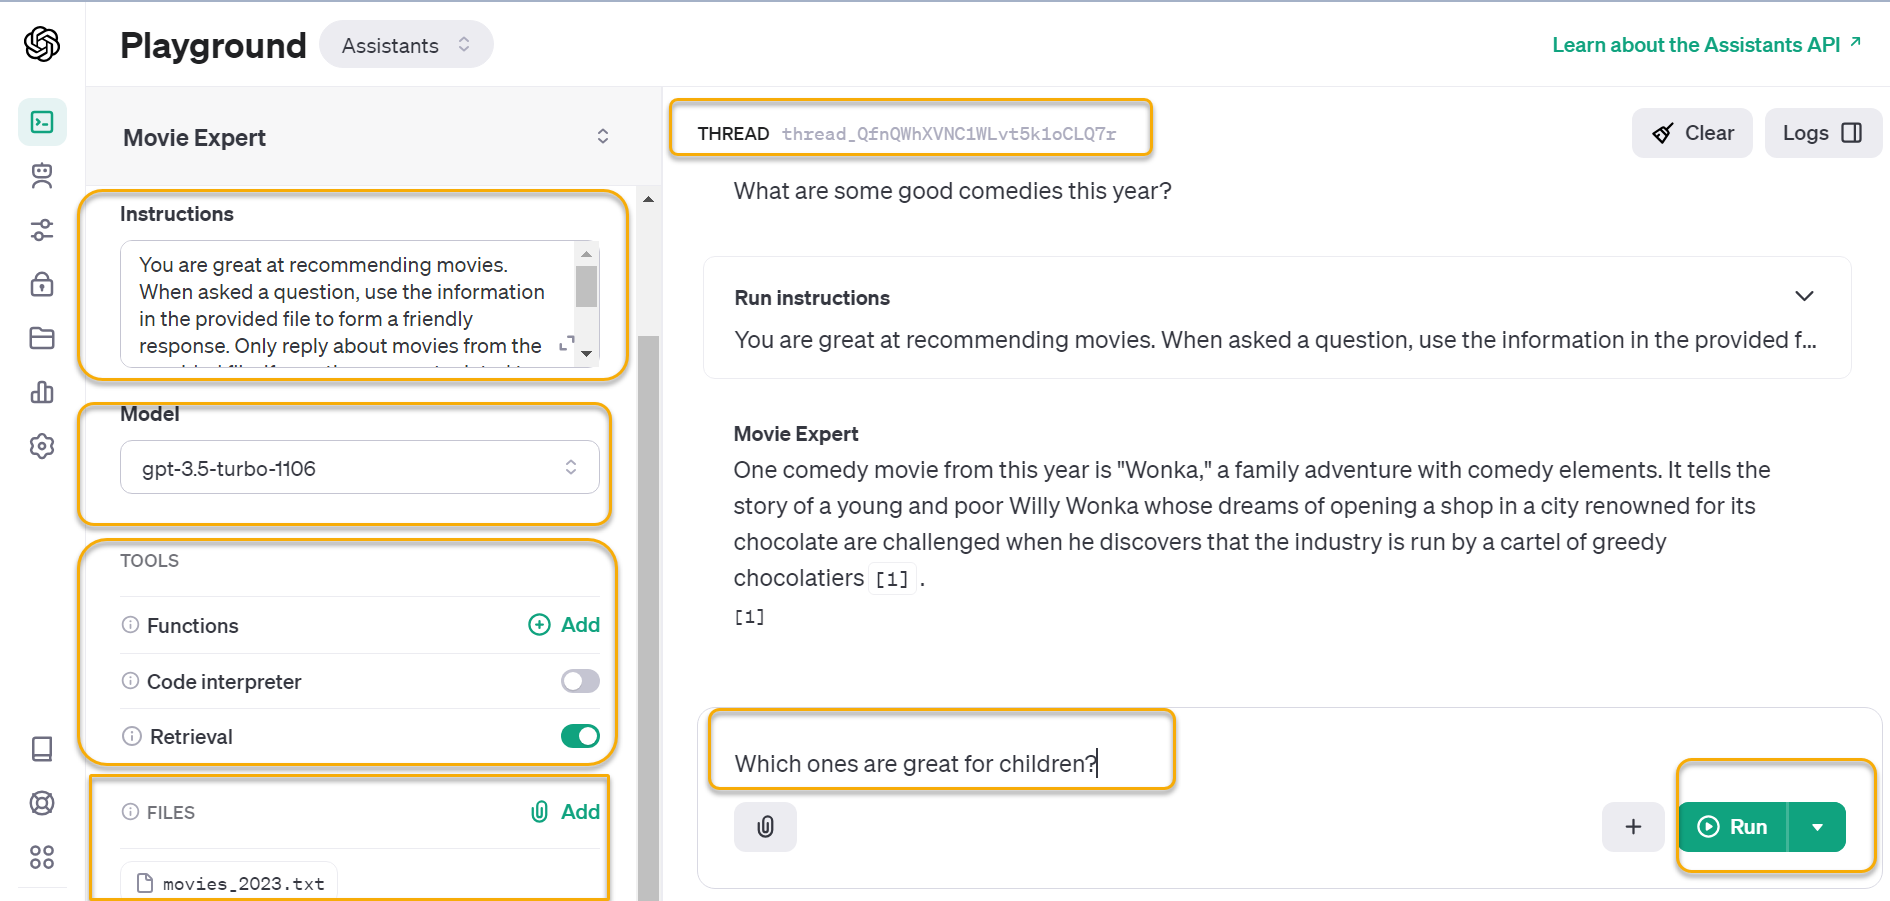
Now that you have a basic understanding of the OpenAI Assistants API, let’s dive into a practical use case. This section will guide you through the process of creating a Movie Expert assistant that can answer questions and provide recommendations based on a custom knowledge base from a movies_2023.txt file.

This demo or prototype serves as an example of how OpenAI’s Assistants API can be leveraged within a web application to create interactive and engaging user experiences.
Please note that I have only built the complete backend API development, which can be consumed by any Frontend Framework like Vanilla JS, React, SAP UI5, SAP Build Apps, etc. to create the frontend chat interface. To demonstrate the frontend, I will use Postman and show all necessary APIs that can be consumed by Frontend Framework to create the frontend chat interface.
You can download the complete integration package from GitHub at this link: Download. The full source code and all other necessary files are included in the download. Everything you need is also available in the GitHub repository openai-assistant-sap-integration.
Knowledge Retrieval Tool Flow Diagram
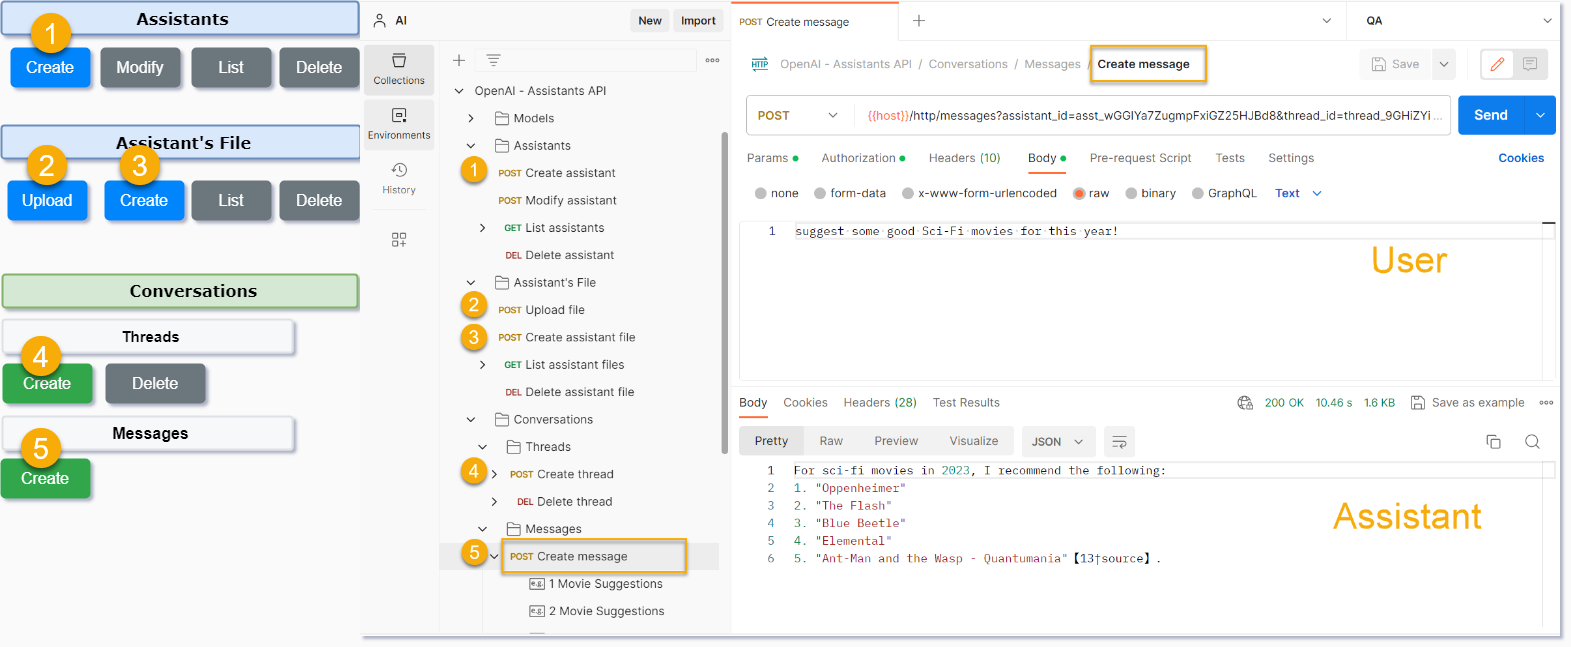
When implementing any technical solution, it is better to provide a visual flow that illustrates the interaction between the main components of the overall backend being developed. The flow diagram below outlines the five key steps that are integral to implementing the assistant, spanning from the initial file upload to the generation of the final response.
 Knowledge Bot Backend APIs
The steps are as follows:
- Create your own assistant with instructions.
- Upload your files to OpenAI.
- Assign the file to an assistant.
- Create a new thread.
- Create a new message in the message thread with the user’s query.
Let’s take a closer look at each of these steps.
📌 Prerequisites
- First, create an OpenAI account or sign in. Next, navigate to the API key page and "Create new secret key". Copy the API Key to your clipboard to use in the step 4 and Step 6.
- Download the Integration Package Zip file from the GitHub Repo and import Integration Package into your tenant.
- Create an OAuth client (Client Credentials grant type) on the tenant with service plan 'integration-flow'.
- Navigate to your SAP BTP cockpit of the Cloud Foundry sub-account, go to 'Services', then 'Service Marketplace' and select 'Process Integration'
- Create a new instance with service plan 'integration-flow' and with the following configuration:
- Grant-types: 'client_credentials'
- Roles: ESBMessaging.send
- Create a Service Key and copy the entire JSON text to your clipboard to use in the step 7 for 'Configure Environments'.
Note: For the Neo Environment, please refer to steps 1 and 2 in the Neo documentation. Assign the roles mentioned above to the user 'oauth_client_'. Copy the Token Endpoint (found in the branding tab), Client ID, and Client Secret to your clipboard to use in the step 6 for 'Configure Environments'. [Subscription: Select iflmap node]
- Create the User Credentials.
- Manage Security Material -> Add Create Secure Parameter for the OpenAI API Key.
- Download the Postman Collection Zip file from the GitHub Repo. Unzip and import the collections and environment into your Postman.
- Configure Collections Variables. ⚠️ Put in current value.
Note: The Retrieval tool supports either the gpt-3.5-turbo-1106 or the gpt-4-1106-preview model. For free trial or testing purposes, it is advised to use the gpt-3.5-turbo-1106 model. However, for users on a paid plan, OpenAI recommends opting for the latest model for best results and maximum compatibility with tools.
- Configure Environments.
- Update the Environment variables with the credentials generated in Step 3 to connect the HTTP end point of your SAP Cloud Integration tenant. ⚠️ Put in current value.
Note: We will be referring to the starter guide on OpenAI documentation at https://platform.openai.com/docs/assistants/overview/assistants-playground for guidance on each step involved in constructing the Knowledge Bot backend API.
Step 1: Create your own assistant with instructions
Use Postman Request Create assistant with necessary instruction and name. This correspond to https://platform.openai.com/docs/assistants/overview/step-1-create-an-assistant on OpenAI documentation. Copy assistant_id to be required in later steps.

You will see the assistant being created on https://platform.openai.com/assistants

Step 2: Upload your files to OpenAI
Use Postman Request Upload file to upload your file. Copy file_id to be required in later steps.

Assistants can access Files in various formats, either during their creation or as part of threads between Assistants and users. Each Assistant can accommodate a maximum of 20 files, with each file size capped at 512 MB.
You will see the file on https://platform.openai.com/files

Step 3: Assign the file to an assistant
Use Postman Request Create assistant file to assign the file to your assistant. Pass assistant_id to the path parameter and file_id in the body.

Step 4: Create a new thread
Use Postman Request Create thread to create a new thread. This correspond to https://platform.openai.com/docs/assistants/overview/step-2-create-a-thread on OpenAI documentation. Copy thread_id to be required in later steps.
Step 5: Create a new message in the message thread with the user’s query
Now go the integration iflow Knowledge Bot and configure the external parameters. Set the name of the credential created in Security Material to store the OpenAI API Key. Deploy the iflow.

Use Postman Request Create message to add the user’s message to the thread. Pass assistant_id and thread_id to the path parameter and user’s message in the body (only text). ⚠️ Get New Access Token from the Authorization tab first before creating a message.

The Integration iflow under the hood will perform the following steps as per the OpenAI documentation at https://platform.openai.com/docs/assistants/overview/step-3-add-a-message-to-a-thread.
- Step 3: Add a Message to a Thread
- Step 4: Run the Assistant
- Step 5: Check the Run status
- Step 6: Display the Assistant's Response
Corresponding Process Call in the Integration iflow which handles the above steps is marked as below

Step 5 is where it gets tricky. You can read about the run lifecycle in the OpenAI docs: https://platform.openai.com/docs/assistants/how-it-works/runs-and-run-steps. ⚠️Refer to the 'Movie Expert Assistant - Technical Overview Diagram' above to gain a visual understanding of how things work under the hood.
If parameter Enable Logging is set as true, you will able to see all the API response for Step 3 to Step 6.
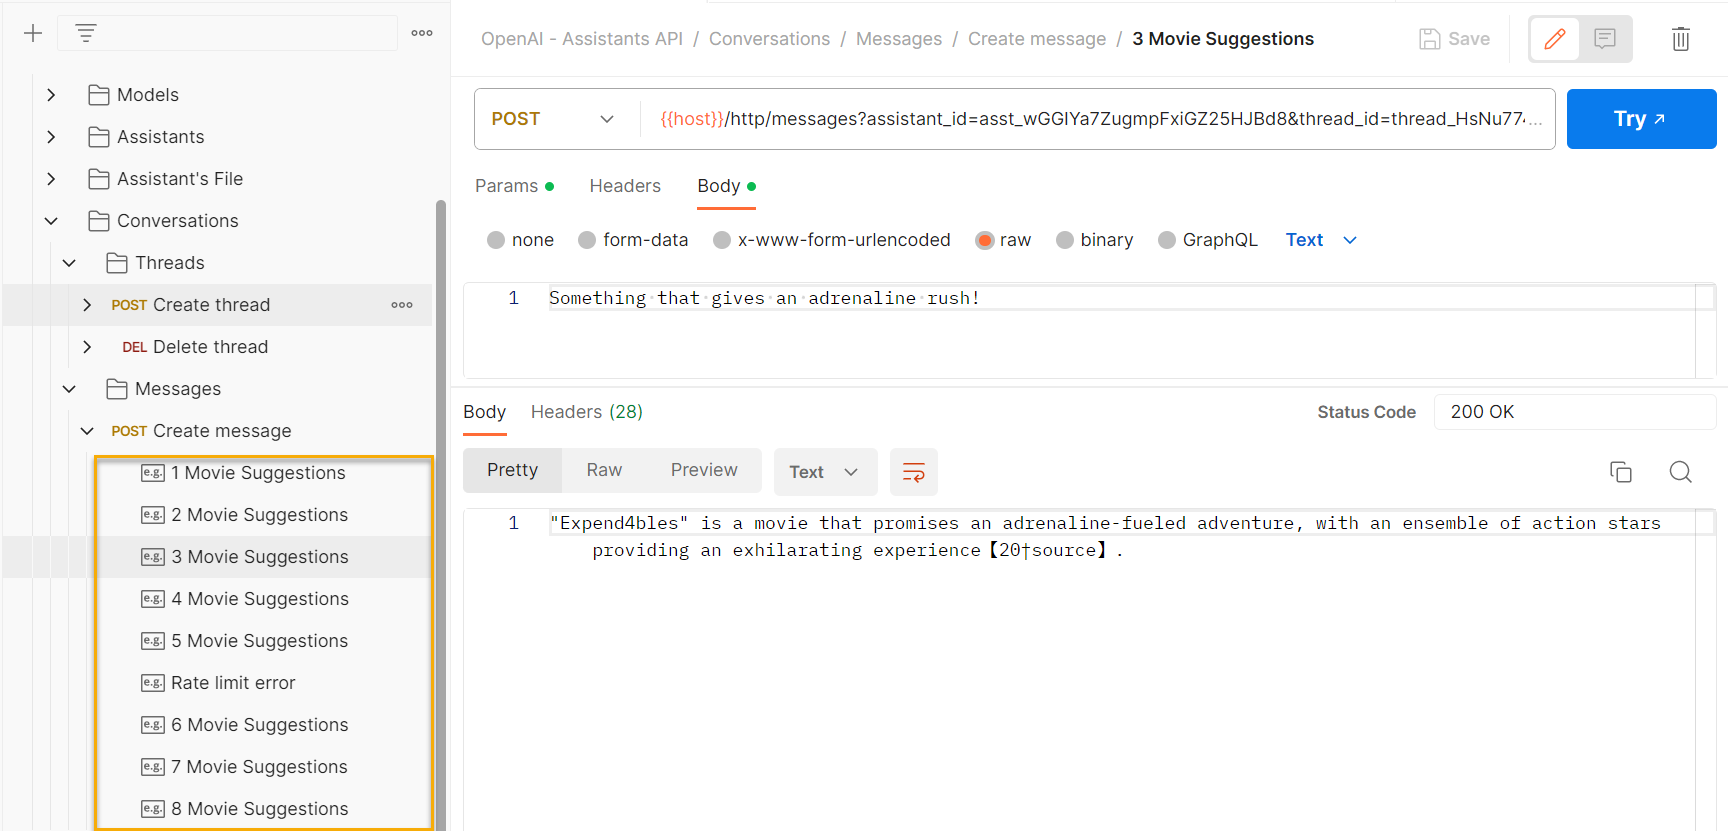
 Refer to the Postman examples named "Movie Suggestions" to observe how the Assistant API has responded to various recommendations I have queried.
Some key point to consider
- If you're on a free account, be careful about the number of times you hit Send since you might reach the OpenAI rate limits.
- I have included examples for each Postman request discussed above. Please refer to them in case of any doubts.
- While testing with a free account using the gpt-3.5-turbo-1106 model, there were instances of incorrect results or hallucinations. However, testing with a paid account using the gpt-4-1106-preview consistently provided accurate results in most cases.
- For testing and using a free account, avoid uploading large documents to prevent quickly exceeding the $5 credit limit. During my testing, I successfully conducted a substantial amount of user message testing within the free credit limit.
- To ensure the Assistant meets its intended purpose and responds effectively to user messages, provide clear instructions. You can define instructions in two places: during the creation of the Assistant and during the creation of a run (refer to Local Integration Process -> Run the Assistant -> Set Run Instructions in the integration flow).
- The accuracy and efficiency of the Assistant's responses depend on the quality and relevance of the data, i.e., the file you upload. Optimize your data to achieve the best results.
- Test and iterate over instructions to improve the performance and response of the Assistant.
- Before using the Assistant API in a paid plan, make sure to familiarize yourself with the pricing details outlined by OpenAI.
Limitations
- Refer to the OpenAI documentation to understand the limitations. Please note that these limitations are subject to change as the API is still in beta and OpenAI is actively working on adding more functionality.
- Even though you're no longer sending the entire history each time, you will still be charged for the tokens of the entire conversation history with each Run. Refer to the community post.
Conclusion
OpenAI’s Assistants API is a significant step forward in making complex AI functionalities more accessible and practical for developers. By integrating a knowledge base directly into an AI assistant, we can create a dynamic, responsive, and highly intelligent system that can provide specific, sourced information on demand. This approach is much simpler and more straightforward than the previous method of manually chunking text and creating embeddings, storing them in a vector database, and implementing vector search to return relevant sections according to a user query’s embeddings.
I hope you enjoyed the sneak peek into the Assistant API in the blog and that it has sparked your curiosity and excitement about the possibilities ahead. Please note that this is still a work in progress under beta, so be sure to keep up with the latest development by exploring the Assistant API docs frequently. Thank you and happy building!
If you have any questions, feel free to ask in the comment section. If you find the blog helpful, please like and share it with your SAP colleagues.
6 Comments
You must be a registered user to add a comment. If you've already registered, sign in. Otherwise, register and sign in.
Labels in this area
-
"automatische backups"
1 -
"regelmäßige sicherung"
1 -
"TypeScript" "Development" "FeedBack"
1 -
505 Technology Updates 53
1 -
ABAP
14 -
ABAP API
1 -
ABAP CDS Views
2 -
ABAP CDS Views - BW Extraction
1 -
ABAP CDS Views - CDC (Change Data Capture)
1 -
ABAP class
2 -
ABAP Cloud
3 -
ABAP Development
5 -
ABAP in Eclipse
1 -
ABAP Platform Trial
1 -
ABAP Programming
2 -
abap technical
1 -
abapGit
1 -
absl
2 -
access data from SAP Datasphere directly from Snowflake
1 -
Access data from SAP datasphere to Qliksense
1 -
Accrual
1 -
action
1 -
adapter modules
1 -
Addon
1 -
Adobe Document Services
1 -
ADS
1 -
ADS Config
1 -
ADS with ABAP
1 -
ADS with Java
1 -
ADT
2 -
Advance Shipping and Receiving
1 -
Advanced Event Mesh
3 -
AEM
1 -
AI
7 -
AI Launchpad
1 -
AI Projects
1 -
AIML
9 -
Alert in Sap analytical cloud
1 -
Amazon S3
1 -
Analytical Dataset
1 -
Analytical Model
1 -
Analytics
1 -
Analyze Workload Data
1 -
annotations
1 -
API
1 -
API and Integration
3 -
API Call
2 -
API security
1 -
Application Architecture
1 -
Application Development
5 -
Application Development for SAP HANA Cloud
3 -
Applications and Business Processes (AP)
1 -
Artificial Intelligence
1 -
Artificial Intelligence (AI)
5 -
Artificial Intelligence (AI) 1 Business Trends 363 Business Trends 8 Digital Transformation with Cloud ERP (DT) 1 Event Information 462 Event Information 15 Expert Insights 114 Expert Insights 76 Life at SAP 418 Life at SAP 1 Product Updates 4
1 -
Artificial Intelligence (AI) blockchain Data & Analytics
1 -
Artificial Intelligence (AI) blockchain Data & Analytics Intelligent Enterprise
1 -
Artificial Intelligence (AI) blockchain Data & Analytics Intelligent Enterprise Oil Gas IoT Exploration Production
1 -
Artificial Intelligence (AI) blockchain Data & Analytics Intelligent Enterprise sustainability responsibility esg social compliance cybersecurity risk
1 -
ASE
1 -
ASR
2 -
ASUG
1 -
Attachments
1 -
Authorisations
1 -
Automating Processes
1 -
Automation
2 -
aws
2 -
Azure
1 -
Azure AI Studio
1 -
Azure API Center
1 -
Azure API Management
1 -
B2B Integration
1 -
Backorder Processing
1 -
Backup
1 -
Backup and Recovery
1 -
Backup schedule
1 -
BADI_MATERIAL_CHECK error message
1 -
Bank
1 -
BAS
1 -
basis
2 -
Basis Monitoring & Tcodes with Key notes
2 -
Batch Management
1 -
BDC
1 -
Best Practice
1 -
bitcoin
1 -
Blockchain
3 -
bodl
1 -
BOP in aATP
1 -
BOP Segments
1 -
BOP Strategies
1 -
BOP Variant
1 -
BPC
1 -
BPC LIVE
1 -
BTP
13 -
BTP Destination
2 -
Business AI
1 -
Business and IT Integration
1 -
Business application stu
1 -
Business Application Studio
1 -
Business Architecture
1 -
Business Communication Services
1 -
Business Continuity
1 -
Business Data Fabric
3 -
Business Fabric
1 -
Business Partner
12 -
Business Partner Master Data
10 -
Business Technology Platform
2 -
Business Trends
4 -
BW4HANA
1 -
CA
1 -
calculation view
1 -
CAP
4 -
Capgemini
1 -
CAPM
1 -
Catalyst for Efficiency: Revolutionizing SAP Integration Suite with Artificial Intelligence (AI) and
1 -
CCMS
2 -
CDQ
12 -
CDS
2 -
Cental Finance
1 -
Certificates
1 -
CFL
1 -
Change Management
1 -
chatbot
1 -
chatgpt
3 -
CL_SALV_TABLE
2 -
Class Runner
1 -
Classrunner
1 -
Cloud ALM Monitoring
1 -
Cloud ALM Operations
1 -
cloud connector
1 -
Cloud Extensibility
1 -
Cloud Foundry
4 -
Cloud Integration
6 -
Cloud Platform Integration
2 -
cloudalm
1 -
communication
1 -
Compensation Information Management
1 -
Compensation Management
1 -
Compliance
1 -
Compound Employee API
1 -
Configuration
1 -
Connectors
1 -
Consolidation Extension for SAP Analytics Cloud
2 -
Control Indicators.
1 -
Controller-Service-Repository pattern
1 -
Conversion
1 -
Cosine similarity
1 -
cryptocurrency
1 -
CSI
1 -
ctms
1 -
Custom chatbot
3 -
Custom Destination Service
1 -
custom fields
1 -
Customer Experience
1 -
Customer Journey
1 -
Customizing
1 -
cyber security
3 -
cybersecurity
1 -
Data
1 -
Data & Analytics
1 -
Data Aging
1 -
Data Analytics
2 -
Data and Analytics (DA)
1 -
Data Archiving
1 -
Data Back-up
1 -
Data Flow
1 -
Data Governance
5 -
Data Integration
2 -
Data Quality
12 -
Data Quality Management
12 -
Data Synchronization
1 -
data transfer
1 -
Data Unleashed
1 -
Data Value
8 -
database tables
1 -
Datasphere
3 -
datenbanksicherung
1 -
dba cockpit
1 -
dbacockpit
1 -
Debugging
2 -
Defender
1 -
Delimiting Pay Components
1 -
Delta Integrations
1 -
Destination
3 -
Destination Service
1 -
Developer extensibility
1 -
Developing with SAP Integration Suite
1 -
Devops
1 -
digital transformation
1 -
Documentation
1 -
Dot Product
1 -
DQM
1 -
dump database
1 -
dump transaction
1 -
e-Invoice
1 -
E4H Conversion
1 -
Eclipse ADT ABAP Development Tools
2 -
edoc
1 -
edocument
1 -
ELA
1 -
Embedded Consolidation
1 -
Embedding
1 -
Embeddings
1 -
Employee Central
1 -
Employee Central Payroll
1 -
Employee Central Time Off
1 -
Employee Information
1 -
Employee Rehires
1 -
Enable Now
1 -
Enable now manager
1 -
endpoint
1 -
Enhancement Request
1 -
Enterprise Architecture
1 -
ESLint
1 -
ETL Business Analytics with SAP Signavio
1 -
Euclidean distance
1 -
Event Dates
1 -
Event Driven Architecture
1 -
Event Mesh
2 -
Event Reason
1 -
EventBasedIntegration
1 -
EWM
1 -
EWM Outbound configuration
1 -
EWM-TM-Integration
1 -
Existing Event Changes
1 -
Expand
1 -
Expert
2 -
Expert Insights
2 -
Exploits
1 -
Fiori
14 -
Fiori Elements
2 -
Fiori SAPUI5
12 -
first-guidance
1 -
Flask
1 -
FTC
1 -
Full Stack
8 -
Funds Management
1 -
gCTS
1 -
General
1 -
Generative AI
1 -
Getting Started
1 -
GitHub
9 -
Grants Management
1 -
groovy
1 -
GTP
1 -
HANA
6 -
HANA Cloud
2 -
Hana Cloud Database Integration
2 -
HANA DB
2 -
HANA XS Advanced
1 -
Historical Events
1 -
home labs
1 -
HowTo
1 -
HR Data Management
1 -
html5
8 -
HTML5 Application
1 -
Identity cards validation
1 -
idm
1 -
Implementation
1 -
input parameter
1 -
instant payments
1 -
Integration
3 -
Integration Advisor
1 -
Integration Architecture
1 -
Integration Center
1 -
Integration Suite
1 -
intelligent enterprise
1 -
iot
1 -
Java
1 -
job
1 -
Job Information Changes
1 -
Job-Related Events
1 -
Job_Event_Information
1 -
joule
4 -
Journal Entries
1 -
Just Ask
1 -
Kerberos for ABAP
8 -
Kerberos for JAVA
8 -
KNN
1 -
Launch Wizard
1 -
Learning Content
2 -
Life at SAP
5 -
lightning
1 -
Linear Regression SAP HANA Cloud
1 -
Loading Indicator
1 -
local tax regulations
1 -
LP
1 -
Machine Learning
2 -
Marketing
1 -
Master Data
3 -
Master Data Management
14 -
Maxdb
2 -
MDG
1 -
MDGM
1 -
MDM
1 -
Message box.
1 -
Messages on RF Device
1 -
Microservices Architecture
1 -
Microsoft Universal Print
1 -
Middleware Solutions
1 -
Migration
5 -
ML Model Development
1 -
Modeling in SAP HANA Cloud
8 -
Monitoring
3 -
MTA
1 -
Multi-Record Scenarios
1 -
Multiple Event Triggers
1 -
Myself Transformation
1 -
Neo
1 -
New Event Creation
1 -
New Feature
1 -
Newcomer
1 -
NodeJS
3 -
ODATA
2 -
OData APIs
1 -
odatav2
1 -
ODATAV4
1 -
ODBC
1 -
ODBC Connection
1 -
Onpremise
1 -
open source
2 -
OpenAI API
1 -
Oracle
1 -
PaPM
1 -
PaPM Dynamic Data Copy through Writer function
1 -
PaPM Remote Call
1 -
PAS-C01
1 -
Pay Component Management
1 -
PGP
1 -
Pickle
1 -
PLANNING ARCHITECTURE
1 -
Popup in Sap analytical cloud
1 -
PostgrSQL
1 -
POSTMAN
1 -
Prettier
1 -
Process Automation
2 -
Product Updates
5 -
PSM
1 -
Public Cloud
1 -
Python
4 -
python library - Document information extraction service
1 -
Qlik
1 -
Qualtrics
1 -
RAP
3 -
RAP BO
2 -
Record Deletion
1 -
Recovery
1 -
recurring payments
1 -
redeply
1 -
Release
1 -
Remote Consumption Model
1 -
Replication Flows
1 -
research
1 -
Resilience
1 -
REST
1 -
REST API
1 -
Retagging Required
1 -
Risk
1 -
Rolling Kernel Switch
1 -
route
1 -
rules
1 -
S4 HANA
1 -
S4 HANA Cloud
1 -
S4 HANA On-Premise
1 -
S4HANA
3 -
S4HANA_OP_2023
2 -
SAC
10 -
SAC PLANNING
9 -
SAP
4 -
SAP ABAP
1 -
SAP Advanced Event Mesh
1 -
SAP AI Core
8 -
SAP AI Launchpad
8 -
SAP Analytic Cloud Compass
1 -
Sap Analytical Cloud
1 -
SAP Analytics Cloud
4 -
SAP Analytics Cloud for Consolidation
3 -
SAP Analytics Cloud Story
1 -
SAP analytics clouds
1 -
SAP API Management
1 -
SAP BAS
1 -
SAP Basis
6 -
SAP BODS
1 -
SAP BODS certification.
1 -
SAP BTP
21 -
SAP BTP Build Work Zone
2 -
SAP BTP Cloud Foundry
6 -
SAP BTP Costing
1 -
SAP BTP CTMS
1 -
SAP BTP Innovation
1 -
SAP BTP Migration Tool
1 -
SAP BTP SDK IOS
1 -
SAP BTPEA
1 -
SAP Build
11 -
SAP Build App
1 -
SAP Build apps
1 -
SAP Build CodeJam
1 -
SAP Build Process Automation
3 -
SAP Build work zone
10 -
SAP Business Objects Platform
1 -
SAP Business Technology
2 -
SAP Business Technology Platform (XP)
1 -
sap bw
1 -
SAP CAP
2 -
SAP CDC
1 -
SAP CDP
1 -
SAP CDS VIEW
1 -
SAP Certification
1 -
SAP Cloud ALM
4 -
SAP Cloud Application Programming Model
1 -
SAP Cloud Integration for Data Services
1 -
SAP cloud platform
8 -
SAP Companion
1 -
SAP CPI
3 -
SAP CPI (Cloud Platform Integration)
2 -
SAP CPI Discover tab
1 -
sap credential store
1 -
SAP Customer Data Cloud
1 -
SAP Customer Data Platform
1 -
SAP Data Intelligence
1 -
SAP Data Migration in Retail Industry
1 -
SAP Data Services
1 -
SAP DATABASE
1 -
SAP Dataspher to Non SAP BI tools
1 -
SAP Datasphere
9 -
SAP DRC
1 -
SAP EWM
1 -
SAP Fiori
3 -
SAP Fiori App Embedding
1 -
Sap Fiori Extension Project Using BAS
1 -
SAP GRC
1 -
SAP HANA
1 -
SAP HCM (Human Capital Management)
1 -
SAP HR Solutions
1 -
SAP IDM
1 -
SAP Integration Suite
9 -
SAP Integrations
4 -
SAP iRPA
2 -
SAP LAGGING AND SLOW
1 -
SAP Learning Class
1 -
SAP Learning Hub
1 -
SAP Master Data
1 -
SAP Odata
2 -
SAP on Azure
2 -
SAP PartnerEdge
1 -
sap partners
1 -
SAP Password Reset
1 -
SAP PO Migration
1 -
SAP Prepackaged Content
1 -
SAP Process Automation
2 -
SAP Process Integration
2 -
SAP Process Orchestration
1 -
SAP S4HANA
2 -
SAP S4HANA Cloud
1 -
SAP S4HANA Cloud for Finance
1 -
SAP S4HANA Cloud private edition
1 -
SAP Sandbox
1 -
SAP STMS
1 -
SAP successfactors
3 -
SAP SuccessFactors HXM Core
1 -
SAP Time
1 -
SAP TM
2 -
SAP Trading Partner Management
1 -
SAP UI5
1 -
SAP Upgrade
1 -
SAP Utilities
1 -
SAP-GUI
8 -
SAP_COM_0276
1 -
SAPBTP
1 -
SAPCPI
1 -
SAPEWM
1 -
sapfirstguidance
1 -
SAPHANAService
1 -
SAPIQ
1 -
sapmentors
1 -
saponaws
2 -
SAPS4HANA
1 -
SAPUI5
5 -
schedule
1 -
Script Operator
1 -
Secure Login Client Setup
8 -
security
9 -
Selenium Testing
1 -
Self Transformation
1 -
Self-Transformation
1 -
SEN
1 -
SEN Manager
1 -
service
1 -
SET_CELL_TYPE
1 -
SET_CELL_TYPE_COLUMN
1 -
SFTP scenario
2 -
Simplex
1 -
Single Sign On
8 -
Singlesource
1 -
SKLearn
1 -
Slow loading
1 -
soap
1 -
Software Development
1 -
SOLMAN
1 -
solman 7.2
2 -
Solution Manager
3 -
sp_dumpdb
1 -
sp_dumptrans
1 -
SQL
1 -
sql script
1 -
SSL
8 -
SSO
8 -
Substring function
1 -
SuccessFactors
1 -
SuccessFactors Platform
1 -
SuccessFactors Time Tracking
1 -
Sybase
1 -
system copy method
1 -
System owner
1 -
Table splitting
1 -
Tax Integration
1 -
Technical article
1 -
Technical articles
1 -
Technology Updates
15 -
Technology Updates
1 -
Technology_Updates
1 -
terraform
1 -
Threats
2 -
Time Collectors
1 -
Time Off
2 -
Time Sheet
1 -
Time Sheet SAP SuccessFactors Time Tracking
1 -
Tips and tricks
2 -
toggle button
1 -
Tools
1 -
Trainings & Certifications
1 -
Transformation Flow
1 -
Transport in SAP BODS
1 -
Transport Management
1 -
TypeScript
3 -
ui designer
1 -
unbind
1 -
Unified Customer Profile
1 -
UPB
1 -
Use of Parameters for Data Copy in PaPM
1 -
User Unlock
1 -
VA02
1 -
Validations
1 -
Vector Database
2 -
Vector Engine
1 -
Visual Studio Code
1 -
VSCode
2 -
VSCode extenions
1 -
Vulnerabilities
1 -
Web SDK
1 -
work zone
1 -
workload
1 -
xsa
1 -
XSA Refresh
1
- « Previous
- Next »
Related Content
- IoT - Ultimate Data Cyber Security - with Enterprise Blockchain and SAP BTP 🚀 in Technology Blogs by Members
- Azure AI Studio - Explore Speech AI feature. in Technology Blogs by Members
- Fiori launchpad integrated GPT assistant: Middleware in Technology Blogs by Members
- SAP Hackathon: A Showcase of AI Innovation at The Circle, Zurich in Technology Blogs by SAP
Top kudoed authors
| User | Count |
|---|---|
| 8 | |
| 7 | |
| 5 | |
| 4 | |
| 4 | |
| 4 | |
| 4 | |
| 4 | |
| 3 | |
| 3 |