
- SAP Community
- Products and Technology
- Supply Chain Management
- SCM Blogs by Members
- Lifecycle Planning with SAP IBP
Supply Chain Management Blogs by Members
Learn about SAP SCM software from firsthand experiences of community members. Share your own post and join the conversation about supply chain management.
Turn on suggestions
Auto-suggest helps you quickly narrow down your search results by suggesting possible matches as you type.
Showing results for
kunalroy
Participant
Options
- Subscribe to RSS Feed
- Mark as New
- Mark as Read
- Bookmark
- Subscribe
- Printer Friendly Page
- Report Inappropriate Content
11-14-2022
4:16 PM
Introduction:
Lifecycle planning is used to introduce, phase-in and phase-out products. As you might already be aware, a typical product’s life can be split across distinct phases from development to end of life. After a product is developed, it is then introduced in the market. Introduction is followed by growth phase where the product sees rise in sales eventually leading to a maturity phase where product sales mature and become stable. Finally comes the decline phase, when the product sees declining sales as it is replaced by a substitute, which in most cases, is something better or cheaper or both.
When a product is just introduced, it won’t have its own sales history data(which can be used for statistical forecasting). Typically, reference product/products which are like this new product are used as “source of sales history” to forecast for the new product’s demand.
SAP IBP helps the modelling of Lifecycle planning through a few apps. This blog focuses on discussing the purpose of the most used sections of those apps.
A couple of points to consider before we proceed:
Note- For more details on statistical forecasting, consider reading the blog post- Statistical Forecasting in IBP- Manage Forecast Models. | SAP Blogs
Setting up lifecycle planning:
To initiate lifecycle planning, the first activity is to assign the business meaning-‘Product Identifier’ to the Product attribute in your planning area. This can be done in the Planning area app(Attributes tab).
The second set of steps are performed in the “Settings for Product Lifecycle” app. In the ‘Planning Area Settings’ option(see Fig 05), we have to provide the levels for lifecycle planning.
Clicking on ‘Planning Area Settings’ is going to open the screen as shown in Fig 06 where we have to assign levels for lifecycle planning. These levels are the combinations at which we can assign reference products. By default, Level 1 is going to be populated with the ‘Product Identifier’ attribute selected earlier (Fig 04). Let’s say we have the requirement where a new product, for example Prod_New, is to replace an old product say, Prod_Old, we just need to maintain Product ID as the Level 1. However, let’s say the requirement is that Prod_New is replacing Prod_Old1 for Customer1 and Prod_Old2 for Customer2, then Customer ID needs to be introduced as a level as well, since it influences the product assignments. For this example, we have maintained Level 1 as the PRDID & Level 2 as CUSTID.
Next step is to maintain the reference product, forecast dates, phase-in, and phase-out profile details. All of these are done in the “Manage Product Lifecycle” app.
The first thing to do in the “Manage Product Lifecycle” app is to maintain product assignments. This is where the assignments to reference products are maintained. Single/multiple products can be assigned in one go.
In the context of this blog, we will proceed with ‘Single Product Assignment’. Click on that option as highlighted above (Fig 07). On the next screen (Fig 08), we have to enter the product being introduced (new product). The new product for this example is PROD1_NEW. 'Launch dimension' provides another level of control for managing lifecycle planning. In this example, we have taken the launch dimension as ‘Customer Country/Region’ which is a Customer Master attribute. Say, if we want to do lifecycle planning for the new product only in one Customer Country/Region, we can control that using launch dimension. Also, if we want different forecast start/phase-in/phase-out dates for different Customer Countries/regions, we can control that as well. Further examples will make it clearer.
Below is what you will see moving to the next screen (Fig 09). By default, the ‘Reference Product ID/Description’ will be populated same as the new product (as maintained in Fig 08). This is added by default by SAP, because eventually when the new product has its own history, you would ideally want to use that as the source for generating the statistical forecast. Weight in %, Valid From & Valid to date fields allow you to control how and when products are to be used as references. More details shared later in the blog.
For the context of this blog, we will just have one old product as the reference for the new product. Say PROD1 is our reference product & so we have maintained that as the reference (Fig 10). You will notice that the default reference of 'self' for PROD1_NEW has been removed by me however, as mentioned above, it is recommended to keep it to consider the product's own history eventually. ‘Weight in %’ defines what percentage of sales history that we would like to use for forecasting the new product. In this case, we have taken that as “100%”. The ‘Customer ID’ column is visible here since we have maintained a CUSTID level as well in “Settings for lifecycle planning” (Fig 06- Settings for Product Lifecycle- Maintaining Levels for Lifecycle planning). You see that there is a ‘*’ value is populated for Customer ID. This means that for every planning object for PROD1_NEW, irrespective of what the Customer ID is, PROD1 will always be the reference Product.
Let’s say we would like to take a special case where PROD2 has to be assigned as the reference product for PROD1_NEW when Customer ID = CUST2. The following will have to be maintained for that:
‘Valid from’ and ‘Valid to’ fields define the period for which you would like to consider that product assignment valid. Let’s look at the dates maintained in Fig 12.
The validity dates shown above mean that PROD1_NEW will use PROD1 as reference product for all Customers starting from 1st October 2021. However, after 1st May 2022, PROD1_NEW will use PROD2 as reference for CUST2. For every other customer, PROD1 would still be used as the reference product.
After Statistical Forecasting is run with lifecycle planning enabled, you will see that PROD2 is used as a reference for PROD1_NEW starting May 2022, for planning combinations with Customer ID=CUST2. While for every other combination PROD1 is used as the reference.
For rest of the steps, we will proceed keeping the validity dates as blank. This means that PROD2 is going to be the reference product for PROD1_NEW for CUST2 across the history horizon.
You can see from the above examples, that we have planning combinations for 3 Customer Ids here- CUST1, CUST2 & CUST3. Below are the ‘Customer Country/Regions’ for these 3 Customers.
Now let’s say the business wants to run lifecycle planning only for Customer Country/Region = INDIA. Remember, we had added Customer Country/Region as the launch dimension (Fig 08- Manage Product Lifecycle- Adding new products with their launch dimension). We can use that to control this requirement.
The tab of ‘Forecast Dates’ controls details related to ‘Launch Dimension’(Customer Country/Region in this case). Value updated for the Launch Dimension by default is ‘*’ (any attribute value).
We can delete the line with ‘*’ and add a line only with INDIA in there. This means that when the forecast model is now run, it will only run for planning objects of PROD1_NEW for those customers which have the Customer Country/Region attribute value= INDIA (which in this case are CUST1 & CUST2).
Now, when forecast model is run, Statistical forecast is only generated for CUST1 & CUST2. CUST3 is ignored as the Customer Country/Region value for CUST3 is BANGLADESH. See Fig 18.
Another use of Launch Dimension: Say, we want PROD1_NEW for INDIA to be forecasted right away while for rest of the Launch dimension values (in this case, BANGLADESH) after 3 months. This requirement can be met by setting up the 'Forecast Start dates' accordingly.
As per the settings maintained in Fig 19, forecast generation for CUST3 will only start from 3rd Jan 2023. Till then no statistical forecast will be generated for CUST3.
Within the ‘Forecast Dates’ tab, we can also maintain the phase-in & phase-out periods. We will go back to the simple example where PROD1_NEW is the new product that uses PROD1 for reference across all combinations. PROD1_NEW is phasing-in and PROD1 has to phase-out in the same period. Here are the ‘Product Assignments’ and ‘Forecast dates’ settings that need to be setup accordingly. See Fig 21 & 22.
Other features of Lifecycle Planning:
In the “Settings for Lifecycle Planning” app, you can create ‘Settings profiles’ that can be assigned to users/user groups. Once assigned, every time that user creates ‘product assignments’ in the “Manage Product Lifecycle” app, the settings from the ‘Settings profiles’ automatically apply to them. You can define settings such as- whether the user is allowed to do Product Assignments, phase-in, phase-out or not, etc.
Since the growth of a product during the growth phase might not be always linear, SAP IBP provides several types of phase-in & phase-out curves. Phase-in Phase-Out curves can also be superlinear or sublinear.
For example, within superlinear graph, here is the difference in output between a square root function v. a fourth root function for our test data.
I hope the example shared above provides the understanding around “Lifecycle Planning in IBP”. I have tried to cover how the different tabs within the app link to each other and how output of one, influences other. You can read other posts relevant to IBP Demand at these links:
SAP Integrated Business Planning for demand | SAP | SAP Blogs
All Questions in SAP Integrated Business Planning for demand | SAP Community
Please feel free to share your feedback/thoughts.
Lifecycle planning is used to introduce, phase-in and phase-out products. As you might already be aware, a typical product’s life can be split across distinct phases from development to end of life. After a product is developed, it is then introduced in the market. Introduction is followed by growth phase where the product sees rise in sales eventually leading to a maturity phase where product sales mature and become stable. Finally comes the decline phase, when the product sees declining sales as it is replaced by a substitute, which in most cases, is something better or cheaper or both.

Fig 01- Product Lifecycle
When a product is just introduced, it won’t have its own sales history data(which can be used for statistical forecasting). Typically, reference product/products which are like this new product are used as “source of sales history” to forecast for the new product’s demand.
SAP IBP helps the modelling of Lifecycle planning through a few apps. This blog focuses on discussing the purpose of the most used sections of those apps.
A couple of points to consider before we proceed:
- Lifecycle planning doesn’t ‘copy’ the sales history data from reference product/s to the new product. It just uses the same to generate statistical forecast. So, if you look at the sales history key figure for the new product after forecasting is run, it will still show ‘blank’ values. However, in examples below, you will see that I have used the key figure “Target Key Figure for Calculated forecast Input” as the sales history key figure and I have shown values updated even for new products. That is done just to show & validate what data ends up being used as “sales history”.
- There is no separate lifecycle planning run in IBP. Lifecycle planning happens along with ‘Statistical forecasting’ run. Below is a screenshot from the “Manage Forecast Models” app. The highlighted checkbox in the ‘General’ tab needs to be checked for lifecycle planning to work. ‘Manual Forecasting’ and ‘Aggregated planning for phase-in phase-out’ are also options related to lifecycle planning but are not in scope of this blog.

Fig 02- Manage Forecast Models- Checkbox to consider lifecycle planning during statistical forecasting run.
- For the examples in this blog, I have only chosen ‘Simple average’ as the statistical model.

Fig 03- Manage Forecast Models- ‘Simple Average’ selected as the algorithm for Statistical Forecasting.
- This blog was written on 12th Nov 2022. This date in important to understand whether some of the dates mentioned later are in the past or in the future.
Note- For more details on statistical forecasting, consider reading the blog post- Statistical Forecasting in IBP- Manage Forecast Models. | SAP Blogs
Setting up lifecycle planning:
To initiate lifecycle planning, the first activity is to assign the business meaning-‘Product Identifier’ to the Product attribute in your planning area. This can be done in the Planning area app(Attributes tab).

Fig 04- Planning Area- Assigning Business Meaning ‘Product Identifier’ to the Product ID attribute.
The second set of steps are performed in the “Settings for Product Lifecycle” app. In the ‘Planning Area Settings’ option(see Fig 05), we have to provide the levels for lifecycle planning.

Fig 05- Settings for Product Lifecycle- Planning Area Settings
Clicking on ‘Planning Area Settings’ is going to open the screen as shown in Fig 06 where we have to assign levels for lifecycle planning. These levels are the combinations at which we can assign reference products. By default, Level 1 is going to be populated with the ‘Product Identifier’ attribute selected earlier (Fig 04). Let’s say we have the requirement where a new product, for example Prod_New, is to replace an old product say, Prod_Old, we just need to maintain Product ID as the Level 1. However, let’s say the requirement is that Prod_New is replacing Prod_Old1 for Customer1 and Prod_Old2 for Customer2, then Customer ID needs to be introduced as a level as well, since it influences the product assignments. For this example, we have maintained Level 1 as the PRDID & Level 2 as CUSTID.

Fig 06- Settings for Product Lifecycle- Maintaining Levels for Lifecycle planning.
Next step is to maintain the reference product, forecast dates, phase-in, and phase-out profile details. All of these are done in the “Manage Product Lifecycle” app.
The first thing to do in the “Manage Product Lifecycle” app is to maintain product assignments. This is where the assignments to reference products are maintained. Single/multiple products can be assigned in one go.

Fig 07- Manage Product Lifecycle- Assigning Reference Products.
In the context of this blog, we will proceed with ‘Single Product Assignment’. Click on that option as highlighted above (Fig 07). On the next screen (Fig 08), we have to enter the product being introduced (new product). The new product for this example is PROD1_NEW. 'Launch dimension' provides another level of control for managing lifecycle planning. In this example, we have taken the launch dimension as ‘Customer Country/Region’ which is a Customer Master attribute. Say, if we want to do lifecycle planning for the new product only in one Customer Country/Region, we can control that using launch dimension. Also, if we want different forecast start/phase-in/phase-out dates for different Customer Countries/regions, we can control that as well. Further examples will make it clearer.

Fig 08- Manage Product Lifecycle- Adding new products with their launch dimension.
Below is what you will see moving to the next screen (Fig 09). By default, the ‘Reference Product ID/Description’ will be populated same as the new product (as maintained in Fig 08). This is added by default by SAP, because eventually when the new product has its own history, you would ideally want to use that as the source for generating the statistical forecast. Weight in %, Valid From & Valid to date fields allow you to control how and when products are to be used as references. More details shared later in the blog.

Fig 09- Manage Product Lifecycle- Product Assignments- Reference Product updated as the ‘new product’ by default.
For the context of this blog, we will just have one old product as the reference for the new product. Say PROD1 is our reference product & so we have maintained that as the reference (Fig 10). You will notice that the default reference of 'self' for PROD1_NEW has been removed by me however, as mentioned above, it is recommended to keep it to consider the product's own history eventually. ‘Weight in %’ defines what percentage of sales history that we would like to use for forecasting the new product. In this case, we have taken that as “100%”. The ‘Customer ID’ column is visible here since we have maintained a CUSTID level as well in “Settings for lifecycle planning” (Fig 06- Settings for Product Lifecycle- Maintaining Levels for Lifecycle planning). You see that there is a ‘*’ value is populated for Customer ID. This means that for every planning object for PROD1_NEW, irrespective of what the Customer ID is, PROD1 will always be the reference Product.

Fig 10- Manage Product Lifecycle- Product Assignments- Adding the right reference product with Weight in %=100%.
Let’s say we would like to take a special case where PROD2 has to be assigned as the reference product for PROD1_NEW when Customer ID = CUST2. The following will have to be maintained for that:

Fig 11- Manage Product Lifecycle- Product Assignments- Maintaining different product assignments at Customer Level.
‘Valid from’ and ‘Valid to’ fields define the period for which you would like to consider that product assignment valid. Let’s look at the dates maintained in Fig 12.

Fig 12- Manage Product Lifecycle- Product Assignments- Using Validity dates
The validity dates shown above mean that PROD1_NEW will use PROD1 as reference product for all Customers starting from 1st October 2021. However, after 1st May 2022, PROD1_NEW will use PROD2 as reference for CUST2. For every other customer, PROD1 would still be used as the reference product.
After Statistical Forecasting is run with lifecycle planning enabled, you will see that PROD2 is used as a reference for PROD1_NEW starting May 2022, for planning combinations with Customer ID=CUST2. While for every other combination PROD1 is used as the reference.

Fig 13- Output of forecast run with Validity dates as shown in Fig 12.
For rest of the steps, we will proceed keeping the validity dates as blank. This means that PROD2 is going to be the reference product for PROD1_NEW for CUST2 across the history horizon.

Fig 14- Output of forecast run with no validity dates.
You can see from the above examples, that we have planning combinations for 3 Customer Ids here- CUST1, CUST2 & CUST3. Below are the ‘Customer Country/Regions’ for these 3 Customers.

Fig 15- Customer MDT- Showing the ‘Customer Country/Region’ for the 3 Customers used in our examples.
Now let’s say the business wants to run lifecycle planning only for Customer Country/Region = INDIA. Remember, we had added Customer Country/Region as the launch dimension (Fig 08- Manage Product Lifecycle- Adding new products with their launch dimension). We can use that to control this requirement.
The tab of ‘Forecast Dates’ controls details related to ‘Launch Dimension’(Customer Country/Region in this case). Value updated for the Launch Dimension by default is ‘*’ (any attribute value).
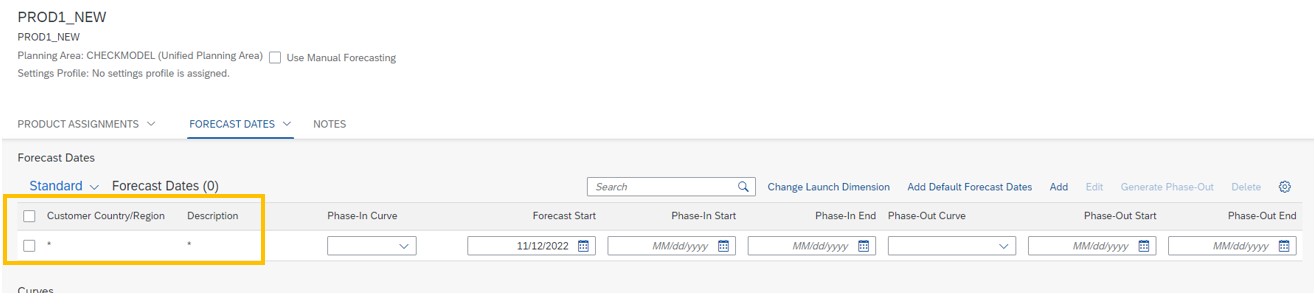
Fig 16- Manage Product Lifecycle- Forecast Dates- Launch dimension value updated as ‘*’ by default.
We can delete the line with ‘*’ and add a line only with INDIA in there. This means that when the forecast model is now run, it will only run for planning objects of PROD1_NEW for those customers which have the Customer Country/Region attribute value= INDIA (which in this case are CUST1 & CUST2).

Fig 17- Manage Product Lifecycle- Forecast Dates- Launch dimension value updated to INDIA.
Now, when forecast model is run, Statistical forecast is only generated for CUST1 & CUST2. CUST3 is ignored as the Customer Country/Region value for CUST3 is BANGLADESH. See Fig 18.

Fig 18- Output of forecast run- Statistical Forecast generation restricted by Launch Dimension- generated only for CUST1 and CUST2.
Another use of Launch Dimension: Say, we want PROD1_NEW for INDIA to be forecasted right away while for rest of the Launch dimension values (in this case, BANGLADESH) after 3 months. This requirement can be met by setting up the 'Forecast Start dates' accordingly.

Fig 19- Manage Product Lifecycle- Forecast Dates- Different Forecast Dates maintained for different Launch Values.
As per the settings maintained in Fig 19, forecast generation for CUST3 will only start from 3rd Jan 2023. Till then no statistical forecast will be generated for CUST3.

Fig 20- Output of forecast run- Statistical Forecast not generated for CUST3 as the Forecast Start date is set as 3rd Jan 2023.
Within the ‘Forecast Dates’ tab, we can also maintain the phase-in & phase-out periods. We will go back to the simple example where PROD1_NEW is the new product that uses PROD1 for reference across all combinations. PROD1_NEW is phasing-in and PROD1 has to phase-out in the same period. Here are the ‘Product Assignments’ and ‘Forecast dates’ settings that need to be setup accordingly. See Fig 21 & 22.

Fig 21- Manage Product Lifecycle- Product Assignments- PROD1 is setup as reference product for PROD1_NEW and for self (to be used in phase-out).

Fig 22- Manage Product Lifecycle- Forecast Dates- PROD1 is phased out while PROD1_NEW is phased in.

Fig 23- Output of Forecast Run- Prod1 is being phased-out while PROD1_NEW is phasing-in from Nov. 22 to Jan 23, before achieving 100% of statistical forecast value from Feb 23.

Fig 24- Output of Forecast Run- Graphical plotting of data in Fig 22.
Other features of Lifecycle Planning:
In the “Settings for Lifecycle Planning” app, you can create ‘Settings profiles’ that can be assigned to users/user groups. Once assigned, every time that user creates ‘product assignments’ in the “Manage Product Lifecycle” app, the settings from the ‘Settings profiles’ automatically apply to them. You can define settings such as- whether the user is allowed to do Product Assignments, phase-in, phase-out or not, etc.
Fig 25- Settings for Lifecycle Planning- Creating ‘Settings Profile’.
Since the growth of a product during the growth phase might not be always linear, SAP IBP provides several types of phase-in & phase-out curves. Phase-in Phase-Out curves can also be superlinear or sublinear.

Fig 26- Manage Product Lifecycle- Forecast Dates- Curve types available for Phase-in or Phase-out curves.
Also, within each of these 3 curves, there are different types of graph functions that can be chosen & saved under the “Curves” section.

Fig 27- Manage Product Lifecycle- Forecast Dates- Graph Functions available within the linear, superlinear or sublinear curve types.
For example, within superlinear graph, here is the difference in output between a square root function v. a fourth root function for our test data.

Fig 28- Output of forecast run with superlinear phase-in curve with a square root function chosen under the ‘curves section’.

Fig 29- Output of forecast run with superlinear phase-in curve with a fourth root function chosen under the ‘curves section’.
- There is an option to upload multiple product assignments at once.

Fig 30- Manage Product Lifecycle- Product Assignments- Add Multiple Product Assignments.
- These Product Assignments, Forecast Dates, Curve settings. can be downloaded and mass uploaded.

Fig 31- Manage Product Lifecycle- Product Assignments- Downloading available template/settings.
- Just in case the planning objects for the new products are missing, you can check and create the same using the option shown below.

Fig 32- Manage Product Lifecycle- Product Assignments- Check for missing planning objects and create them.
I hope the example shared above provides the understanding around “Lifecycle Planning in IBP”. I have tried to cover how the different tabs within the app link to each other and how output of one, influences other. You can read other posts relevant to IBP Demand at these links:
SAP Integrated Business Planning for demand | SAP | SAP Blogs
All Questions in SAP Integrated Business Planning for demand | SAP Community
Please feel free to share your feedback/thoughts.
2 Comments
You must be a registered user to add a comment. If you've already registered, sign in. Otherwise, register and sign in.
Labels in this area
-
aATP
1 -
ABAP Programming
1 -
Activate Credit Management Basic Steps
1 -
Adverse media monitoring
1 -
Alerts
1 -
Ausnahmehandling
1 -
bank statements
1 -
Bin Sorting sequence deletion
1 -
Bin Sorting upload
1 -
BP NUMBER RANGE
1 -
Brazil
1 -
Business partner creation failed for organizational unit
1 -
Business Technology Platform
1 -
Central Purchasing
1 -
Charge Calculation
2 -
Cloud Extensibility
1 -
Compliance
1 -
Controlling
1 -
Controlling Area
1 -
Data Enrichment
1 -
DIGITAL MANUFACTURING
1 -
digital transformation
1 -
Dimensional Weight
1 -
Direct Outbound Delivery
1 -
E-Mail
1 -
ETA
1 -
EWM
6 -
EWM - Delivery Processing
2 -
EWM - Goods Movement
4 -
EWM Outbound configuration
1 -
EWM-RF
1 -
EWM-TM-Integration
1 -
Extended Warehouse Management (EWM)
3 -
Extended Warehouse Management(EWM)
7 -
Finance
1 -
Freight Settlement
1 -
FUB_Strategy
1 -
FUBR
1 -
Geo-coordinates
1 -
Geo-routing
1 -
Geocoding
1 -
Geographic Information System
1 -
GIS
1 -
Goods Issue
2 -
GTT
2 -
IBP inventory optimization
1 -
inbound delivery printing
1 -
Incoterm
1 -
Innovation
1 -
Inspection lot
1 -
intraday
1 -
Introduction
1 -
Inventory Management
1 -
Localization
1 -
Logistics Optimization
1 -
Map Integration
1 -
Material Management
1 -
Materials Management
1 -
MFS
1 -
New Feature
1 -
Outbound with LOSC and POSC
1 -
Packaging
1 -
PPF
1 -
PPOCE
1 -
PPOME
1 -
print profile
1 -
Process Controllers
1 -
Production process
1 -
QM
1 -
QM in procurement
1 -
Real-time Geopositioning
1 -
Risk management
1 -
S4 HANA
1 -
S4 HANA 2022
1 -
S4-FSCM-Custom Credit Check Rule and Custom Credit Check Step
1 -
S4SCSD
1 -
Sales and Distribution
1 -
SAP DMC
1 -
SAP ERP
1 -
SAP Extended Warehouse Management
2 -
SAP Hana Spatial Services
1 -
SAP IBP IO
1 -
SAP MM
1 -
sap production planning
1 -
SAP QM
1 -
SAP REM
1 -
SAP repetiative
1 -
SAP S4HANA
1 -
SAP TM
1 -
SAP Transportation Management
3 -
SAP Variant configuration (LO-VC)
1 -
SAPTM
1 -
SD (Sales and Distribution)
1 -
Shotcut_Scenario
1 -
Source inspection
1 -
Storage bin Capacity
1 -
Supply Chain
1 -
Supply Chain Disruption
1 -
Supply Chain for Secondary Distribution
1 -
Technology Updates
1 -
TMS
1 -
Transportation Cockpit
1 -
Transportation Management
2 -
Visibility
2 -
warehouse door
1 -
WOCR
1
- « Previous
- Next »
Related Content
- Enhanced Shortcut Scenario SAP TM in Supply Chain Management Blogs by Members
- SAP Business Network for Logistics 2404 Release – What’s New? in Supply Chain Management Blogs by SAP
- SAP Named a Leader in the 2024 Gartner Magic Quadrant for Transportation Management Systems in Supply Chain Management Blogs by SAP
- Advanced Shipping and Receiving Simplifying the Connectivity in Supply Chain Management Blogs by Members
- SAP IBP Real-Time Integration: Empowering Businesses for Smarter, Faster Decisions in Supply Chain Management Blogs by SAP
Top kudoed authors
| User | Count |
|---|---|
| 5 | |
| 5 | |
| 2 | |
| 2 | |
| 2 | |
| 1 | |
| 1 | |
| 1 | |
| 1 | |
| 1 |