
- SAP Community
- Products and Technology
- Spend Management
- Spend Management Blogs by Members
- Configuration of Commodity Codes in Ariba
Spend Management Blogs by Members
Check out community member blog posts about spend management and SAP Ariba, SAP Fieldglass, and SAP Concur solutions. Post or comment about your experiences.
Turn on suggestions
Auto-suggest helps you quickly narrow down your search results by suggesting possible matches as you type.
Showing results for
Chhetan1
Participant
Options
- Subscribe to RSS Feed
- Mark as New
- Mark as Read
- Bookmark
- Subscribe
- Printer Friendly Page
- Report Inappropriate Content
02-19-2023
12:27 PM
Hello, welcome to my blog post! It’s a complete guide for Ariba consultants and administrators who configures and manages commodity codes in Ariba buying solution and Ariba guided buying.
Introduction
Commodity codes are created to classify goods and services. They are made up of different levels such as segment, family, class and commodity code and each level of commodity code provides varying details. For example:
Customers can create custom commodity codes to classify goods and services. A custom commodity code can have 6, 8 or 10 digits. In Ariba, they can map their custom commodity codes or taxonomy codes to standard classification codes which are created by the following classification system
Commodity codes are used to calculate tax, track spend, categorize items in catalogs, simplify 2-way and 3-way match processes, control goods receipts process, set up validation and approval processes etc.
Let’s discuss how to manage commodity codes in Ariba, if customer is using custom commodity codes instead of UNSPSC’s
How to configure commodity codes in Ariba?
Ariba consultants creates commodity codes in Commodity Code Manager workspace or by using .csv file. A user who has following roles can create, modify, delete, map commodity codes in Ariba buying solution
There are 3 files required to configure commodity codes in Ariba buying solution. System commodity codes and classification code relationships files need to be loaded to parent realm and ERP commodity to commodity file need to be loaded to child realm
Instructions to fill System CommodityCodes.csv
Domain: Enter the domain of the commodity code being used, for example: custom or unspsc
UniqueName: Update unique code/number of the commodity code
Name: Update description or title of the commodity code
ParentUniqueName: It shows the hierarchical relationship between commodity codes. Update the unique name of parent commodity code such as level 1, level 2, or level 3 commodities
Enabled: This field is useful to hide or show codes. The default value is “Yes”
AdhocClassification: This field is optional and can be used to display classification of commodity codes for ad-hoc purchases
Sample System CommodityCodes.csv file format:
Steps to import the file in Ariba
Note:
Instructions to fill classification Code Relationships.csv
DomainFrom: Enter the domain of the commodity code to map from, for example: custom
ValueFrom: Update the unique name/code of the commodity of From Domain
DomainTo: Enter the domain of the commodity code to map to, for example: unspsc
ValueTo: Update the unique name/code of the commodity of To Domain
Sample Classification Code Relationships.csv file format:
Steps to import the file in Ariba
Note:
Instructions to fill ERP Commodity to Commodity mapping.csv
AccountType: It should be updated as per AccountType.csv file. It shows operating expenses or capital expenditures. Customers can create multiple account types as per their requirements.
For Example: CapEx, OpEx, Asset, Lease, Audit, Expense, Sundry Exp etc.
MaterialGroup: It should be updated as per ERPCommodityCode.csv file. It indicates SAP material group code.
CommonIdDomain: Update the name of domain for a commodity code. For example: custom or unspsc
ItemCategory: It should be updated as per ItemCategory.csv file. It shows good or service line items. It should be updated as M for Material or D for Service
CompanyCode,Asset: It should be updated as per Asset.csv file. Update company code which is associated with asset.
Asset: It should also be updated as per Asset.csv file.
CompanyCode,GeneralLedger: It should be updated as per GeneralLedger.csv file. This column can be left blank while modifying or updating the line items of the file
WBSElement: It should be updated as per ComapnyCodeWBSMap.csv or WBSElement.csv files. Ensure that WBS should match the combination of General Ledger, company code and cost center
InternalOrder: It should be updated as per ComapnyCodeIOMap.csv or InternalOrder.csv files. Ensure that Internal Order should match the combination of General Ledger, company code and cost center
SAPPurchaseGroup: It should be updated as per purchaseGroup.csv file.
AccountCategory: It should be updated as per AccountCategory.csv file. A indicates Asset, K indicates Cost Center, F indicates internal order number, P indicates Project
CompanyCode: It should be updated as per CompanyCode.csv file. Ensure that General Ledger, WBS and Internal order numbers are mapped to the company codes to avoid errors
MaxAmt and MinAmt: It shows the maximum and minimum amount allowed for the line item. When line-item amount falls under the specified range, that account type is selected in the requisition. If the line-item amount is not within limit or specified range, users are not allowed to submit the requisition.
CurrForMinAndMaxAmt: It indicates the currency of the amount mentioned in Min and Max amount fields
CommonId: Commodity codes should always be updated in this field.
GeneralLedger: GL numbers need to be updated in this filed. Ensure that it should be 10 digit number. If there are 8 digits in the GL number then add 2 zeros as prefix
Preferred: Indicates if the entry is preferred or not. Acceptable values are “Yes” or “No”
SubAsset: The value of asset. It should match the asset number updated in the Asser.csv file
BillTo: Billing address that is associated with the company code. Billing address ID need to be updated in this field as per address.csv file.
ShipTo: Ship to address that is associated with the plant code. Ship to ID need to be updated in this field as per Plant.csv file
DeliverTo: It’s an optional field. It can be updated as per the business requirement, if required
Sample ERP Commodity to Commodity Mapping.csv (CEME) file format:


Steps to import the file in Ariba buying solution
Note:
Recommendation: Before loading ERP commodity to commodity mapping file to child realm
How to configure Ad-hoc Classifier in Ariba Guided Buying?
A list of commodity codes that allows users to select an appropriate code while creating non-catalog requests.
Steps:
Note:
Sample codes created in Notepad++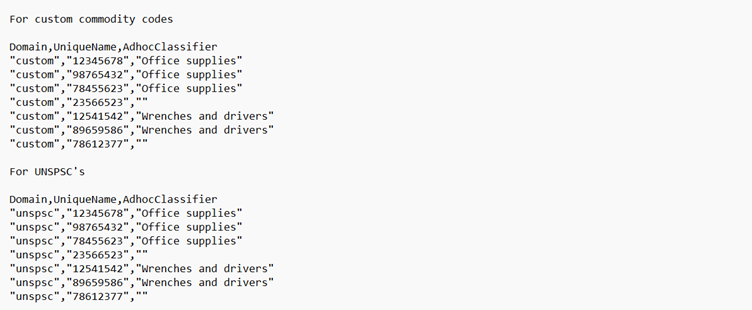
Note: The last line removes the commodity code from the list
Sample codes created in excel template
Conclusion
This blog explains how to configure commodity codes in Ariba buying solution and Ariba guided buying which would certainly help Ariba consultants and administrators who manages commodity codes in Ariba.
Thank you so much for reading my blog post. I hope you liked it. Please do like, comment, share, ask questions and follow my profile for similar content.
Introduction
Commodity codes are created to classify goods and services. They are made up of different levels such as segment, family, class and commodity code and each level of commodity code provides varying details. For example:
Customers can create custom commodity codes to classify goods and services. A custom commodity code can have 6, 8 or 10 digits. In Ariba, they can map their custom commodity codes or taxonomy codes to standard classification codes which are created by the following classification system
- United Nations Standard Products and Services Code (UNSPSC)
- The Harmonized System (HSN SAC ->Codes are used by Indian customer)
Commodity codes are used to calculate tax, track spend, categorize items in catalogs, simplify 2-way and 3-way match processes, control goods receipts process, set up validation and approval processes etc.
Let’s discuss how to manage commodity codes in Ariba, if customer is using custom commodity codes instead of UNSPSC’s
- Configuration of commodity codes in Ariba buying solution
- Configuration of Ad-hoc classifier in Ariba guided buying
How to configure commodity codes in Ariba?
Ariba consultants creates commodity codes in Commodity Code Manager workspace or by using .csv file. A user who has following roles can create, modify, delete, map commodity codes in Ariba buying solution
- Customer Administrator
- Commodity Code Manager
- Purchasing Manager
- Purchasing Agent
- Procurement Manager
- Procurement Agent
There are 3 files required to configure commodity codes in Ariba buying solution. System commodity codes and classification code relationships files need to be loaded to parent realm and ERP commodity to commodity file need to be loaded to child realm
- System Commodity codes
- Classification code Relationships
- ERP Commodity to Commodity Mapping
Instructions to fill System CommodityCodes.csv
Domain: Enter the domain of the commodity code being used, for example: custom or unspsc
UniqueName: Update unique code/number of the commodity code
Name: Update description or title of the commodity code
ParentUniqueName: It shows the hierarchical relationship between commodity codes. Update the unique name of parent commodity code such as level 1, level 2, or level 3 commodities
Enabled: This field is useful to hide or show codes. The default value is “Yes”
AdhocClassification: This field is optional and can be used to display classification of commodity codes for ad-hoc purchases
Sample System CommodityCodes.csv file format:
Steps to import the file in Ariba
- Go to Parent realm
- On Dashboard, Click Manage
- Click Core Administration
- Dropdown Site Manager and click Data Import/Export
- In the search bar, type commodity and click search
- Click on Export tab
- Click on export button to export “Export Commodity Codes” file
- Update the commodity codes as per the above instructions
- Save the file in .csv file
- Go to Import tab
- Search for Import System Commodity Codes
- Click on Import button
- Select Load radio button
- Browse the file
- Click on Run
Note:
- Status “Completed’ indicates that the file has been loaded successfully with no errors
- Status “Completed(!)” indicates that the file has been loaded but there are errors/warnings
Instructions to fill classification Code Relationships.csv
DomainFrom: Enter the domain of the commodity code to map from, for example: custom
ValueFrom: Update the unique name/code of the commodity of From Domain
DomainTo: Enter the domain of the commodity code to map to, for example: unspsc
ValueTo: Update the unique name/code of the commodity of To Domain
Sample Classification Code Relationships.csv file format:
Steps to import the file in Ariba
- Go to Parent realm
- On Dashboard, Click Manage
- Click Core Administration
- Dropdown Site Manager and click Data Import/Export
- In the search bar, type classification and click search
- Click on Export tab
- Click on export button to export “Export Classification Code Relationships” file
- Update the commodity codes as per the above instructions
- Save the file in .csv file
- Go to Import tab
- Search for Import Classification Code Relationships
- Click on Import button
- Select Load radio button
- Browse the file
- Click on Run
Note:
- Status “Completed’ indicates that the file has been loaded successfully with no errors
- Status “Completed(!)” indicates that the file has been loaded but there are errors/warnings
Instructions to fill ERP Commodity to Commodity mapping.csv
AccountType: It should be updated as per AccountType.csv file. It shows operating expenses or capital expenditures. Customers can create multiple account types as per their requirements.
For Example: CapEx, OpEx, Asset, Lease, Audit, Expense, Sundry Exp etc.
MaterialGroup: It should be updated as per ERPCommodityCode.csv file. It indicates SAP material group code.
CommonIdDomain: Update the name of domain for a commodity code. For example: custom or unspsc
ItemCategory: It should be updated as per ItemCategory.csv file. It shows good or service line items. It should be updated as M for Material or D for Service
CompanyCode,Asset: It should be updated as per Asset.csv file. Update company code which is associated with asset.
Asset: It should also be updated as per Asset.csv file.
CompanyCode,GeneralLedger: It should be updated as per GeneralLedger.csv file. This column can be left blank while modifying or updating the line items of the file
WBSElement: It should be updated as per ComapnyCodeWBSMap.csv or WBSElement.csv files. Ensure that WBS should match the combination of General Ledger, company code and cost center
InternalOrder: It should be updated as per ComapnyCodeIOMap.csv or InternalOrder.csv files. Ensure that Internal Order should match the combination of General Ledger, company code and cost center
SAPPurchaseGroup: It should be updated as per purchaseGroup.csv file.
AccountCategory: It should be updated as per AccountCategory.csv file. A indicates Asset, K indicates Cost Center, F indicates internal order number, P indicates Project
CompanyCode: It should be updated as per CompanyCode.csv file. Ensure that General Ledger, WBS and Internal order numbers are mapped to the company codes to avoid errors
MaxAmt and MinAmt: It shows the maximum and minimum amount allowed for the line item. When line-item amount falls under the specified range, that account type is selected in the requisition. If the line-item amount is not within limit or specified range, users are not allowed to submit the requisition.
CurrForMinAndMaxAmt: It indicates the currency of the amount mentioned in Min and Max amount fields
CommonId: Commodity codes should always be updated in this field.
GeneralLedger: GL numbers need to be updated in this filed. Ensure that it should be 10 digit number. If there are 8 digits in the GL number then add 2 zeros as prefix
Preferred: Indicates if the entry is preferred or not. Acceptable values are “Yes” or “No”
SubAsset: The value of asset. It should match the asset number updated in the Asser.csv file
BillTo: Billing address that is associated with the company code. Billing address ID need to be updated in this field as per address.csv file.
ShipTo: Ship to address that is associated with the plant code. Ship to ID need to be updated in this field as per Plant.csv file
DeliverTo: It’s an optional field. It can be updated as per the business requirement, if required
Sample ERP Commodity to Commodity Mapping.csv (CEME) file format:
Steps to import the file in Ariba buying solution
- Go to Child realm
- On Dashboard, Click Manage
- Click Core Administration
- Dropdown Site Manager and click Data Import/Export
- In the search bar, type Commodity and click search
- Click on Export tab
- Click on export button to export “Export ERP Commodity to Commodity Mapping” file
- Update the commodity codes as per the above instructions
- Save the file in .csv file
- Go to Import tab
- Search for Import ERP Commodity to Commodity Mapping
- Click on Import button
- Select Load radio button
- Browse the file
- Click on Run
Note:
- Status “Completed’ indicates that the file has been loaded successfully with no errors
- Status “Completed(!)” indicates that the file has been loaded but there are errors/warnings
Recommendation: Before loading ERP commodity to commodity mapping file to child realm
- Ensure that the material groups are received in ERP Commodity Codes file from SAP. The material group data can be sent from SAP to Ariba by manually or auto job run
- Make sure that General ledgers, WBS, Internal order numbers are mapped to required company codes to avoid errors in Ariba buying solution. SAP R2R team maps GL to company codes in SAP and the data will be received via auto job run
- Format of Company Code and General Ledger columns should be corrected. Add zeros to the codes as prefix. These codes must contain 4 and 10 digits.
- Leave columns CompanyCode,GeneralLedger and CompanyCode,Asset blank while modifying the existing content of the file
- Prepare delta file for incremental load
How to configure Ad-hoc Classifier in Ariba Guided Buying?
A list of commodity codes that allows users to select an appropriate code while creating non-catalog requests.
Steps:
- Ariba consultants or administrators need set these parameters ENABLE_TREE_MENU_CHOOSER and ENABLE_ADHOC_CLASSIFICATION to “True” in Ariba guided buying before configuring the Ad-hoc classifier
- Create folders for local ID’s en_US, en_DE, en_GB, en_IE, en_CZ, en_NL, en_CA etc.
- Create an Ad Hoc Commodity file for each Local ID or language and update values in Domain, UniqueName and AdhocClassifier columns. Save the file in .csv format under each Local folder
- For example: Domain->custom or unspsc; UniqueName->12345678; AdhocClassifier-> Description
- Create a Zip folder by including all the Local ID folders into one folder
- On the guided buying home page, click Admin
- In the Adhoc classifiers for commodity codes section, click Update commodity codes
- Click Upload file, and browse the ZIP file from desktop
- Click Upload
Note:
- Custom labels will be visible as soon as the file is loaded to guided buying. However, the commodity codes associated with each label might take maximum of 4 hours to appear in the commodity list
- Add, update or delete commodity codes through incremental load. To delete or remove an entry, leave a blank cell in the AdhocClassifier column.
- Guided buying displays a maximum of 100 results in commodity code chooser window
- The commodity codes should be in active status
- In the Adhoc classifier column, enter description of Top-level commodity hierarchy to create a label for a set of commodity codes. The labels don’t have to match the description of each commodity code that exists in the hierarchy
- Create/verify the files in Notepad++ to avoid errors while loading the files in guided buying
Sample codes created in Notepad++
Note: The last line removes the commodity code from the list
Sample codes created in excel template
Conclusion
This blog explains how to configure commodity codes in Ariba buying solution and Ariba guided buying which would certainly help Ariba consultants and administrators who manages commodity codes in Ariba.
Thank you so much for reading my blog post. I hope you liked it. Please do like, comment, share, ask questions and follow my profile for similar content.
- SAP Managed Tags:
- SAP Ariba Buying and Invoicing
4 Comments
You must be a registered user to add a comment. If you've already registered, sign in. Otherwise, register and sign in.
Labels in this area
Related Content
- SAP Ariba Procure to Order 2405 Release Key Innovations in Spend Management Blogs by SAP
- SAP Ariba Supplier Management 2405 Release Key Innovations Preview in Spend Management Blogs by SAP
- Discover SAP Ariba REST API Try Out feature – an essential yet overlooked tool! in Spend Management Blogs by SAP
- Configuration steps for using Ariba Guided Buying Catalog from SAP S/4HANA Workorder screen in Spend Management Blogs by SAP
- Integration of Supplier’s Preferred Bank Account Details during Invoicing in CA/ DSN/ SCC in Spend Management Blogs by Members