
- SAP Community
- Products and Technology
- Enterprise Resource Planning
- ERP Blogs by SAP
- Unlock the Full Potential of Short-Term Cash Posit...
Enterprise Resource Planning Blogs by SAP
Get insights and updates about cloud ERP and RISE with SAP, SAP S/4HANA and SAP S/4HANA Cloud, and more enterprise management capabilities with SAP blog posts.
Turn on suggestions
Auto-suggest helps you quickly narrow down your search results by suggesting possible matches as you type.
Showing results for
Advisor
Options
- Subscribe to RSS Feed
- Mark as New
- Mark as Read
- Bookmark
- Subscribe
- Printer Friendly Page
- Report Inappropriate Content
10-30-2023
10:34 PM
While you may have briefly ventured into the realm of short-term cash positioning through a 10-minute guide, there's so much more waiting to be discovered in Short-Term Cash Positioning. This blog serves as your comprehensive guide to help you not only understand but master every setting in Define Cash Position Profiles, the app that empowers you to customize your reports in Short-Term Cash Positioning, tailoring them to meet your unique business needs. Are you ready to dive in and unlock the full potential of this powerful tool? Let's get started!
In the Short-Term Cash Positioning app, bank accounts are organized in a hierarchical order. You can define how the bank accounts are organized by specifying a hierarchy source. For example, you can directly use the bank account hierarchy defined in the Manage Bank Account Hierarchies app. If you want to organize the bank accounts by certain attributes, you can define the hierarchy levels according to your needs. What’s more, if you have cash pools, you can even view bank accounts organized by cash pools.
Here are some details about the options for using a hierarchy source:
Select this option if you want to customize a hierarchy according to the key attributes defined in the bank account master data, for example, company code, bank country/region, bank account currency, and so on. After you select this hierarchy source, for a hierarchy to be determined you need to specify an attribute for at least the level 1 hierarchy. You can define an attribute for up to three hierarchy levels according to your business needs.
For each hierarchy level, you specify an attribute of the bank account master data that is used to group bank accounts, such as company code and currency. The defined hierarchy levels determine the hierarchical structure of bank accounts displayed in the Short-Term Cash Positioning app.
Here’s an example of a three-level hierarchy setting and how it renders in the Short-Term Cash Positioning app.
You can also enable a root node if you need a global overview. To enable a root node, choose Yes in the Enable Root Node field and then enter a text in the Root Node Name field.
The node text appears as the root node in the hierarchy, and you can get a cash position overview for all entities in your hierarchy from the root node as shown below:
Select this option if you want to use an existing bank account hierarchy defined in the Manage Bank Account Hierarchies app. You can define different bank account hierarchies for different management purposes and use various structures when displaying reports.
After you select this hierarchy source, you need to specify a hierarchy ID.
With this hierarchy source, the root node defined in the specified bank account hierarchy is used. Here’s how it looks in the Short-Term Cash Positioning app.
Select this option if you want to derive a hierarchy to show bank accounts in groups of cash pools. If you select this hierarchy source, the root node is not supported, and the hierarchy levels are fixed as follows:
Under the level 2 hierarchy (Bank Account Currency), bank accounts that are used in cash pools are displayed in their cash pool structure – subaccounts under the header account. Please note that only cash pools that are defined in the Manage Cash Pools (Version 2) app are supported in this case.
As shown below, cash pool CP01 is displayed with the header account 2023063001 as the parent node, and all of its subaccounts displayed as sub nodes. Other bank accounts that don’t belong to any cash pools are displayed directly under the bank account currency level.

Now that you have decided the hierarchy source you want to use, let’s continue with some other mandatory fields that you need to fill for your cash position profile.
In the Short-Term Cash Positioning app, for each bank account, you can see detailed information including the opening balance, the closing balance, and cash flows listed according to their planning levels. However, in a higher-level view, for example in the company code view, or the bank view, numbers are aggregated so you can only choose to view one figure in the Cash Position Overview page.
Bank Account View in Short-Term Cash Positioning
Cash Position Overview for Higher Level Aggregation
To decide what you’ll see on the Cash Position Overview page, in the View Category field, you can select either of the following options:
By default, the Value Date Balance is used. You can switch to Available Balance if needed. Here’s an explanation of the two balance types:
You can use the following fields to define the time range and how it’s displayed in the Short-Term Cash Positioning:
For example:
When the period unit comes to weeks, months, or years, you may need to consider whether to use the calendar period. The Use Calendar Period option is designed for this purpose.
Note:
A calendar week is displayed from Monday through Sunday.
Example:
The current date is November 8, 2022 (Tuesday) and you set the Period Unit as Weeks, Increment as 2.
The current date is November 8, 2022 (Tuesday) and you set the Period Unit as Months, Increment as 2.
Moreover, you can specify a factory calendar and use the shift options to show only work days.
Hierarchy Source (Mandatory)
In the Short-Term Cash Positioning app, bank accounts are organized in a hierarchical order. You can define how the bank accounts are organized by specifying a hierarchy source. For example, you can directly use the bank account hierarchy defined in the Manage Bank Account Hierarchies app. If you want to organize the bank accounts by certain attributes, you can define the hierarchy levels according to your needs. What’s more, if you have cash pools, you can even view bank accounts organized by cash pools.
Here are some details about the options for using a hierarchy source:
- Option 1: Derived by Bank Account Master Data
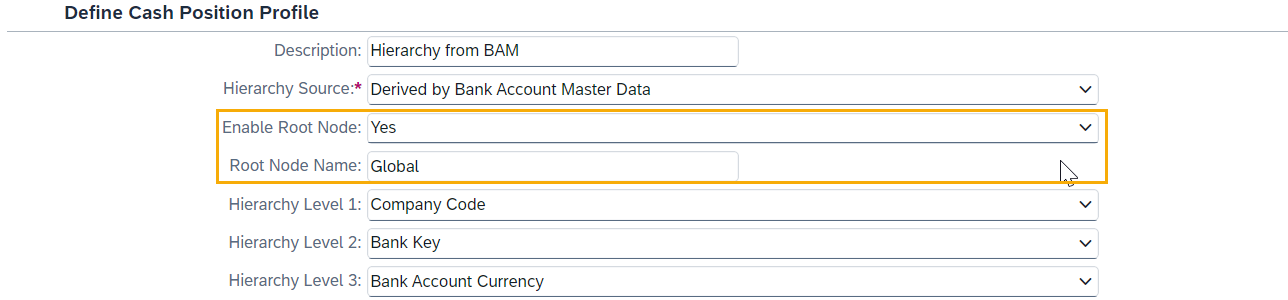
Select this option if you want to customize a hierarchy according to the key attributes defined in the bank account master data, for example, company code, bank country/region, bank account currency, and so on. After you select this hierarchy source, for a hierarchy to be determined you need to specify an attribute for at least the level 1 hierarchy. You can define an attribute for up to three hierarchy levels according to your business needs.
For each hierarchy level, you specify an attribute of the bank account master data that is used to group bank accounts, such as company code and currency. The defined hierarchy levels determine the hierarchical structure of bank accounts displayed in the Short-Term Cash Positioning app.
Here’s an example of a three-level hierarchy setting and how it renders in the Short-Term Cash Positioning app.


You can also enable a root node if you need a global overview. To enable a root node, choose Yes in the Enable Root Node field and then enter a text in the Root Node Name field.
The node text appears as the root node in the hierarchy, and you can get a cash position overview for all entities in your hierarchy from the root node as shown below:

- Option 2: Derived from Bank Account Hierarchy
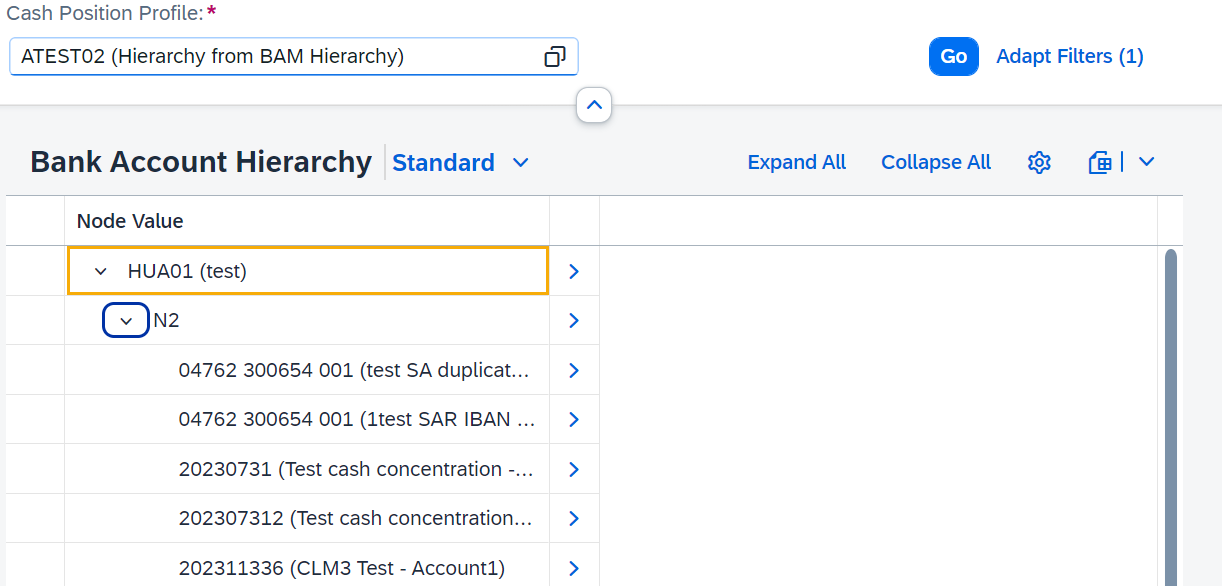
Select this option if you want to use an existing bank account hierarchy defined in the Manage Bank Account Hierarchies app. You can define different bank account hierarchies for different management purposes and use various structures when displaying reports.
After you select this hierarchy source, you need to specify a hierarchy ID.

With this hierarchy source, the root node defined in the specified bank account hierarchy is used. Here’s how it looks in the Short-Term Cash Positioning app.
- Option 3: Derived from Cash Pool and Bank Account Master Data
Select this option if you want to derive a hierarchy to show bank accounts in groups of cash pools. If you select this hierarchy source, the root node is not supported, and the hierarchy levels are fixed as follows:
- Hierarchy Level 1: Company Code
- Hierarchy Level 2: Bank Account Currency
Under the level 2 hierarchy (Bank Account Currency), bank accounts that are used in cash pools are displayed in their cash pool structure – subaccounts under the header account. Please note that only cash pools that are defined in the Manage Cash Pools (Version 2) app are supported in this case.

As shown below, cash pool CP01 is displayed with the header account 2023063001 as the parent node, and all of its subaccounts displayed as sub nodes. Other bank accounts that don’t belong to any cash pools are displayed directly under the bank account currency level.
View Category and Balance Category (Mandatory)
Now that you have decided the hierarchy source you want to use, let’s continue with some other mandatory fields that you need to fill for your cash position profile.
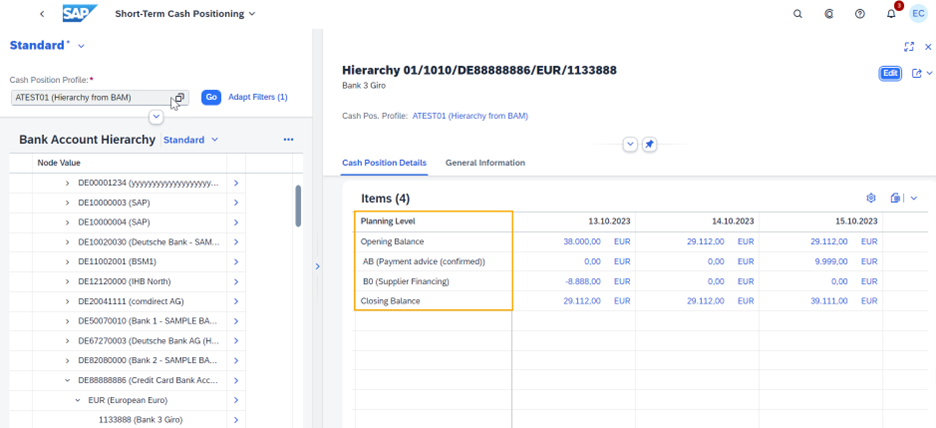
In the Short-Term Cash Positioning app, for each bank account, you can see detailed information including the opening balance, the closing balance, and cash flows listed according to their planning levels. However, in a higher-level view, for example in the company code view, or the bank view, numbers are aggregated so you can only choose to view one figure in the Cash Position Overview page.
Bank Account View in Short-Term Cash Positioning
Cash Position Overview for Higher Level Aggregation
To decide what you’ll see on the Cash Position Overview page, in the View Category field, you can select either of the following options:
- Balance View: Either opening balance or closing balance will be displayed.
Once you select this option, you must specify in the Balance Category field whether you want to display the opening balance or the closing balance
- Delta View: Sum of net cash flows will be displayed.

Balance Type
By default, the Value Date Balance is used. You can switch to Available Balance if needed. Here’s an explanation of the two balance types:
- Available Balance
The available balance indicates the funds available to the account holder for immediate use.
Some banks, particularly those in the United States, provide the available balance in bank statements. For bank statements that do not provide it, the system creates a data entry for the available balance by copying the amount of the Value Date Balance.
- Value Date Balance
The Value Date Balance is the interest-bearing closing balance for a particular day. It is calculated based on the ledger balance.
Reporting Period Settings
Let’s take a look at the reporting period settings:
You can use the following fields to define the time range and how it’s displayed in the Short-Term Cash Positioning:
- Increment
- Period Unit
For example:
- If you want to see a 7-day report, enter 7 for the increment, and Days for the Period Unit.
- If you want to see a 12-week report, enter 12 for the increment, and Months for the Period Unit.
When the period unit comes to weeks, months, or years, you may need to consider whether to use the calendar period. The Use Calendar Period option is designed for this purpose.
- When the option is set as Yes, the periods are displayed in calendar weeks, months, or years, starting from the current date.
Note:
A calendar week is displayed from Monday through Sunday.
- When the option is set as No, the periods are selected according to the logic below, starting from the current date:
- When the Period Unit is Weeks, intervals of 7 days are displayed.
- When the Period Unit is Months, months start on the day of the current date, and end on the day prior to the same day of the next month.
- When the Period Unit is Years, years start on the day of the current date, and end on the day prior to the same day of the next year.
Example:
The current date is November 8, 2022 (Tuesday) and you set the Period Unit as Weeks, Increment as 2.
- If you set the Use Calendar Period option as Yes, the weeks are displayed by calendar week from Monday to Sunday, starting from the current date:
- November 8, 2022 (Current Date) – November 13, 2022 (Sunday)
- November 14, 2022 (Monday) – November 20, 2022 (Sunday)
- If you set the Use Calendar Period option as No, the weeks are displayed by intervals of 7 days, starting from the current date:
- November 8, 2022 (Current Date) – November 14, 2022 (Monday)
- November 15, 2022 (Tuesday) – November 21, 2022 (Monday)
The current date is November 8, 2022 (Tuesday) and you set the Period Unit as Months, Increment as 2.
- If you set the Use Calendar Period option as Yes, calendar months are displayed, starting from the current date:
- November 8, 2022 (Current Date) – November 30, 2022
- December 1, 2022 – December 31, 2022
- If you set the Use Calendar Period option as No, the months are displayed as follows:
- November 8, 2022 (Current Date) – December 7, 2022
- December 8, 2022 – January 7, 2023
Moreover, you can specify a factory calendar and use the shift options to show only work days.
A factory calendar distinguishes between working days and non-working days. If you have entered an exception rule for non-working days, you must enter a factory calendar that is relevant to your company.
Conclusion
Now you have learned how to define a hierarchy source for your cash position profile as well as other mandatory settings. Let's take a break here. In the next post, we'll take at look at other important settings for cash position profiles.
Related Info
- Unlock the Full Potential of Short-Term Cash Positioning – Part 2
- Cash and Liquidity Management (SAP S/4HANA Cloud): https://help.sap.com/s4_ce_clm
- Cash and Liquidity Management (SAP S/4HANA): https://help.sap.com/s4_op_clm
Labels:
1 Comment
You must be a registered user to add a comment. If you've already registered, sign in. Otherwise, register and sign in.
Labels in this area
-
Artificial Intelligence (AI)
1 -
Business Trends
363 -
Business Trends
24 -
Customer COE Basics and Fundamentals
1 -
Digital Transformation with Cloud ERP (DT)
1 -
Event Information
461 -
Event Information
24 -
Expert Insights
114 -
Expert Insights
160 -
General
1 -
Governance and Organization
1 -
Introduction
1 -
Life at SAP
415 -
Life at SAP
2 -
Product Updates
4,684 -
Product Updates
220 -
Roadmap and Strategy
1 -
Technology Updates
1,502 -
Technology Updates
89
Related Content
- The Role of SAP Business AI in the Chemical Industry. Overview in Enterprise Resource Planning Blogs by SAP
- SAP S/4HANA Cloud Private Edition | 2023 FPS01 Release – Part 2 in Enterprise Resource Planning Blogs by SAP
- Sustainability with SAP S/4HANA Cloud Public Edition 2402 in Enterprise Resource Planning Blogs by SAP
- Unlock the Full Potential of Short-Term Cash Positioning – Part 2 in Enterprise Resource Planning Blogs by SAP
Top kudoed authors
| User | Count |
|---|---|
| 11 | |
| 10 | |
| 9 | |
| 8 | |
| 7 | |
| 7 | |
| 6 | |
| 5 | |
| 4 | |
| 4 |