
- SAP Community
- Products and Technology
- Enterprise Resource Planning
- ERP Blogs by SAP
- Transport Your Spaces and Pages Configurations in ...
Enterprise Resource Planning Blogs by SAP
Get insights and updates about cloud ERP and RISE with SAP, SAP S/4HANA and SAP S/4HANA Cloud, and more enterprise management capabilities with SAP blog posts.
Turn on suggestions
Auto-suggest helps you quickly narrow down your search results by suggesting possible matches as you type.
Showing results for
Product and Topic Expert
Options
- Subscribe to RSS Feed
- Mark as New
- Mark as Read
- Bookmark
- Subscribe
- Printer Friendly Page
- Report Inappropriate Content
10-10-2022
9:38 PM
In my previous blog on How to Use Spaces and Pages in SAP S/4HANA Cloud, Public Edition, I explained the details on creating spaces and pages in a Development System – Customizing Tenant. In this blog, I will explain how you are going to deliver (it is called transports in the SAP universe) this same configuration to other systems in the 3-System Landscape, namely the Test System and the Production System.
First things first, we need to do a quick highlight on the transport mechanism, as it is a vehicle to deliver all contents (development, customizing and extensibility) in the 3-System Landscape.
From Release 2208, the SAP S/4HANA Cloud solution has a 3-System Landscape, involving Development, Test and Production Systems, on top of a temporary Starter System (for customers to conduct a fit-to-standard workshop). A sophisticated content transport management mechanism is available, and documented in 3-System Landscape and Transport Management on the SAP Help Portal.
The content movement starts from the SAP Central Business Configuration (CBC) and ends at the Production System. In the CBC, business users configure their business processes, and deploy them to the Development System. With its own development and configuration activities, the Development System generates a rich content including business processes, ABAP development objects, configurations, and key user extensibilities and deposit in a repository. Users can pick and choose which content to be added on to a specific Software Collection to be exported to the Test and Production Systems.
The vehicle to transmit these contents is called transport (as a noun), from the Development System, to the Test System and the Production System.
Corresponding to the Development System, the Test System imports the transport contents. Subsequently, it forwards the content to the Production System to be imported from. The content in the transports can be edited and re-exported and re-imported to reflect the changes of the business.
The SAP Fiori Launchpad Spaces and Pages topic belongs to the Key User Extensibility category. Therefore, we use the Customizing Tenant of the Development System to create/edit Spaces and Pages along with the Business User Roles. The changes made during this creation and editing are handled by the Extensibility transports, and managed with Export Software Collection Fiori App.
First, let’s go to Maintain Business User Roles Fiori App, and create an Accounts Receivable Manager user role Z_BR_AR_MANAGER by copying it from a SAP standard template BR_AR _MANAGER.
Since this is a copy from a SAP template, there is already one space ZBR_AR_MANAGER assigned to it. Let’s take this default setting.
By taking a closer look at this space, we notice there are three pages assigned to it, and take a note for our later usage.
Now let’s go to Export Software Collection Fiori App. Currently there are only two Software Collections. None of them is associated with the Accounts Receivable Manager role. So, we need to manually create a new Software Collection.
To create a new Software Collection, you click on the “+” icon. The new Software Collection can be called “Z_SP_AR_MGR”, standing for “spaces and pages for accounts receivable manager” for easy reorganization purpose.
To add the right content into this Software Collection, click on the Add Items icon. In the filter Type, select 3 types to filter out all irrelevant items: Business Role, SAP Fiori Launchpad Pages and SAP Fiori Launchpad Spaces. Then hit the Go button.
By first glance, we immediately noticed two items to select:
However, don’t forget about the three pages assigned to this space. This time, we set the filter type to “SAP Fiori Launchpad Pages” only, and make sure all three pages are selected. By adding another filter type “Last Changed On”, I can easily find three pages I am looking for.
Now we completed adding five items to my Software Collection Z_SP_AR_MGR.
Before exporting this Software Collection, clicking on the Check --> All Items button to make sure everything is right. The Check result is displayed in the Log tab.
Finally, clicking on Export -> All Items button to release this Software Collection to the Test System for importing. At this moment, you will get another confirmation window before hitting the final Export button.
The Software Collection Export takes some time, depending on the content size. It took 10 sec for this simple software collection. After the export is done, an export log becomes available.
After a successful export of the Software Collection, we can expect it to be available for importing on the Test System.
Open the Import Collection Fiori App. Enter “Z_SP*” in the Search area, then click the Go button. The Software Collection Z_SP_AR_MGR is shown. Since this software collection falls into the Key User Extensibility category, it has a Low Risk.
After clicking on the “>” icon on the righthand side, the content of this Software Collection is displayed.
By clicking on the Import button, it validates the content. Now we are entering the final import step.
After the Import started, its status is displayed, from Importing to Imported.
The importing process keeps a good log for tracking purpose. For example, by clicking on Notes (1) tab, we can see who and when this Software Collection was imported.
After the above user role and its associated space and pages are imported into the Test System, we can assign the users to this role.
Opening Maintain Business Roles Fiori App, clicking on Assigned Business Users (0) tab. A popup message shows up to remind the administrator that this user role was imported. If new version of the role is imported later, the changes to this role within the Test System will be overwritten by the originator system, i.e., the Development System. Clicking the OK button to acknowledge it.
Assigning business user George to this newly imported business role. Hit the Save button.
Now logon to the Test System as George, we can clearly see the Space Accounts Receivable and its subsequent three pages available.
After verifying this Software Collection’s accuracy, don’t forget to Forward it to the Production System.
Note: About naming conventions for spaces and pages, please refer to my blog Naming and Tracking Your Business Roles, Spaces and Pages in the SAP S/4HANA Cloud 3-System Landscap....
(Updated on February 6, 2023)
First things first, we need to do a quick highlight on the transport mechanism, as it is a vehicle to deliver all contents (development, customizing and extensibility) in the 3-System Landscape.
Transport Mechanism in the SAP S/4HANA Cloud 3-System Landscape Systems
From Release 2208, the SAP S/4HANA Cloud solution has a 3-System Landscape, involving Development, Test and Production Systems, on top of a temporary Starter System (for customers to conduct a fit-to-standard workshop). A sophisticated content transport management mechanism is available, and documented in 3-System Landscape and Transport Management on the SAP Help Portal.
The content movement starts from the SAP Central Business Configuration (CBC) and ends at the Production System. In the CBC, business users configure their business processes, and deploy them to the Development System. With its own development and configuration activities, the Development System generates a rich content including business processes, ABAP development objects, configurations, and key user extensibilities and deposit in a repository. Users can pick and choose which content to be added on to a specific Software Collection to be exported to the Test and Production Systems.
The vehicle to transmit these contents is called transport (as a noun), from the Development System, to the Test System and the Production System.
![]()
Transport Management in 3-System Landscape
Corresponding to the Development System, the Test System imports the transport contents. Subsequently, it forwards the content to the Production System to be imported from. The content in the transports can be edited and re-exported and re-imported to reflect the changes of the business.
The SAP Fiori Launchpad Spaces and Pages topic belongs to the Key User Extensibility category. Therefore, we use the Customizing Tenant of the Development System to create/edit Spaces and Pages along with the Business User Roles. The changes made during this creation and editing are handled by the Extensibility transports, and managed with Export Software Collection Fiori App.
Create a New Transport to Deliver the New Space and Pages Configuration
First, let’s go to Maintain Business User Roles Fiori App, and create an Accounts Receivable Manager user role Z_BR_AR_MANAGER by copying it from a SAP standard template BR_AR _MANAGER.

Business Role - Accounts Receivable Manager
Since this is a copy from a SAP template, there is already one space ZBR_AR_MANAGER assigned to it. Let’s take this default setting.
By taking a closer look at this space, we notice there are three pages assigned to it, and take a note for our later usage.
- ZBR_AR_MANAGER_002
- ZBR_AR_MANAGER_003
- ZBR_AR_MANAGER_004
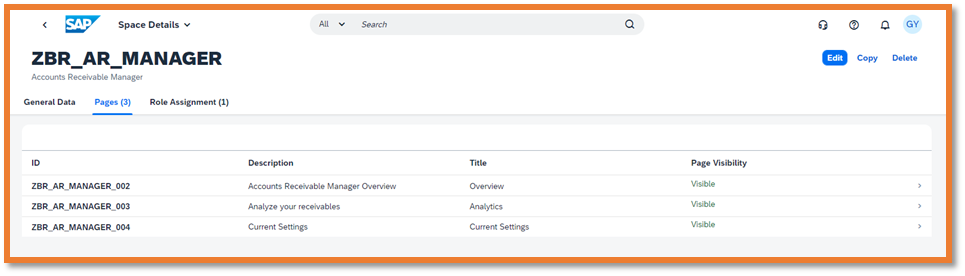
Three Pages of the Space ZBR_AR_MANAGER
Now let’s go to Export Software Collection Fiori App. Currently there are only two Software Collections. None of them is associated with the Accounts Receivable Manager role. So, we need to manually create a new Software Collection.

Add A New Software Collection
To create a new Software Collection, you click on the “+” icon. The new Software Collection can be called “Z_SP_AR_MGR”, standing for “spaces and pages for accounts receivable manager” for easy reorganization purpose.

Create A New Software Collection Z_SP_AR_MGR
To add the right content into this Software Collection, click on the Add Items icon. In the filter Type, select 3 types to filter out all irrelevant items: Business Role, SAP Fiori Launchpad Pages and SAP Fiori Launchpad Spaces. Then hit the Go button.

Filter Items in Software Collection Creation
By first glance, we immediately noticed two items to select:
- Accounts Receivable Manager, Business Role
- Accounts Receivable Manager, SAP Fiori Launchpad Spaces

Select Items into Software Collection
However, don’t forget about the three pages assigned to this space. This time, we set the filter type to “SAP Fiori Launchpad Pages” only, and make sure all three pages are selected. By adding another filter type “Last Changed On”, I can easily find three pages I am looking for.

Add Pages to the Software Collection
Now we completed adding five items to my Software Collection Z_SP_AR_MGR.

A Completed Software Collection
Before exporting this Software Collection, clicking on the Check --> All Items button to make sure everything is right. The Check result is displayed in the Log tab.
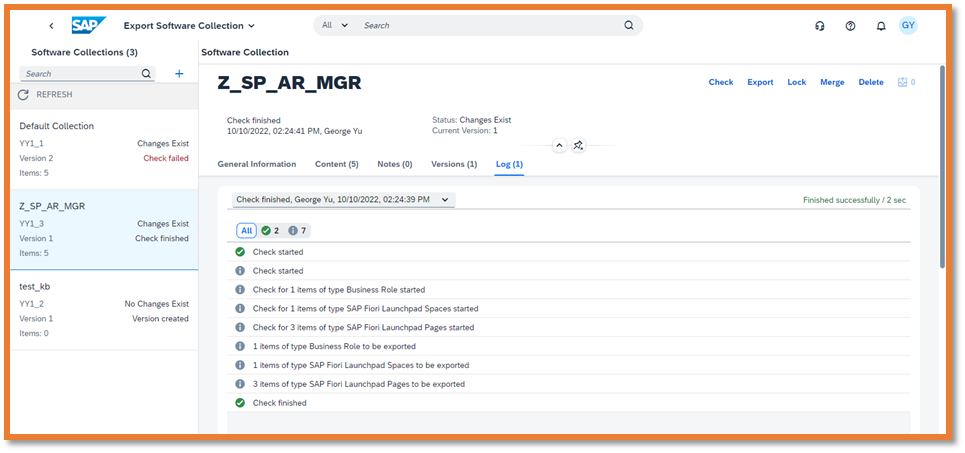
Check Log
Finally, clicking on Export -> All Items button to release this Software Collection to the Test System for importing. At this moment, you will get another confirmation window before hitting the final Export button.

Software Collection Export Confirmation
The Software Collection Export takes some time, depending on the content size. It took 10 sec for this simple software collection. After the export is done, an export log becomes available.

Export Log
Import a Transport with the New Spaces and Pages Configuration
After a successful export of the Software Collection, we can expect it to be available for importing on the Test System.
Open the Import Collection Fiori App. Enter “Z_SP*” in the Search area, then click the Go button. The Software Collection Z_SP_AR_MGR is shown. Since this software collection falls into the Key User Extensibility category, it has a Low Risk.

Import Collection Fiori App
After clicking on the “>” icon on the righthand side, the content of this Software Collection is displayed.

Content in Import Collection Fiori App
By clicking on the Import button, it validates the content. Now we are entering the final import step.
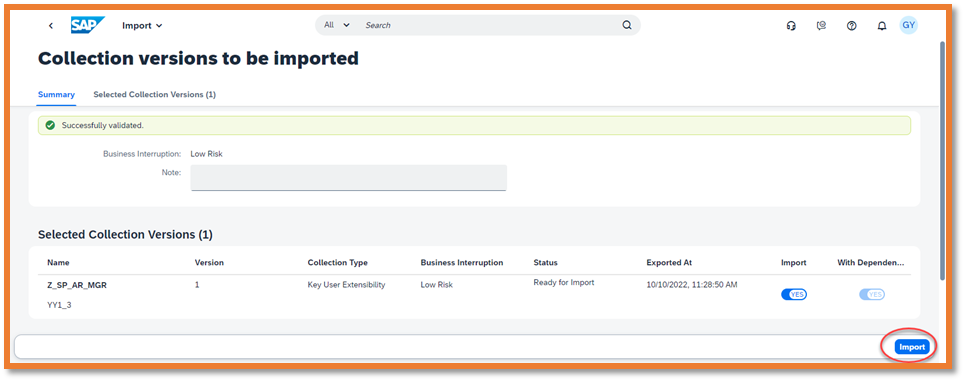
Import Collection Confirmation
After the Import started, its status is displayed, from Importing to Imported.

Import Software Collection Status
The importing process keeps a good log for tracking purpose. For example, by clicking on Notes (1) tab, we can see who and when this Software Collection was imported.

Notes on Import Software Collection
Use the Newly Imported User Role and Its Space and Pages in the Test System
After the above user role and its associated space and pages are imported into the Test System, we can assign the users to this role.
Opening Maintain Business Roles Fiori App, clicking on Assigned Business Users (0) tab. A popup message shows up to remind the administrator that this user role was imported. If new version of the role is imported later, the changes to this role within the Test System will be overwritten by the originator system, i.e., the Development System. Clicking the OK button to acknowledge it.
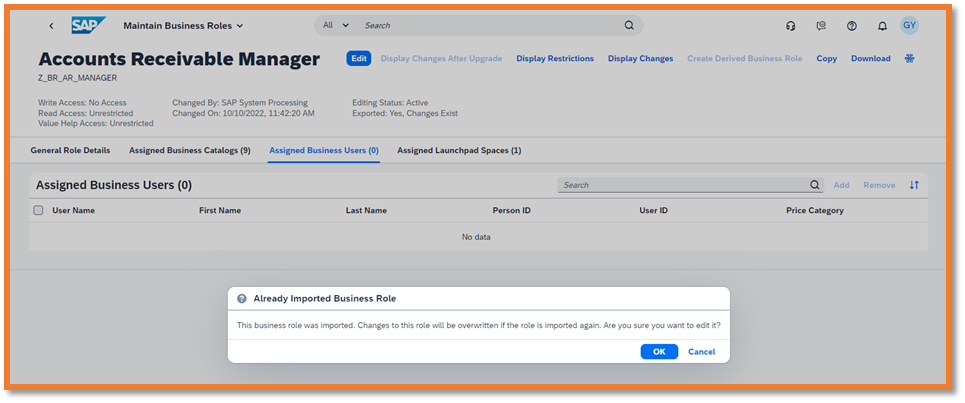
Warning Message about Imported User Role
Assigning business user George to this newly imported business role. Hit the Save button.

Assign A User to the Imported Business User Role
Now logon to the Test System as George, we can clearly see the Space Accounts Receivable and its subsequent three pages available.

User Launchpad in the Test System
After verifying this Software Collection’s accuracy, don’t forget to Forward it to the Production System.
Note: About naming conventions for spaces and pages, please refer to my blog Naming and Tracking Your Business Roles, Spaces and Pages in the SAP S/4HANA Cloud 3-System Landscap....
(Updated on February 6, 2023)
- SAP Managed Tags:
- SAP Activate,
- SAP S/4HANA Public Cloud
Labels:
4 Comments
You must be a registered user to add a comment. If you've already registered, sign in. Otherwise, register and sign in.
Labels in this area
-
Artificial Intelligence (AI)
1 -
Business Trends
363 -
Business Trends
24 -
Customer COE Basics and Fundamentals
1 -
Digital Transformation with Cloud ERP (DT)
1 -
Event Information
461 -
Event Information
24 -
Expert Insights
114 -
Expert Insights
159 -
General
1 -
Governance and Organization
1 -
Introduction
1 -
Life at SAP
415 -
Life at SAP
2 -
Product Updates
4,684 -
Product Updates
219 -
Roadmap and Strategy
1 -
Technology Updates
1,502 -
Technology Updates
89
Related Content
- Advance Return Management complete configuration(SAP ARM) in Enterprise Resource Planning Blogs by Members
- S/4HANA Cloud, Private edition Upgrade Questions in Enterprise Resource Planning Q&A
- FAQ on Upgrading SAP S/4HANA Cloud Public Edition in Enterprise Resource Planning Blogs by SAP
- In S/4 Hana Cloud, public ed. no SCC1 App to transport CBC configuration between D100 and D080. in Enterprise Resource Planning Q&A
- Quality Gate Management in SAP Solution Manager 7.2 in Enterprise Resource Planning Blogs by Members
Top kudoed authors
| User | Count |
|---|---|
| 11 | |
| 10 | |
| 9 | |
| 7 | |
| 7 | |
| 7 | |
| 6 | |
| 5 | |
| 4 | |
| 4 |