
- SAP Community
- Products and Technology
- CRM and Customer Experience
- CRM and CX Blogs by Members
- FIORI Simplified- Creation of KUT field using FIOR...
CRM and CX Blogs by Members
Find insights on SAP customer relationship management and customer experience products in blog posts from community members. Post your own perspective today!
Turn on suggestions
Auto-suggest helps you quickly narrow down your search results by suggesting possible matches as you type.
Showing results for
sumitarora1
Explorer
Options
- Subscribe to RSS Feed
- Mark as New
- Mark as Read
- Bookmark
- Subscribe
- Printer Friendly Page
- Report Inappropriate Content
10-24-2019
2:04 PM
SAP is one of the most dynamic and adaptive company. Keeping in line with the ever-changing business market conditions SAP has always come up with dynamic systems in order to cater to the needs of businesses.
When we head into new horizons we need to say Good bye to some older technology trends.In this blog post, I will be discussing how we can leverage FIORI for creating KUT fields in SAP C4C when we bid Good bye to HTML5 with the 1911 release. I’m also going to include certain basic information about how we can make adaptation changes (within creation of KUT field) through FIORI client in C4C.
Alright, so let’s jump into it.
In order to enable adaptation in FIORI client, navigate to “Settings”.

Now, go to Adaptation Settings->Enable Adaptation by clicking “YES”

Click on “Save” followed by “Log out”.
Log in again for Adaptation to become active.
Now, let’s begin with the Adaptation step by step.
Step 1:
Go to the “Profile Icon”, which is in the right top corner and choose “Start Adaptation”.

Step 2:
To create a KUT field, navigate to any standard business object e.g. “Contact” in our scenario. Click on “Edit” (as highlighted below), followed by “Contact” under the adaptation mode overview tab as shown below:
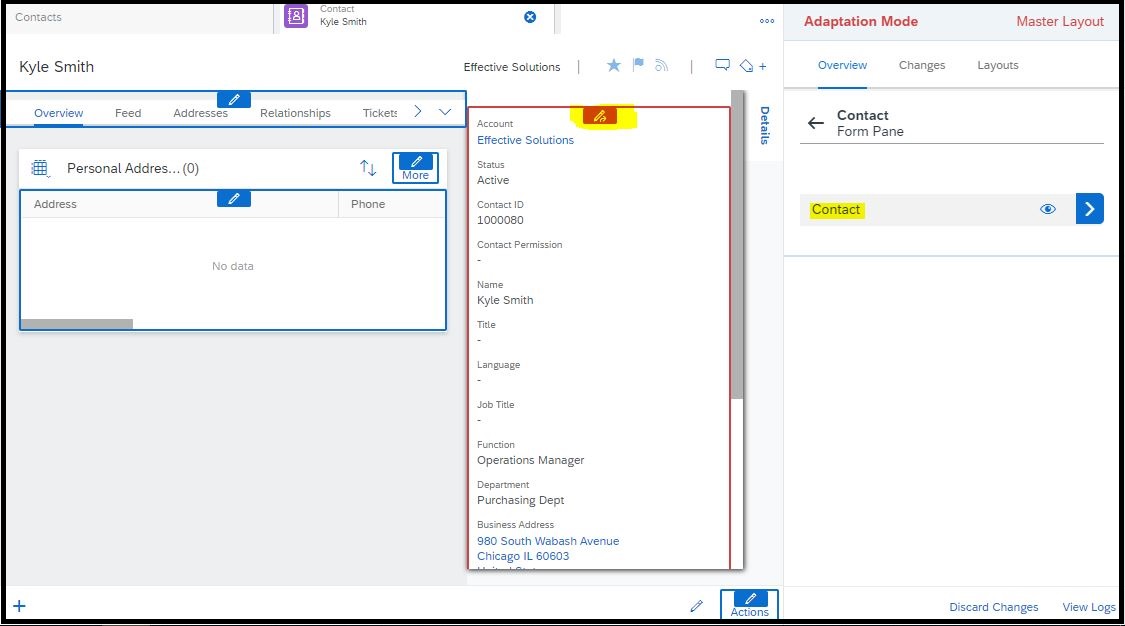
Step 3:
Now, Go to Add -> Field

Step 4:
Click on “Create Fields”

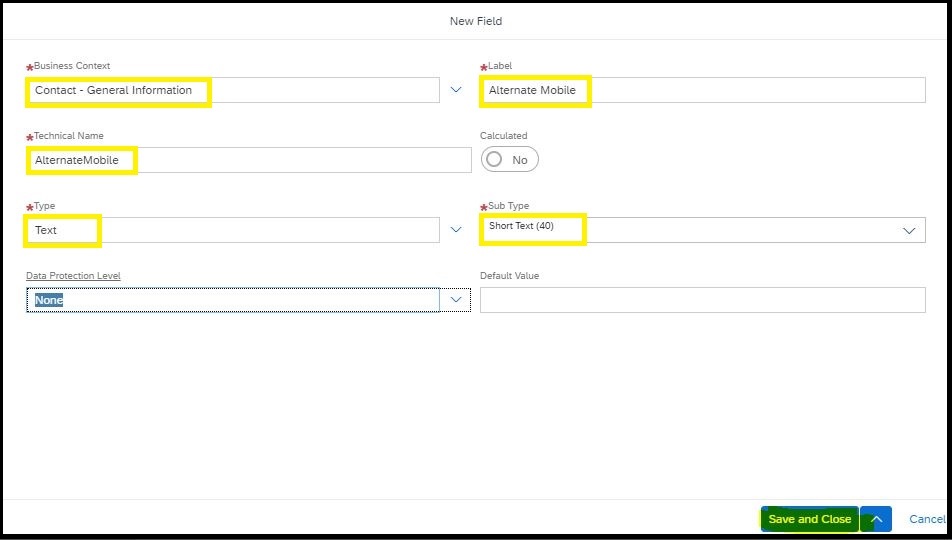
Step 5:
Populate the fields as per your requirement. Once you add the label, ‘Technical Name’ will be automatically generated. To complete the KUT field creation, click on ‘Save and Close’. This creates the KUT field in the system.
Step 6:
To display the newly created KUT field, select field checkbox and click on “Apply” as shown below:

This completes the creation of a new KUT field.
Next, we need to set the properties of the newly created KUT field.
Step 1:
Navigate to the Contact section and scroll down to select “Alternate Mobile” field

Step 2:
Click on blue arrow next to “Value”

You will be able to see options like “Set to mandatory”, “Set as Read-only” etc. as shown below. Change the properties as needed.

This completes setting up of the KUT field properties.
Next, we will extend KUT field (similar to ‘Field Definition’ in HTML) proceed with following steps:
Step 1:
KUT field created in the document earlier can be extended as needed in order to use it in form templates, reporting and so on.
When in your KUT field properties, Click ‘Edit’

Step 2:
Let’s consider the use case where we want to add the KUT field in an extension scenario. To make these changes, go to “Extension Scenario” tab-> “Edit”.
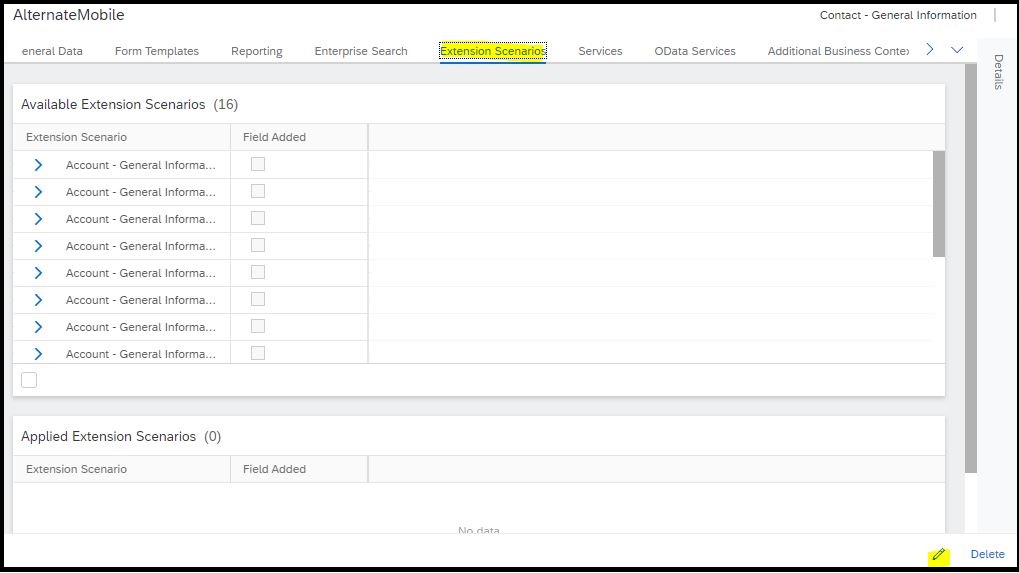
Step 3:
Click on “+” sign against “Account – General Information to Contract – General Information”, and then click “Save”.

KUT Field is now added to the extension scenario. To see the implemented changes, click on “End Adaptation and then logout.
Let’s login again to see the changes made.

Newly created KUT field can now be successfully seen under the contact overview section.

Reference Info:
For reference here is a List of functions available till 1908 release and the ones planned for 1911 release:

I really hope you enjoyed reading this and that this was helpful for you, my revered reader. In case you have any queries/questions please provide your feedback in the comments section and I’ll respond to you positively.
When we head into new horizons we need to say Good bye to some older technology trends.In this blog post, I will be discussing how we can leverage FIORI for creating KUT fields in SAP C4C when we bid Good bye to HTML5 with the 1911 release. I’m also going to include certain basic information about how we can make adaptation changes (within creation of KUT field) through FIORI client in C4C.
Alright, so let’s jump into it.
In order to enable adaptation in FIORI client, navigate to “Settings”.
Now, go to Adaptation Settings->Enable Adaptation by clicking “YES”
Click on “Save” followed by “Log out”.
Log in again for Adaptation to become active.
Now, let’s begin with the Adaptation step by step.
Step 1:
Go to the “Profile Icon”, which is in the right top corner and choose “Start Adaptation”.
Step 2:
To create a KUT field, navigate to any standard business object e.g. “Contact” in our scenario. Click on “Edit” (as highlighted below), followed by “Contact” under the adaptation mode overview tab as shown below:
Step 3:
Now, Go to Add -> Field
Step 4:
Click on “Create Fields”
Step 5:
Populate the fields as per your requirement. Once you add the label, ‘Technical Name’ will be automatically generated. To complete the KUT field creation, click on ‘Save and Close’. This creates the KUT field in the system.
Step 6:
To display the newly created KUT field, select field checkbox and click on “Apply” as shown below:
This completes the creation of a new KUT field.
Next, we need to set the properties of the newly created KUT field.
Step 1:
Navigate to the Contact section and scroll down to select “Alternate Mobile” field
Step 2:
Click on blue arrow next to “Value”
You will be able to see options like “Set to mandatory”, “Set as Read-only” etc. as shown below. Change the properties as needed.
This completes setting up of the KUT field properties.
Next, we will extend KUT field (similar to ‘Field Definition’ in HTML) proceed with following steps:
Step 1:
KUT field created in the document earlier can be extended as needed in order to use it in form templates, reporting and so on.
When in your KUT field properties, Click ‘Edit’
Step 2:
Let’s consider the use case where we want to add the KUT field in an extension scenario. To make these changes, go to “Extension Scenario” tab-> “Edit”.
Step 3:
Click on “+” sign against “Account – General Information to Contract – General Information”, and then click “Save”.
KUT Field is now added to the extension scenario. To see the implemented changes, click on “End Adaptation and then logout.
Let’s login again to see the changes made.
Newly created KUT field can now be successfully seen under the contact overview section.
Reference Info:
For reference here is a List of functions available till 1908 release and the ones planned for 1911 release:
I really hope you enjoyed reading this and that this was helpful for you, my revered reader. In case you have any queries/questions please provide your feedback in the comments section and I’ll respond to you positively.
17 Comments
You must be a registered user to add a comment. If you've already registered, sign in. Otherwise, register and sign in.
Labels in this area
-
ABAP
1 -
API Rules
1 -
c4c
1 -
CAP development
1 -
clean-core
1 -
CRM
1 -
Custom Key Metrics
1 -
Customer Data
1 -
Determination
1 -
Determinations
1 -
Introduction
1 -
KYMA
1 -
Kyma Functions
1 -
open SAP
1 -
RAP development
1 -
Sales and Service Cloud Version 2
1 -
Sales Cloud
1 -
Sales Cloud v2
1 -
SAP
1 -
SAP Community
1 -
SAP CPQ
1 -
SAP CRM Web UI
1 -
SAP Customer Data Cloud
1 -
SAP Customer Experience
1 -
SAP CX
1 -
SAP CX extensions
1 -
SAP Integration Suite
1 -
SAP Sales Cloud v2
1 -
SAP Service Cloud v2
1 -
SAP Service Cloud Version 2
1 -
Service and Social ticket configuration
1 -
Service Cloud v2
1 -
side-by-side extensions
1 -
Ticket configuration in SAP C4C
1 -
Validation
1 -
Validations
1
Related Content
- Ticket Configuration in SAP C4C in CRM and CX Blogs by Members
- Effectively adopting Recurring Service process from S/4 HANA Service Management into your business in CRM and CX Blogs by SAP
- SAP Inside Track 2024 – Bangalore – February 17 !!My experience as a Speaker in CRM and CX Blogs by Members
- SAP Marketing Cloud Release 2402 is Here! in CRM and CX Blogs by SAP
- Issue with employee creation in FIORI App in CRM and CX Questions
Top kudoed authors
| User | Count |
|---|---|
| 4 | |
| 1 | |
| 1 | |
| 1 | |
| 1 |