
- SAP Community
- Products and Technology
- Technology
- Technology Blogs by SAP
- Using the new SAP Analytics Cloud Data Import Serv...
Technology Blogs by SAP
Learn how to extend and personalize SAP applications. Follow the SAP technology blog for insights into SAP BTP, ABAP, SAP Analytics Cloud, SAP HANA, and more.
Turn on suggestions
Auto-suggest helps you quickly narrow down your search results by suggesting possible matches as you type.
Showing results for
former_member30
Discoverer
Options
- Subscribe to RSS Feed
- Mark as New
- Mark as Read
- Bookmark
- Subscribe
- Printer Friendly Page
- Report Inappropriate Content
09-05-2023
10:28 PM
Introduction
In 2022, the Data Export Service API for SAP Analytics Cloud has been released. Given its huge success and adoption, an API for data import has been added to the SAP Analytics Cloud API family in Q2 2023. So, it is about time to showcase a very prominent use case for the API – and that is to push data from an ABAP application into the SAP Analytics Cloud model. Obviously, the ABAP stack can give you a lot of flexibility and you can use it to push data into SAP Analytics Cloud via the ABAP ICM framework.
The new Data Import Service API
Up until now, a model in SAP Analytics Cloud could be provisioned by the Data Acquisition Framework and only for the specific import connections available. SAP BW could provide queries, S/4 could provide analytic CDS views, and so forth. With the new API, you can integrate fact and master data from any type of source. Find more info in the official product documentation.
The documentation for the API is also available on the SAP Business Accelerator Hub:
https://api.sap.com/api/DataImport_API/overview
As of Q3 2023, the API supports the import of fact data, master data and currency rates. Further enhancements shall be added to the roadmap (e.g., hierarchy support). Note that the Data Import API only works for New Models and in non-SAP data center tenants. Classic Account Models are not supported.
But now, let’s look deeper into our use case step-by-step.
Setting up a Connection to SAP ANALYTICS CLOUD from ABAP
The API authenticates via OAuth 2. Therefore, we need to consider the communication ping-pong, that goes back and forth between the ABAP instance and the SAP Analytics Cloud public cloud. Here is a rough overview of the communication path:

Communication Paths for Authentication
Keep in mind that there are a few communication barriers between a system in a corporate network and a system in the public cloud. Hence, there might be differences between the basic setup we describe here and your set-up. We will look into root cause analysis very briefly here, but please note that if the setup does not work you should involve colleagues from your basis team and corporate network teams.
To communicate over the above channel with an ABAP program to SAP Analytics Cloud, it makes sense to create a destination that you can reference centrally. So, as a first step, go to SM59 and create a destination type “HTTP Connection to External Server”. Maintain the target as the domain and host from your SAP Analytics Cloud tenant.
SAP Analytics Cloud URL: https://<host name>.<domain>
Target in SM59: <host name>.<domain>
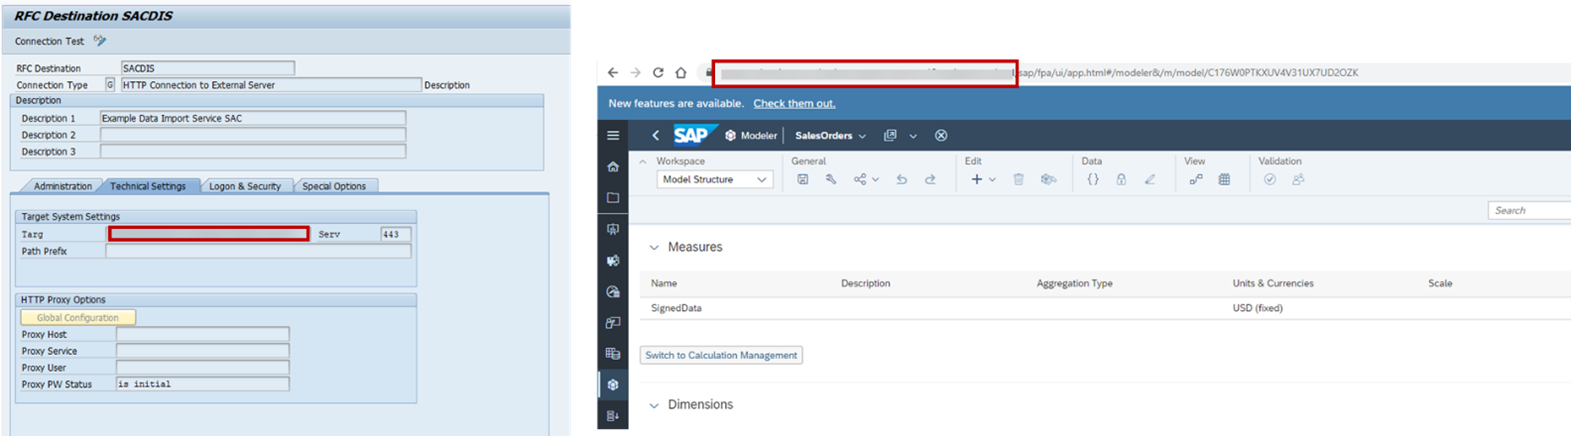
HTTP Connection to External Server
Use the SSL port 443 for the connection. As there will be a call back from the cloud for the handshake process, the caller must be trusted. So, specify the relevant folder for SSL certificates in Logon & Security options of the connection. In our case we just used the default SSL client. We will come to the needed certificates later.

SSL Certificate Storage Location
Figure 2 SSL Certificate Storage Location
For the authentication in Logon & Security you will need to specify an OAuth profile. You need an OAuth profile for every SAP Analytics Cloud tenant. This can be done by following steps.
Additionally it may be necessary to adjust cookie or other connection specific settings, which are specific to your surrounding.
ABAP Framework Steps
Go to SE80 and create an OAuth 2.0 Client Profile in a custom package, e.g.:

OAuth 2 Client Profile
To configure the OAuth client, go to transaction OA2C_CONFIG and create a new profile. In the drop-down list you should be able to find the OAuth Client you just created in SE80. In this profile you will need the following information: Client ID, Client Secret, Authorization Endpoint, Token Endpoint. To get these you will need to perform the following steps:
SAP Analytics Cloud App Integration Settings
First and foremost, the caller (the ABAP system) needs to be whitelisted. The SAP Analytics Cloud system should therefore trust the origin of the call. To find out the outbound host of the ABAP system, it is best to involve your basis team . This can vary significantly depending on the outbound communication setup from the corporate network. As soon as you have the public caller host, in your SAP Analytics Cloud tenant go to Administration > App Integration > Trusted Origins and add the caller.
In the same area, go to OAuth Clients and copy out Authorization URL and Token URL. You can already enter these in your OAuth Profile on your ABAP Server.
Then go to Configured Clients > Add New OAuth Client and assign it a name. Choose purpose “Interactive Usage and API Access” and enter the authorization scope in the Access part. The scope should be at least “Data Import Service”. Keep in mind though, that you can have only up to 10 clients, therefore at some point in time they will need to share access types.
After saving, you get a Client ID and a Client Secret. Now you have all necessary entries to finish the ABAP OAuth 2 profile.
Finish OAuth Profile Setup
Now you should have all necessary information to finalize the OAuth profile:

OAuth 2.0 Client Profile Setup
For the access settings you will need to specify basic authentication, resource authentication via header fields, and grant type client credentials. Additionally refer to the SSL keystore in SSL Client PSE. In this case we use the same for both necessary keys.
Configure Trust on the Application Server
As stated, to trust the call back, you now need to upload the relevant certificates in the transaction STRUST. As stated in Figure 1, there are two endpoints calling back. First the App Router and second the API endpoint. The first is a regional gateway, the second is your tenant. Upload the specific certificates from these endpoints in the certification list.
Test Connection
As soon as everything is set up, you should be able to go to SM59 > SAP Analytics Cloud connection and test the connection. If all goes well, this is the response:

http Connection Test
If this is not the case, then we need to proceed to:
Error Handling
If the connection does not work, one of the communication steps fails. This could happen anywhere in between the systems. Therefore, check with your basis and network team to find the root cause. On the ABAP side, it is always best to trace security via SM50. The dev traces in ST11 should show an error message pointing to missing trust or different trust settings or failing certificate validation. A network monitor can also help find out if a port needs to be allowed or an intermediate step failed. Keep in mind, that development systems usually have less restrictive security standards than productive systems. This means the connection tests need to be performed in the entire landscape, before proceeding.
Create an ABAP Program to Upload Data
As a “Hello World!” example, let’s just run briefly through some code snippets to upload some data. Preliminary steps include creating a model in SAP Analytics Cloud with dimensions and a measure. As an example, we created a model called “SalesOrders” with the following dimensions: SALESORDERID, CREATEDBY, CREATEDAT, CHANGEDBY, CHANGEDAT, FISCVARIANT, FISCALYEARPERIOD, NOTEID, PARTNERID, SALESORG, CURRENCY, GROSSAMOUNT, NETAMOUNT, TAXAMOUNT, LIFECYCLESTATUS, BILLINGSTATUS, DELIVERYSTATUS.
Figure 5 SAC Model with Dimensions
A possible data record to upload to this model would look as follows:
{

  "Data": [{

    "Version": "public.Actual",

    "Account": "GROSSAMOUNT",

    "CREATEDAT": "20180111",

    "CHANGEDAT": "20180116",

    "SALESORDERID": "0500000001",

    "CREATEDBY": "0000000004",

    "CHANGEDBY": "0000000004",

    "FISCVARIANT": "K4",

    "NOTEID": "#",

    "PARTNERID": "0100000000",

    "SALESORG": "APJ",

    "CURRENCY": "USD",

    "LIFECYCLESTATUS": "C",

    "BILLINGSTATUS": "C",

    "DELIVERYSTATUS": "C",

    "FISCALYEARPERIOD": "2018001",

    "SignedData": 20000}]

}
Let’s do this with a small ABAP program that performs the following steps:
- Create a client
- Get bearer token
- Fetch CSRF Token
- Create http request
- Post request
ABAP Coding Steps to Use SAP Analytics Cloud Data Import Service
First, we create a client based on the destination we created in SM59 with
call method cl_http_client=>CREATE_BY_DESTINATION

  EXPORTING

    destination = l_dest

  IMPORTING

    client = DATA(lr_http)

  EXCEPTIONS …
In this case l_dest type RFCDEST value 'SACDIS'. We get back the entity lr_http which is the http client. After this, we can execute the authentication workflow for OAuth with these steps:
Step 1: specify path where to authenticate
CALL METHOD cl_http_utility=>set_request_uri

  EXPORTING

    request = lr_http->request

    uri = l_path.


l_path = ‘<SAC URL>/api/v1/dataimport/models'.
Step 3: create OAuth client with the profile we created in OA2C_CONFIG
call method cl_oauth2_client=>create

  exporting

    i_profile = l_profile

  receiving

    ro_oauth2_client = data(l_oauth_client).


catch cx_oa2c into data(lx_oa2c).

  "error handling

  return.


call method l_oauth_client->execute_cc_flow.


catch cx_oa2c into lx_oa2c.

  "error handling

  return.
Step 4: set the token to the http client for further use
call method l_oauth_client->set_token

  exporting

    io_http_client = lr_http.


catch cx_oa2c into lx_oa2c.

  "error handling

  return.
We are now authenticated, we have implemented the best kind of error handling possible, and we can continue. The profile we refer to is: l_profile type OA2C_PROFILE value 'ZSACDIS_PROFILE' (as configured before).
As soon as we have that, we need a CSRF token to be able to write into the application. We create a rest entity, a request with headers and send the request. For example:
Step 1: Create request entity
CREATE OBJECT lr_rest

EXPORTING

  io_http_client = lr_http.

  lr_request = lr_rest->if_rest_client~create_request_entity( ).
Step 2: specify headers and send request
CALL METHOD lr_rest->if_rest_client~set_request_header

EXPORTING

  iv_name = 'x-csrf-token'

  iv_value = 'fetch'.


CALL METHOD lr_rest->if_rest_client~set_request_header

  EXPORTING

    iv_name = 'x-sap-sac-custom-auth'

    iv_value = 'gzip, deflate, br'.


CALL METHOD lr_rest->if_rest_client~set_request_header

  EXPORTING

    iv_name = 'Accept-Encoding'

    iv_value = 'true'.


lr_http->propertytype_logon_popup = 0.


CALL METHOD lr_rest->if_rest_client~get( ).
Step 3: extract CSRF token
data(l_csrf_token) = lr_rest->if_rest_client~get_response_header( 'x-csrf-token' ).Now we’re all set. We can go ahead and send our data to SAP Analytics Cloud. For this, we create another request to post to the fact data endpoint of our model. The following steps are now necessary:
Step 1: create request entity set URL and set header and body
lr_post_request = lr_rest->if_rest_client~create_request_entity( ).


l_path = ‘<SAC Host>/api/v1/dataimport/import/<Model ID>/factData'.


CALL METHOD cl_http_utility=>set_request_uri

  EXPORTING

    request = lr_http->request

    uri = l_path.


call method lr_rest->if_rest_client~set_request_header

  exporting

    iv_name = 'Content-Type'

    iv_value = 'application/json'.


call method lr_rest->if_rest_client~set_request_header

  exporting

    iv_name = 'x-csrf-token'

    iv_value = l_csrf_token.


call method lr_post_request->('SET_STRING_DATA')

  exporting

    iv_data = l_data_json.
Step 2: post request
CALL METHOD lr_rest->if_rest_client~post

  EXPORTING

    io_entity = lr_post_request.
The model should now be one line richer in data:

Data in SAP Analytics Cloud Model
It is a bit tricky to convert ABAP data types into the corresponding types of the model. To explore what data types are needed, you can always send a get request to <model URL>/metadata to see what the target needs.
Conclusion
We learned how to load data into SAP Analytics Cloud from an ABAP application using the new Data Import Service API. With the new API, you can integrate fact and master data from any type of source.
As I said earlier, you may face different challenges in your custom set-up. Involve basis and application teams to resolve these issues.
- SAP Managed Tags:
- SAP Analytics Cloud,
- API,
- ABAP Development
Labels:
5 Comments
You must be a registered user to add a comment. If you've already registered, sign in. Otherwise, register and sign in.
Labels in this area
-
ABAP CDS Views - CDC (Change Data Capture)
2 -
AI
1 -
Analyze Workload Data
1 -
BTP
1 -
Business and IT Integration
2 -
Business application stu
1 -
Business Technology Platform
1 -
Business Trends
1,658 -
Business Trends
93 -
CAP
1 -
cf
1 -
Cloud Foundry
1 -
Confluent
1 -
Customer COE Basics and Fundamentals
1 -
Customer COE Latest and Greatest
3 -
Customer Data Browser app
1 -
Data Analysis Tool
1 -
data migration
1 -
data transfer
1 -
Datasphere
2 -
Event Information
1,400 -
Event Information
67 -
Expert
1 -
Expert Insights
177 -
Expert Insights
301 -
General
1 -
Google cloud
1 -
Google Next'24
1 -
GraphQL
1 -
Kafka
1 -
Life at SAP
780 -
Life at SAP
13 -
Migrate your Data App
1 -
MTA
1 -
Network Performance Analysis
1 -
NodeJS
1 -
PDF
1 -
POC
1 -
Product Updates
4,577 -
Product Updates
346 -
Replication Flow
1 -
REST API
1 -
RisewithSAP
1 -
SAP BTP
1 -
SAP BTP Cloud Foundry
1 -
SAP Cloud ALM
1 -
SAP Cloud Application Programming Model
1 -
SAP Datasphere
2 -
SAP S4HANA Cloud
1 -
SAP S4HANA Migration Cockpit
1 -
Technology Updates
6,873 -
Technology Updates
430 -
Workload Fluctuations
1
Related Content
- HDI Artifact Recovery Wizard in Technology Blogs by SAP
- Sapphire 2024 user experience and application development sessions in Technology Blogs by SAP
- SAP BW/4 - revamp and true to the line 2024 in Technology Blogs by Members
- Exploring GraphQL and REST for SAP Developers in Technology Blogs by SAP
- Extract blob data (PDF) from CAPM using python library of Document information extraction service. in Technology Blogs by Members
Top kudoed authors
| User | Count |
|---|---|
| 31 | |
| 17 | |
| 15 | |
| 13 | |
| 11 | |
| 9 | |
| 8 | |
| 8 | |
| 8 | |
| 7 |