
- SAP Community
- Products and Technology
- Technology
- Technology Blogs by SAP
- Unlocking the potential of Data Locking APIs in yo...
Technology Blogs by SAP
Learn how to extend and personalize SAP applications. Follow the SAP technology blog for insights into SAP BTP, ABAP, SAP Analytics Cloud, SAP HANA, and more.
Turn on suggestions
Auto-suggest helps you quickly narrow down your search results by suggesting possible matches as you type.
Showing results for
Employee
Options
- Subscribe to RSS Feed
- Mark as New
- Mark as Read
- Bookmark
- Subscribe
- Printer Friendly Page
- Report Inappropriate Content
01-24-2022
11:33 AM
Introduction
In this blog post we will learn how we can leverage the Data Locking APIs as part of our planning application for analytics designer.
What is Data Locking?
Data Locking is a mechanism that allows us to protect data areas from changes during planning operations. This includes locking of such data areas, or restricting write operations for some of them to the authorised responsible users.
Modeller Settings for Data Locking
Data Locking is configured on the model level and its settings are affecting the planning operations performed on that model (e.g. data entry, publish). As such, Data Locking should first be activated in the model settings and a default lock state should be chosen.
Additionally, the driving dimensions should be specified in the data locking settings. The driving dimensions are a subset of the model's dimensions and effectively specify the locks granularity. That is, only members of the driving dimensions can be used later on to define slices for which the input enabled can be controlled via data locking.
The Data Locking APIs
After the modeller settings have been defined by enabling data locking on the model and choosing the driving dimensions, we can go ahead and set lock states on some data areas. This can be achieved either by using the data locking UI offered by the application (see the picture below) or via the Data Locking APIs.
In this article, we will have a deeper look at the Data Locking APIs.
In analytics designer, we can employ the Data Locking APIs to set the data locking state via setState() to either of the three possible options:
- Open
- Restricted
- Locked
If the state is set to “Restricted” only the owner of the area can enter data (see the Glossary section for more details).
Retrieving the lock state of a selection is done as easily through the getState() API, to either of the possible results:
- Open
- Restricted
- Locked
- Mixed
Preparing the Data Locking Scenario
In this example, we will observe how we can restrict data entry for the EMEA region for all public versions.
We start by extending the definition of the “Driving Dimensions” to include “Region”, besides the default driving dimensions of “Time” and “Version” by using the Data Locking dialog accessible from the modelling area.
To achieve this, we navigate to our model of interest called ProfitAndLoss_Planning_Model and choose the key icon from under the "Data" section:

Data Locking toolbar shortcut in Modeller settings
In the Data Locking dialog, we choose the "Region" from the dropdown of dimensions:

Data Locking configuration in Modeller
Identifying the Data Areas to lock
In the analytic application, we will start by adding a table to the canvas. The table will be autogenerated with a name called "Table_1". Upon adding the table, we choose as datasource the model that we have edited above. The table structure is as follows:
- rows contains "Account"
- columns contains "Version" and "Region"
- no filters are set on the table
Since our model is a planning model, several public versions are available. For each and every public version, we want to lock the data entry in the EMEA Region.
For "Table_1" we edit the "onSelect" script, so that we can observe the selection when clicking on a cell:

The onSelect event for Table_1
We then run the analytic application and click on the "EMEA" Region for version "Actual" to obtain the selection:

getSelections() result of EMEA Region for Actual
Great, now we have an example of the selection we are interested in. Further, we want to modify this selection as to apply the locks on all the public versions in the model. As you might have already observed, the APIs' selection represents nothing else than what we have called a “data area” in the context of Data Locking.
We copy this selection and adjust it further in our script.
Setting the Data Locks
After we copied the selection that we are interested in, we proceed with extending our script to consider all the public versions.
For that, we use an existing API that returns all the public versions that we have available in the model: Planning.getPublicVersions().
To perform these steps programmatically, we add a new button and call it “Lock EMEA” and give it a color. “EMEA” region is already coloured in the table, to follow easier the expected cells to be locked:

Planning Scenario in analytics designer: one table and one button
We then edit the "onClick" script of the button as follows:
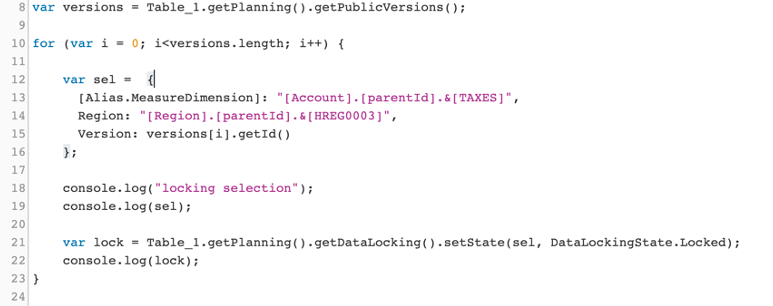
In line 8, we loop over all the versions and modify our selection to contain the current version. The “Version” will become the current version that we loop over: versions[i].getId().
Adjusting the Data Locks only if cell is not already locked
We have seen how we can set the data locks directly, without enquiring the lock state of the selection. Let us now extend the script so that we only lock the "EMEA" region if it is not already locked. This will save us backend requests.
To achieve this, we use in line 13 the getState() API. Afterwards, a comparison is done in line 15, to verify if the cell is already locked. If it is already locked, we log a message to the console that no further action is necessary in line 19:

How to verify that the selection is valid
We can further extend the script by verifying that the selection is correct before employing the selection in the getState() or setState() API.
This is particularly useful if we want to avoid errors because of a selection that cannot be found in the table. At any point in time, the selection should be visible in the table so that the system recognises the data region.
It can be the case that the table rows / columns have changed when running the analytic application, for example because of setting filters or expanding the nodes. An error message will be shown consequently, that warns the user that the data cell is not found.
To protect against similar cases, we will verify that the selection exists and can be found in the table at runtime using the Datasource.getData() API as presented in line 10:

If the selection is correct, we will continue with the steps of locking the cells.
Friendly messages
In our script we have used console logs to observe the results of the APIs. If we want to inform the users in a more friendly manner, we can make us of the existing Application.showMessage() API.
This can be accomplished by defining a variable isLockedSuccesfully, initialised as true. If any error occurs, it shall be updated to false as can be seen in lines 20 and 26:

Finally, we will customise the script by showing two messages. A success message and an error message if the locks are not set:

Completing the workflow
The final script looks as follows:
var planning = Table_1.getPlanning();

var versions = planning.getPublicVersions();


var isLockedSuccesfully = true;

for (var i = 0; i<versions.length; i++) {

	var sel =  {

      [Alias.MeasureDimension]: "[Account].[parentId].&[INCOME_STMT]",

      Region: "[Region].[parentId].&[HREG0003]",

      Version: versions[i].getId()

	};

	var getCellContent = Table_1.getDataSource().getData(sel);

	if (getCellContent) {

		console.log("Locking selection:");

		console.log(sel);

		var dataLockingState = planning.getDataLocking().getState(sel);

		if (dataLockingState !== DataLockingState.Locked) {

			var lock = planning.getDataLocking().setState(sel, DataLockingState.Locked);

			if (lock) {

				console.log(lock);

			} else {

				isLockedSuccesfully = false;

			}

		} else {

			console.log("The selection is already locked, no action is necessary");

		}

	} else {

		isLockedSuccesfully = false;

		console.log("Please verify that the selection is correct");

	}

}

if (isLockedSuccesfully) {

	Application.showMessage(ApplicationMessageType.Success, "EMEA has been succesfully locked");

} else {

	Application.showMessage(ApplicationMessageType.Error, "Unfortunately, locking EMEA was not successfull. Please try again later or verify the console errors." );

}
When running the script after clicking the button "Lock EMEA" all the public versions will be locked on the Region EMEA. A demo can be observed below:

When all the regions are successfully locked, a success message is shown "EMEA has been successfully locked!". Furthermore, through command console.log(lock); we show the result of the setState() API.
Summary
In this post we have learned how to programatically lock the Region "EMEA" from each public version of a table using the Data Locking APIs in analytics designer. We have covered the APIs setState(), getState() as well as extended our script to contain user friendly messages.
We hope you have enjoyed reading this blog post and you found it useful! You can add anytime a new question, should you have enquiries about this topic or about planning in SAP Analytics Cloud by following this link.
Glossary
Data Locking Area, also known as Slice: a given sub-cube defined by a member/set of members out of each of the driving dimensions
Driving Dimensions: a subset of the models' dimensions that define the locks granularity
- Time and Version are included by default
- The user can include two more driving dimensions, so that it amounts to a maximum of 4 driving dimensions
Data Locking Owner: a user or a team that owns driving dimension's members (i.e. owner for that member)
- The owners of slices have different privileges with respect to:
- The changing of the slice state
- The ability to change data of that slice
- Owners can be set in a special column (Data Locking Ownership) attached to those driving dimension for which the data locking ownership has been turned ON
- If multiple driving dimensions have the data locking ownership ON, an effective ownership is calculated for each slice (by intersection of all the owners of the slice's driving dimensions members)
Data Locking Manager: A user or a team that owns a driving dimension's non-leaf member (i.e. manager for all children of that member)
Data Locking State: one of the three states (OPEN, RESTRICTED, LOCKED) that can be attached to a data locking slice
- Open: any user can write data belonging to that slice
- Restricted: only owners and owner's managers can write data belonging to that slice
- Locked: nobody can change the slice
- SAP Managed Tags:
- SAP Analytics Cloud for planning,
- SAP Analytics Cloud, analytics designer
Labels:
1 Comment
You must be a registered user to add a comment. If you've already registered, sign in. Otherwise, register and sign in.
Labels in this area
-
ABAP CDS Views - CDC (Change Data Capture)
2 -
AI
1 -
Analyze Workload Data
1 -
BTP
1 -
Business and IT Integration
2 -
Business application stu
1 -
Business Technology Platform
1 -
Business Trends
1,658 -
Business Trends
93 -
CAP
1 -
cf
1 -
Cloud Foundry
1 -
Confluent
1 -
Customer COE Basics and Fundamentals
1 -
Customer COE Latest and Greatest
3 -
Customer Data Browser app
1 -
Data Analysis Tool
1 -
data migration
1 -
data transfer
1 -
Datasphere
2 -
Event Information
1,400 -
Event Information
67 -
Expert
1 -
Expert Insights
177 -
Expert Insights
301 -
General
1 -
Google cloud
1 -
Google Next'24
1 -
GraphQL
1 -
Kafka
1 -
Life at SAP
780 -
Life at SAP
13 -
Migrate your Data App
1 -
MTA
1 -
Network Performance Analysis
1 -
NodeJS
1 -
PDF
1 -
POC
1 -
Product Updates
4,577 -
Product Updates
346 -
Replication Flow
1 -
REST API
1 -
RisewithSAP
1 -
SAP BTP
1 -
SAP BTP Cloud Foundry
1 -
SAP Cloud ALM
1 -
SAP Cloud Application Programming Model
1 -
SAP Datasphere
2 -
SAP S4HANA Cloud
1 -
SAP S4HANA Migration Cockpit
1 -
Technology Updates
6,873 -
Technology Updates
430 -
Workload Fluctuations
1
Related Content
- Error opening 'Guided development' for analytical list page in Technology Q&A
- Sapphire 2024 user experience and application development sessions in Technology Blogs by SAP
- S/4HANA Cloud Live connection SAP Analytcis Cloud in Technology Q&A
- SAP BW/4 - revamp and true to the line 2024 in Technology Blogs by Members
- Creating a Custom Navigation Side Panel in SAP Analytics Cloud (Optimized Story Experience) in Technology Blogs by SAP
Top kudoed authors
| User | Count |
|---|---|
| 29 | |
| 17 | |
| 15 | |
| 13 | |
| 11 | |
| 9 | |
| 8 | |
| 8 | |
| 8 | |
| 7 |