
- SAP Community
- Products and Technology
- Technology
- Technology Blogs by SAP
- Streamlining Development Workflow: Integrating Git...
Technology Blogs by SAP
Learn how to extend and personalize SAP applications. Follow the SAP technology blog for insights into SAP BTP, ABAP, SAP Analytics Cloud, SAP HANA, and more.
Turn on suggestions
Auto-suggest helps you quickly narrow down your search results by suggesting possible matches as you type.
Showing results for
Product and Topic Expert
Options
- Subscribe to RSS Feed
- Mark as New
- Mark as Read
- Bookmark
- Subscribe
- Printer Friendly Page
- Report Inappropriate Content
06-20-2023
11:05 AM
Written in collaboration with: santosh.kumar97
In modern software development, effective project management and streamlined workflows are crucial for successful collaboration among team members. Integrating GitHub, a popular version control platform, with Jira, a powerful issue-tracking tool, can significantly enhance the development experience. By leveraging this integration and customizing Git hooks, developers can seamlessly track pull requests, commits, and branches, ensuring smoother communication and increased productivity. In this blog post, we will explore how to integrate GitHub and Jira, and how custom Git hooks can be used to optimize your development workflow.
By following these steps, you will be able to install and configure GitHub for Jira, allowing you to integrate GitHub organizations with your Jira Cloud account. This integration enables seamless tracking and visibility of GitHub repositories, issues, pull requests, and more within Jira, enhancing collaboration and project management capabilities.
By following these steps, you can effectively integrate GitHub and Jira to track pull requests, commits, and branches. This integration improves project management, collaboration, and traceability, resulting in a more efficient and productive development experience.
When you integrate GitHub with Jira, you can easily view GitHub development data within Jira. To link GitHub commits, branches, and pull requests to Jira issues, you need to include the Jira issue key in the commit message, branch name, or PR title.
For example, when a developer makes a commit, they can include the Jira Software issue key in the commit message:
To enforce the above commit, branch, and PR names in the project we have utilized something called Git Hooks.
Git hooks are powerful tools that enable you to automate and enhance your Git workflow. Hooks are scripts that run at specific points in the Git lifecycle, such as before or after a commit, a push, or a merge. They allow you to perform custom actions or enforce certain rules and policies.
By leveraging Git hooks, you can enforce coding standards, validate commit messages, run tests before pushing changes, integrate with external systems, and much more. Git hooks are executed locally on each developer's machine, ensuring consistency and enabling collaboration within a team.
To set a global Git hook that applies to all local repositories on your machine, you can follow these steps:
Integrating GitHub and Jira empowers development teams to streamline their workflows and enhance collaboration. By leveraging the power of custom Git hooks, you can enforce naming conventions, validate commit messages, and maintain consistency throughout the development process. This integration fosters effective project management, improves visibility, and promotes standardized practices. Start integrating GitHub and Jira today to optimize your development workflow and achieve greater productivity
Introduction:
In modern software development, effective project management and streamlined workflows are crucial for successful collaboration among team members. Integrating GitHub, a popular version control platform, with Jira, a powerful issue-tracking tool, can significantly enhance the development experience. By leveraging this integration and customizing Git hooks, developers can seamlessly track pull requests, commits, and branches, ensuring smoother communication and increased productivity. In this blog post, we will explore how to integrate GitHub and Jira, and how custom Git hooks can be used to optimize your development workflow.
Integrating GitHub and Jira:
- Sign in to your Jira Cloud account.
- In the top navigation, click on "Apps" and select "Explore more apps" from the dropdown menu. This will take you to the Atlassian Marketplace.
- Search for "GitHub for Jira" and click on it to access the app's page.
- On the app's page, click on "Get app" to start the installation process.
- Select "Get Started" to begin configuring GitHub for Jira. If needed, you can always access the app's configuration page later by going to "Apps" > "Manage apps" > "GitHub for Jira" > "Get started."
- To connect a GitHub organization, click on "Connect GitHub organization."
- Choose "GitHub Cloud" and click "Continue" to proceed.
- You will be prompted to log in to your GitHub account. After logging in, review the permissions requested by Jira and click "Authorize Jira" to grant access.
- Find the GitHub organization you want to integrate with Jira and click "Connect." Alternatively, you can select "Install GitHub for Jira" to connect to a new organization.
- Back on the GitHub for Jira page, click on "Connect GitHub organization" again and choose the organization you want to connect with.
- GitHub for Jira will start backfilling your repository data from the past year. If you want to change the date range, click on "Restart backfill" and select your preferred start date.
- To connect more organizations, click on "Connect GitHub organization" and select "Connect GitHub Cloud."
By following these steps, you will be able to install and configure GitHub for Jira, allowing you to integrate GitHub organizations with your Jira Cloud account. This integration enables seamless tracking and visibility of GitHub repositories, issues, pull requests, and more within Jira, enhancing collaboration and project management capabilities.
What do the above steps achieve?
By following these steps, you can effectively integrate GitHub and Jira to track pull requests, commits, and branches. This integration improves project management, collaboration, and traceability, resulting in a more efficient and productive development experience.
- Track Pull Requests: With the GitHub-Jira integration in place, you can link pull requests to Jira issues. This connection provides a comprehensive overview of the changes made in each pull request and helps you associate them with specific tasks or requirements. It facilitates efficient code reviews and ensures that each pull request is associated with the appropriate Jira ticket.
- Monitor Commits: By integrating GitHub with Jira, you can automatically reference Jira issues in commit messages. This linkage enables developers to provide meaningful context and traceability to their commits. It ensures that each commit is associated with a specific Jira task or bug, making it easier to understand the purpose and impact of the changes.
- Manage Branches: Implement a branch naming convention that aligns with your Jira project. By adopting a consistent naming pattern for branches, such as prefixing them with the Jira issue key, you can easily identify which branch corresponds to a specific task or user story. This naming convention promotes clarity and organization throughout the development process.
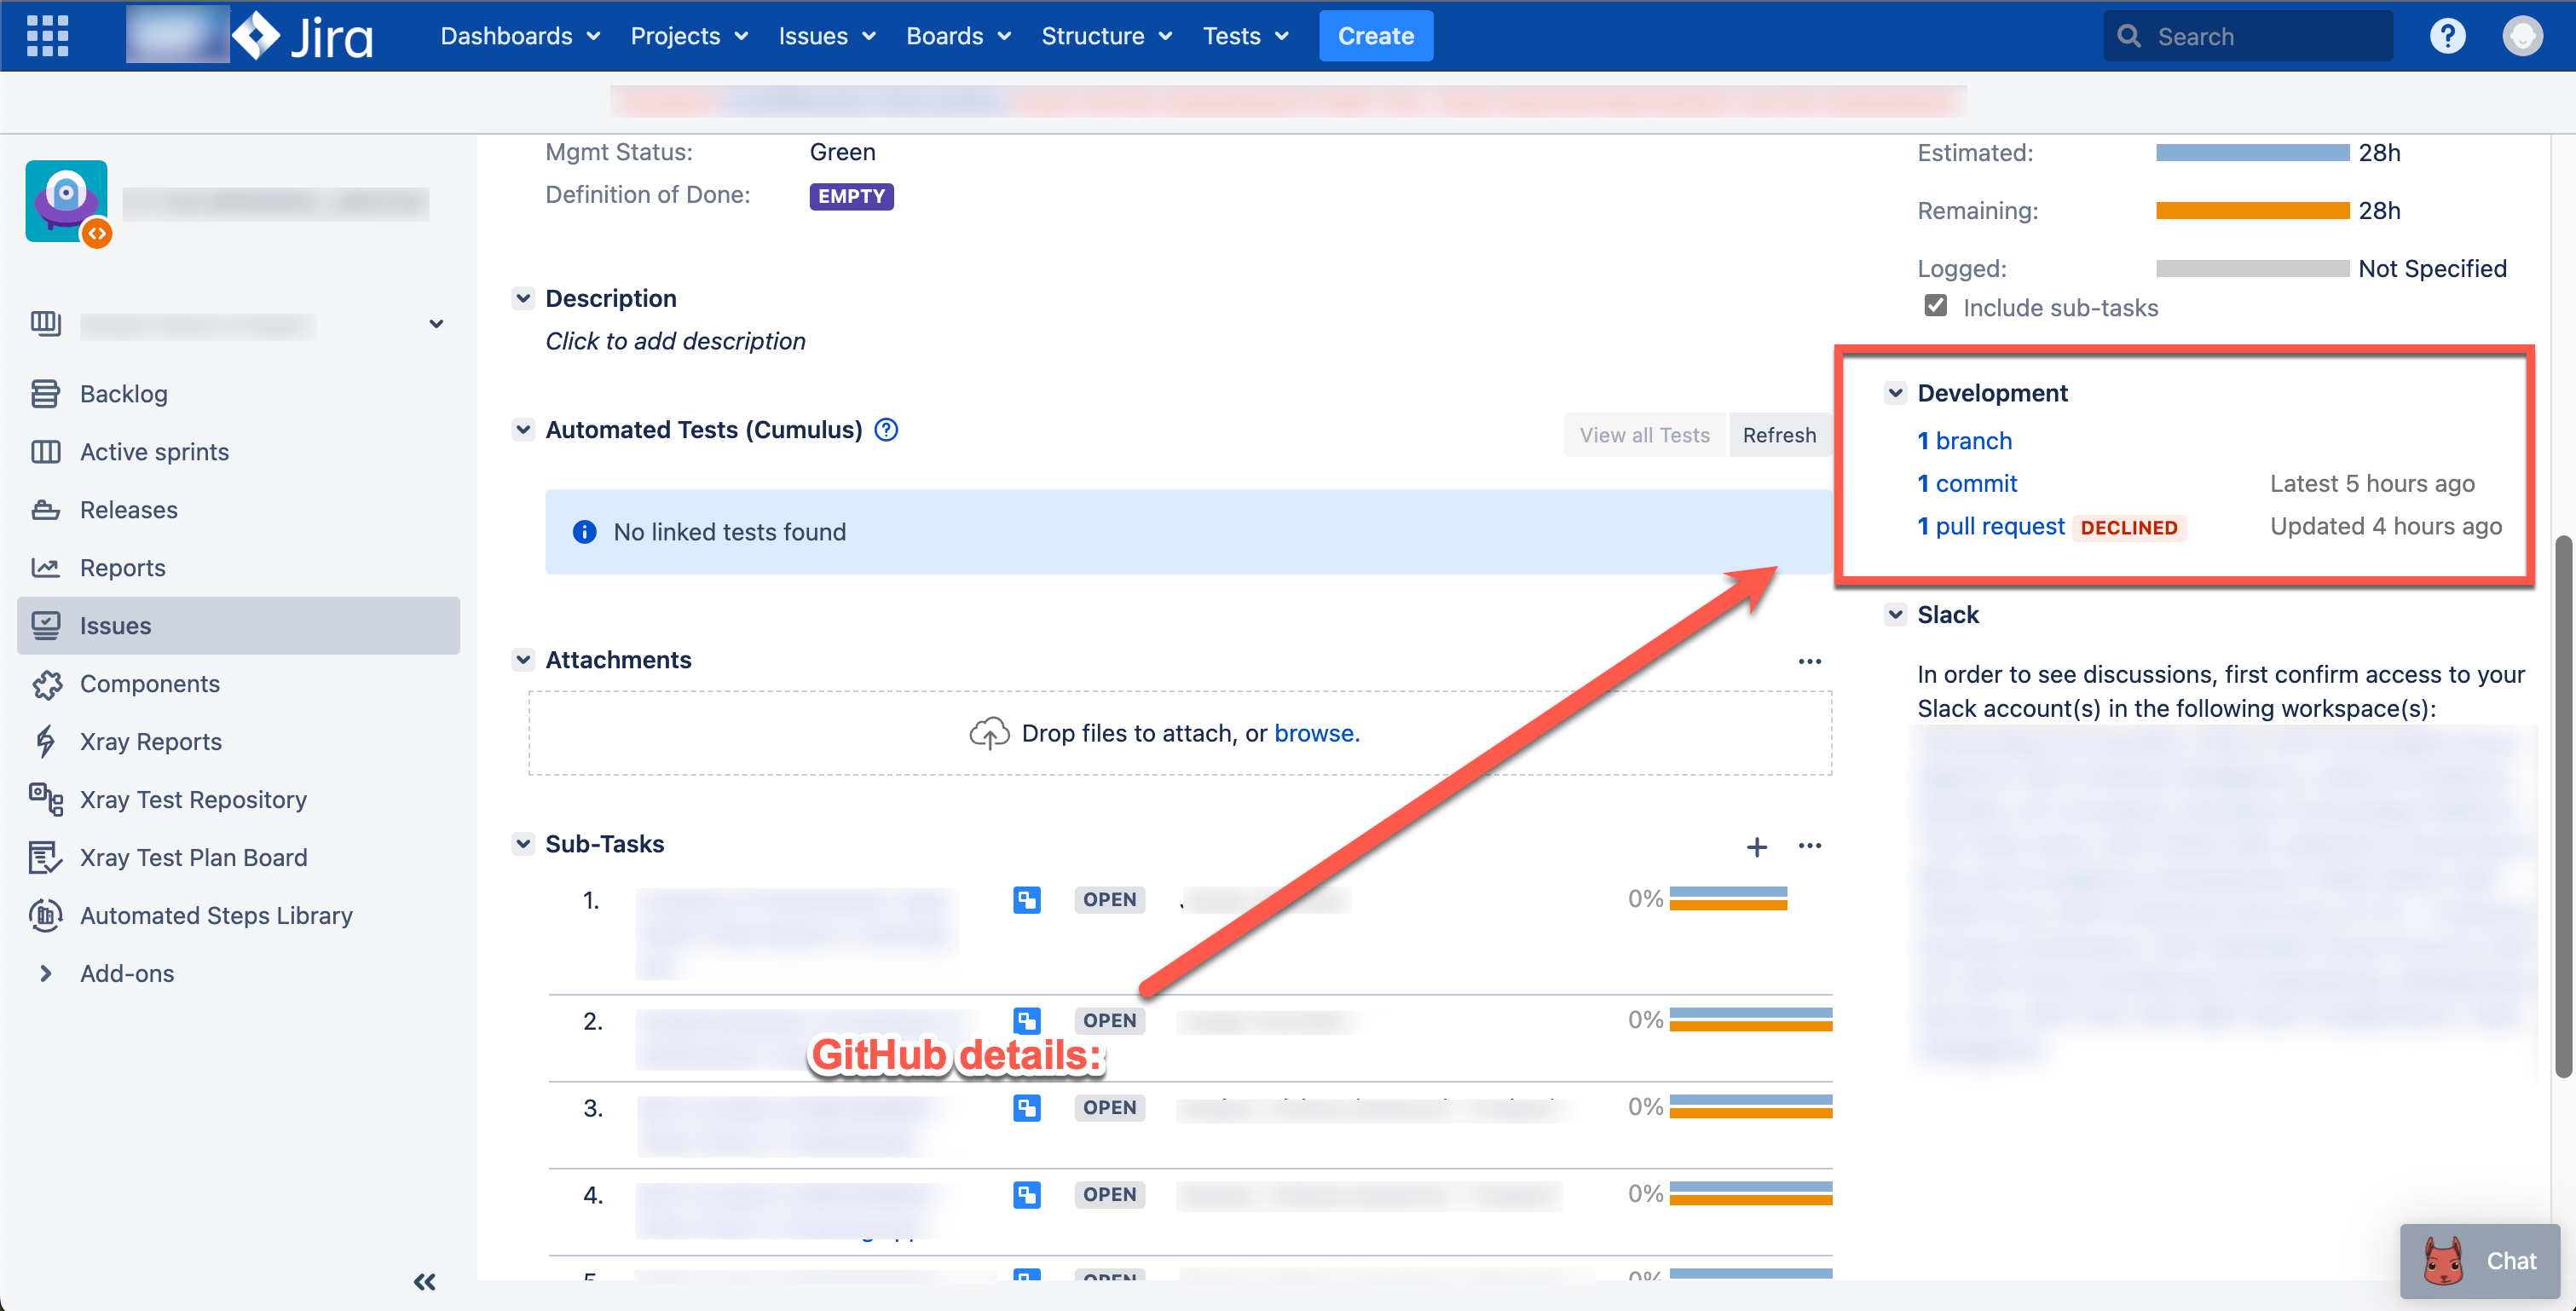
View GitHub information on Jira issues:
When you integrate GitHub with Jira, you can easily view GitHub development data within Jira. To link GitHub commits, branches, and pull requests to Jira issues, you need to include the Jira issue key in the commit message, branch name, or PR title.
For example, when a developer makes a commit, they can include the Jira Software issue key in the commit message:
git commit -m "PROJ-123 add a README file to the project."

git push origin <branchname>
The branch name and PR title should also contain the term "PROJ-123" so that it's visible in Jira
Jira GitHub Integration

Pull request details
Custom Git Hooks for Workflow Optimization:
To enforce the above commit, branch, and PR names in the project we have utilized something called Git Hooks.
Git hooks are powerful tools that enable you to automate and enhance your Git workflow. Hooks are scripts that run at specific points in the Git lifecycle, such as before or after a commit, a push, or a merge. They allow you to perform custom actions or enforce certain rules and policies.
By leveraging Git hooks, you can enforce coding standards, validate commit messages, run tests before pushing changes, integrate with external systems, and much more. Git hooks are executed locally on each developer's machine, ensuring consistency and enabling collaboration within a team.
We have used the following Git Hooks to enforce the branch name and commit messages:
- Pre-commit hook: This hook runs before creating a commit and allows you to perform checks on the code being committed. You can run linters, style checkers, or even perform unit tests to ensure the code meets specific quality standards before it is committed.
#!/bin/bash
branch_name=$(git symbolic-ref --short HEAD)
# Check if the branch name matches the desired pattern
if [[ ! $branch_name =~ ^(feature|bugfix)\/PROJ-[0-9]+$ ]]; then
echo "Error: Invalid branch name '$branch_name'. Branch names must be either 'feature/PROJ-123' or 'bugfix/PROJ-123' (where 123 represents backlog ID)."
exit 1
fi
- Commit-msg hook: This hook is triggered after entering a commit message and can enforce guidelines for commit messages. You can check if the commit message follows a specific format, includes a reference to an issue or a task ID, or meets other requirements set by your team.
#!/bin/bash


commit_msg_file=$1


# Read the commit message from the file

commit_msg=$(cat "$commit_msg_file")


# Check if the commit message contains the desired pattern

if [[ ! $commit_msg =~ PROJ-[0-9]+ ]]; then

   echo "Error: Invalid commit message. Commit messages must contain the pattern 'PROJ-123' (where 123 represents backlog ID)."

   exit 1

fi

exit 0
- Pre-push hook: This hook executes before pushing changes to a remote repository. It allows you to run tests, perform code analysis, or check for any issues that might arise from pushing the changes. It helps ensure that only validated and high-quality code is pushed to the shared repository.
#!/bin/bash
current_branch=$(git symbolic-ref --short HEAD)
remote=$(git config --get remote.origin.url)
# Function to check if the branch name contains 'PROJ-123' pattern
function enforce_branch_name() {
branch_name=$1
if [[ ! $branch_name =~ ^(feature|bugfix)\/PROJ-[0-9]+$ ]]; then
echo "Error: Invalid branch name '$branch_name'. Branch names must be either 'feature/PROJ-123' or 'bugfix/PROJ-123' (where 123 represents backlog ID). Aborting push…"
exit 1
fi
}
# Check branch name only for new branches being pushed
if [[ "$(git rev-parse --abbrev-ref HEAD@{u} 2>/dev/null)" == "" ]]; then
enforce_branch_name "$current_branch"
fi
# Continue with the push
exit 0
How to create and implement a Git hook:
- Navigate to the
.gitdirectory of your Git repository. This directory is usually located at the root of your project. - Inside the
.gitdirectory, locate thehooksdirectory. This directory contains the sample hook scripts. - Choose the appropriate hook script for your needs. For example, if you want to create a pre-commit hook, you can use the
pre-commit.samplefile. - Rename the selected sample script to remove the
.sampleextension. For instance, renamepre-commit.sampleit topre-commit. - Open the renamed file in a text editor.
- Write your custom hook logic in the file using your preferred programming language or scripting language. For example, you can write shell commands, Python scripts, or any other executable code.
- Save the file after adding your hook logic.
- Make sure the hook script is executable. You can set the executable permission using the following command:
chmod +x pre-commit
Replacepre-commitwith the name of your hook script. - Test your hook by performing the Git action that triggers it. For example, if you created a pre-commit hook, try to create a commit and see if your hook logic is executed.
Set global Git hooks:
To set a global Git hook that applies to all local repositories on your machine, you can follow these steps:
- Identify the global Git hooks directory on your system. This directory is typically located at
~/.git-templates/hooks. If the directory doesn't exist, you can create it. - Copy the above created executable files and paste them to this directory.
- Now, configure Git to use the global hooks directory by running the following command:
git config --global core.hooksPath ~/.git-templates/hooks
This sets the global Git templates directory to the directory containing your hooks. - Test your hook by performing the Git action that triggers it. For example, if you created a pre-commit hook, try to create a commit and see if your hook logic is executed.
Benefits of Integration and Custom Git Hooks:
- Improved Visibility: Integrating GitHub and Jira allows for better visibility into project progress, as all relevant information is consolidated in one place. Team members can easily track issues, pull requests, and commits, gaining a holistic view of the development status.
- Enhanced Collaboration: By connecting GitHub and Jira, team members can collaborate more effectively. Developers can associate their work with specific tasks, facilitating seamless communication between developers and project managers. This integration streamlines code reviews and enables stakeholders to stay informed about the progress of each issue.
- Standardized Processes: Custom Git hooks enforce naming conventions and commit message patterns, ensuring consistency across the team. By automating these checks, developers are encouraged to follow established practices, reducing errors and enhancing code quality.
Conclusion:
Integrating GitHub and Jira empowers development teams to streamline their workflows and enhance collaboration. By leveraging the power of custom Git hooks, you can enforce naming conventions, validate commit messages, and maintain consistency throughout the development process. This integration fosters effective project management, improves visibility, and promotes standardized practices. Start integrating GitHub and Jira today to optimize your development workflow and achieve greater productivity
- SAP Managed Tags:
- Industry Cloud
Labels:
You must be a registered user to add a comment. If you've already registered, sign in. Otherwise, register and sign in.
Labels in this area
-
ABAP CDS Views - CDC (Change Data Capture)
2 -
AI
1 -
Analyze Workload Data
1 -
BTP
1 -
Business and IT Integration
2 -
Business application stu
1 -
Business Technology Platform
1 -
Business Trends
1,658 -
Business Trends
93 -
CAP
1 -
cf
1 -
Cloud Foundry
1 -
Confluent
1 -
Customer COE Basics and Fundamentals
1 -
Customer COE Latest and Greatest
3 -
Customer Data Browser app
1 -
Data Analysis Tool
1 -
data migration
1 -
data transfer
1 -
Datasphere
2 -
Event Information
1,400 -
Event Information
67 -
Expert
1 -
Expert Insights
177 -
Expert Insights
301 -
General
1 -
Google cloud
1 -
Google Next'24
1 -
GraphQL
1 -
Kafka
1 -
Life at SAP
780 -
Life at SAP
13 -
Migrate your Data App
1 -
MTA
1 -
Network Performance Analysis
1 -
NodeJS
1 -
PDF
1 -
POC
1 -
Product Updates
4,577 -
Product Updates
346 -
Replication Flow
1 -
REST API
1 -
RisewithSAP
1 -
SAP BTP
1 -
SAP BTP Cloud Foundry
1 -
SAP Cloud ALM
1 -
SAP Cloud Application Programming Model
1 -
SAP Datasphere
2 -
SAP S4HANA Cloud
1 -
SAP S4HANA Migration Cockpit
1 -
Technology Updates
6,873 -
Technology Updates
430 -
Workload Fluctuations
1
Related Content
- Integrating Smart contracts with SAPUI5 in Technology Blogs by Members
- Improving Time Management in SAP S/4HANA Cloud: A GenAI Solution in Technology Blogs by SAP
- Embracing TypeScript in SAPUI5 Development in Technology Blogs by Members
- New Machine Learning features in SAP HANA Cloud in Technology Blogs by SAP
- Switch on gCTS (for existing packages) in Technology Blogs by SAP
Top kudoed authors
| User | Count |
|---|---|
| 29 | |
| 17 | |
| 15 | |
| 13 | |
| 11 | |
| 9 | |
| 8 | |
| 8 | |
| 8 | |
| 7 |