
- SAP Community
- Products and Technology
- Technology
- Technology Blogs by SAP
- Start Your scripting Journey The Easy Way With SAP...
Technology Blogs by SAP
Learn how to extend and personalize SAP applications. Follow the SAP technology blog for insights into SAP BTP, ABAP, SAP Analytics Cloud, SAP HANA, and more.
Turn on suggestions
Auto-suggest helps you quickly narrow down your search results by suggesting possible matches as you type.
Showing results for
Product and Topic Expert
Options
- Subscribe to RSS Feed
- Mark as New
- Mark as Read
- Bookmark
- Subscribe
- Printer Friendly Page
- Report Inappropriate Content
11-23-2023
3:03 PM
The Journey
I’ve been using SAP Analytics Cloud for almost 8 years and like many of you, have stuck to stories rather than Analytic Applications as I don’t have a massive coding background. Well if truth be told, I’m old and so my Basic and Pascal skills haven’t had an airing for quite a few years.
With the latest innovations such as the Optimised Design Experience and the ability to add script elements to existing stories, I have now started to ‘enhance’ my visual storytelling. It struck me that rather than go big bang I would take an existing SAC Story and add code where I could get some quick wins without having to write big chunks of code
Where to start this journey - that was the question and this piece continues from Part One where I show 2 small code elements that help me to create a more appealing, usable story that adds a little more finesse to the standard story interface. Now in my 2nd part of the series we look at a couple more simple scripting elements to help you make your stories more engaging.
#3 Page to Page Navigation, Help Pages etc.
So you can of course use the SAC Page to Page Navigation options at the top of the screen but for me, it's nice to be able offer more control for the users to move to a specific page and, as we'll see, to be able to jump back to the page that you've come from.
Imagine if you will the idea of a Help Page in your story :

Wouldn't it be great to 'jump to the help page' and then return to the page you came from with a single click. Well that's exactly what I add to each page of each story I create - and you guessed it - the code is really simple.
Let's imagine a story with 4 pages, 3 containing content and the 4th page is some sort of About or Help page. The idea here is that on each of the first 3 pages we have a button that jumps to page 4 and on page 4 we have a single button that 'returns' you to the page you came from.
So if I was on page 2 and I jump to page 4 I would return to page 2. If I was on page 1 and I jump to the Help Page, the same button would take me back to page 1. This method will work for a story containing any amount of pages and here's how it works.
1st step requires the creation of a Script Variable in the Outline. We will create a script variable called What_Page of type String and give it a default value of the name of our 1st page in the outline - here "Page_1"
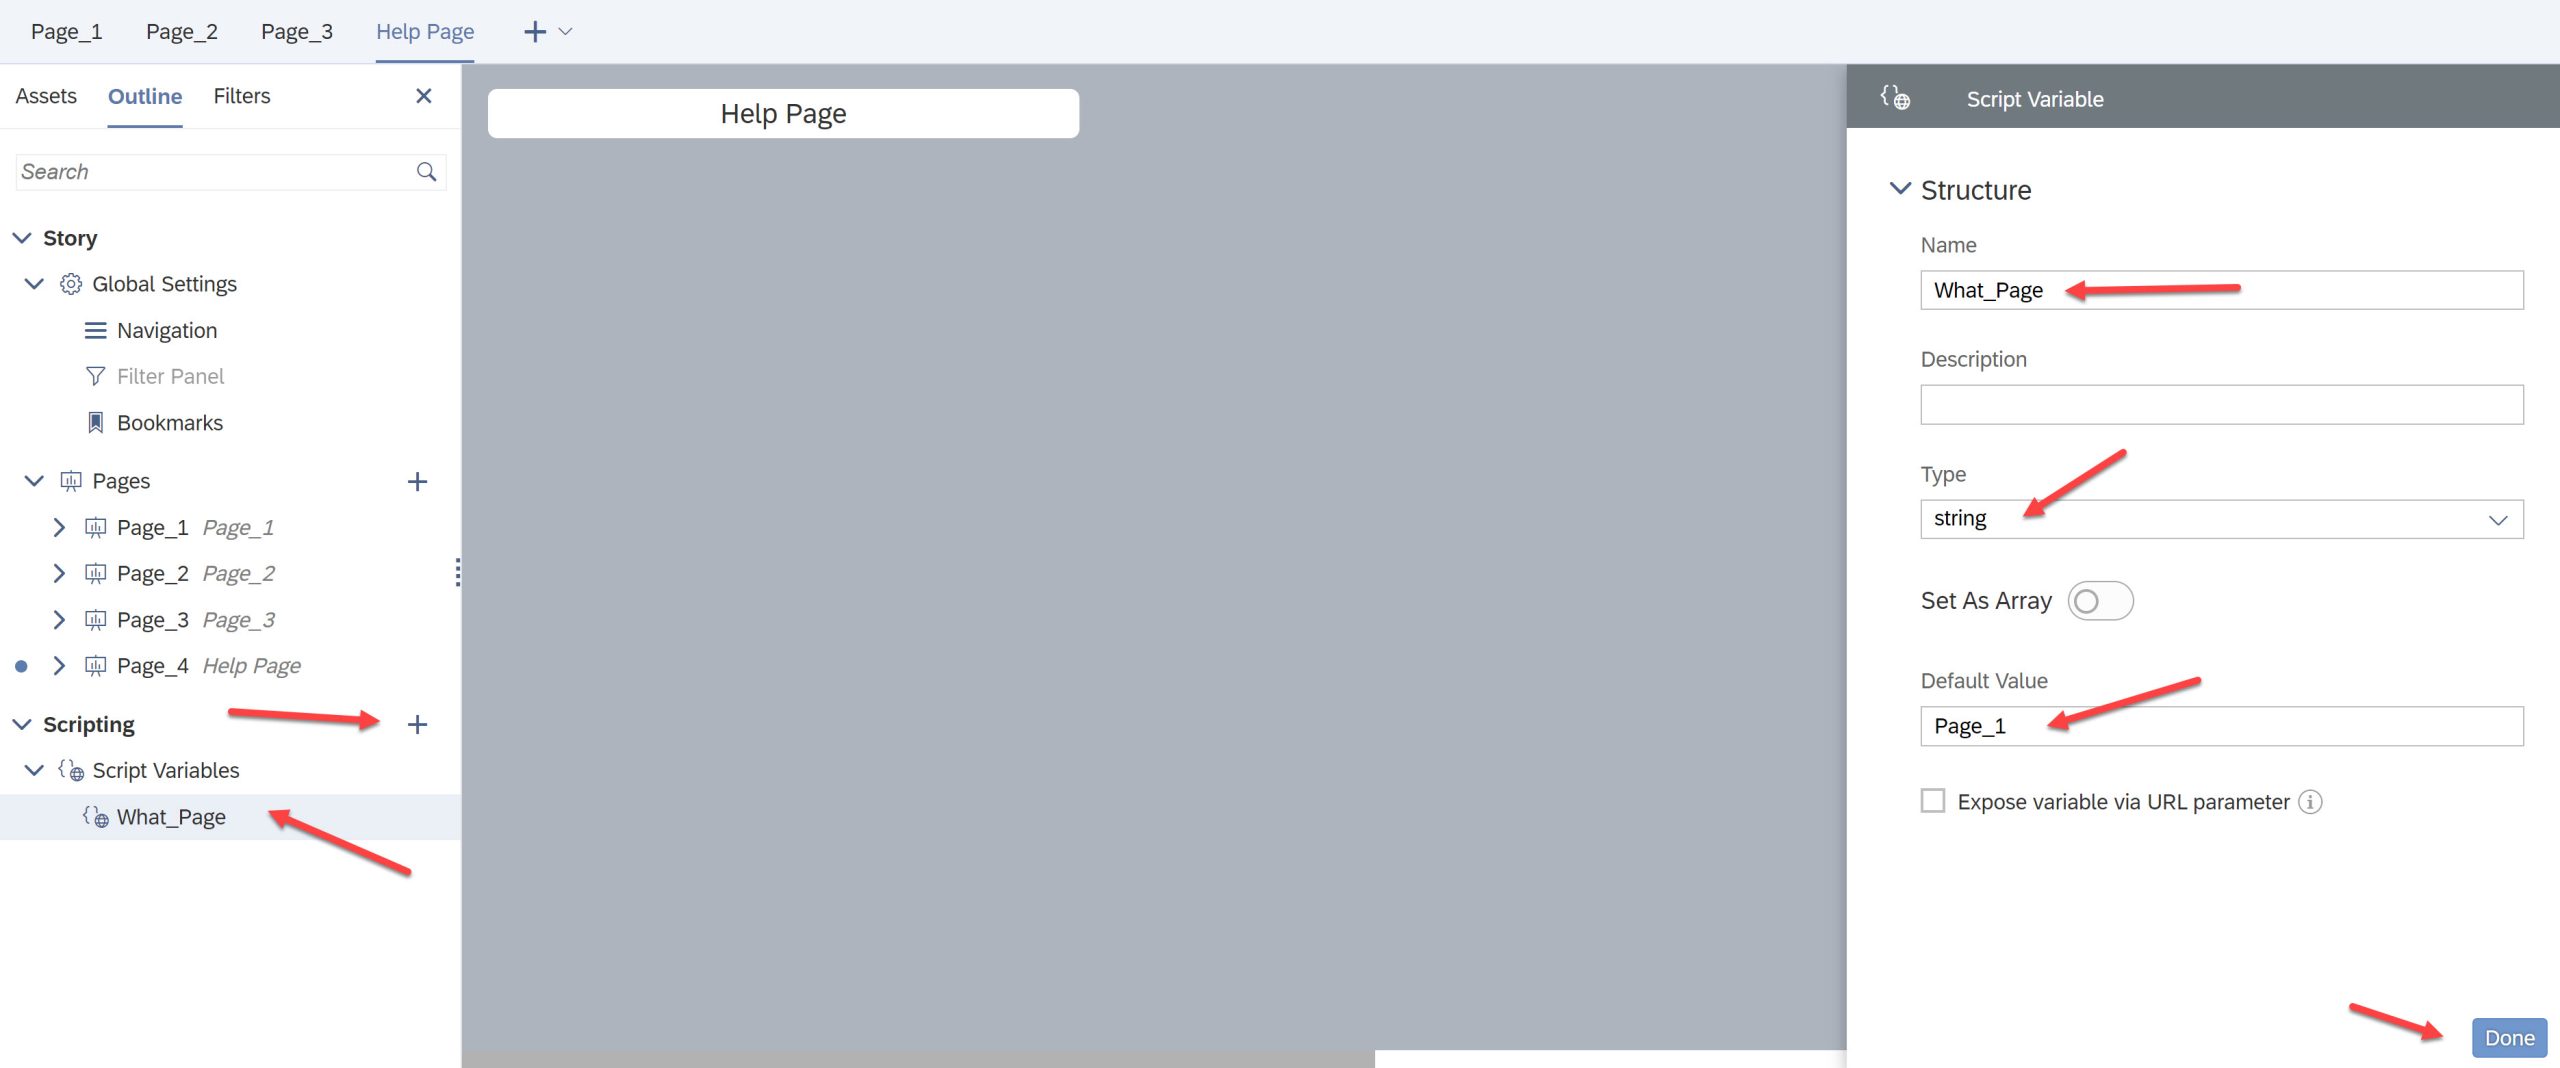
We now have a variable that we'll use to note the page we are currently on - the logic here is that I can write some code to navigate to the help page and then use the stored location to return to the page I came from.
Now we'll need to create one button on each of the 4 pages... 3 that will navigate to the help page and one, on the help page, that will 'return' the user to the page they have just come from. Let's start with the navigation buttons.
Add a button onto your 1st page and add the following script:
// Set the page you are jumping from then load the help page


What_Page = 'Page_1';

Application.setActivePage('Page_4');
So what exactly is the code doing - well as we now know the 1st line is a comment as SAC uses '//' as the comment indicator. The 2nd line of code sets our script variable What_Page to 'Page_1' - the page we are currently on and the 3rd line tells SAC to navigate to Page_4. The Application.setActivePage() function makes SAC navigate to the page contained in the brackets. So we set the variable to where we are currently residing and we then navigate to the help page.
We can repeat this on step on the 2nd and 3rd pages but with 1 modification on each.
For Page_2 we have this code:
// Set the page you are jumping from then load the help page


What_Page = 'Page_2';

Application.setActivePage('Page_4');
For Page_3 we have this code:
// Set the page you are jumping from then load the help page


What_Page = 'Page_3';

Application.setActivePage('Page_4');
We can see that the only difference in any of the 3 button scripts is the value you assign to the variable. It's set to the page you are currently on - so Page_1 or Page_2 or Page_3. Now to complete this section we now need to add a push button onto the Help Page (Page_4) and add the following script:
// Now return to the page you camee from (stored in the What_Page variable)


Application.setActivePage(What_Page);
Yes it really is that simple - one line of code to 'return' to the page stored in the variable What_Page. So if you came from Page_2 that's where you'll return to and so on.
Final step would be to remove the button texts, add tooltips and images to your buttons to give you the following:
The video above shows my development process but to see this is action I created this sample SAC story using this method of navigation to show Help / About and then return the user to the calling page. This video sample below shows that SAC story in use:
#4 Use a Dropdown Menu to Navigate Page to Page
So all my stories have the same basic look-and-feel and one of the elements I like to add is the ability to use a Dropdown Menu within the story to control 'Page to Page' Navigation. I do this in the story so I can hide the toolbar, remove many options I don't need there and that might complicate the UI for users. Take the following story:
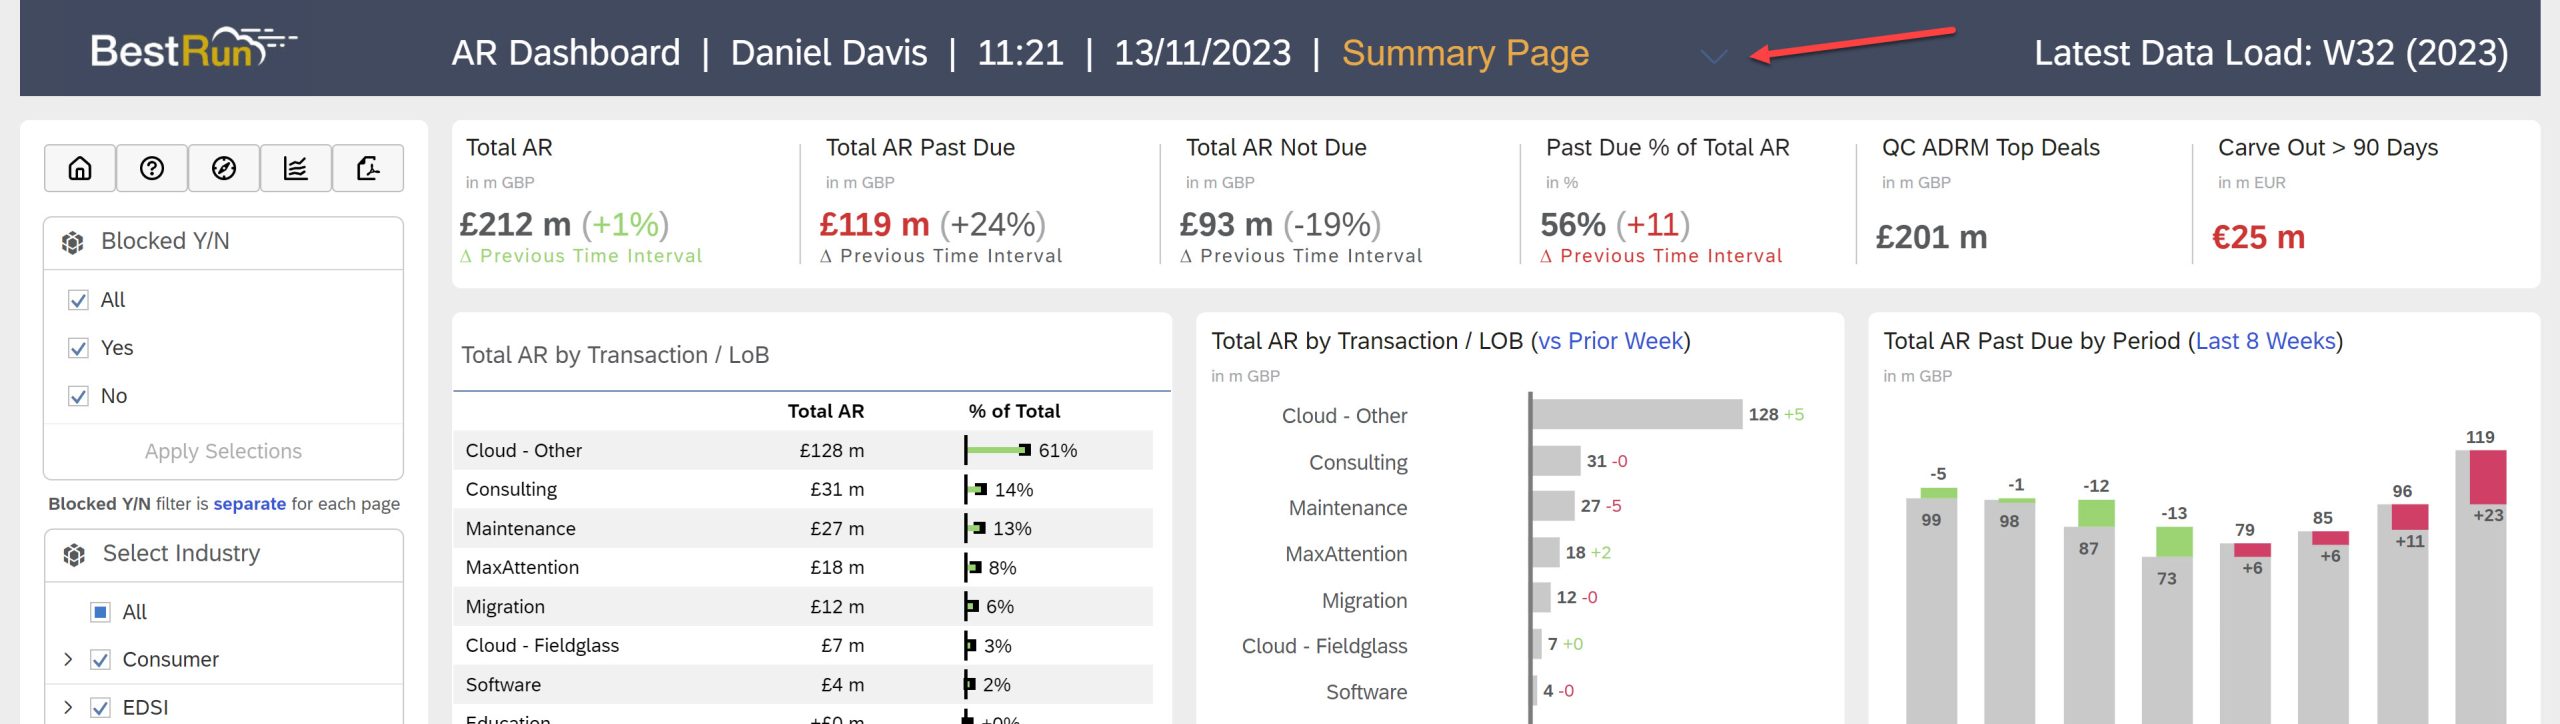
At the top of the story we can see the story title, some metadata, user, time, date etc and then, in orange, the Current Page that as you'll see, doubles up as the navigation to all the other pages in the story. Click the Dropdown and you are presented with a list of all the other story pages:
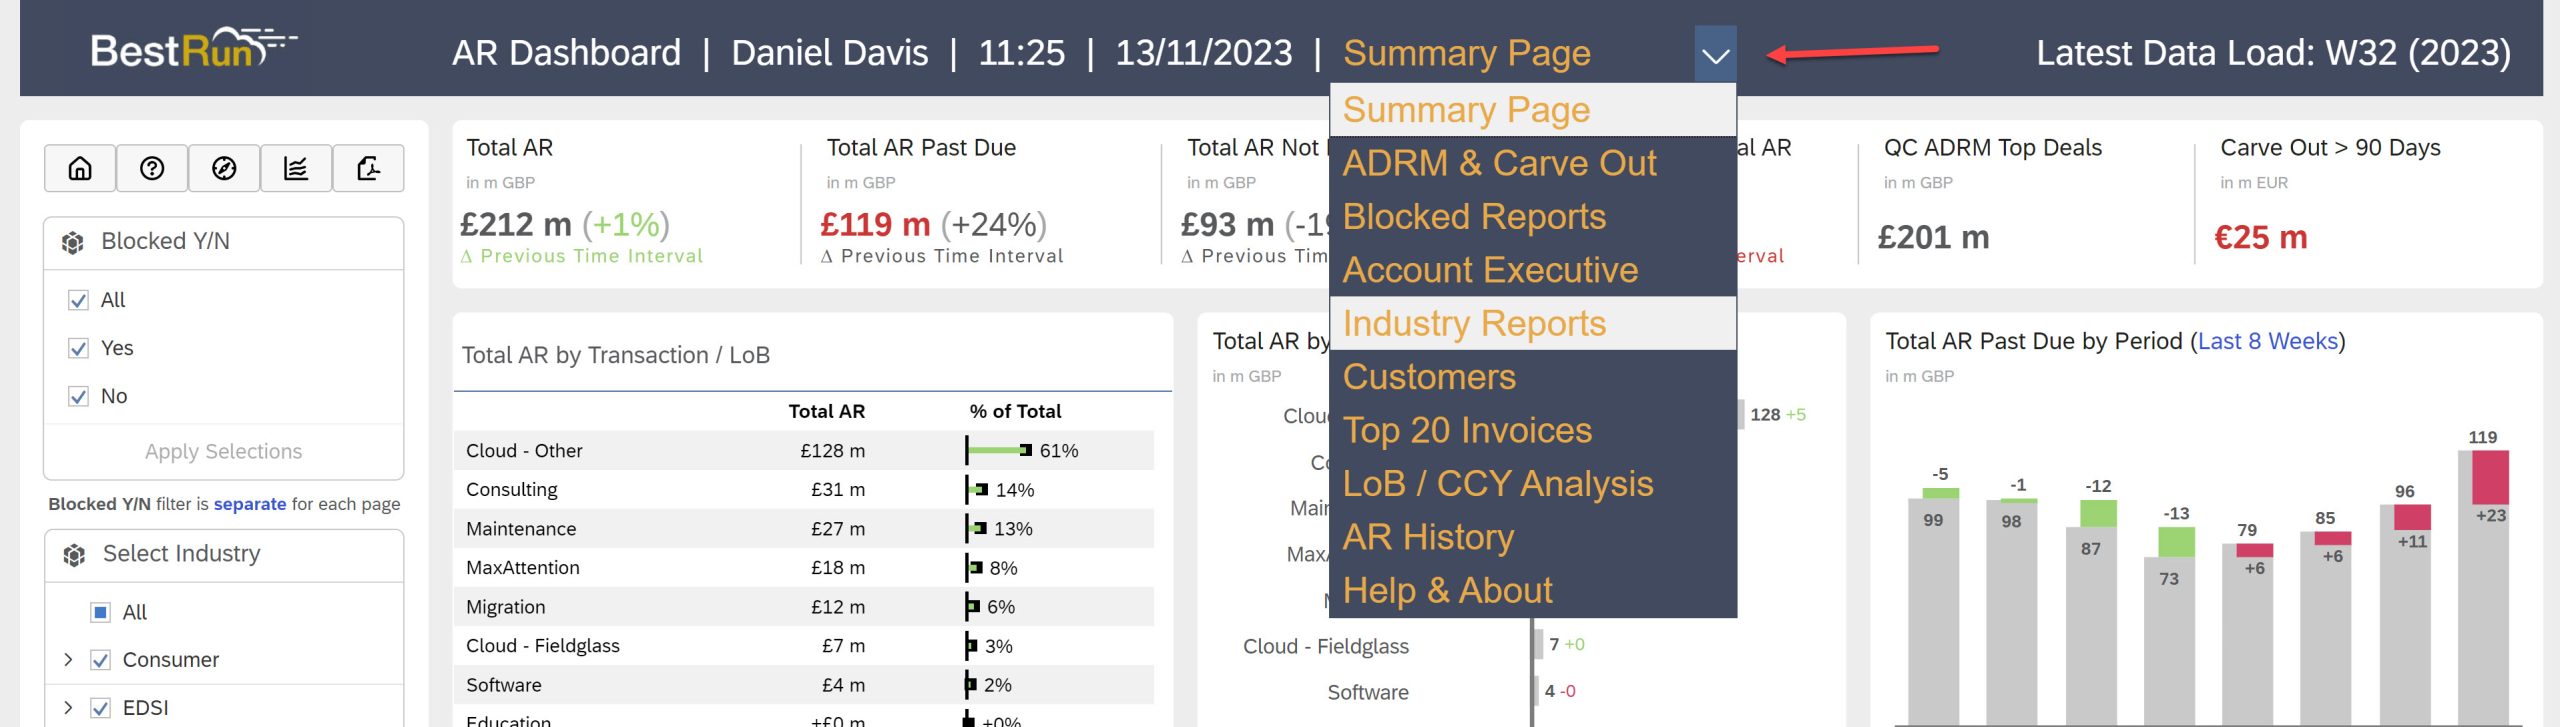
So as you can see selecting one of the other pages from the dropdown will now navigate you to the selected page and reset the dropdown to the current page you are now viewing.

For me this just adds a little but of consistency to my stories because all my stories follow common standards. If you've used one then you've used them all - but more about consistency in Part Three.
So how is this made possible - you've guessed it, with a little simple scripting, in this case just 3 lines of code for each page in your story. We'll start by adding a Dropdown menu to each page of the story. I add it to the 1st page, configure the object, add the scripting & then copy this object to each page where you can edit the scripts accordingly.
So the 1st step is to add the Dropdown menu to the 1st page and in the Builder Panel configure the options to map to each page of your story. In our example we've got four pages in total so you'll need to add 4 items to the Dropdown. You need to configure the ID's to the technical names of each page and the Text Descriptions to be text you want displayed as the Title of each page as illustrated below:

So as you can see above we have 4 pages in the Story Outline, those being:
- Page_1 Sales
- Page_2 Product
- Page_3 Staff
- Page_4 Help Page
We need to add 1 line per page and then (important this bit) set the Default Flag to be the page the Dropdown menu is created on. For this example it's on Page_1 so that's the Default but when you copy it to each page you will need to set it to Page_2 or Page_3 or Page_4 accordingly.

That's the control added, now we need to add the script to the control to do the clever part of navigating the user to the selected page and this is the code needed to accomplish this action:
// Get the page that the user selects

// Reset the filter display (for next time)

// Finally navigate to the selected page.


What_Page = Dropdown_1.getSelectedKey();

Dropdown_1.setSelectedKey('Page_1');

Application.setActivePage(What_Page);
1st three lines are comments as you know but after that we have the active code. We can see that we are using the same Scripting Variable 'What_Page' to hold the value the user selects when using the Dropdown - in this case the Dropdown is called "Dropdown_1" but you will need to change the name to whatever SAC has named your added object.
The 2nd line of the code resets the Dropdown to its initial value of "Page_1" so that if we return to this page, the Dropdown will correctly show the page we are currently on and not the page selected when you last used the Dropdown. As an example when you add this Dropdown to 'Page_3' this will be the code:
// Get the page that the user selects

// Reset the filter display (for next time)

// Finally navigate to the selected page.


What_Page = Dropdown_3.getSelectedKey();

Dropdown_3.setSelectedKey('Page_3');

Application.setActivePage(What_Page);
The fine line of code navigates the story to whatever item the user selects in their interaction with the Dropdown at runtime. That's it, set a variable to where you want to go, reset the dropdown for next time and then navigate to the page the user selected.
For the 2nd page, 'Page_2' (and all pages) we can now copy the Dropdown from Page_1 to Page_2 and make one change only to the Dropdown - we need to set the Default to Page_2 not Page_1 as follows:

The only other difference is that this Dropdown has a different name inside the SAC Outline, in this case this is Dropdown_2 not Dropdown_1. So we need to modify the script inside this new object as follows:
// Get the page that the user selects

// Reset the filter display (for next time)

// Finally navigate to the selected page.


What_Page = Dropdown_2.getSelectedKey();

Dropdown_2.setSelectedKey('Page_2');

Application.setActivePage(What_Page);
We modify the name of the Dropdown in line #1 to reflect the object we are interrogating (Dropdown_2) and we need to reset this new Dropdown with the default value for the correct page we are on - in this case "Page_2" not "Page_1".
Other than that the script is the same for each page we do, in this case we copy the Dropdown to each of the 4 pages and edit the script accordingly. That's it - we now have a Dropdown on each page that shows the page we are on and also allows the user to navigate to other pages with the same control:
Before I go I got asked in the comments as to where I got my SAP Fiori Icons from - you'll notice them in some of the videos and in Part Three we'll show you how to access and apply them in your stories. Also if you have any questions please do add them in the comments and i'll make sure I respond.
I will continue in Part Three of this occasional series as soon as I have some time and here's the link to Part One.
Happy Coding
Daniel
Labels:
5 Comments
You must be a registered user to add a comment. If you've already registered, sign in. Otherwise, register and sign in.
Labels in this area
-
ABAP CDS Views - CDC (Change Data Capture)
2 -
AI
1 -
Analyze Workload Data
1 -
BTP
1 -
Business and IT Integration
2 -
Business application stu
1 -
Business Technology Platform
1 -
Business Trends
1,658 -
Business Trends
112 -
CAP
1 -
cf
1 -
Cloud Foundry
1 -
Confluent
1 -
Customer COE Basics and Fundamentals
1 -
Customer COE Latest and Greatest
3 -
Customer Data Browser app
1 -
Data Analysis Tool
1 -
data migration
1 -
data transfer
1 -
Datasphere
2 -
Event Information
1,400 -
Event Information
74 -
Expert
1 -
Expert Insights
177 -
Expert Insights
348 -
General
1 -
Google cloud
1 -
Google Next'24
1 -
GraphQL
1 -
Kafka
1 -
Life at SAP
780 -
Life at SAP
14 -
Migrate your Data App
1 -
MTA
1 -
Network Performance Analysis
1 -
NodeJS
1 -
PDF
1 -
POC
1 -
Product Updates
4,575 -
Product Updates
392 -
Replication Flow
1 -
REST API
1 -
RisewithSAP
1 -
SAP BTP
1 -
SAP BTP Cloud Foundry
1 -
SAP Cloud ALM
1 -
SAP Cloud Application Programming Model
1 -
SAP Datasphere
2 -
SAP S4HANA Cloud
1 -
SAP S4HANA Migration Cockpit
1 -
Technology Updates
6,871 -
Technology Updates
484 -
Workload Fluctuations
1
Related Content
- Unleashing the Power of Custom Widgets in SAP Analytics Cloud in Technology Blogs by Members
- Watch the SAP BW Modernization Webinar Series in Technology Blogs by SAP
- Inside SAP: Discover How SAP’s IT Drives Transformation and Innovation in Technology Blogs by SAP
- SAP Datasphere catalog - Harvesting from SAP Datasphere, SAP BW bridge in Technology Blogs by SAP
- Unveiling SAP Analytics Cloud Performance Analysis Insights for Optimal Performance in Technology Blogs by Members
Top kudoed authors
| User | Count |
|---|---|
| 14 | |
| 11 | |
| 11 | |
| 10 | |
| 9 | |
| 8 | |
| 8 | |
| 8 | |
| 7 | |
| 7 |