
- SAP Community
- Products and Technology
- Technology
- Technology Blogs by SAP
- SAP Integration Suite: Custom message to S/4HANA t...
Technology Blogs by SAP
Learn how to extend and personalize SAP applications. Follow the SAP technology blog for insights into SAP BTP, ABAP, SAP Analytics Cloud, SAP HANA, and more.
Turn on suggestions
Auto-suggest helps you quickly narrow down your search results by suggesting possible matches as you type.
Showing results for
Product and Topic Expert
Options
- Subscribe to RSS Feed
- Mark as New
- Mark as Read
- Bookmark
- Subscribe
- Printer Friendly Page
- Report Inappropriate Content
09-19-2022
3:52 AM
Motivation
Recently I had to map a custom message type to a defined S/4HANA OData service. What sounds like a simple task might not be so easy if you are a beginner with SAP Integration Suite. If this tutorial can save you some hours of research work, it has already served its purpose!
I will focus on the elements that are "not so straightforward" and leave out the obvious to keep the blog short and crisp. Let's get started!
Scenario
From a custom purchase request submitted by a 3rd-party system a purchase requisition is to be created in SAP S/4HANA. Below outlines the flow and setup.
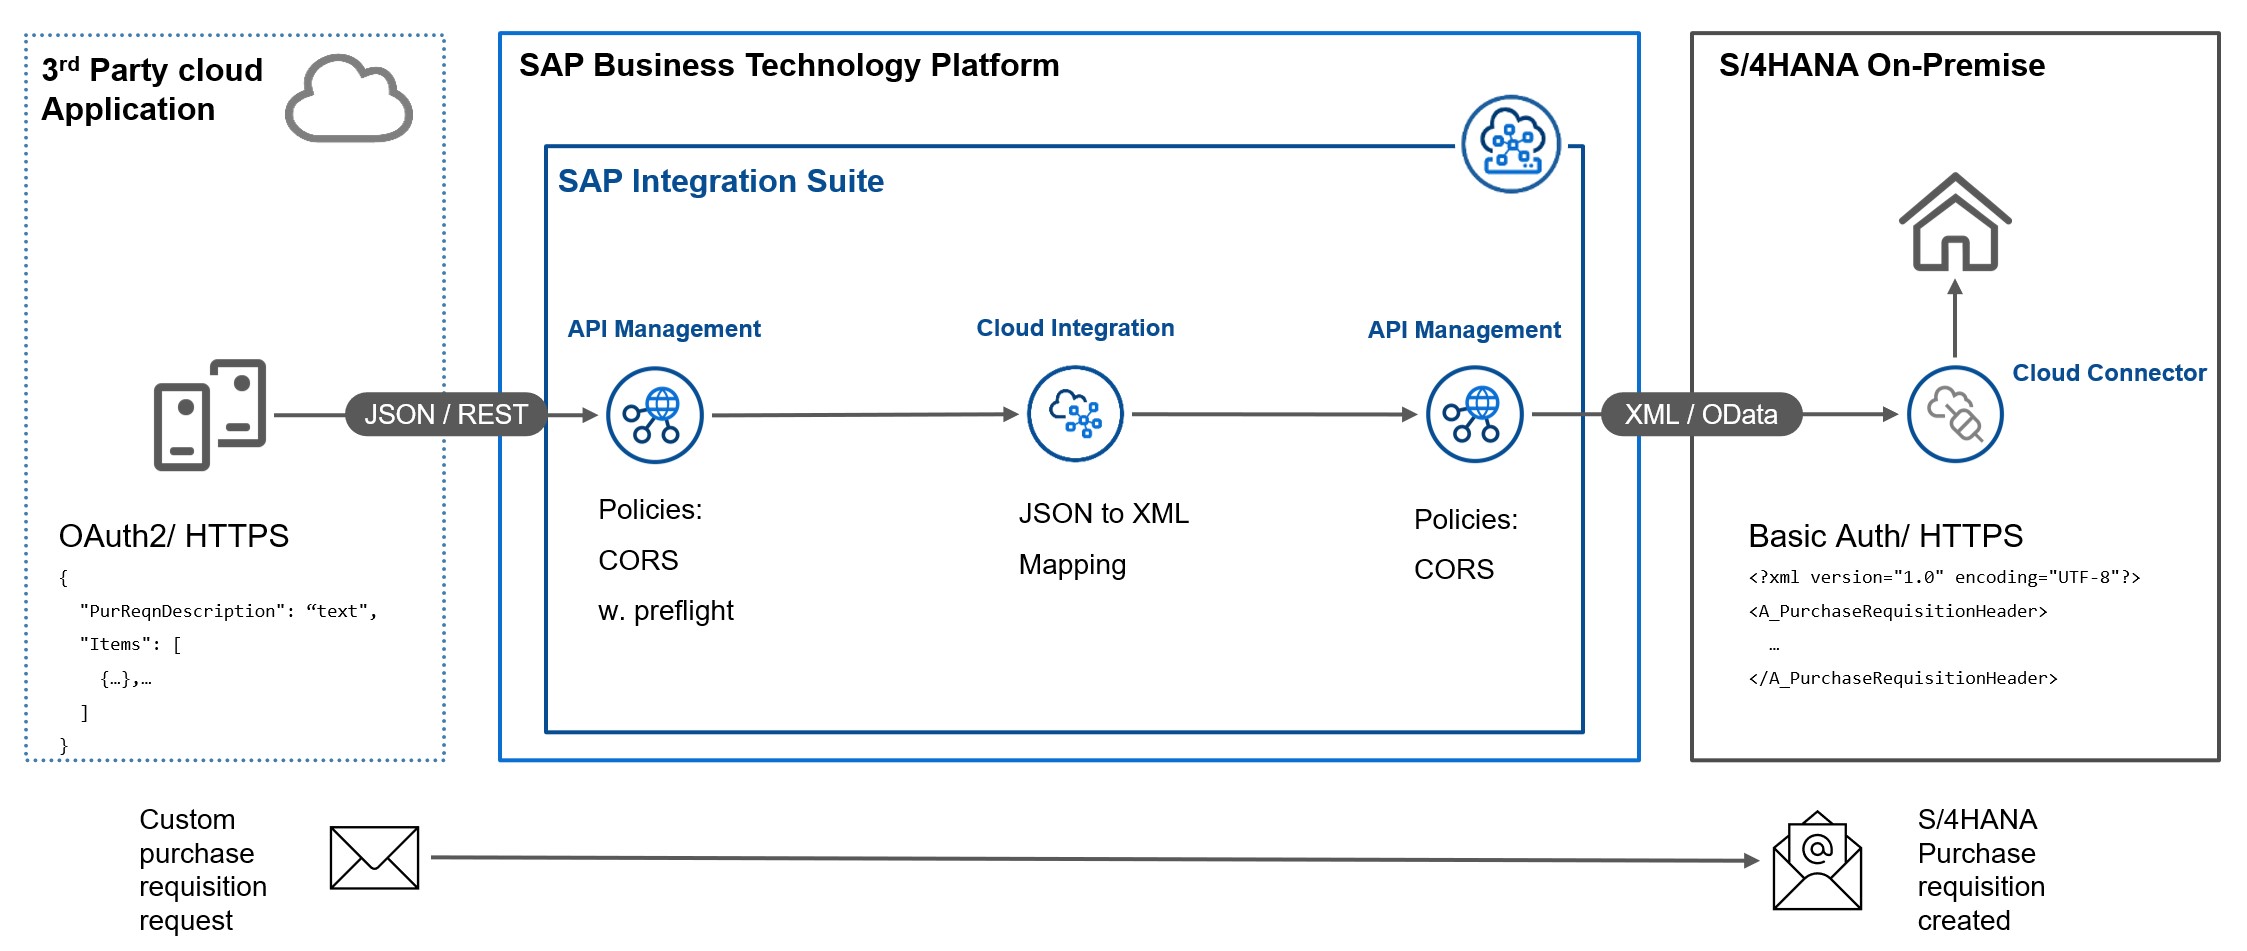
Solution architecture and process flow: Purchase requisition creation.
The source message is sent as JSON to a REST interface. The destination API is OData v2 using XML (API_PURCHASEREQ_PROCESS_SRV).
Integration Suite - API Management
For both source and target message API management is used.
Source API Proxy
The TargetEndPoint refers to the URL that Cloud Integration provides after the iFlow is deployed. In the Proxy Endpoint we set 2 route rules, one for the preflight request (OPTIONS) which is submitted during the CORS procedure by the sending party, one for any other request verb.

Proxy EndPoint route rules for source message proxy.
Furthermore in the Policies one Mediation Policy is defined for the ProxyEndPoint PostFlow. This is to provide the needed CORS headers for the caller to allow the POST. You add a Assign Message policy into the flow. The content can look like this - it might need adjustment for your case:
<!-- This policy can be used to create or modify the standard HTTP request and response messages -->

<AssignMessage async="false" continueOnError="false" enabled="true" xmlns='http://www.sap.com/apimgmt'>

		 <Add>

		     <Headers>

		         <Header name="Access-Control-Allow-Headers">set-cookie, origin, accept, maxdataserviceversion, x-csrf-token, authorization, dataserviceversion, accept-language, x-http-method, content-type, X-Requested-With, apikey</Header>

		         <Header name="Access-Control-Max-Age">3628800</Header>

		         <Header name="Access-Control-Allow-Methods">GET, PUT, POST, DELETE</Header>

		         <Header name="Access-Control-Expose-Headers">set-cookie, x-csrf-token, x-http-method</Header>

		     </Headers>

		 </Add>

		 <IgnoreUnresolvedVariables>false</IgnoreUnresolvedVariables>

		 <AssignTo createNew="false" type="response">response</AssignTo>

</AssignMessage>
Also, add a new flow condition called "PreFlight" which deals with the OPTIONS verb in a request. Set the flow condition string like this:
request.verb == "OPTIONS"
So the setup should be like indicated in the picture below. If you don't deal with CORS your API call will work from Postman or maybe also from a system, but it will not work from within a browser page.

Policies of source message: PreFlight condition and CORS handling on PostFlow
Target API Proxy
This is the proxy we have to set in our Cloud Integration iFlow for the target URL. The TargetEndPoint points to the cloud connector destination or maybe directly to the S/4HANA URL (not recommended).
There are no other settings required except creating the proxy in API Management. Now that we are done in the API Management let's look at the specialties of the Cloud Integration for a custom message flow.
Integration Suite - Cloud Integration
For our example there is just one artifact needed for the integration: The Integration Flow itself.

Integration Design: Integration overview
Let's take a glimpse at the complete iFlow to have an overview. It is simple and consist out of a JSON to XML Converter (standard settings) and the mapping.

Overview of the iFlow
Source message
The inbound connection uses User Role authorization with a custom role. That means your calling system has to authenticate using OAuth2 with client credentials. If you are wondering how to do this (creating your own role), please watch the video here. With this procedure you are "linking" the new role you defined to a new instance of a runtime that provides an OAuth2 endpoint.

Connection settings for source system
Note, the source system would not use CSRF (while the S/4HANA would).
Target message
The target connection refers to the API management URL we defined before using basic authentication. The credentials are stored in the Security Material and are just referred as text in this place. CSRF is active.
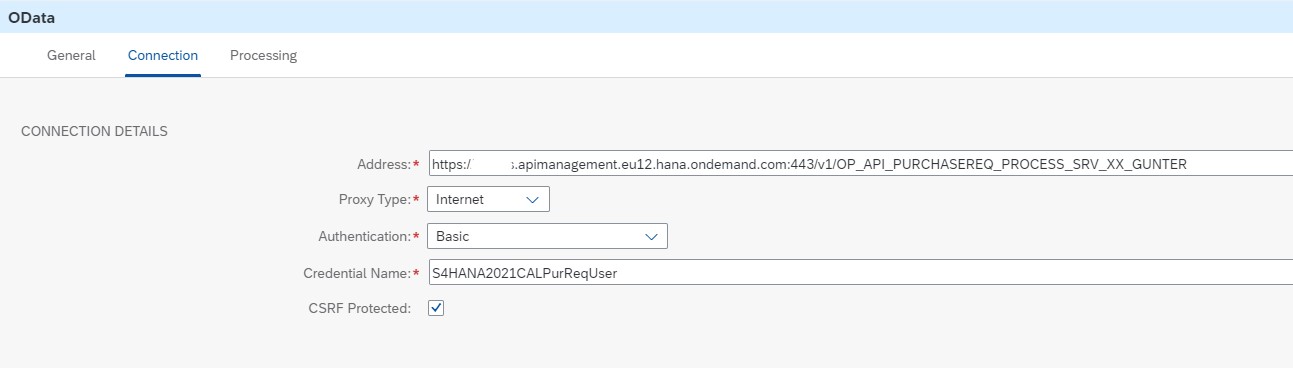
Target connection settings
The target processing settings are defined by letting Cloud Integration retrieve the metadata from S/4HANA for the OData v2 service and then selecting the resource path (here: A_PurchaseRequisitionHeader) and the fields needed to create (in this case) the purchase requisition. The operation to create is POST (the request verb).
When you define the target processing settings a new window will open like this:

Target processing: Prepare to get the schema definition.
The important thing is to select Generate XML Schema definition and set a name for the target schema .xsd-file. We need this file in a later step (it won't be downloaded but be present inside the iFlow).
Later you will see your selected fields and structures in the target processing window like below.

Target processing settings to S/4HANA.
Mapping of messages
I assume you have already mapped messages in Cloud Integration - the trick here is, that the source message is a custom JSON and there is nothing in the library of messages you can use. Now, how to map custom JSON to a defined XML OData to S/4HANA?
1. Convert JSON to XML
We need a template JSON message, one that represents how the source system would send the data. Like this one below which I invented for my exercise:
{

    "PurReqnDescription": "This is a header description",

    "Items": [

        {

            "PurchaseRequisitionItemText": "This is an item description of item 1",

            "PurchaseRequisitionPrice": "12.35",

            "RequestedQuantity": "150",

            "BaseUnit": "PC"

        },

        {

            "PurchaseRequisitionItemText": "This is an item description of item 2",

            "PurchaseRequisitionPrice": "7.20",

            "RequestedQuantity": "12",

            "BaseUnit": "PC"

        }

    ]

}
We feed this into a JSON to XML converter. I used Convert JSON To XML - but you can use any other you like.
After that you will get the XML message out of it like this:
<?xml version="1.0" encoding="UTF-8" ?>

<root>

  <PurReqnDescription>This is a header description</PurReqnDescription>

  <Items>

    <PurchaseRequisitionItemText>This is an item description of item 1</PurchaseRequisitionItemText>

    <PurchaseRequisitionPrice>12.35</PurchaseRequisitionPrice>

    <RequestedQuantity>150</RequestedQuantity>

    <BaseUnit>PC</BaseUnit>

  </Items>

  <Items>

    <PurchaseRequisitionItemText>This is an item description of item 2</PurchaseRequisitionItemText>

    <PurchaseRequisitionPrice>7.20</PurchaseRequisitionPrice>

    <RequestedQuantity>12</RequestedQuantity>

    <BaseUnit>PC</BaseUnit>

  </Items>

</root>
That's a big step - however we need a XML Schema.
2. Convert XML to XML Schema
What is a schema? Think of the message of the object and the schema as the class of that object. That means a schema contains the information what the message is made out of like the data types, the occurences (like the items in our message) and more. Therefore, it's not possible to deduct a schema from a message. However, clever schema generators are able to guess what the schema might be like based on a good template message. And then your review and potential adjustments need to follow!
I used Free Online XML to XSD Converter and again, feel free to make your own choice of tools. Feeding above XML message will lead to:
<?xml version="1.0" encoding="utf-8"?>

<!-- Created with Liquid Technologies Online Tools 1.0 (https://www.liquid-technologies.com) -->

<xs:schema attributeFormDefault="unqualified" elementFormDefault="qualified" xmlns:xs="http://www.w3.org/2001/XMLSchema">

  <xs:element name="root">

    <xs:complexType>

      <xs:sequence>

        <xs:element name="PurReqnDescription" type="xs:string" />

        <xs:element maxOccurs="unbounded" name="Items">

          <xs:complexType>

            <xs:sequence>

              <xs:element name="PurchaseRequisitionItemText" type="xs:string" />

              <xs:element name="PurchaseRequisitionPrice" type="xs:decimal" />

              <xs:element name="RequestedQuantity" type="xs:unsignedByte" />

              <xs:element name="BaseUnit" type="xs:string" />

            </xs:sequence>

          </xs:complexType>

        </xs:element>

      </xs:sequence>

    </xs:complexType>

  </xs:element>

</xs:schema>
You see, the RequestedQuantity element shouts out for a type change to a decimal or such. Once we have made the adjustments, save it into a file like "purReqSourceSchema.xsd". We need it in the final step.
3. Apply XML Schema as new message in the mapping
When you add the mapping element to the graphical iFlow, click on Add source message. At the bottom of the pop-up click on “Upload from File System”. Select the .xsd message we created in step 2. You should see your source message like this:

Mapping: Source message definition
Wonderful! We have just defined a custom message that we can map! Now we just need to load the target message.
Click on Add target message. You should see a generated message schema file from our target processing exercise we did before in this blog. It might be called “A_PurchaseRequisitionHeaderEntityPOST.xsd” if you work with the S/4HANA Purchase Requisition or whatever you selected or used before. Select it. You are now ready to do the regular mapping of fields and structures.
Closing
We saw how to move from a custom JSON message to a mapping in the SAP Integration Suite iFlow. I hope it was useful - would be happy to receive your comments!
Useful links:
- SAP Managed Tags:
- SAP Integration Suite,
- OData,
- SAP S/4HANA
Labels:
2 Comments
You must be a registered user to add a comment. If you've already registered, sign in. Otherwise, register and sign in.
Labels in this area
-
ABAP CDS Views - CDC (Change Data Capture)
2 -
AI
1 -
Analyze Workload Data
1 -
BTP
1 -
Business and IT Integration
2 -
Business application stu
1 -
Business Technology Platform
1 -
Business Trends
1,658 -
Business Trends
95 -
CAP
1 -
cf
1 -
Cloud Foundry
1 -
Confluent
1 -
Customer COE Basics and Fundamentals
1 -
Customer COE Latest and Greatest
3 -
Customer Data Browser app
1 -
Data Analysis Tool
1 -
data migration
1 -
data transfer
1 -
Datasphere
2 -
Event Information
1,400 -
Event Information
67 -
Expert
1 -
Expert Insights
177 -
Expert Insights
310 -
General
1 -
Google cloud
1 -
Google Next'24
1 -
GraphQL
1 -
Kafka
1 -
Life at SAP
780 -
Life at SAP
13 -
Migrate your Data App
1 -
MTA
1 -
Network Performance Analysis
1 -
NodeJS
1 -
PDF
1 -
POC
1 -
Product Updates
4,576 -
Product Updates
353 -
Replication Flow
1 -
REST API
1 -
RisewithSAP
1 -
SAP BTP
1 -
SAP BTP Cloud Foundry
1 -
SAP Cloud ALM
1 -
SAP Cloud Application Programming Model
1 -
SAP Datasphere
2 -
SAP S4HANA Cloud
1 -
SAP S4HANA Migration Cockpit
1 -
Technology Updates
6,873 -
Technology Updates
441 -
Workload Fluctuations
1
Related Content
- API Management: Unlocking OAuth Strategies in Technology Blogs by SAP
- Explore the SAP HANA Cloud vector engine with a free learning experience in Technology Blogs by SAP
- What’s New in SAP Datasphere Version 2024.9 — Apr 23, 2024 in Technology Blogs by Members
- SAP CAI Chatbot integration in Alexa and Telegram in Technology Blogs by Members
- Not possible to create Integration Suite in BTP Trial in Technology Q&A
Top kudoed authors
| User | Count |
|---|---|
| 19 | |
| 14 | |
| 12 | |
| 11 | |
| 10 | |
| 9 | |
| 8 | |
| 8 | |
| 8 | |
| 7 |