
- SAP Community
- Products and Technology
- Technology
- Technology Blogs by SAP
- SAP Fiori Elements: Adaptation Project - Adding a ...
Technology Blogs by SAP
Learn how to extend and personalize SAP applications. Follow the SAP technology blog for insights into SAP BTP, ABAP, SAP Analytics Cloud, SAP HANA, and more.
Turn on suggestions
Auto-suggest helps you quickly narrow down your search results by suggesting possible matches as you type.
Showing results for
Advisor
Options
- Subscribe to RSS Feed
- Mark as New
- Mark as Read
- Bookmark
- Subscribe
- Printer Friendly Page
- Report Inappropriate Content
01-26-2022
9:18 AM
SAPUI5 Flexibility supports the easy extension of SAP delivered apps ensuring that the adapted application (called Application Variant) will be compatible with future updates provided by SAP. A variant is semantically a new application with an own id, which technically is comprised of the extended application resources and the changes created as part of adaptation project. Note that the resources of the original app are not copied over but are referenced instead. This is just one of the available possibilities (developer adaptation) - you can find more details on the different flexibility capabilities on this blog post from Stefanie Hager (which I recommend reading before you proceed). Also this blog post by Hristo Tsolev provides a nice overview on Adaptation Project and the questions and discussions on the comments area could help you if you are running into difficulties.
On this blog post we will go a little deeper and focus on the implementation of such an extension using an SAP Fiori elements app: adding a custom filter to a List Report. We will start with an application that lists available products and add a new filter that checks if a product needs approval for purchase – which happens if the price is above a certain limit. For that we will look at how to create an Adaptation Project in SAP Business Application Studio, how to implement the extension using SAPUI5 Visual Editor, how to test and debug the Application Variant, and finally look at other available resources so you can dig deeper into the topic.
Note: The steps described on this post are only valid for an application using OData V2.
Update: If you are also interested in adapting freestyle SAPUI5 applications, check out this new post.
Target Audience: Developers who want to compatibly adapt and extend standard Fiori elements applications, adjusting their appearance and/or functionality (like adding or removing controls).
Creating the Adaptation Project in SAP Business Application Studio
SAP Business Application Studio is an SAP Business Technology Platform (SAP BTP) service that offers a development environment optimized for business applications. You can find information on how to get access and start the service here. Once you have SAP Business Application Studio running, you are ready to start an Adaptation Project to extend a standard application. On this blog we will focus on an SAP Fiori elements application - you can find more details on this topic here. Note that the same capabilities are also available for freestyle apps - but this example and the code used is specific for SAP Fiori elements.
From the welcome page you choose Start from Template. Alternatively, you can go to File => New Project from Template.

New project
Now select Adaptation Project and click on Start. A step-by-step wizard will be launched. First you need to select the Target environment: ABAP or Cloud Foundry – select the one where the application you want to adapt is located. If you are not sure, contact your SAP BTP Administrator.
In the next step you need to enter some basic information. The Project Name needs to have multiple parts divided by a dot (.) – I use “adapt.blog” for this example. The Namespace will default to project name with "customer." before it. For the Application Title you should provide something meaningful to easily find and manage the application in the future. For this example, I simply use “Fiori Elements Project”.

Basic Information
On the next step you configure the Adaptation Project:
- First you select the destination (system) – which will determine the rest of the required information. For this example, I am using a destination to an ABAP system which requires credentials. In this case, the list of applications will only load after a successful login (press Enter or click on the login button by the input field).
- Carefully select the application you want to adapt from the Select Application drop-down. If the list is not loading or you can’t find the application, contact your SAP BTP Administrator to ensure that you are connecting to the correct destination.
- You can also choose an SAPUI5 version on the next drop-down – normally you will use the proposed value (which is determined from the system), since the application will run using that version after deployment. However, another version can be selected if, for example, you want to test the app using a newer SAPUI5 version before it is applied to the system.
- Finally, you can see the Fiori ID and Application Component Hierarchy (ACH) that will respectively identify the application (when you go to the About section in the Fiori Toolbar) and the component that should be used for support. These fields are pre-populated with information from the selected source application.
- Click on Finish and wait for the project to be generated.
Working with the SAPUI5 Visual Editor
The Adaptation Project is generated and ready for your changes. To get started, go to the generated workspace, open the webapp folder, right-click on the manifest.appdescr_variant file and select Open SAPUI5 Visual Editor:
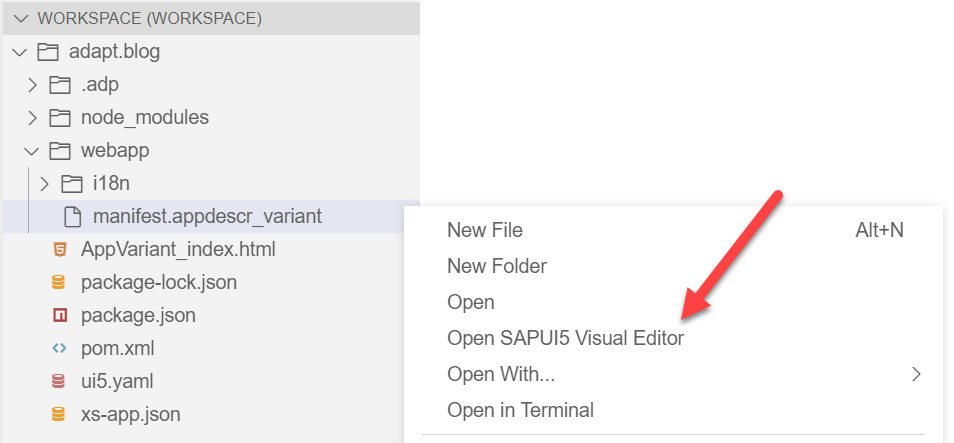
Open SAPUI5 Visual Editor
This will open the SAPUI5 Visual Editor, which is an intuitive tool for easily adapting your variant of the application and seeing the result of your changes. The preview of the application can also display data and, depending on which destination was selected, you might need to re-enter your credentials during this step. Once the preview is loaded, you can press Go on the application to load data and click on Edit to start making changes.

SAPUI5 Visual Editor
Using the SAPUI5 Visual Editor, you can easily make visual changes to your variant of the application like moving or renaming elements. All the changes are saved separately, meaning that the original application remains untouched, and your changes will always be compatible. You can find more details on the capabilities here. I will jump right into our use case: adding the new filter.
Adding the XML Fragment
As the new filter will be a Change to an existing control, we need to create an XML Fragment. To do that, simply right-click on the Smart Filter Bar, and choose Add Fragment.

Add Fragment
In the pop-up you need to select the Target Aggregation and the index (position in the aggregation) for the new fragment. In our example we use the controlConfiguration aggregation. For this aggregation the index is selected automatically. Proceed by clicking on Create new.

Create new
In the next pop-up you need to choose an appropriate name for the fragment. For this example, I use ApprovalFilter.

Fragment Name
By pressing Create, a new Change is created pointing to a new fragment XML file that is automatically added to the /webapp/changes/fragments folder: ApprovalFilter.fragment.xml. Before we start changing the XML, notice the comment on the first line: Use stable and unique id’s! When working with SAPUI5 flexibility, it is very important to understand stable ids. More details on the topic can be found here.
Below is the finalized XML for the new filter. Check it out and then we will analyze it in detail:
<!-- Use stable and unique id's!-->

<core:FragmentDefinition xmlns:core='sap.ui.core' xmlns='sap.ui.comp.smartfilterbar' xmlns:m='sap.m'>


   <ControlConfiguration

      id="purchaseApproval"

      key="purchaseApproval"

      label="Purchase Approval"

      visibleInAdvancedArea="true">

      <customControl>

         <m:ComboBox id="purchaseApprovalComboBox">

            <core:Item id="purchaseApprovalComboBoxItem0" key="noApprovalRequired" text="No Approval Required"/>

            <core:Item id="purchaseApprovalComboBoxItem1" key="approvalRequired" text="Approval Required"/>

          </m:ComboBox>

        </customControl>

    </ControlConfiguration>


</core:FragmentDefinition>
As we are extending the SmartFilterBar, we set it as the default namespace to make the tags more readable. We also need a control from the sap.m library (sap.m.ComboBox), so we add this namespace too.
Since this fragment was defined for the Control Configuration aggregation of the SmartFilterBar, this is the first control we need. For the properties, we define an id and key to uniquely identify this control. We also set a label (we will make it translatable later in this tutorial). Finally, we set visibleInAdvancedArea to true, so the filter is added there by default. More details on the properties of this control can be found in the API.
Now we define how the filter should look. We are defining it ourselves, so we start with the customControl tag which allows custom content. The filter is a simple ComboBox with two items: No Approval Required and Approval Required.
Add Custom Controller Extension
Now that the fragment is ready, we need to define its behavior. To do that, go back to the SAPUI5 Visual Editor and again right-click the SmartFilterBar – but this time choose Extend with Controller.
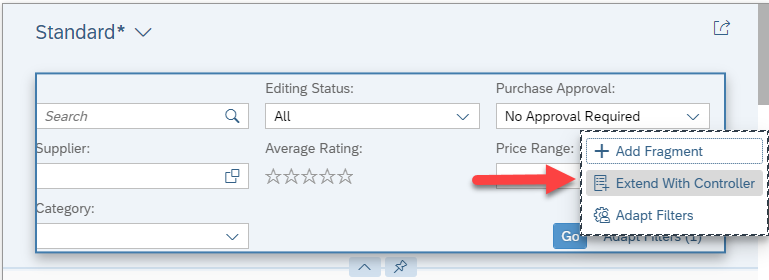
Extend With Controller
In the pop-up, choose a suitable name for the controller. As the List Report is being extended here, you can call the extension ListReport and click on Extend. This will create the file ListReport.js on the /webapp/changes/coding folder. Further extensions to the List Report (unrelated to our new filter) can also be added to this file. You can find more information about controller extensions here.
On the SAPUI5 Visual Editor, notice that near the Outline there is a tab called Changes, where you can see the changes that were done to the Application Variant. On this tab you can also see the details of the Changes or delete them.

Changes tab
The ListReport.js file is created with many comments to guide your coding. Since we know what we want to do, I removed all the other comments and only left what is relevant for this example.
/***

@controller Name:sap.suite.ui.generic.template.ListReport.view.ListReport,

*@viewId:sap.ui.demoapps.rta.fe::sap.suite.ui.generic.template.ListReport.view.ListReport::SEPMRA_C_PD_Product

*/

sap.ui.define([

        'sap/ui/core/mvc/ControllerExtension',

        "sap/ui/model/Filter",

        "sap/ui/model/FilterOperator"

    ],

    function (

        ControllerExtension,

        Filter,

        FilterOperator

    ) {

        "use strict";


        var APPROVAL_LIMIT = 5;


        return ControllerExtension.extend("customer.adapt.blog.ListReport", {

            override: {

                //  override public method of the ListReport controller

                templateBaseExtension: {

                    /**

                     * Can be used to add filters. They will be combined via AND with all other filters

                     * sControlId is the ID of the control on which extension logic to be applied.

                     * For each filter the extension must call fnAddFilter(oControllerExtension, oFilter)

                     * oControllerExtension must be the ControllerExtension instance which adds the filter

                     * oFilter must be an instance of sap.ui.model.Filter

                     */

                    addFilters: function (fnAddFilter, sControlId) {

                        var oComboBox = this.byId("purchaseApprovalComboBox");

                        var sSelectedKey = oComboBox.getSelectedKey();

                        var oFilter;

                        switch(sSelectedKey) {

                            case "noApprovalRequired":

                                oFilter = new Filter({

                                    path: "Price",

                                    operator: FilterOperator.LT,

                                    value1: APPROVAL_LIMIT

                                    });

                                break;

                            case "approvalRequired":

                                oFilter = new Filter({

                                    path: "Price",

                                    operator: FilterOperator.GE,

                                    value1: APPROVAL_LIMIT

                                });

                                break;

                            default:

                                break;

                        }

                        if (oFilter){

                            fnAddFilter(this, oFilter);

                        }

                    }

                }

            }

        });

    });
To extend the List Report, you need to include your code in the override block, under templateBaseExtension. You can find more details on how to extend the List Report and other SAP Fiori elements controls here. One of the available extensibility functions is addFilters(), which we are using in this example. The function is also explained in the code comments.
Our new filter is based on the state of the purchaseApprovalComboBox control, so we start by retrieving this control and checking which key is selected. If the key noApprovalRequired is selected (we want to filter out the items over a certain price), we build a new Filter (sap.ui.model.Filter) with path (OData property, in this case Price), operator (in this case LT, “Less Than”) and value1 (defined in the APPROVAL_LIMIT variable). Other filter operators like BT (“Between”) require value1 and value2.
For the approvalRequired key, we use the opposite logic, selecting only products with price greater than or equal to (FilterOperator.GE – greater or equal) the approval limit. If no keys are selected (default case), no additional filter is created.
If a filter was created, we finally call fnAddFilter() with the Controller Extension itself (this) and the new filter (oFilter).
App State
Another important topic to consider when extending an application is the App State. When navigating between pages, the filter state should remain intact. It is also important to keep the current filter value in cases like bookmarking the page or sharing the application link.
To do that, the List Report provides two methods for the App State: provideExtensionAppStateData and restoreExtensionAppStateData. These methods should be included in the controller code also under override (same level as templateBaseExtension). The complete ListReport.js file including the handling of the App State for the new filter can be seen below:
/***

@controller Name:sap.suite.ui.generic.template.ListReport.view.ListReport,

*@viewId:sap.ui.demoapps.rta.fe::sap.suite.ui.generic.template.ListReport.view.ListReport::SEPMRA_C_PD_Product

*/

sap.ui.define([

        'sap/ui/core/mvc/ControllerExtension',

        "sap/ui/model/Filter",

        "sap/ui/model/FilterOperator"

    ],

    function (

        ControllerExtension,

        Filter,

        FilterOperator

    ) {

        "use strict";


        var APPROVAL_LIMIT = 5;


        return ControllerExtension.extend("customer.adapt.blog.ListReport", {

            override: {

                // override public method of the ListReport controller

                templateBaseExtension: {

                    /**

                     * Can be used to add filters. They will be combined via AND with all other filters

                     * sControlId is the ID of the control on which extension logic to be applied.

                     * For each filter the extension must call fnAddFilter(oControllerExtension, oFilter)

                     * oControllerExtension must be the ControllerExtension instance which adds the filter

                     * oFilter must be an instance of sap.ui.model.Filter

                     */

                    addFilters: function (fnAddFilter, sControlId) {

                        var oComboBox = this.byId("purchaseApprovalComboBox");

                        var sSelectedKey = oComboBox.getSelectedKey();

                        var oFilter;

                        switch(sSelectedKey) {

                            case "noApprovalRequired":

                                oFilter = new Filter({

                                    path: "Price",

                                    operator: FilterOperator.LT,

                                    value1: APPROVAL_LIMIT

                                    });

                                break;

                            case "approvalRequired":

                                oFilter = new Filter({

                                    path: "Price",

                                    operator: FilterOperator.GE,

                                    value1: APPROVAL_LIMIT

                                });

                                break;

                            default:

                                break;

                        }

                        if (oFilter){

                            fnAddFilter(this, oFilter);

                        }

                    }

                },


                /**

                * Can be used to store specific state by calling fnSetAppStateData(oControllerExtension, oAppState).

                * oControllerExtension must be the ControllerExtension instance for which the state should be stored.                * oAppState is the state to be stored.

                */

                provideExtensionAppStateData: function (fnSetAppStateData) {

                    var oComboBox = this.byId("purchaseApprovalComboBox");

                    var sSelectedKey = oComboBox.getSelectedKey();


                    fnSetAppStateData(this, {

                        customApprovalFilter: sSelectedKey

                    });

                },


                /**

                * Allows extensions to restore their state according to a state which was previously stored.

                */

                restoreExtensionAppStateData: function (fnGetAppStateData) {

                    var oExtensionData = fnGetAppStateData(this);

                    if(oExtensionData) {

                        this.byId("purchaseApprovalComboBox").setSelectedKey(oExtensionData.customApprovalFilter);

                    }

                }

            }

        });

    });
Testing the Adaptation
Once the fragment and the extension are complete, you can verify that the adaptation was successful. First you need to save all files (if autosave is not enabled) and close the editor. When the SAPUI5 Visual Editor is opened again, you should already see the changes on the application preview. Let’s try it out: I select “No Approval Required” and press “Go” – and, sure enough, only the products with price < 5 are displayed on the list.

Testing the application
Selecting “Approval Required” will only show products with price >= 5 and clearing the combo box will not have any effect on the list. Also notice that, when you select a value on the combo box, this is automatically detected as a change to the Standard view (* is added to the view name) – just like when the other filters are changed.
Make Fields Translatable
When applications are being used all over the world, it is important that they are properly localized. This is also true for extensions – you don’t want your new fields to be the only ones still in English when the app is being run by a German user, right? To avoid this situation, you should make use of Resource Bundles (i18n files).
Adaptation Project already creates the proper i18n files for you in the folder webapp/i18n. Go to the ListReport folder, open the folder for the relevant entity – in this case SEPMRA_C_PD_Product – and add these lines to the file i18n.properties:
# Approval Texts

PURCHASE_APPROVAL=Purchase Approval

APPROVAL_REQUIRED=Approval Required

NO_APPROVAL_REQUIRED=No Approval Required
Afterwards go back to the fragment XML and replace the texts with the i18n bindings:
label="Purchase Approval" with label=“{i18n>PURCHASE_APPROVAL}“
text="No Approval Required" with text=“{i18n>NO_APPROVAL_REQUIRED}“
text="Approval Required" with text=“{i18n>APPROVAL_REQUIRED}“
<!-- Use stable and unique id's!-->

<core:FragmentDefinition xmlns:core='sap.ui.core' xmlns='sap.ui.comp.smartfilterbar' xmlns:m='sap.m'>


   <ControlConfiguration

      id="purchaseApproval"

      key="purchaseApproval"

      label="{i18n>PURCHASE_APPROVAL}"

      visibleInAdvancedArea="true">

      <customControl>

         <m:ComboBox id="purchaseApprovalComboBox">

            <core:Item id="purchaseApprovalComboBoxItem0" key="noApprovalRequired" text="{i18n>NO_APPROVAL_REQUIRED}"/>

            <core:Item id="purchaseApprovalComboBoxItem1" key="approvalRequired" text="{i18n>APPROVAL_REQUIRED}"/>

          </m:ComboBox>

       </customControl>

   </ControlConfiguration>


</core:FragmentDefinition>
Reload the SAPUI5 Visual Editor to see if the texts still appear correctly. If the app needs to be translated to other languages, they can now be properly added to the respective i18n files.
Debugging
Update: it is now possible to preview your application in a separate tab, making the testing and debugging process faster and more convenient. You just need to right-click the manifest.appdescr_variant file and choose "Open Preview". You can then use the developer tools (for this example I am using Google Chrome) and find the file you changed (ListReport.js) to set breakpoints, watch variables, etc... If you make further changes on the application, you can simply reload the preview tab to see the updates.
Debugging in the preview mode of the SAPUI5 Visual Editor is also possible, but you need to pay attention to some details. If you cannot find the file or the execution is not stopping on your breakpoints, check if you are on the correct JS context: it should be the iFrame of the application preview (starts with “__adaptUiPreviewBodyIFrame”). You can see below how the debugger detects a missing reference (I commented out "APPROVAL_LIMIT" from the controller code to cause this error):

Debugging the application
Wrap Up and Next Steps
In this blog post we went through a simple example of an extension done using Adaptation Project. However, you can use it to make much more elaborate changes to your applications. Don’t forget to check the other available tutorials and courses provided by SAP and keep an eye on this blog as we will be updating with further resources as soon as they are available. For example: the openSAP course Developing and Extending SAP Fiori Elements Apps contains comprehensive lessons on extension topics, especially in week 4 (units 3 & 4).
I would like to thank Stefanie Hager (don't forget to check her blog post), Mikhail Benderskiy, Hristo Tsolev, Lavanya S. and Domink Stork for helping prepare and review the content of this blog.
We would love to hear from you! Please leave your feedback below.
- SAP Managed Tags:
- SAP Business Application Studio,
- SAP Fiori,
- SAP Fiori Elements,
- SAPUI5,
- SAP Fiori for SAP S/4HANA,
- SAP S/4HANA
Labels:
24 Comments
You must be a registered user to add a comment. If you've already registered, sign in. Otherwise, register and sign in.
Labels in this area
-
ABAP CDS Views - CDC (Change Data Capture)
2 -
AI
1 -
Analyze Workload Data
1 -
BTP
1 -
Business and IT Integration
2 -
Business application stu
1 -
Business Technology Platform
1 -
Business Trends
1,658 -
Business Trends
93 -
CAP
1 -
cf
1 -
Cloud Foundry
1 -
Confluent
1 -
Customer COE Basics and Fundamentals
1 -
Customer COE Latest and Greatest
3 -
Customer Data Browser app
1 -
Data Analysis Tool
1 -
data migration
1 -
data transfer
1 -
Datasphere
2 -
Event Information
1,400 -
Event Information
67 -
Expert
1 -
Expert Insights
177 -
Expert Insights
301 -
General
1 -
Google cloud
1 -
Google Next'24
1 -
GraphQL
1 -
Kafka
1 -
Life at SAP
780 -
Life at SAP
13 -
Migrate your Data App
1 -
MTA
1 -
Network Performance Analysis
1 -
NodeJS
1 -
PDF
1 -
POC
1 -
Product Updates
4,577 -
Product Updates
346 -
Replication Flow
1 -
REST API
1 -
RisewithSAP
1 -
SAP BTP
1 -
SAP BTP Cloud Foundry
1 -
SAP Cloud ALM
1 -
SAP Cloud Application Programming Model
1 -
SAP Datasphere
2 -
SAP S4HANA Cloud
1 -
SAP S4HANA Migration Cockpit
1 -
Technology Updates
6,873 -
Technology Updates
430 -
Workload Fluctuations
1
Related Content
- Sapphire 2024 user experience and application development sessions in Technology Blogs by SAP
- Empowering Retail Business with a Seamless Data Migration to SAP S/4HANA in Technology Blogs by Members
- WebIDE: Extending Create Purchase Requisition New (F1643A) in Technology Q&A
- Unlocking Full-Stack Potential using SAP build code - Part 1 in Technology Blogs by Members
- Cloud Integration: Manually Sign / Verify XML payload based on XML Signature Standard in Technology Blogs by SAP
Top kudoed authors
| User | Count |
|---|---|
| 26 | |
| 18 | |
| 15 | |
| 13 | |
| 11 | |
| 9 | |
| 8 | |
| 8 | |
| 8 | |
| 7 |