
- SAP Community
- Products and Technology
- Technology
- Technology Blogs by SAP
- SAP Data Intelligence Python Operators and Cloud C...
Technology Blogs by SAP
Learn how to extend and personalize SAP applications. Follow the SAP technology blog for insights into SAP BTP, ABAP, SAP Analytics Cloud, SAP HANA, and more.
Turn on suggestions
Auto-suggest helps you quickly narrow down your search results by suggesting possible matches as you type.
Showing results for
Advisor
Options
- Subscribe to RSS Feed
- Mark as New
- Mark as Read
- Bookmark
- Subscribe
- Printer Friendly Page
- Report Inappropriate Content
04-14-2023
8:20 AM
The Transmission Control Protocol (TCP) is a widely used protocol that provides a reliable and ordered delivery of data between applications running on different hosts. It serves as the foundation for many technologies and plays a crucial role in modern IT infrastructure.
SAP Data Intelligence is a powerful platform that allows you to integrate various systems and data sources to gain insights and make informed decisions. Its custom Python operators offer even more flexibility, enabling you to connect to systems beyond what the standard shipped operators support.
In this blog post, we'll guide you through the steps to establish connectivity to an on-premises TCP-based system using Python in SAP Data Intelligence.
Scenario: We aim to establish a connection with a TCP-based system using the Python operator in SAP Data Intelligence. Many databases but also other protocols like SFTP etc. are based on TCP. To achieve this, we will configure the cloud connector, which involves a series of steps. For the purposes of this demonstration, we will use an example of a "Hello TCP" server that is running on my local computer. The ultimate objective is to access this server from within SAP Data Intelligence using the Cloud Connector.
Before proceeding with the steps outlined in this guide, it is essential to have an instance of the SAP Cloud Connector installed. While it is possible to install the cloud connector on a server, for the purposes of this demonstration, we will be using a Windows machine. We recommend following the instructions provided in this blog (https://blogs.sap.com/2021/09/05/installation-and-configuration-of-sap-cloud-connector/) to install and configure the cloud connector.
The second requirement is a BTP subaccount with a Data Intelligence cluster. To this Subaccount we will connect the Cloud Connector.
The first step is to create a configuration in the Cloud Connector that connects to our subaccount and exposes the TCP resource. For the purpose of this demonstration, I ran a small Node.js server on my Windows machine that outputs "Hello TCP!".
To create the configuration, navigate to the admin interface for the cloud connector and create a "Cloud to On-Premise" configuration.
In the screenshot above, you can see that I exposed the internal host "localhost" with port 4444 via a virtual host called "virtualhost". This virtual host is the host that we will be requesting from the BTP side. Compared to HTTP resources, we do not need to explicitly expose paths.
On the BTP end, we can check the cockpit and the connected cloud connectors in the respective menu tab. If you cannot see this tab, you may be missing some roles. It is important to note that we see the LocationID "FELIXLAPTOP", which is an identifier that distinguishes multiple cloud connectors connected to the same subaccount.
For our purposes, we do not want to hard-code the connection details, because we need a little help from the connection management to access the Connectivity Service of BTP. In the Connection Management application from SAP Data Intelligence we can create connections of all types. We create a connection of type HTTP with host, port and SAP Cloud Connector as the gateway.
Note: Not all connection types allow you to access via the Cloud Connector. See the official product documentation for details.
In the operators menu of Data Intelligence we create a new custom operator based on the Python3 operator.
We than change the configSchema.json of this operator to accept an HTTP Connection as a parameter. This file can be found in the repository under the following path.
Note: This is a bit hacky. Data Intelligence proxies the Connectivity Service from the BTP internally. We can reach it using the internal host provided in the connection details ("connectivity-proxy-service") of a HTTP Connection (because this connection supports the SAP Cloud Connector as a gateway - other connection types might work as well). It is important to notice that the behavior of this proxy is exactly the same as that of the Connectivity Service. In other environments, like Cloud Foundry, you can bind an instance of the Connectivity Service to your application and access the service that way. Data Intelligence also helps us with the authentication flow; in the connection details, we will find a valid JWT token to authenticate against the Connectivity Proxy.
The JSON file looks like this:
In the Python Operator we will be using the sapcloudconnectorpythonsocket library I created for this purpose. This needs to be installed in a custom Dockerfile. The reason we cannot use standard librarys like PySocks to connect to the connectivity service, is the custom authentication flow used.
This post will not elaborate further on how to link the Dockerfile to the Custom Operator using tags.
And finally, the actual script looks straightforward:
First we take the connection details from the api.config.http_connection object. Then we hand those credentials to the library to connect a socket via the Cloud Connector proxy to our destination server. The logs reveal the various fields that are accessible.
One thing to keep in mind here. Instead of the standard HTTP proxy port of the connectivity service, we use the SOCKS5 proxies port. Looking at a regular service key of a connectivity service instance will make things clearer:
We find the classic XSUAA style clientid, clientsecret and token_service_url to retrieve a token in the client credential flow (Data Intelligence does that for us). Plus, one can also see the different ports exposed by the Connectivity Service.
This is why we specify the SOCKS5 port specifically in the opening of the socket.
With the successful opening of a socket, we are now able to send requests to the TCP server. In the example I am sending a request with an empty body, my local server returns "Hello Tcp!" to every request.
Finally we can put the new operator in a empty graph and fill the http_connection parameter. In this instance, I provide the Connection ID of the connection I created previously.
When executing the graph we can have a look at the console and see the following entries:
That means we were successful and the operator was able to request the local TCP server on my windows machine.
Hope you find the content of this blog helpful. Feel free to comment for further clarifications.
SAP Data Intelligence is a powerful platform that allows you to integrate various systems and data sources to gain insights and make informed decisions. Its custom Python operators offer even more flexibility, enabling you to connect to systems beyond what the standard shipped operators support.
In this blog post, we'll guide you through the steps to establish connectivity to an on-premises TCP-based system using Python in SAP Data Intelligence.
Access TCP-based resources:
Scenario: We aim to establish a connection with a TCP-based system using the Python operator in SAP Data Intelligence. Many databases but also other protocols like SFTP etc. are based on TCP. To achieve this, we will configure the cloud connector, which involves a series of steps. For the purposes of this demonstration, we will use an example of a "Hello TCP" server that is running on my local computer. The ultimate objective is to access this server from within SAP Data Intelligence using the Cloud Connector.

Szenario Architecture
Prerequisite:
Before proceeding with the steps outlined in this guide, it is essential to have an instance of the SAP Cloud Connector installed. While it is possible to install the cloud connector on a server, for the purposes of this demonstration, we will be using a Windows machine. We recommend following the instructions provided in this blog (https://blogs.sap.com/2021/09/05/installation-and-configuration-of-sap-cloud-connector/) to install and configure the cloud connector.
The second requirement is a BTP subaccount with a Data Intelligence cluster. To this Subaccount we will connect the Cloud Connector.
1. Configuration:
The first step is to create a configuration in the Cloud Connector that connects to our subaccount and exposes the TCP resource. For the purpose of this demonstration, I ran a small Node.js server on my Windows machine that outputs "Hello TCP!".
telnet localhost 4444

Connecting to localhost ...

Hello TCP!
To create the configuration, navigate to the admin interface for the cloud connector and create a "Cloud to On-Premise" configuration.

Cloud Connector configuration
In the screenshot above, you can see that I exposed the internal host "localhost" with port 4444 via a virtual host called "virtualhost". This virtual host is the host that we will be requesting from the BTP side. Compared to HTTP resources, we do not need to explicitly expose paths.

BTP Cockpit Cloud Connector Resources
On the BTP end, we can check the cockpit and the connected cloud connectors in the respective menu tab. If you cannot see this tab, you may be missing some roles. It is important to note that we see the LocationID "FELIXLAPTOP", which is an identifier that distinguishes multiple cloud connectors connected to the same subaccount.
2. Creating a Data Intelligence Connection:
For our purposes, we do not want to hard-code the connection details, because we need a little help from the connection management to access the Connectivity Service of BTP. In the Connection Management application from SAP Data Intelligence we can create connections of all types. We create a connection of type HTTP with host, port and SAP Cloud Connector as the gateway.
Note: Not all connection types allow you to access via the Cloud Connector. See the official product documentation for details.
3. Developing a Custom Operator:
In the operators menu of Data Intelligence we create a new custom operator based on the Python3 operator.
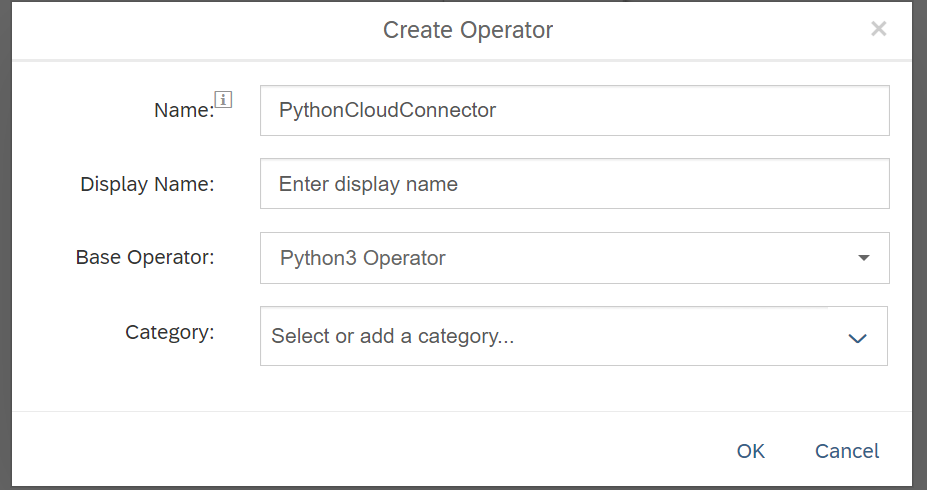
Creating Custom Python Operator
We than change the configSchema.json of this operator to accept an HTTP Connection as a parameter. This file can be found in the repository under the following path.
Note: This is a bit hacky. Data Intelligence proxies the Connectivity Service from the BTP internally. We can reach it using the internal host provided in the connection details ("connectivity-proxy-service") of a HTTP Connection (because this connection supports the SAP Cloud Connector as a gateway - other connection types might work as well). It is important to notice that the behavior of this proxy is exactly the same as that of the Connectivity Service. In other environments, like Cloud Foundry, you can bind an instance of the Connectivity Service to your application and access the service that way. Data Intelligence also helps us with the authentication flow; in the connection details, we will find a valid JWT token to authenticate against the Connectivity Proxy.
vflow\subengines\com\sap\python36\operators\PythonCloudConnector\configSchema.jsonThe JSON file looks like this:
{

    "$schema": "http://json-schema.org/draft-06/schema#",

    "$id": "http://sap.com/vflow/PythonCloudConnector.configSchema.json",

    "type": "object",

    "properties": {

        "codelanguage": {

            "type": "string"

        },

        "scriptReference": {

            "type": "string"

        },

        "script": {

            "type": "string"

        },

        "http_connection": {

            "title": "HTTP Connection",

            "description": "HTTP Connection",

            "type": "object",

            "properties": {

                "configurationType": {

                    "title": "Configuration Type",

                    "description": "Configuration Type",

                    "type": "string",

                    "enum": [

                        " ",

                        "Configuration Manager",

                        "Manual"

                    ]

                },

                "connectionID": {

                    "title": "Connection ID",

                    "type": "string",

                    "format": "com.sap.dh.connection.id"

                },

                "connectionProperties": {

                    "title": "Connection Properties",

                    "description": "Connection Properties",

                    "$ref": "http://sap.com/vflow/com.sap.dh.connections.http.schema.json",

                    "sap_vflow_constraints": {

                        "ui_visibility": [

                            {

                                "name": "configurationType",

                                "value": "Manual"

                            }

                        ]

                    }

                }

            }

        }

    },

    "required": [

        "http_connection"

    ]

}
In the Python Operator we will be using the sapcloudconnectorpythonsocket library I created for this purpose. This needs to be installed in a custom Dockerfile. The reason we cannot use standard librarys like PySocks to connect to the connectivity service, is the custom authentication flow used.
This post will not elaborate further on how to link the Dockerfile to the Custom Operator using tags.
FROM $com.sap.sles.base


RUN python3 -m pip --no-cache-dir install 'sapcloudconnectorpythonsocket' --user
And finally, the actual script looks straightforward:
from sapcloudconnectorpythonsocket import CloudConnectorSocket


tcp_connection = api.config.http_connection


api.logger.info(str(tcp_connection))


def gen():

    api.logger.info("Generator Start")


    cc_socket = CloudConnectorSocket()

    cc_socket.connect(

        dest_host=tcp_connection["connectionProperties"]["host"],

        dest_port=tcp_connection["connectionProperties"]["port"],

        proxy_host=tcp_connection["gateway"]["host"],

        proxy_port=20004,

        token=tcp_connection["gateway"]["authentication"],

        location_id="FELIXLAPTOP"

    )


    cc_socket.send(b"")


    response = cc_socket.recv(4096)

    api.logger.info(response)


    api.logger.info("Generator End")


api.add_generator(gen)
First we take the connection details from the api.config.http_connection object. Then we hand those credentials to the library to connect a socket via the Cloud Connector proxy to our destination server. The logs reveal the various fields that are accessible.
{

   "configurationType":"Configuration Manager",

   "connectionID":"TCP_ONPREM_SYSTEM",

   "connectionProperties":{

      "authenticationType":"NoAuth",

      "host":"virtualhost",

      "port":4444,

      "protocol":"HTTP"

   },

   "connectionType":"HTTP",

   "gateway":{

      "authentication":"<token>",

      "host":"connectivity-proxy-service",

      "locationId":"",

      "password":"",

      "port":20003,

      "subaccount":"2343242-b1ea-415c-9a50-46347c32fa2a",

      "user":""

   },

   "type":"HTTP"

}
One thing to keep in mind here. Instead of the standard HTTP proxy port of the connectivity service, we use the SOCKS5 proxies port. Looking at a regular service key of a connectivity service instance will make things clearer:
{

    "clientid": "<clientid>",

    "clientsecret": "<clientsecret>",

    "url": "https://<subaccount>.authentication.sap.hana.ondemand.com",

    "identityzone": "<subaccount>",

    "tenantid": "<tenantid>",

    "tenantmode": "dedicated",

    "verificationkey": "<verificationkey>",

    "xsappname": "iueniuerncoirencorencercer!b3008|connectivity!b137",

    "uaadomain": "authentication.sap.hana.ondemand.com",

    "credential-type": "binding-secret",

    "onpremise_proxy_host": "connectivityproxy.internal.cf.sap.hana.ondemand.com",

    "onpremise_proxy_http_port": "20003",

    "onpremise_proxy_ldap_port": "20001",

    "onpremise_proxy_port": "20003",

    "onpremise_proxy_rfc_port": "20001",

    "onpremise_socks5_proxy_port": "20004",

    "token_service_domain": "authentication.sap.hana.ondemand.com",

    "token_service_url": "https://<subaccount>.authentication.sap.hana.ondemand.com"

}
We find the classic XSUAA style clientid, clientsecret and token_service_url to retrieve a token in the client credential flow (Data Intelligence does that for us). Plus, one can also see the different ports exposed by the Connectivity Service.
- HTTP: 20003
- SOCKS5/TCP: 20004
This is why we specify the SOCKS5 port specifically in the opening of the socket.
With the successful opening of a socket, we are now able to send requests to the TCP server. In the example I am sending a request with an empty body, my local server returns "Hello Tcp!" to every request.
4. Testing the Custom Operator:
Finally we can put the new operator in a empty graph and fill the http_connection parameter. In this instance, I provide the Connection ID of the connection I created previously.

Python Operator Parameters
When executing the graph we can have a look at the console and see the following entries:
Generator Start

Hello TCP!

Generator End
That means we were successful and the operator was able to request the local TCP server on my windows machine.
Hope you find the content of this blog helpful. Feel free to comment for further clarifications.
- SAP Managed Tags:
- SAP Data Intelligence,
- Python,
- SAP Connectivity service,
- Cloud Connector
Labels:
3 Comments
You must be a registered user to add a comment. If you've already registered, sign in. Otherwise, register and sign in.
Labels in this area
-
ABAP CDS Views - CDC (Change Data Capture)
2 -
AI
1 -
Analyze Workload Data
1 -
BTP
1 -
Business and IT Integration
2 -
Business application stu
1 -
Business Technology Platform
1 -
Business Trends
1,658 -
Business Trends
95 -
CAP
1 -
cf
1 -
Cloud Foundry
1 -
Confluent
1 -
Customer COE Basics and Fundamentals
1 -
Customer COE Latest and Greatest
3 -
Customer Data Browser app
1 -
Data Analysis Tool
1 -
data migration
1 -
data transfer
1 -
Datasphere
2 -
Event Information
1,400 -
Event Information
67 -
Expert
1 -
Expert Insights
177 -
Expert Insights
310 -
General
1 -
Google cloud
1 -
Google Next'24
1 -
GraphQL
1 -
Kafka
1 -
Life at SAP
780 -
Life at SAP
13 -
Migrate your Data App
1 -
MTA
1 -
Network Performance Analysis
1 -
NodeJS
1 -
PDF
1 -
POC
1 -
Product Updates
4,576 -
Product Updates
353 -
Replication Flow
1 -
REST API
1 -
RisewithSAP
1 -
SAP BTP
1 -
SAP BTP Cloud Foundry
1 -
SAP Cloud ALM
1 -
SAP Cloud Application Programming Model
1 -
SAP Datasphere
2 -
SAP S4HANA Cloud
1 -
SAP S4HANA Migration Cockpit
1 -
Technology Updates
6,873 -
Technology Updates
441 -
Workload Fluctuations
1
Related Content
- SAP Datasphere + SAP S/4HANA: Your Guide to Seamless Data Integration in Technology Blogs by SAP
- AI Core - on-premise Git support in Technology Q&A
- Unable to log in to SAP BusinessObjects CMC in Technology Blogs by Members
- ML Scenario Implementation (Logistics Regression Model) using SAP Data Intelligence in Technology Blogs by Members
- There is a problem connecting to the database. JDBC PostgreSQL in Technology Q&A
Top kudoed authors
| User | Count |
|---|---|
| 21 | |
| 14 | |
| 13 | |
| 11 | |
| 10 | |
| 10 | |
| 9 | |
| 9 | |
| 8 | |
| 7 |