
- SAP Community
- Products and Technology
- Technology
- Technology Blogs by SAP
- SAP Cloud Integration: How to use Password Credent...
Technology Blogs by SAP
Learn how to extend and personalize SAP applications. Follow the SAP technology blog for insights into SAP BTP, ABAP, SAP Analytics Cloud, SAP HANA, and more.
Turn on suggestions
Auto-suggest helps you quickly narrow down your search results by suggesting possible matches as you type.
Showing results for
Product and Topic Expert
Options
- Subscribe to RSS Feed
- Mark as New
- Mark as Read
- Bookmark
- Subscribe
- Printer Friendly Page
- Report Inappropriate Content
10-19-2023
9:22 AM
SAP Cloud Integration (aka CPI) provides support for calling OAuth-protected service endpoints via HTTP Receiver channel.
Using “Credentials” artifacts, e.g. "Client Credentials", CPI is able to automatically fetch JWT tokens that are sent to the target endpoint.
However, the OAuth flow “Resource Owner Password Credentials” is not supported.
This blog post shows how to manually implement it.
0.1. Prerequisites
0.2. Introduction
0.3. The Target Application
1. Approach using Token Request
2. Approach using Groovy Request
3. Approach using Destination Service
4. Optional: curl requests
Appendix: Sample Code
Let's go through the goals and the challenges for this blog post.
Scenario
We have a target application or a backend that allows to receive e.g. POST request for creating data.
It is typically used by real users via frontend.
However, in our scenario it is required to call the REST endpoint from an iFlow.
For whatever reason.
As the target app requires a real user (can be a real technical user), we cannot use “Client Credentials” in the HTTP Receiver adapter
The “Authorization Code” credentials is also not really suitable for our scenario.
We want to use the “Resource Owner Password Credentials” flow.
Challenge
SAP Cloud Integration doesn’t support this grant type, means it is not possible to create a “Credentials” artifact for this OAuth flow and use it in the HTTP Receiver adapter.
So we have to manually implement this flow.
Why not supported?
Thanks for the good question.
Some Background:
We should consider that OAuth was specifically designed for avoiding that any web application should have to deal with user's passwords.
In OAuth, verifying the user password is delegated to the “Authorization Server”.
The web application only has to deal with the (short-lived) JWT token which is issued by the Authorization Server.
To obtain a JWT token, several mechanisms were defined, like “Client Credentials” flow or “Authorization Code” flow.
The “Resource Owner Password Credentials” flow was added to the OAuth specification in order to facilitate the migration of classic "Basic Authentication" towards OAuth.
It was actually always recommended to not use it.
Even the specification of OAuth 2.0 itself states that this grant type requires special “trust relationship” and should be only allowed “when other flows are not viable.”
(see section 4.3. of OAuth 2.0 spec).
In the meantime, most websites are based on OAuth.
A new version of the OAuth specification has been drafted and published, version 2.1 and in this new version, the best practices and learnings have been considered.
Which means that the “Resource Owner Password Credentials” grant type has been omitted.

Then why this blog post?
Some more background:
The “normal” way of using OAuth (shortened) is as follows:
The web application (i.e. the "OAuth Client") forwards the authentication of a user (“Resource Owner”) to the Identity Provider (“Authorization Server”) which presents a login-screen, validates the user input and issues a JWT token to the client.
Then the client can use this JWT token to call the protected resource (“Resource Server”).
However, for some scenarios it is still convenient to use the “password” flow, because they don’t have user interaction, but still require user-information.
E.g. test scenarios, or middleware like CPI.
This blog post shows how to manually implement the “password” flow even though we don’t have automatic support in CPI.
Why do it, if it will be omitted?
Good question. I don’t know.
It will take a while until the new spec will be finalized and then it will take more time until Identity Providers ("Authorization Servers") will adopt the new OAuth version and remove the support for this grant type.
This tutorial provides short term solution for your requirement and you can take your time to think about long term solution.
What’s in this tutorial?
We create a sample target application that requires:
🔸Valid JWT token
🔸Valid user
🔸User must have role
🔸Grant type must be "password"
We show how to achieve the “Password Credentials” flow in a simple iFlow.
Scenario overview:
Above diagram shows the target application protected with XSUAA binding.
It is located in the same subaccount like the Cloud Integration tenant, but it could be running elsewhere.
The iFlow contains scripting that accesses user credentials and the iFlow is in charge of fetching the JWT token and of sending it to the receiver.
Fetching and sending is not done by a “Credentials” artifact.
The second diagram adds a few more details:
It depicts the propagation of the user.
The username and password is contained in the “User Credentials” artifact and thanks to the “Resource Owner Password Credentials” flow, the user info is propagated to the target application.
Furthermore, we can see that the user is assigned to a role collection which contains the role which is required by the target app.
Approaches
I've figured out 3 approaches to solve the requirement, each has more or less advantages and disadvantages.
🔸The first approach uses a "Request Reply" step to run the token request.
🔸The second approach does everything manually in one Groovy script.
🔸The third approach uses the Destination service of BTP to run the token request
We start out tutorial with creating and deploying a little Node.js application which serves as target for the outbound call with password credentials.
Disclaimer
This is not an official documentation, nor a recommendation, just describing my way of solving the requirement
First of all, let’s quickly create our target application which is supposed to be called from the iFlow.
We create a simple Node.js application that is protected with OAuth and requires a scope (user role).
Furthermore, it requires that the endpoint is called by a real user, for whatever reason.
E.g. because the user info must be logged, or because the user should be propagated to a backend, etc
We use XSUAA for protection.
The procedure in the iFlow would be pretty much the same for any other OAuth Authorization server, or IAS.
Before we create our service instance of XSUAA, we have a look at the configuration file:
We define a specific scope and corresponding user role and role collection.
This scope will be enforced by our application code.
Following commands can be used to create the service instance on command line:
Create instance
cf cs xsuaa application backendXsuaa -c xs-security.json
Note:
If you use the BTP Cockpit to create the service instance, make sure to use the same name for the instance "backendXsuaa", as it is used in the target application in next section.
We create a simple server application which provides a REST endpoint and implements only the POST request method.
This endpoint is meant for users who send data in the request body for creating anything.
As it is some sensitive operation, we implement 4 security layers:
🔸OAuth protection
🔸Role enforcement
🔸Grant type check
🔸User auditing
At least one layer is missing…
Note:
For the sake of simplicity, we skip the CSRF-token handling.
Means, the requirement of a valid CSRF-token for modifying operations, is skipped for today.
Keeping the code simple and straight-forward
🔷 server.js
Note:
The enforcement of the “password” grant type is only for the sake of this scenario.
In productive environment, you might be able to configure grant type at the Identity Provider, OAuth client configuration.
Or you would enforce the authorization code grant type.
What we want to showcase: the grant type "client credentials" is not allowed.
The full project, which can be found in the appendix 1 , can be deployed with cf push.
After deploy, we can access the credentials of the XSUAA instance.
These are provided in the service binding and we can view them in the environment of the application.
Can be done in the Cockpit or via this command:
cf env backend
We need the System-Provided VCAP_SERVICES variable with name xsuaa.
We take a note of the following 3 properties which we’ll need later in CPI.
In my example:
clientid: sb-backendxsuaa!t78007
clientsecret: L62A9tkJJDp1QAx=
url: https://subd.authentication.eu12.hana.ondemand.com/oauth/token
Note:
we need to append the segments /oauth/token to the url property
Before we can run the below scenarios we need to prepare our user.
As our target application defines and requires a user role, we need to assign it to our “Technical (Test) User”.
We go to the BTP Cockpit -> Subaccount -> Security -> Role Collections.
We already defined a suitable role collection in our xs-security.json file, so we just need to find it, then assign our user to it.
In my example it looks like this:
We create a simple iFlow which does nothing than calling our target application via HTTP Receiver adapter.
For some reason, we have to use "password credentials" flow.
To avoid hard-coding the user password in plain text, we create a "User Credentials" artifact, which will then be used in the script.
In addition, we create another "User Credentials" for the clientid / secret that are used for fetching a JWT token.
1.1.1. User credentials for human test user
The “Password” grant type would probably be used in most cases with a technical user, which has sufficient permissions for the required operations in the backend.
The username and password should nevertheless be externalized into a “User Credentials” artifact in CPI, such that the password is not visible in the iFlow.
We go to Monitor -> Integrations -> Manage Security -> Security Material
Then Create -> User Credentials
🔸We enter a name for the “Credentials” artifact.
We’ll need this name to access it from Groovy script.
In my example: BACKEND_USER
🔸We enter the user name and the password of our cloud user who is allowed to access the target application and who has been assigned the role collection in previous chapter.
In my example, it is the good old Joe Cool.
1.1.2. User Credentials for the Token Request
Going further, we can also move the credentials of the OAuth client into a User Credentials artifact.
I mean the credentials of the XSUAA instance, which we've seen in section 1.3.
What?
I mean, we need to fetch a JWT token from the same XSUAA service instance which is used to protect the target application.
OK?
OK.
🔸We enter a name for the “Credentials” artifact.
In my example: BACKEND_CLIENT
🔸We enter the clientid and secret from section 1.3.
In my example:
clientid: sb-backendxsuaa!t78007
clientsecret: L62A9tkJJDp1QAx=
Now we create our simple iFLow, which looks as follows:
What it does:
The iFlow is triggered by a timer, to make it simple.
Every iFlow has a message, so we compose some dummy message with a Content Modifier.
Before we can fetch a JWT token, we need to prepare the request (headers, body, auth) with a Groovy Script.
The “Request Reply” step is used to fetch the JWT token with password credentials.
It calls the Token-Endpoint-Receiver via HTTP channel.
Afterwards, we read the reply and we use another Groovy script to compose the "authorization" header for the following HTTP request.
Finally, we call the target Backend app via HTTP adapter and send the JWT token.
Note on CSRF
Our POST endpoint is not CSRF-protected, to leave our sample code lean.
Anyways, the procedure with CSRF-protection would be very similar:
Add one more Request/Reply step to fetch the CSRF-token, then extract it from the response header and use it in a new request header in the final Receiver channel.
Let’s go through the steps
🔷Timer
🔸 We define a start event via Timer with default properties, i.e. run once
🔷Content Modifier
🔸Name
Optional, to make clear that we define a fake message content her.
E.g. THE MESSAGE
🔸Message Body
We enter any dummy message content.
In my example:
Original message body in iFlow
Note:
The content must match the "content-type" header in the iFlow and the body parser in the target app.
🔷Content Modifier
We define another Content Modifier which has to take care of storing the original message content in a variable (exchange property).
This is necessary because we will overwrite the message body with the content required for the token request and response.
🔸Name
"Save To Clipboard"
🔸Exchanger Property
Name: clipboard
Source Type: Expression
Source Value: ${in.body}
🔷Groovy Script 1
The first script is meant to prepare the token request.
The following steps are performed:
1. Read "Credentials" artifacts
We use API calls to fetch the user/password and clientif/secret from the "Credentials" artifacts:
2. Compose authorization
We compose the "Authorization" header for the token request.
The request is sent with basic authentication to the Authorization Server, i.e. XSUAA token endpoint.
The clientid and clientsecret, means user and password, are concatenated and encoded with Base64, to form the basic auth header.
3. Compose body
Next, we compose the content of the request body for the token request, according to the OAuth specification.
It contains the user and password in plaintext.
But at least, the user credentials are not visible in the iFLow in plain text.
Furthermore, we don’t send these parameters in the URL, we put them in the request body, which is a little bit more safe
(URLs are easily accessible and frequently logged etc)
4. Configure request
Finally, we set the message body and header.
In addition, in this script we specify the "Content-Type" header, which must be set to "application/x-www-form-urlencoded" because in token request we’re sending the parameters in body and not in the URL.
That’s it for the request which is sent in the next step.
Note that the error handling is missing.
The full code can be found in the appendix 2.
🔷Request Reply
This step from Call -> External Call -> Request Reply doesn’t need to be configured.
🔷HTTP channel
The HTTP channel for the token endpoint call is configured with the data which we stored from the app env in step 1.2.
🔸Address
We enter the URL of the token endpoint.
In my example, it is XSUAA, so we need to append /oauth/token to the end of the base URL which we get in the uri property of the app env.
It looks similar like this:
https://subdomain.authentication.eu12.hana.ondemand.com/oauth/token
🔸Method
We choose "POST", because we decided to send the parameters in the request body, not in the URL
🔸Authentication
We choose "None", because we’ve composed the "Authorization" header (which is used for authentication) already in the Groovy script.
🔸HEADER DETAILS
We enter "Authorization" as we explicitly want to allow this relevant header.
🔷Groovy Script 2
This script runs after the token request.
It is used to prepare the final call to the Backend.
We need to read the response of the token request, adapt it and compose the "Authorization" header for the call to the backend.
We have to know that the response of the token request is a JSON String which contains the JWT token in a property with name access_token.
And, BTW, we assume that the current content of the iFlow message body contains the response of the "Request Reply" step, we skip any error handling, as usual.
1. Parse the JSON response
So first we get the response string from the message body and parse it:
2. Configure call to Backend app
We need to manually set the "Authorization" header for the final HTTP channel, because there’s no "Credential" artifact available.
Composing the "Authorization" header with the obtained JWT token is simple.
Additionally, we need to specify the "Content-Type" header for the call to the Backend app.
This content type must match the body parser which we’re using in our Backend app.
In our sample, we’re expecting just a dummy string, so we set the content type to "text/plain".
Note the <blank> after "Bearer"
🔷Content Modifier
At the end of the password-credentials-process, we have to restore the original message payload which we had stored in an exchange property.
We’re doing this in another Content Modifier step.
🔸Name
"Restore From Clipboard"
🔸Message Body:
Type: Expression
Body: ${property.clipboard}
🔷HTTP channel
After all these preparation steps, we can call our target application via HTTP Receiver adapter.
🔸Authentication
Thanks to our preparation, we can set the “Authentication” option to “None”.
🔸Address
According to our target application deployment, we set the Address
In my example:
https://backend.cfapps.eu12.hana.ondemand.com/endpoint
🔸Method:
As implemented in our app: "POST"
🔸HEADER DETAILS
And of course, we need to allow to send the "Authorization" header
We’re done with the iFlow and don’t forget to save.
The full scripts can be found in the appendix 2
Now we can deploy the iFlow.
1.3.1. View Cloud Foundry logs
The result can be viewed in the cloud logs via command
cf logs backend --recent
The result in my example:
We can see that
- the endpoint has been successfully invoked, no error occurred.
Which means that the checks for authentication, for authorization and for grant type have successfully passed.
- The user “Joe” has been successfully propagated to the target application
- our implementation of password credentials works fine.
1.3.2. View CPI logs
Finally, we have a look at the CPI logs.
To do so, we change the log level to “Trace” at
Monitor -> Manage Integration Content -> Log Configuration
We deploy the iFlow again.
Afterwards we go to Monitor -> Monitor Message Processing, we find our log and click on “Trace”.
Then select the "HTTP step" to see that the “Authorization” header has been masked, for safety.
Nice.
Then we check the payload and we see that the user password is visible in plain text:
Disappointing.
it is even tragic.
So is there any chance to keep the password secret?
I would say yes, that's why we have 2 more variants described in this blog post.
The approach described here seems to be the standard way, following usual iFlow design practices.
👍It lets CPI fetch the token via "Request Reply" step.
The 2 groovy scripts are unavoidable, yet short.
👎The great disadvantage is that the user password can be seen in the traces.👎👎👎
To overcome the traces-problem, we can implement the whole “password credentials” flow manually in one groovy script.
The iFlow looks like this:
What it does:
The Groovy script is based on the previous scripts, but in addition, it has to do the REST-call for fetching the JWT token.
One benefit: we don’t need to modify the message body, so we don’t need the "Clipboard"-step.
Let's just have a look at the script, the other steps remain the same.
🔷Groovy Script
The following steps are performed in the Groovy script:
1. Read the "Credentials" artifacts
Same as above, we're reading the user and client from the credentials artifacts
2. Compose authorization
Same as above, we compose the "Authorization" header for the token request.
3. Compose body
Same as above
4. Configure and send token request
We need the URL of the Authorization Server, which we used in the “Request Reply” step above.
We hard-code it in the script:
Alternatively, you might want to store it in a property in the iFlow.
For executing the token request, we use native library that comes with Groovy:
The response is accessed as follows:
Note that we’re ignoring all error handling in this tutorial.
5. Parse the response and set Authorization
This step is same as in first approach
Finally, set the JWT token as Authorization header to be used by HTTP Receiver adapter
See full script in appendix 3.
The target application remains the same.
After deployment of this second iFlow, we can check the traces and we realize that there are no visible credentials anymore.
This native Groovy approach assumes that users might want to write one complete script, instead of 2 small scripts.
👍This approach makes the full flow much shorter.
It has the great advantage that the user password cannot be seen in the traces.
Another benefit: we don't need to buffer the message payload.
👎The disadvantage: we need to take care of the REST call, including error cases.
What about an approach that doesn't require any coding at all?
There’s another variant for those users who are a bit familiar with SAP BTP and have access to the subaccount with enough privileges for creating service instances.
In this approach, we’re making use of the Destination service in SAP BTP.
It can be used to externalize URLs and authentication data.
In addition, the Destination service is able to fetch JWT tokens for us.
It supports several OAuth flows, including the "Resource Owner Password Credentials" flow.
So it seems ideal for your use case: we’ll make use of it for storing the credentials of our user and to execute the “Password” OAuth flow.
The diagram shows that the Destination service fetches the JWT token based on the given "Destination Configuration".
The Destination Service offers a REST API which is protected with OAuth itself. The credentials are stored in CPI in a "Client Credentials" artifact.
The REST API is called by a "Request Reply" step and the response contains the JWT token.
First of all, before we can use the Destination service, we need to create a service instance.
Also, we need the credentials for calling the service.
3.1.1. Create Instance of Destination Service
Creating service instance and service key can be easily done from the BTP Cockpit, given that the required permissions are available.
No parameters for instance required.
Go to BTP Cockpit -> Subaccount -> Services -> Marketplace
Find “Destination Service” and press “Create”
Enter a name like “cpiDestination” and finish the wizard.
After creation, view the instance (Services -> Instances) and choose “Create Service Key”.
Enter a name like "cpiKey" and finish the dialog.
Afterwards, press “View” for the service key and take a note of the following 4 properties.
We’ll need this data in CPI, when it comes to calling the Destination service.
In my example:
clientid: sb-clone123!b789|destination-xsappname!b9
clientsecret: 123ABC=
url: https://mysubdomain.authentication.eu12.hana.ondemand.com
uri: https://destination-configuration.cfapps.eu12.hana.ondemand.com
To create the artifacts on command line, the following commands can be used:
cf cs destination lite cpiDestination
cf csk cpiDestination cpiKey
cf service-key cpiDestination cpiKey
3.1.2. Create Destination Configuration
Now we create the “Destination Configuration”.
This is a lightweight artifact which does nothing than store URL and credentials that are required for calling some target.
In addition, some more features are offered that include automatic token request.
To create a Destination Configuration, we go to the subaccount (same in which we’ve created the Destination service instance), then
Connectivity -> Destinations -> New Destination
We configure the destination config with the same data that we used for the “User Credentials” in CPI in chapter 1.1.1. and 1.1.2.
🔸Name
This name will be used later by the REST request from iFlow, for fetching the JWT token.
As such, the name entered here must match the configuration in iFlow
In my example: "backend_destination"
🔸Type:
HTTP
🔸Description
Any text of our choice
🔸URL
The full URL of our target application, in my example
https://backend.cfapps.eu12.hana.ondemand.com/endpoint
However, this URL is not used in our scenario.
🔸Proxy Type
This setting is required, If the target application is onPremise and a Cloud Connector is used.
Otherwise, like in our example, we leave the default, which is "Internet".
🔸Authentication
Here we choose the most wanted OAuth flow of this tutorial:
"OAuth2Password"
🔸User
Here we enter the user name to be used for fetching the token.
It is the same user that was entered in the CPI "User Credentials in chapter 1.1.1
In my example: the email of good old Joe Cool
🔸Password
Joe’s password is usually very long, e.g. "11111111111111"
🔸Use mTLS
This option can be activated if the token-fetch-request, which is done automatically by the Destination service, should use certificate instead of client-secret.
However, in that case, the service has to be configured accordingly
I explained in this blog post how to use this option.
🔸Client ID
The same client ID which we used in chapter 1.1.2.
🔸Client Secret
The very same client secret which we used in the very same chapter 1.1.2
🔸Token Service URL
The URL we got from the service key in chapter 1.1., same like client id / secret
In my example:
https://subdomain.authentication.eu12.hana.ondemand.com/oauth/token
Finally, in my example, the destination config looks as follows:
Alternatively, a destination configuration can be imported from a file containing content like this:
The docu can be found here.
3.2. Create Security Artifact for Destination Service
After creating service instance and destination configuration in BTP, we head over to CPI.
The credentials which we received in the service key of the destination service, must be made available in CPI.
To do so, we create a “Client Credentials” artifact for the Destination Service:
We go to Monitor -> Integrations -> Manage Security -> Security Material
Then Create -> OAuth2 Client Credentials
🔸Name
We enter a name for the “Credentials” artifact which will be used in the iFlow configuration below.
In my example:
BACKEND_DESTINATION_CLIENT
🔸Client ID
We enter the clientid from the service key of the destination service instance created in chapter 3.1.1.
🔸Client Secret
We enter the client secret from the same service key
🔸Client Authentication
We choose "Body Parameter"
🔸Content Type
Must be set accordingly to "application/x-www-form-urlencoded"
As mentioned, this iFlow lets CPI call the Destination service and also avoids any Groovy scripting.
Basically, in the approaches above, use used the Groovy script for parsing the JSON response.
However, the parsing is only required for reading one property value.
This could be done with a simple JSONPath statement.
However, CPI doesn't support JSONPath, only XPath is supported.
As such, we have to convert the JSON response to XML, then apply the XPath.
The conversion might not be performant, but at least we know that the response of the Destination service is always small, so we can afford it.
What it does:
The iFlow uses a "Request Reply" step to call the Destination service.
The response contains the JWT token, which could be parsed in a Groovy Script, but we replace the Groovy script with a "JSON to XML Converter" step.
In the final Content Modifier, we use an XPath expression to access the value of the xml response.
This iFlow again needs to store the original payload in a temporary buffer.
Important to note:
The Destination service REST API is designed to return all the configuration data that was entered in the destination configuration, in the BPT Cockpit.
This means: the user password is contained in the response of the service request.
The drawback: the response can be seen in the tracing tool of the CPI log.
As a consequence, the user password would be displayed there.
However, there’s one important setting which makes sure that the response of the destination service doesn’t contain the user credentials.
It is a parameter which is offered by the REST API.
It allows to omit the credentials from the response.
This query parameter has to be configured in the HTTP channel
Documentation:
Destination Service REST API
API Reference of this REST API on SAP Business Accelerator Hub.
Let’s go through the steps
🔷Timer
🔸 We define a start event via Timer with default properties, i.e. run once
🔷Content Modifier
Same as in first approach, some dummy message content.
Note:
The content must match the "content-type" header in the iFlow and the body parser in the target app.
🔷Content Modifier
Same as above, we define another Content Modifier which has to take care of storing the original message content in a variable (exchange property).
🔷Request Reply
This step from Call -> External Call -> Request Reply doesn’t need to be configured
🔷HTTP channel
The HTTP channel for the destination service call is configured with the data which we stored from the service key in step 3.1.1.
🔸Address
Here we enter the URL of the destination service endpoint.
It is composed as follows:
<uri>/destination-configuration/v1/destinations/<name>
Where uri is the uri property from the service key (3.1.1.) and name is the name of the destination configuration (chapter 3.1.2.)
In my example:
https://destination-configuration.cfapps.eu12.hana.ondemand.com/destination-configuration/v1/destina...
🔸Query
We enter the important flag which results in credentials being omitted from the response
$skipCredentials=true
Note:
Don't forget this setting
🔸Method
GET
🔸Authentication
OAuth2 Client Credentials
🔸Credential Name
BACKEND_DESTINATION_CLIENT
🔸HEADER DETAILS
Request Headers: Authorization
🔷JSON to XML Converter
For our use case, we can use the default settings
Namespace Mapping is actually not required and can be deselected.
🔷Content Modifier
At the end of the password-credentials-process, we have to restore the original message payload which we had stored in an exchange property.
However, before overwriting the payload which is currently the xml-response of the Destination service, we want to access this xml for extracting the JWT token via XPath.
For constructing the XPath statement, it is useful to view the xml content:
We're interested in the value of the http_header node which contains the full value of the "Authorization", which is wonderful, as we can just pass the whole node content to the header.
So this is the path:
/root/authTokens/http_header/value
The "root" node was defined in the previous converter step
🔸Headers
1. We define a new header:
Name: “Authorization”
Source Type: “XPath”
Source Value: "/root/authTokens/http_header/value"
Data Type: "java.lang.String"
2. In addition, we need to set the second header, the Content-Type with value “text/plain”, which we need to use in our simple sample scenario.
The name and the message body are same as above:
🔸Name
"Restore From Clipboard"
🔸Message Body:
Type: Expression
Body: ${property.clipboard}
If you don't like the Converter step, you can simply replace it with below Groovy script.
The message body contains the response from Destination service, formatted as JSON with following structure:
owner
destinationConfiguration
authTokens [
{
value: <theJWT>
http_header
key: "Authorization"
value: "Bearer <theJWT>"
On root level, there is the authTokens element which contains an array which usually contains 1 entry.
Such an authToken entry contains the JWT token.
However, as a convenience, the Destination service sends us a ready-to-use header in the element http_header which we can directly pass to our header in our iFlow.
I mean, it contains the “Bearer” plus <blank> plus JWT.
As such, the job of the Groovy script is clear:
Get body -> parse -> access http_header -> set iFlow-headers -> restore payload
See appendix 4 for full script.
The target application remains the same.
After deployment of this second iFlow, we can check the traces and we realize that there are no visible credentials anymore.
This approach with Destination service moves the user credentials from CPI to BTP.
👍This approach is elegant and does not require any coding.
It has the great advantage that the user password cannot be seen in the traces.
👎The disadvantage: permissions to access to BTP required.
For those of you who use curl instead of iFlow, find these commands for your convenience:
Password Credentials:
Client Credentials:
In this blog post we’ve learned how to call a target application with OAuth 2 “Resource Owner Password Credentials” flow.
Manual implementation is necessary because CPI doesn’t offer a corresponding type of “Credentials” artifacts.
We’ve seen 3 possible ways of achieving password credentials in an iFlow, with more or less scripting.
The challenge is to hide the user password, which obviously should be stored in a “User Credentials” artifact.
Nevertheless, it can be viewed in the logs, if passed in the body.
Solution can be manual scripting or using a Destination in BTP.
The original message body has to be stored in a temporary buffer, like an exchange property.
We’ve also learned that this grant type is not recommended and will disappear with the release of the next version of OAuth, which is currently draft mode of v2.1
To summarize the relevant settings:
🔸We need to hide the user password in "User Credentials" artifact.
🔸We need Groovy script for reading the user credentials
🔸Token request: compose request body like this:
grant_type=password&username=joe&password=123&client_id=xx<>/span
🔸Token Request: authorization
composed as clientid:secret
Then encoded with Base64
Then use it for basic auth as "Basic<blank><b64>
🔸Store the message payload in an intermediate buffer, e.g. Exchange Property:
${in.body}
Restore after token request:
${property.clipboard}
🔸Destination
URL is composed like this
<uri>/destination-configuration/v1/destinations/<name>
🔸Destination-query
Param for hiding user password:
$skipCredentials=true
🔸Response of destination-request
The header value (“Bearer <JWT>”) is contained in the response (JSON) path at:
Root->authTokens->http_header->value
SAP Help Portal:
Scripting APIs
Destination Configuration docu
Destination Service REST API docu
API Reference for REST API on SAP Business Accelerator Hub
Other:
Security Glossary Blog
OAuth 2.0 spec
Note that you need to adapt the names of artifacts or content type or body parser, in case you deviated from tutorial description.
Note:
Make sure to change the body parser to express.json() or similar, if you send a message payload that is not text/plain
🔷 server.js
🔷 package.json
🔷 manifest.yml
🔷 xs-security.json
🔷 Groovy Script 1
🔷 Groovy Script 2
🔷 Groovy Script
🔷 Optional: Groovy Script
🔷 backend_destination

Using “Credentials” artifacts, e.g. "Client Credentials", CPI is able to automatically fetch JWT tokens that are sent to the target endpoint.
However, the OAuth flow “Resource Owner Password Credentials” is not supported.
This blog post shows how to manually implement it.
Quicklinks:
Takeaways
Sample Code
To Alex
Content
0.1. Prerequisites
0.2. Introduction
0.3. The Target Application
1. Approach using Token Request
2. Approach using Groovy Request
3. Approach using Destination Service
4. Optional: curl requests
Appendix: Sample Code
0.1. Prerequisites
- Access to a Cloud Integration tenant.
- Optional: Access to BTP and admin permissions in subaccount
- Optional: Familiar with Node.js, although the tutorial can be followed without local Node.js installation.
0.2. Introduction
Let's go through the goals and the challenges for this blog post.
Scenario
We have a target application or a backend that allows to receive e.g. POST request for creating data.
It is typically used by real users via frontend.
However, in our scenario it is required to call the REST endpoint from an iFlow.
For whatever reason.
As the target app requires a real user (can be a real technical user), we cannot use “Client Credentials” in the HTTP Receiver adapter
The “Authorization Code” credentials is also not really suitable for our scenario.
We want to use the “Resource Owner Password Credentials” flow.
Challenge
SAP Cloud Integration doesn’t support this grant type, means it is not possible to create a “Credentials” artifact for this OAuth flow and use it in the HTTP Receiver adapter.
So we have to manually implement this flow.
Why not supported?
Thanks for the good question.
Some Background:
We should consider that OAuth was specifically designed for avoiding that any web application should have to deal with user's passwords.
In OAuth, verifying the user password is delegated to the “Authorization Server”.
The web application only has to deal with the (short-lived) JWT token which is issued by the Authorization Server.
To obtain a JWT token, several mechanisms were defined, like “Client Credentials” flow or “Authorization Code” flow.
The “Resource Owner Password Credentials” flow was added to the OAuth specification in order to facilitate the migration of classic "Basic Authentication" towards OAuth.
It was actually always recommended to not use it.
Even the specification of OAuth 2.0 itself states that this grant type requires special “trust relationship” and should be only allowed “when other flows are not viable.”
(see section 4.3. of OAuth 2.0 spec).
In the meantime, most websites are based on OAuth.
A new version of the OAuth specification has been drafted and published, version 2.1 and in this new version, the best practices and learnings have been considered.
Which means that the “Resource Owner Password Credentials” grant type has been omitted.
Then why this blog post?
Some more background:
The “normal” way of using OAuth (shortened) is as follows:
The web application (i.e. the "OAuth Client") forwards the authentication of a user (“Resource Owner”) to the Identity Provider (“Authorization Server”) which presents a login-screen, validates the user input and issues a JWT token to the client.
Then the client can use this JWT token to call the protected resource (“Resource Server”).
However, for some scenarios it is still convenient to use the “password” flow, because they don’t have user interaction, but still require user-information.
E.g. test scenarios, or middleware like CPI.
This blog post shows how to manually implement the “password” flow even though we don’t have automatic support in CPI.
Why do it, if it will be omitted?
Good question. I don’t know.
It will take a while until the new spec will be finalized and then it will take more time until Identity Providers ("Authorization Servers") will adopt the new OAuth version and remove the support for this grant type.
This tutorial provides short term solution for your requirement and you can take your time to think about long term solution.
What’s in this tutorial?
We create a sample target application that requires:
🔸Valid JWT token
🔸Valid user
🔸User must have role
🔸Grant type must be "password"
We show how to achieve the “Password Credentials” flow in a simple iFlow.
Scenario overview:

Above diagram shows the target application protected with XSUAA binding.
It is located in the same subaccount like the Cloud Integration tenant, but it could be running elsewhere.
The iFlow contains scripting that accesses user credentials and the iFlow is in charge of fetching the JWT token and of sending it to the receiver.
Fetching and sending is not done by a “Credentials” artifact.
The second diagram adds a few more details:

It depicts the propagation of the user.
The username and password is contained in the “User Credentials” artifact and thanks to the “Resource Owner Password Credentials” flow, the user info is propagated to the target application.
Furthermore, we can see that the user is assigned to a role collection which contains the role which is required by the target app.
Approaches
I've figured out 3 approaches to solve the requirement, each has more or less advantages and disadvantages.
🔸The first approach uses a "Request Reply" step to run the token request.
🔸The second approach does everything manually in one Groovy script.
🔸The third approach uses the Destination service of BTP to run the token request
We start out tutorial with creating and deploying a little Node.js application which serves as target for the outbound call with password credentials.
Disclaimer
This is not an official documentation, nor a recommendation, just describing my way of solving the requirement
0.3. Create Target Application
First of all, let’s quickly create our target application which is supposed to be called from the iFlow.
We create a simple Node.js application that is protected with OAuth and requires a scope (user role).
Furthermore, it requires that the endpoint is called by a real user, for whatever reason.
E.g. because the user info must be logged, or because the user should be propagated to a backend, etc
0.3.1. Create service instance
We use XSUAA for protection.
The procedure in the iFlow would be pretty much the same for any other OAuth Authorization server, or IAS.
Before we create our service instance of XSUAA, we have a look at the configuration file:
    "xsappname": "backendxsuaa",

    "scopes": [{

        "name": "$XSAPPNAME.backendscope"

    }],

    "role-templates": [{

            "name": "BackendUserRole",

            "scope-references": ["$XSAPPNAME.backendscope"]

        }],

    "role-collections": [{

          "name": "BackendRoles",

          "role-template-references": ["$XSAPPNAME.BackendUserRole"]
We define a specific scope and corresponding user role and role collection.
This scope will be enforced by our application code.
Following commands can be used to create the service instance on command line:
Create instance
cf cs xsuaa application backendXsuaa -c xs-security.json
Note:
If you use the BTP Cockpit to create the service instance, make sure to use the same name for the instance "backendXsuaa", as it is used in the target application in next section.
0.3.2. Create Application
We create a simple server application which provides a REST endpoint and implements only the POST request method.
This endpoint is meant for users who send data in the request body for creating anything.
As it is some sensitive operation, we implement 4 security layers:
🔸OAuth protection
🔸Role enforcement
🔸Grant type check
🔸User auditing
At least one layer is missing…
Note:
For the sake of simplicity, we skip the CSRF-token handling.
Means, the requirement of a valid CSRF-token for modifying operations, is skipped for today.
Keeping the code simple and straight-forward
🔷 server.js
app.post('/endpoint', passport.authenticate('JWT', {session: false}), (req, res) => {


    const jwtDecodedJson = req.tokenInfo.getPayload()


    // check authorization

    const auth = req.authInfo

    if (! auth.checkScope(UAA_CREDENTIALS.xsappname + '.backendscope')) {

        res.status(403).end('Forbidden. Missing authorization.')

    }


    // check grant type

    if (jwtDecodedJson.grant_type != 'password') {

        res.status(403).end('Forbidden. Unsupported grant type.')

    }


    // The fake audit logging

    console.log(`===> [AUDIT] backend called by user '${auth.getGivenName()}' ...`)
Note:
The enforcement of the “password” grant type is only for the sake of this scenario.
In productive environment, you might be able to configure grant type at the Identity Provider, OAuth client configuration.
Or you would enforce the authorization code grant type.
What we want to showcase: the grant type "client credentials" is not allowed.
0.3.3. Deploy
The full project, which can be found in the appendix 1 , can be deployed with cf push.
After deploy, we can access the credentials of the XSUAA instance.
These are provided in the service binding and we can view them in the environment of the application.
Can be done in the Cockpit or via this command:
cf env backend
We need the System-Provided VCAP_SERVICES variable with name xsuaa.
We take a note of the following 3 properties which we’ll need later in CPI.
In my example:
clientid: sb-backendxsuaa!t78007
clientsecret: L62A9tkJJDp1QAx=
url: https://subd.authentication.eu12.hana.ondemand.com/oauth/token
Note:
we need to append the segments /oauth/token to the url property
0.3.4. Assign Role Collection
Before we can run the below scenarios we need to prepare our user.
As our target application defines and requires a user role, we need to assign it to our “Technical (Test) User”.
We go to the BTP Cockpit -> Subaccount -> Security -> Role Collections.
We already defined a suitable role collection in our xs-security.json file, so we just need to find it, then assign our user to it.
In my example it looks like this:

1. First Approach: iFlow using Token Request
We create a simple iFlow which does nothing than calling our target application via HTTP Receiver adapter.
For some reason, we have to use "password credentials" flow.
1.1. Create Credentials
To avoid hard-coding the user password in plain text, we create a "User Credentials" artifact, which will then be used in the script.
In addition, we create another "User Credentials" for the clientid / secret that are used for fetching a JWT token.
1.1.1. User credentials for human test user
The “Password” grant type would probably be used in most cases with a technical user, which has sufficient permissions for the required operations in the backend.
The username and password should nevertheless be externalized into a “User Credentials” artifact in CPI, such that the password is not visible in the iFlow.
We go to Monitor -> Integrations -> Manage Security -> Security Material
Then Create -> User Credentials
🔸We enter a name for the “Credentials” artifact.
We’ll need this name to access it from Groovy script.
In my example: BACKEND_USER
🔸We enter the user name and the password of our cloud user who is allowed to access the target application and who has been assigned the role collection in previous chapter.
In my example, it is the good old Joe Cool.

![]()
1.1.2. User Credentials for the Token Request
Going further, we can also move the credentials of the OAuth client into a User Credentials artifact.
I mean the credentials of the XSUAA instance, which we've seen in section 1.3.
What?
I mean, we need to fetch a JWT token from the same XSUAA service instance which is used to protect the target application.
OK?
OK.
🔸We enter a name for the “Credentials” artifact.
In my example: BACKEND_CLIENT
🔸We enter the clientid and secret from section 1.3.
In my example:
clientid: sb-backendxsuaa!t78007
clientsecret: L62A9tkJJDp1QAx=

1.2. Create iFlow
Now we create our simple iFLow, which looks as follows:

What it does:
The iFlow is triggered by a timer, to make it simple.
Every iFlow has a message, so we compose some dummy message with a Content Modifier.
Before we can fetch a JWT token, we need to prepare the request (headers, body, auth) with a Groovy Script.
The “Request Reply” step is used to fetch the JWT token with password credentials.
It calls the Token-Endpoint-Receiver via HTTP channel.
Afterwards, we read the reply and we use another Groovy script to compose the "authorization" header for the following HTTP request.
Finally, we call the target Backend app via HTTP adapter and send the JWT token.
Note on CSRF
Our POST endpoint is not CSRF-protected, to leave our sample code lean.
Anyways, the procedure with CSRF-protection would be very similar:
Add one more Request/Reply step to fetch the CSRF-token, then extract it from the response header and use it in a new request header in the final Receiver channel.
Let’s go through the steps
🔷Timer
🔸 We define a start event via Timer with default properties, i.e. run once
🔷Content Modifier
🔸Name
Optional, to make clear that we define a fake message content her.
E.g. THE MESSAGE
🔸Message Body
We enter any dummy message content.
In my example:
Original message body in iFlow
Note:
The content must match the "content-type" header in the iFlow and the body parser in the target app.
🔷Content Modifier
We define another Content Modifier which has to take care of storing the original message content in a variable (exchange property).
This is necessary because we will overwrite the message body with the content required for the token request and response.
🔸Name
"Save To Clipboard"
🔸Exchanger Property
Name: clipboard
Source Type: Expression
Source Value: ${in.body}
🔷Groovy Script 1
The first script is meant to prepare the token request.
The following steps are performed:
1. Read "Credentials" artifacts
We use API calls to fetch the user/password and clientif/secret from the "Credentials" artifacts:
def secureStoreService = ITApiFactory.getApi(SecureStoreService.class, null)

def userCredUser = secureStoreService.getUserCredential("BACKEND_USER")

String user = userCredUser.getUsername()

String pwd = new String(userCredUser.getPassword())
2. Compose authorization
We compose the "Authorization" header for the token request.
The request is sent with basic authentication to the Authorization Server, i.e. XSUAA token endpoint.
The clientid and clientsecret, means user and password, are concatenated and encoded with Base64, to form the basic auth header.
def credentialsString = clientid.concat(":").concat(clientsecret)

def credentialsBase64 = Base64.getEncoder().encodeToString(credentialsString.getBytes())

def authorizationHeader = "Basic".concat(" ").concat(credentialsBase64)
3. Compose body
Next, we compose the content of the request body for the token request, according to the OAuth specification.
It contains the user and password in plaintext.
But at least, the user credentials are not visible in the iFLow in plain text.
Furthermore, we don’t send these parameters in the URL, we put them in the request body, which is a little bit more safe
(URLs are easily accessible and frequently logged etc)
def messageBody = "grant_type=password&username=".concat(user).concat("&password=").concat(pwd).concat("&client_id=").concat(clientid)4. Configure request
Finally, we set the message body and header.
In addition, in this script we specify the "Content-Type" header, which must be set to "application/x-www-form-urlencoded" because in token request we’re sending the parameters in body and not in the URL.
message.setBody(messageBody);

message.setHeader("Authorization", authorizationHeader)

message.setHeader("Content-Type", "application/x-www-form-urlencoded")
That’s it for the request which is sent in the next step.
Note that the error handling is missing.
The full code can be found in the appendix 2.
🔷Request Reply
This step from Call -> External Call -> Request Reply doesn’t need to be configured.
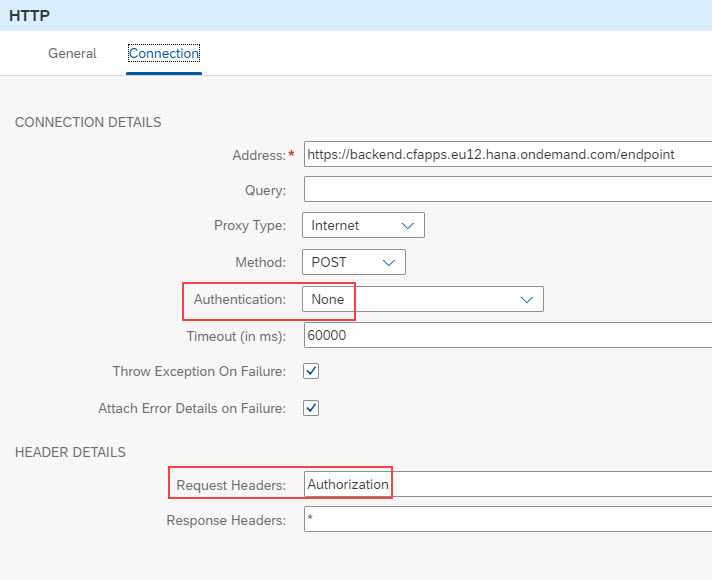
🔷HTTP channel
The HTTP channel for the token endpoint call is configured with the data which we stored from the app env in step 1.2.
🔸Address
We enter the URL of the token endpoint.
In my example, it is XSUAA, so we need to append /oauth/token to the end of the base URL which we get in the uri property of the app env.
It looks similar like this:
https://subdomain.authentication.eu12.hana.ondemand.com/oauth/token
🔸Method
We choose "POST", because we decided to send the parameters in the request body, not in the URL
🔸Authentication
We choose "None", because we’ve composed the "Authorization" header (which is used for authentication) already in the Groovy script.
🔸HEADER DETAILS
We enter "Authorization" as we explicitly want to allow this relevant header.

🔷Groovy Script 2
This script runs after the token request.
It is used to prepare the final call to the Backend.
We need to read the response of the token request, adapt it and compose the "Authorization" header for the call to the backend.
We have to know that the response of the token request is a JSON String which contains the JWT token in a property with name access_token.
And, BTW, we assume that the current content of the iFlow message body contains the response of the "Request Reply" step, we skip any error handling, as usual.
1. Parse the JSON response
So first we get the response string from the message body and parse it:
def messageBody = message.getBody(java.lang.String) as String

def jsonSlurper = new JsonSlurper()

def jsonResponse = jsonSlurper.parseText(messageBody)

def jwt = jsonResponse.access_token
2. Configure call to Backend app
We need to manually set the "Authorization" header for the final HTTP channel, because there’s no "Credential" artifact available.
Composing the "Authorization" header with the obtained JWT token is simple.
Additionally, we need to specify the "Content-Type" header for the call to the Backend app.
This content type must match the body parser which we’re using in our Backend app.
In our sample, we’re expecting just a dummy string, so we set the content type to "text/plain".
message.setHeader("Authorization", "Bearer " + jwt)

message.setHeader("Content-Type", "text/plain")
Note the <blank> after "Bearer"
🔷Content Modifier
At the end of the password-credentials-process, we have to restore the original message payload which we had stored in an exchange property.
We’re doing this in another Content Modifier step.
🔸Name
"Restore From Clipboard"
🔸Message Body:
Type: Expression
Body: ${property.clipboard}
🔷HTTP channel
After all these preparation steps, we can call our target application via HTTP Receiver adapter.
🔸Authentication
Thanks to our preparation, we can set the “Authentication” option to “None”.
🔸Address
According to our target application deployment, we set the Address
In my example:
https://backend.cfapps.eu12.hana.ondemand.com/endpoint
🔸Method:
As implemented in our app: "POST"
🔸HEADER DETAILS
And of course, we need to allow to send the "Authorization" header
We’re done with the iFlow and don’t forget to save.
The full scripts can be found in the appendix 2
1.3. Run
Now we can deploy the iFlow.
1.3.1. View Cloud Foundry logs
The result can be viewed in the cloud logs via command
cf logs backend --recent
The result in my example:
![]()
We can see that
- the endpoint has been successfully invoked, no error occurred.
Which means that the checks for authentication, for authorization and for grant type have successfully passed.
- The user “Joe” has been successfully propagated to the target application
- our implementation of password credentials works fine.
1.3.2. View CPI logs
Finally, we have a look at the CPI logs.
To do so, we change the log level to “Trace” at
Monitor -> Manage Integration Content -> Log Configuration
We deploy the iFlow again.
Afterwards we go to Monitor -> Monitor Message Processing, we find our log and click on “Trace”.
Then select the "HTTP step" to see that the “Authorization” header has been masked, for safety.
Nice.

Then we check the payload and we see that the user password is visible in plain text:
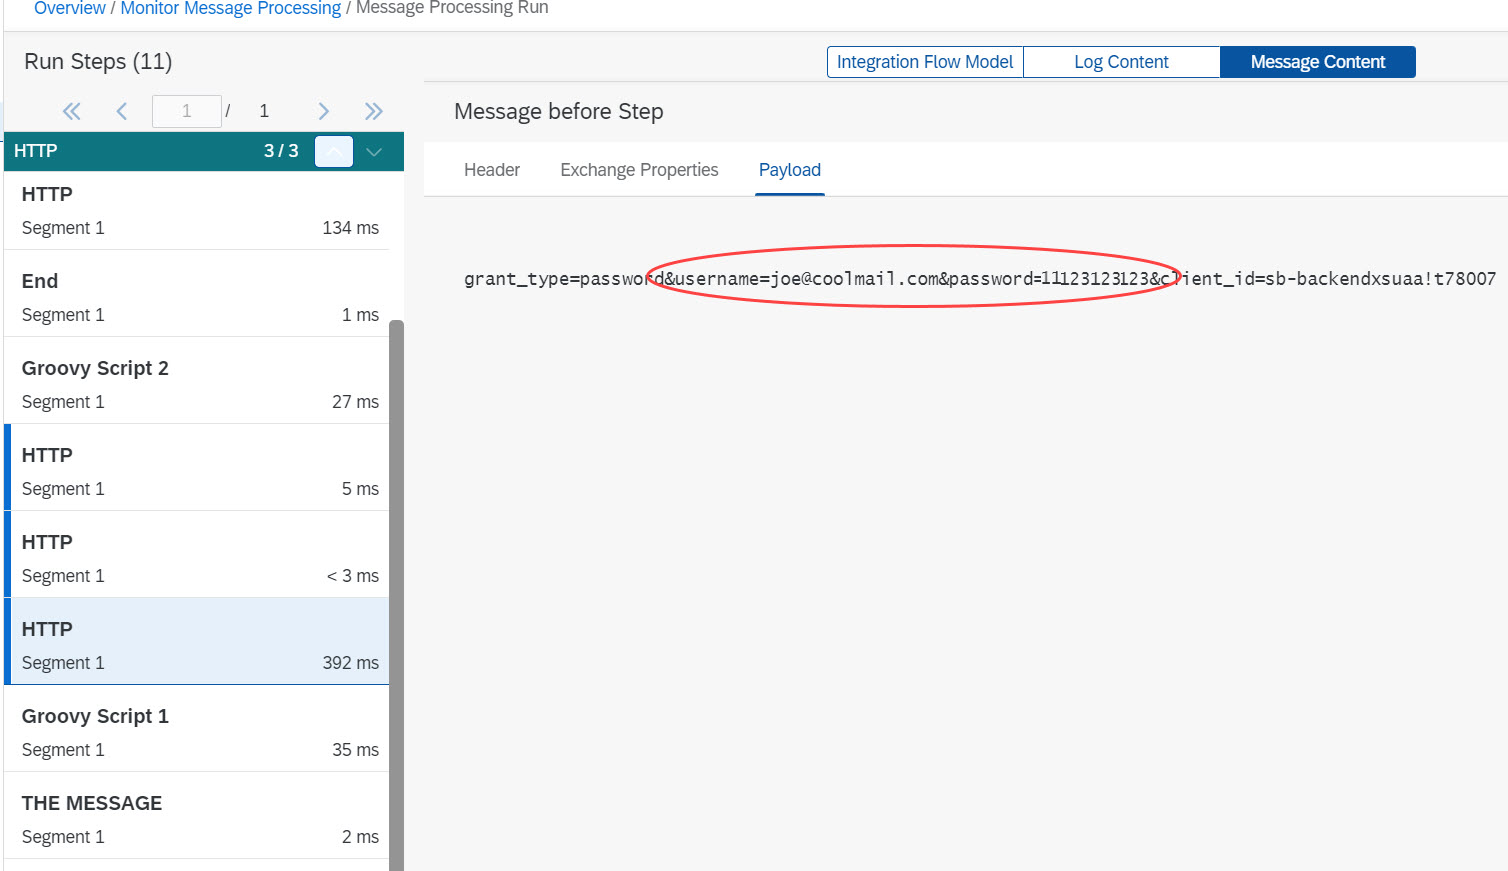
Disappointing.
it is even tragic.
So is there any chance to keep the password secret?
I would say yes, that's why we have 2 more variants described in this blog post.
1.4. Summary
The approach described here seems to be the standard way, following usual iFlow design practices.
👍It lets CPI fetch the token via "Request Reply" step.
The 2 groovy scripts are unavoidable, yet short.
👎The great disadvantage is that the user password can be seen in the traces.👎👎👎
2. Second Approach: iFlow using Groovy Request
To overcome the traces-problem, we can implement the whole “password credentials” flow manually in one groovy script.
The iFlow looks like this:

What it does:
The Groovy script is based on the previous scripts, but in addition, it has to do the REST-call for fetching the JWT token.
One benefit: we don’t need to modify the message body, so we don’t need the "Clipboard"-step.
Let's just have a look at the script, the other steps remain the same.
🔷Groovy Script
The following steps are performed in the Groovy script:
1. Read the "Credentials" artifacts
Same as above, we're reading the user and client from the credentials artifacts
def secureStoreService = ITApiFactory.getApi(SecureStoreService.class, null)

def userCredUser = secureStoreService.getUserCredential("BACKEND_USER")
2. Compose authorization
Same as above, we compose the "Authorization" header for the token request.
def credentialsString = clientid.concat(":").concat(clientsecret)

def credentialsBase64 = Base64.getEncoder().encodeToString(credentialsString.getBytes())

def authorizationHeader = "Basic".concat(" ").concat(credentialsBase64)
3. Compose body
Same as above
def messageBody = "grant_type=password&username=".concat(user).concat("&password=").concat(pwd).concat("&client_id=").concat(clientid)4. Configure and send token request
We need the URL of the Authorization Server, which we used in the “Request Reply” step above.
We hard-code it in the script:
def tokUrl = https://subdomain.authentication.eu12.hana.ondemand.com/oauth/tokenAlternatively, you might want to store it in a property in the iFlow.
For executing the token request, we use native library that comes with Groovy:
def postRequest = new URL(tokUrl).openConnection();

postRequest.setRequestMethod("POST")

postRequest.setDoOutput(true)

postRequest.setRequestProperty("Authorization", authorizationHeader)

postRequest.setRequestProperty("Content-Type", "application/x-www-form-urlencoded")

postRequest.getOutputStream().write(requestBody.getBytes("UTF-8"));
The response is accessed as follows:
def response = postRequest.getInputStream().getText()Note that we’re ignoring all error handling in this tutorial.
5. Parse the response and set Authorization
This step is same as in first approach
def jsonSlurper = new JsonSlurper();

def jsonResponse = jsonSlurper.parseText(response)

def jwt = jsonResponse.access_token
Finally, set the JWT token as Authorization header to be used by HTTP Receiver adapter
message.setHeader("Authorization", "Bearer " + jwt)

message.setHeader("Content-Type", "text/plain")
See full script in appendix 3.
Run Scenario
The target application remains the same.
After deployment of this second iFlow, we can check the traces and we realize that there are no visible credentials anymore.
Summary
This native Groovy approach assumes that users might want to write one complete script, instead of 2 small scripts.
👍This approach makes the full flow much shorter.
It has the great advantage that the user password cannot be seen in the traces.
Another benefit: we don't need to buffer the message payload.
👎The disadvantage: we need to take care of the REST call, including error cases.
3. Third Approach: iFlow using Destination Service
What about an approach that doesn't require any coding at all?
There’s another variant for those users who are a bit familiar with SAP BTP and have access to the subaccount with enough privileges for creating service instances.
In this approach, we’re making use of the Destination service in SAP BTP.
It can be used to externalize URLs and authentication data.
In addition, the Destination service is able to fetch JWT tokens for us.
It supports several OAuth flows, including the "Resource Owner Password Credentials" flow.
So it seems ideal for your use case: we’ll make use of it for storing the credentials of our user and to execute the “Password” OAuth flow.

The diagram shows that the Destination service fetches the JWT token based on the given "Destination Configuration".
The Destination Service offers a REST API which is protected with OAuth itself. The credentials are stored in CPI in a "Client Credentials" artifact.
The REST API is called by a "Request Reply" step and the response contains the JWT token.
3.1. Create Destination
First of all, before we can use the Destination service, we need to create a service instance.
Also, we need the credentials for calling the service.
3.1.1. Create Instance of Destination Service
Creating service instance and service key can be easily done from the BTP Cockpit, given that the required permissions are available.
No parameters for instance required.
Go to BTP Cockpit -> Subaccount -> Services -> Marketplace
Find “Destination Service” and press “Create”
Enter a name like “cpiDestination” and finish the wizard.
After creation, view the instance (Services -> Instances) and choose “Create Service Key”.
Enter a name like "cpiKey" and finish the dialog.
Afterwards, press “View” for the service key and take a note of the following 4 properties.
We’ll need this data in CPI, when it comes to calling the Destination service.
In my example:
clientid: sb-clone123!b789|destination-xsappname!b9
clientsecret: 123ABC=
url: https://mysubdomain.authentication.eu12.hana.ondemand.com
uri: https://destination-configuration.cfapps.eu12.hana.ondemand.com
To create the artifacts on command line, the following commands can be used:
cf cs destination lite cpiDestination
cf csk cpiDestination cpiKey
cf service-key cpiDestination cpiKey
3.1.2. Create Destination Configuration
Now we create the “Destination Configuration”.
This is a lightweight artifact which does nothing than store URL and credentials that are required for calling some target.
In addition, some more features are offered that include automatic token request.
To create a Destination Configuration, we go to the subaccount (same in which we’ve created the Destination service instance), then
Connectivity -> Destinations -> New Destination
We configure the destination config with the same data that we used for the “User Credentials” in CPI in chapter 1.1.1. and 1.1.2.
🔸Name
This name will be used later by the REST request from iFlow, for fetching the JWT token.
As such, the name entered here must match the configuration in iFlow
In my example: "backend_destination"
🔸Type:
HTTP
🔸Description
Any text of our choice
🔸URL
The full URL of our target application, in my example
https://backend.cfapps.eu12.hana.ondemand.com/endpoint
However, this URL is not used in our scenario.
🔸Proxy Type
This setting is required, If the target application is onPremise and a Cloud Connector is used.
Otherwise, like in our example, we leave the default, which is "Internet".
🔸Authentication
Here we choose the most wanted OAuth flow of this tutorial:
"OAuth2Password"
🔸User
Here we enter the user name to be used for fetching the token.
It is the same user that was entered in the CPI "User Credentials in chapter 1.1.1
In my example: the email of good old Joe Cool
🔸Password
Joe’s password is usually very long, e.g. "11111111111111"
🔸Use mTLS
This option can be activated if the token-fetch-request, which is done automatically by the Destination service, should use certificate instead of client-secret.
However, in that case, the service has to be configured accordingly
I explained in this blog post how to use this option.
🔸Client ID
The same client ID which we used in chapter 1.1.2.
🔸Client Secret
The very same client secret which we used in the very same chapter 1.1.2
🔸Token Service URL
The URL we got from the service key in chapter 1.1., same like client id / secret
In my example:
https://subdomain.authentication.eu12.hana.ondemand.com/oauth/token
Finally, in my example, the destination config looks as follows:

Alternatively, a destination configuration can be imported from a file containing content like this:
#clientSecret=<< Existing password/certificate removed on export >>

#Password=<< Existing password/certificate removed on export >>

#

#Fri Oct 13 06:25:30 UTC 2023

Type=HTTP

clientId=sb-backendxsuaa\!t78007

Authentication=OAuth2Password

Name=backend_destination

tokenServiceURL=https\://subdomain.authentication.eu12.hana.ondemand.com/oauth/token

ProxyType=Internet

URL=https\://backend.cfapps.eu12.hana.ondemand.com/endpoint

User=joe@coolmail.com
The docu can be found here.
3.2. Create Security Artifact for Destination Service
After creating service instance and destination configuration in BTP, we head over to CPI.
The credentials which we received in the service key of the destination service, must be made available in CPI.
To do so, we create a “Client Credentials” artifact for the Destination Service:
We go to Monitor -> Integrations -> Manage Security -> Security Material
Then Create -> OAuth2 Client Credentials
🔸Name
We enter a name for the “Credentials” artifact which will be used in the iFlow configuration below.
In my example:
BACKEND_DESTINATION_CLIENT
🔸Client ID
We enter the clientid from the service key of the destination service instance created in chapter 3.1.1.
🔸Client Secret
We enter the client secret from the same service key
🔸Client Authentication
We choose "Body Parameter"
🔸Content Type
Must be set accordingly to "application/x-www-form-urlencoded"

3.3. Create iFlow
As mentioned, this iFlow lets CPI call the Destination service and also avoids any Groovy scripting.
Basically, in the approaches above, use used the Groovy script for parsing the JSON response.
However, the parsing is only required for reading one property value.
This could be done with a simple JSONPath statement.
However, CPI doesn't support JSONPath, only XPath is supported.
As such, we have to convert the JSON response to XML, then apply the XPath.
The conversion might not be performant, but at least we know that the response of the Destination service is always small, so we can afford it.

What it does:
The iFlow uses a "Request Reply" step to call the Destination service.
The response contains the JWT token, which could be parsed in a Groovy Script, but we replace the Groovy script with a "JSON to XML Converter" step.
In the final Content Modifier, we use an XPath expression to access the value of the xml response.
This iFlow again needs to store the original payload in a temporary buffer.
Important to note:
The Destination service REST API is designed to return all the configuration data that was entered in the destination configuration, in the BPT Cockpit.
This means: the user password is contained in the response of the service request.
The drawback: the response can be seen in the tracing tool of the CPI log.
As a consequence, the user password would be displayed there.
However, there’s one important setting which makes sure that the response of the destination service doesn’t contain the user credentials.
It is a parameter which is offered by the REST API.
It allows to omit the credentials from the response.
This query parameter has to be configured in the HTTP channel
Documentation:
Destination Service REST API
API Reference of this REST API on SAP Business Accelerator Hub.
Let’s go through the steps
🔷Timer
🔸 We define a start event via Timer with default properties, i.e. run once
🔷Content Modifier
Same as in first approach, some dummy message content.
Note:
The content must match the "content-type" header in the iFlow and the body parser in the target app.
🔷Content Modifier
Same as above, we define another Content Modifier which has to take care of storing the original message content in a variable (exchange property).
🔷Request Reply
This step from Call -> External Call -> Request Reply doesn’t need to be configured
🔷HTTP channel
The HTTP channel for the destination service call is configured with the data which we stored from the service key in step 3.1.1.
🔸Address
Here we enter the URL of the destination service endpoint.
It is composed as follows:
<uri>/destination-configuration/v1/destinations/<name>
Where uri is the uri property from the service key (3.1.1.) and name is the name of the destination configuration (chapter 3.1.2.)
In my example:
https://destination-configuration.cfapps.eu12.hana.ondemand.com/destination-configuration/v1/destina...
🔸Query
We enter the important flag which results in credentials being omitted from the response
$skipCredentials=true
Note:
Don't forget this setting
🔸Method
GET
🔸Authentication
OAuth2 Client Credentials
🔸Credential Name
BACKEND_DESTINATION_CLIENT
🔸HEADER DETAILS
Request Headers: Authorization

🔷JSON to XML Converter
For our use case, we can use the default settings

Namespace Mapping is actually not required and can be deselected.
🔷Content Modifier
At the end of the password-credentials-process, we have to restore the original message payload which we had stored in an exchange property.
However, before overwriting the payload which is currently the xml-response of the Destination service, we want to access this xml for extracting the JWT token via XPath.
For constructing the XPath statement, it is useful to view the xml content:
<?xml version='1.0' encoding='UTF-8'?>

<root>

    <owner>

    ...

    </owner>

    <destinationConfiguration>

        <Name>backend_destination</Name>

        <URL>https://backend.cfapps.eu12.hana.ondemand.com/endpoint</URL>

        ...

    </destinationConfiguration>

    <authTokens>

        <type>bearer</type>

        <value>eyJhbG...WN6Q</value>

        <http_header>

            <key>Authorization</key>

            <value>Bearer eyJhb...WN6Q</value>

        </http_header>

        ...

    </authTokens>

</root>
We're interested in the value of the http_header node which contains the full value of the "Authorization", which is wonderful, as we can just pass the whole node content to the header.
So this is the path:
/root/authTokens/http_header/value
The "root" node was defined in the previous converter step
🔸Headers
1. We define a new header:
Name: “Authorization”
Source Type: “XPath”
Source Value: "/root/authTokens/http_header/value"
Data Type: "java.lang.String"
2. In addition, we need to set the second header, the Content-Type with value “text/plain”, which we need to use in our simple sample scenario.

The name and the message body are same as above:
🔸Name
"Restore From Clipboard"
🔸Message Body:
Type: Expression
Body: ${property.clipboard}

Optional: Groovy
If you don't like the Converter step, you can simply replace it with below Groovy script.
The message body contains the response from Destination service, formatted as JSON with following structure:
owner
destinationConfiguration
authTokens [
{
value: <theJWT>
http_header
key: "Authorization"
value: "Bearer <theJWT>"
On root level, there is the authTokens element which contains an array which usually contains 1 entry.
Such an authToken entry contains the JWT token.
However, as a convenience, the Destination service sends us a ready-to-use header in the element http_header which we can directly pass to our header in our iFlow.
I mean, it contains the “Bearer” plus <blank> plus JWT.
As such, the job of the Groovy script is clear:
Get body -> parse -> access http_header -> set iFlow-headers -> restore payload
def messageBody = message.getBody(java.lang.String) as String


def jsonSlurper = new JsonSlurper();

def jsonResponse = jsonSlurper.parseText(messageBody)

def authHeader = jsonResponse.authTokens[0].http_header.value


message.setHeader("Authorization", authHeader)

message.setHeader("Content-Type", "text/plain")
See appendix 4 for full script.
Run Scenario
The target application remains the same.
After deployment of this second iFlow, we can check the traces and we realize that there are no visible credentials anymore.
Summary
This approach with Destination service moves the user credentials from CPI to BTP.
👍This approach is elegant and does not require any coding.
It has the great advantage that the user password cannot be seen in the traces.
👎The disadvantage: permissions to access to BTP required.
4. Optional: curl requests
For those of you who use curl instead of iFlow, find these commands for your convenience:
Password Credentials:
curl -X POST --url https://subdomain.authentication.eu12.hana.ondemand.com/oauth/token -d 'grant_type=password&username=joe@cool.com&password=123&client_id=id &client_secret=xx'Client Credentials:
curl -X POST --url https:// subdomain.authentication.eu12.hana.ondemand.com/oauth/token -d 'grant_type=client_credentials&client_id=id&client_secret=xx'Summary
In this blog post we’ve learned how to call a target application with OAuth 2 “Resource Owner Password Credentials” flow.
Manual implementation is necessary because CPI doesn’t offer a corresponding type of “Credentials” artifacts.
We’ve seen 3 possible ways of achieving password credentials in an iFlow, with more or less scripting.
The challenge is to hide the user password, which obviously should be stored in a “User Credentials” artifact.
Nevertheless, it can be viewed in the logs, if passed in the body.
Solution can be manual scripting or using a Destination in BTP.
The original message body has to be stored in a temporary buffer, like an exchange property.
We’ve also learned that this grant type is not recommended and will disappear with the release of the next version of OAuth, which is currently draft mode of v2.1
Key Takeaways
To summarize the relevant settings:
🔸We need to hide the user password in "User Credentials" artifact.
🔸We need Groovy script for reading the user credentials
🔸Token request: compose request body like this:
grant_type=password&username=joe&password=123&client_id=xx<>/span
🔸Token Request: authorization
composed as clientid:secret
Then encoded with Base64
Then use it for basic auth as "Basic<blank><b64>
🔸Store the message payload in an intermediate buffer, e.g. Exchange Property:
${in.body}
Restore after token request:
${property.clipboard}
🔸Destination
URL is composed like this
<uri>/destination-configuration/v1/destinations/<name>
🔸Destination-query
Param for hiding user password:
$skipCredentials=true
🔸Response of destination-request
The header value (“Bearer <JWT>”) is contained in the response (JSON) path at:
Root->authTokens->http_header->value
Links
SAP Help Portal:
Scripting APIs
Destination Configuration docu
Destination Service REST API docu
API Reference for REST API on SAP Business Accelerator Hub
Other:
Security Glossary Blog
OAuth 2.0 spec
Appendix: Sample Code
Note that you need to adapt the names of artifacts or content type or body parser, in case you deviated from tutorial description.
Appendix 1: The Target Application
Note:
Make sure to change the body parser to express.json() or similar, if you send a message payload that is not text/plain
🔷 server.js
const xsenv = require('@sap/xsenv')

const UAA_CREDENTIALS = xsenv.getServices({myXsuaa: {tag: 'xsuaa'}}).myXsuaa


const express = require('express')

const app = express();

const xssec = require('@sap/xssec')

const passport = require('passport')

const JWTStrategy = xssec.JWTStrategy

passport.use('JWT', new JWTStrategy(UAA_CREDENTIALS))

app.use(passport.initialize())

app.use(express.text())


app.listen(process.env.PORT)


app.post('/endpoint', passport.authenticate('JWT', {session: false}), (req, res) => {

    console.log("===> [BACKENDAPP] invoked with POST and body: " + JSON.stringify(req.body))


    const jwtDecodedJson = req.tokenInfo.getPayload()


    // check authorization

    const auth = req.authInfo

    if (! auth.checkScope(UAA_CREDENTIALS.xsappname + '.backendscope')) {

        res.status(403).end('Forbidden. Missing authorization.')

    }


    // check grant type

    if (jwtDecodedJson.grant_type != 'password') {

        res.status(403).end('Forbidden. Unsupported grant type.')

    }


    // The fake audit logging

    console.log(`===> [AUDIT] backend called by user '${auth.getGivenName()}' ...`)


    res.end()

})
🔷 package.json
{

  "dependencies": {

    "@sap/xsenv": "latest",

    "@sap/xssec": "^3.2.13",

    "express": "^4.17.1",

    "passport": "^0.4.0"

  }

}
🔷 manifest.yml
---

applications:

  - name: backend

    path: app

    memory: 64M

    routes:

    - route: backend.cfapps.eu12.hana.ondemand.com

    services:

      - backendXsuaa
🔷 xs-security.json
{

    "xsappname": "backendxsuaa",

    "tenant-mode": "dedicated",

    "scopes": [{

        "name": "$XSAPPNAME.backendscope"

    }],

    "role-templates": [{

            "name": "BackendUserRole",

            "scope-references": ["$XSAPPNAME.backendscope"]

        }],

    "role-collections": [{

          "name": "BackendRoles",

          "role-template-references": ["$XSAPPNAME.BackendUserRole"]

        }],

    "oauth2-configuration": {"token-validity": 60}

}
Appendix 2: First Approach using Token Request
🔷 Groovy Script 1
import com.sap.gateway.ip.core.customdev.util.Message;

import com.sap.it.api.ITApiFactory;

import com.sap.it.api.securestore.SecureStoreService;

import com.sap.it.api.securestore.UserCredential;


def Message processData(Message message) {


    //read user credential artifacts

    def secureStoreService = ITApiFactory.getApi(SecureStoreService.class, null)

    def userCredUser = secureStoreService.getUserCredential("BACKEND_USER")

    String user = userCredUser.getUsername();

    String pwd = new String(userCredUser.getPassword());


    def userCredJwt = secureStoreService.getUserCredential("BACKEND_CLIENT")

    def clientid = userCredJwt.getUsername();

    def clientsecret = new String(userCredJwt.getPassword());


    // compose authorization

    def credentialsString = clientid.concat(":").concat(clientsecret)

    def credentialsBase64 = Base64.getEncoder().encodeToString(credentialsString.getBytes())

    def authorizationHeader = "Basic".concat(" ").concat(credentialsBase64)


    // comopse request body for password credentials flow

    def messageBody = "grant_type=password&username=".concat(user).concat("&password=").concat(pwd).concat("&client_id=").concat(clientid)


    // prepare for subsequent Request/Reply iflow-step

    message.setBody(messageBody);

    message.setHeader("Authorization", authorizationHeader)

    message.setHeader("Content-Type", "application/x-www-form-urlencoded")


    return message;

}
🔷 Groovy Script 2
import com.sap.gateway.ip.core.customdev.util.Message;

import groovy.json.*


def Message processData(Message message) {


    // message body contains response of token request

    def messageBody = message.getBody(java.lang.String) as String


    // parse the JSON content in the message body, extract the actual JWT token

    def jsonSlurper = new JsonSlurper();

    def jsonResponse = jsonSlurper.parseText(messageBody)

    def jwt = jsonResponse.access_token


    // finally, set the JWT token as Authorization header to be used by HTTP Receiver adapter

    message.setHeader("Authorization", "Bearer " + jwt)

    message.setHeader("Content-Type", "text/plain")


    return message;

}
Appendix 3: Approach using Groovy Request
🔷 Groovy Script
import com.sap.gateway.ip.core.customdev.util.Message;

import java.util.HashMap;

import com.sap.it.api.ITApiFactory;

import com.sap.it.api.securestore.SecureStoreService;

import com.sap.it.api.securestore.UserCredential;

import com.sap.it.rt.scc.connectivity.security.IToken

import groovy.json.*


def Message processData(Message message) {


    // read the credentials

    def secureStoreService = ITApiFactory.getApi(SecureStoreService.class, null)

    def userCredUser = secureStoreService.getUserCredential("BACKEND_USER")

    String user = userCredUser.getUsername();

    String pwd = new String(userCredUser.getPassword());


    def userCredJwt = secureStoreService.getUserCredential("BACKEND_CLIENT")

    String clientid = userCredJwt.getUsername();

    String clientsecret = new String(userCredJwt.getPassword());


    // compose authorization

    def credentialsString = clientid.concat(":").concat(clientsecret)

    def credentialsBase64 = Base64.getEncoder().encodeToString(credentialsString.getBytes())

    def authorizationHeader = "Basic".concat(" ").concat(credentialsBase64)


    // comopse the request body for password credentials flow

    def requestBody = "grant_type=password&username=".concat(user).concat("&password=").concat(pwd).concat("&client_id=").concat(clientid)


    // URL from service key

    def tokUrl = "https://subdomain.authentication.eu12.hana.ondemand.com/oauth/token"


    // compose REST request

    def postRequest = new URL(tokUrl).openConnection();

    postRequest.setRequestMethod("POST")

    postRequest.setDoOutput(true)

    postRequest.setRequestProperty("Authorization", authorizationHeader)

    postRequest.setRequestProperty("Content-Type", "application/x-www-form-urlencoded")


    postRequest.getOutputStream().write(requestBody.getBytes("UTF-8"));

    def response = postRequest.getInputStream().getText()


    // parse the JSON content in the message body, to get the actual JWT token

    def jsonSlurper = new JsonSlurper();

    def jsonResponse = jsonSlurper.parseText(response)

    def jwt = jsonResponse.access_token


    // finally, set the JWT token as Authorization header to be used by HTTP Receiver adapter

    message.setHeader("Authorization", "Bearer " + jwt)

    message.setHeader("Content-Type", "text/plain")


    return message;

}
Appendix 4: Approach using Destination
🔷 Optional: Groovy Script
import com.sap.gateway.ip.core.customdev.util.Message;

import groovy.json.*

import com.sap.it.rt.scc.connectivity.security.IToken


def Message processData(Message message) {

    def messageBody = message.getBody(java.lang.String) as String


    // parse the JSON content in the message body, the response of the call to destination service

    def jsonSlurper = new JsonSlurper();

    def jsonResponse = jsonSlurper.parseText(messageBody)


    // the property contains the "Bearer" plus space

    def authHeader = jsonResponse.authTokens[0].http_header.value


    // finally, set the JWT token as Authorization header to be used by HTTP Receiver adapter

    message.setHeader("Authorization", authHeader)

    message.setHeader("Content-Type", "text/plain")


    return message;

}
🔷 backend_destination
#clientSecret=<< Existing password/certificate removed on export >>

#Password=<< Existing password/certificate removed on export >>

#

#Fri Oct 13 06:25:30 UTC 2023

Type=HTTP

clientId=sb-backendxsuaa\!t78007

Authentication=OAuth2Password

Name=backend_destination

tokenServiceURL=https\://subdomain.authentication.eu12.hana.ondemand.com/oauth/token

ProxyType=Internet

URL=https\://backend.cfapps.eu12.hana.ondemand.com/endpoint

User=joe@coolmail.com
Labels:
2 Comments
You must be a registered user to add a comment. If you've already registered, sign in. Otherwise, register and sign in.
Labels in this area
-
ABAP CDS Views - CDC (Change Data Capture)
2 -
AI
1 -
Analyze Workload Data
1 -
BTP
1 -
Business and IT Integration
2 -
Business application stu
1 -
Business Technology Platform
1 -
Business Trends
1,658 -
Business Trends
93 -
CAP
1 -
cf
1 -
Cloud Foundry
1 -
Confluent
1 -
Customer COE Basics and Fundamentals
1 -
Customer COE Latest and Greatest
3 -
Customer Data Browser app
1 -
Data Analysis Tool
1 -
data migration
1 -
data transfer
1 -
Datasphere
2 -
Event Information
1,400 -
Event Information
67 -
Expert
1 -
Expert Insights
177 -
Expert Insights
301 -
General
1 -
Google cloud
1 -
Google Next'24
1 -
GraphQL
1 -
Kafka
1 -
Life at SAP
780 -
Life at SAP
13 -
Migrate your Data App
1 -
MTA
1 -
Network Performance Analysis
1 -
NodeJS
1 -
PDF
1 -
POC
1 -
Product Updates
4,577 -
Product Updates
346 -
Replication Flow
1 -
REST API
1 -
RisewithSAP
1 -
SAP BTP
1 -
SAP BTP Cloud Foundry
1 -
SAP Cloud ALM
1 -
SAP Cloud Application Programming Model
1 -
SAP Datasphere
2 -
SAP S4HANA Cloud
1 -
SAP S4HANA Migration Cockpit
1 -
Technology Updates
6,873 -
Technology Updates
430 -
Workload Fluctuations
1
Related Content
- Using Integration Suite API's with Basic Auth in Technology Q&A
- Govern SAP APIs living in various API Management gateways in a single place with Azure API Center in Technology Blogs by Members
- Configuring SAP CI/CD pipeline for Deploying ReactJS application in Cloud Foundry in Technology Q&A
- How to use AI services to translate Picklists in SAP SuccessFactors - An example in Technology Blogs by SAP
- It has never been easier to print from SAP with Microsoft Universal Print in Technology Blogs by Members
Top kudoed authors
| User | Count |
|---|---|
| 30 | |
| 17 | |
| 15 | |
| 13 | |
| 11 | |
| 9 | |
| 8 | |
| 8 | |
| 8 | |
| 7 |