
- SAP Community
- Products and Technology
- Technology
- Technology Blogs by SAP
- [SAP BTP Onboarding Series] - Step-by-Step guide t...
Technology Blogs by SAP
Learn how to extend and personalize SAP applications. Follow the SAP technology blog for insights into SAP BTP, ABAP, SAP Analytics Cloud, SAP HANA, and more.
Turn on suggestions
Auto-suggest helps you quickly narrow down your search results by suggesting possible matches as you type.
Showing results for
Product and Topic Expert
Options
- Subscribe to RSS Feed
- Mark as New
- Mark as Read
- Bookmark
- Subscribe
- Printer Friendly Page
- Report Inappropriate Content
01-02-2023
2:23 PM
This blog is a part of the SAP BTP Customer Onboarding Series, and we aim to keep the onboarding series of blogs up to date with any changes in the product setup activities. We look forward to your feedback and continuous support to keep these onboarding documents updated.
With the new announcements from SAP TechEd on SAP Build Work Zone, we found it exciting to get our customers, IT Professionals, and line of business experts to easily build and design engaging business sites for your employees, partners, and customers to increase productivity. In short, SAP Build Work Zone offers the following benefits:
The benefits are huge, now the next question is how do you activate these services, and what prerequisites/services are required for you to get started?? Well, from the point of onboarding you to a new service, let us look at how to activate SAP Build Work Zone, advanced edition:
While we explain each of the points in detail, please pay close attention to the service configurations specifically on Booster activation, IAS, & IPS Configurations, and Run Configurator steps.
Caution: Scenarios not considered in this blog are, an existing JAM migration, and SAP SuccessFactors WorkZone setup.
Before we get started, here is the official documentation on the SAP Build Work Zone setup. We understand the various needs of our customers, partner, and community and we will explore this in more detail including step-by-step instructions with screenshots & background information.
As a part of the setup process, you need to have the SAP BTP Global Administrator role to perform the next task. In case you do not have a global admin role, please reach your internal team.
In this blog, we are considering the setup with a new Global Account, and are therefore going to create a New Sub-account and activate the SAP Cloud Identity Services. In case you have an existing sub-account or an active SAP Cloud Identity Service you may skip the creating/activating steps (a and b).
Note: SAP has updated the SAP IDP services. In the new version, IAS & IPS are accessible in the same URL. Most of the screens and steps have been updated.
3. Setup Trust between SAP Identity Service - Identity Authentication, and BTP Subaccount
a. Establish/configure Trust between the SAP Cloud Identity service and the SAP BTP subaccount
Now, let us go back to our subaccount WorkZoneBlogSetup, click on Security ->, and Click on Trust Configuration. This page helps to establish trust between the identity services and the subaccount and it helps in using the existing user base for security. You may learn more about the concepts in our official documentation here.
Here you have two approaches,
Now, this establishes trust both ways from Subaccount to Identity Services and vice versa. This can be verified on the same page; a Custom Identity Provider for Application should be listed.
We also need to stop the default IDP service from user authentication. Click on the Edit/Pencil icon assigned to Default identity Provider (image 10) -> remove the selection “Available for User Logon” and Save the settings.
To verify the trust set up in the IAS system, go to the IAS tenant URL, and click on Application and Resources -> Applications -> in Bundled Applications, you will be able to see the new entry with the subaccount name which confirms the Trust has been setup successfully.
Before we move to the next step of configuration, we also have to make some changes to the OIDC configurations. Go to your SAP Cloud Identity Services, click on Applications and Resources -> Click on Applications -> in Bundled Applications click your application XSUAA_WorkZoneBlogSetup -> click on Assertion Attributes.
Modify the details as shown in Image 13 and ensure to use capitals and lower letters as shown in the image and Save. In case you have additional attributes, you can delete them.
Click on the back button as shown in the above image, now click on Default Attributes -> click on Add -> enter the values as in Image 14 and Save the details.
Groups : Workzone_User_Type_${type}
b. Adding new Users to IAS (Optional):
You may continue the setup process as you have the Admin role, however, in case you need to add additional employees to give access to your Work Zone, you can add new users to the IDP Services. You may click on Users & Authorizations -> click on User Management -> click on Add User and enter the details required, and in User Type please ensure to select Employee.
c. Create groups in the Identity Authentication service and Assign Users:
Here we will create SAP Build Work Zone, advanced edition user group in the Identity Authentication Services (IAS), and assign users to them. Based on these user groups, the user will be authorized for the role.
Open the SAP Cloud Identity Services tenant, click on Users and Authorization -> click User Group -> Click on Create to add the following user groups enter the same values in the Name section and Display Name, and click on Create to save the user groups.
Now, click on the user group Workzone_Admin -> click on Add button -> select your ID and the users whom you want to provide this role as shown in image 15. Repeat the same steps and create the following roles in the system.
Please pay attention to the upper case and lower case letters as they are case-sensitive and ensure you have the same value in the display name also.
4. Run the booster “SAP Build Work Zone, Advanced Edition”
SAP BTP Boosters helps us to activate the services in the subaccounts. To do this, we would now need to go to our SAP BTP Global Account -> Select Boosters -> Search for Getting Started with SAP Build Work Zone, Advanced Edition, and click on it.
Take your time to get familiar with Overview and the Components listed, then click on the Start button -> a new pop-up screen appears click on Continue -> the system checks if the required components are available, and then click on Next.
In the Configure Subaccount step, please select the subaccount to which you want to run the Work Zone services and the Org and Space should be prefilled as we have not created the Cloud Foundry services, you can leave it to default values and click on Next.
In my case, I have selected the subaccount that we are working on. This will also create a Cloud Foundry environment and a dev space to deploy the apps if not activated previously, and before you click on next, in case you do not want Workflow Service, please delete it and click on next.
Note: SAP Workflow Management is scheduled to be retired as of June 15th, 2023. It will be available until the end of the current subscription term. It will not be available for renewal terms that begin after the retirement date. Workflow Management capabilities can be now found under SAP Build Process Automation.
The third step fetches the Identity Services, please ensure the Custom IDP URL matches the configurations which we have done in the above steps as shown below, and enter the additional Administrators and Developers who require access to the system as by default the logged user will be granted both Admin and Developer role, click on Next.
Verify the settings and click on Finish. Based on the prerequisites and configurations, the system starts the automation to activate the services, and once completed you should be able to see a success message, click on the Close option.
This should activate the required services in the subaccount, you can navigate to your subaccount and validate these service activations.
Note: The Booster services are updated with SAP Cloud Identity Services activation and roles are created in your Trust Center for the Identity Services.
5. Post Booster Configuration
Now, this is where we must pay special attention as we have to configure our Identity Provisioning Service to communicate between systems and take care of the provisioning.
URL structure is generally the Work Zone page with “dt”. In my case, I have the following URL:
https://subdomainname.dt.workzone.cfapps.eu10.hana.ondemand.com/
6. Run the SAP Build Work Zone, advanced edition – configurator (final setup)
If you have an existing SAP JAM Collaboration and would like to use it, please follow the additional setup details as mentioned on the help page - Step 1.
If you are doing a new setup of SAP Build Work Zone, advanced edition you may skip step 1 on the existing SAP JAM Collaboration page.
We would need to create a destination in the BTP Subaccount.
Navigate to the work zone subaccount -> click on Connectivity -> click on Destinations -> click on Download Trust, this will download the metadata file. Please store this metadata file as we need it in the next steps.
and
Click on Next as shown in Image 25.
i. Select “Create an App in the Identity Authentication Using the Metadata that you download here” and download the metadata file.
Open the IAS service URL (reference Image 7) -> click on Application and Resources -> Select Applications -> click on Create button -> enter the Display Name as shown in the Image below and save the settings.
Select the newly created application SAP WorkZoneBlogSetup DWS, (DWS - Digital Workspace Service) and click on SAML 2.0 Configuration -> click on Browse and upload the metadata file which we downloaded as shown in Image 27. The details will be auto-populated, now click on Save.
Click on SAP WorkZoneBlogSetup DWS, In the Trust tab -> click on search for the option Subject Name Identifier and change the Select a basic attribute value to Global User ID/User UUID and Save the changes.
ii. We will now continue with “Set Identity Authentication as a source system”.
As a pre-requisite, first, we need to create a Technical User of type System with a password and generated client ID to communicate between the IAS and the IPS system. (To know more, please refer to the official documentation here.)
Within the IAS service -> Select Users & Authorizations -> click on Administrators -> click on Add and select the type System -> enter a System Display Name as shown below.
Select the newly created system user, WorkZoneBlogSetup_Sys_Admin -> click on Secrets -> click on Add -> enter a short description like System User for IAS and IPS Connection, and save it -> we should now be able to see the Client ID and the Client Secret values, please ensure save them as it will be required in the next step.
We are now ready to configure the source and target system in the IPS tenants.
Open the IPS service (reference Image 7) -> click on Source System -> Click on Add -> Select the Type as Identity Authentication -> enter the System Name (IAS/IPS URL) -> enter the Description and click on Save.
Once the details are saved, you will be able to see the entry under Customer Managed service, click on the connection which we created -> click on Transformation -> click on Edit. We need to change the default value, to copy the source code please visit the official documentation and look for “Identity Authentication service Source System Transformation (v2) - Code Sample” in option 2 of the setup process. Copy the source copy and paste it into the Transformations and save the new code.
Now click on the Properties tab on the same page -> click on Edit and Add type Standard, the following mandatory values which are case sensitive.
The final result should be as shown below with case-sensitive values in the properties section.
This completes the Source system setup.
iii. Now let us Set SAP Build Work Zone, advanced edition as a target system using oAuth Client Key and Client Secret (reference Image 27):
Within the IPS tenant, click on Target System -> Click on Add -> Select the Type as SAP Work Zone, Advanced Edition -> enter a valid System Name -> Enter Description -> select the Source System which we created in the previous step -> Click on Save.
Similar configurations on Transformation and Properties need to be modified in Target System too.
Click on the newly added Target System, DWSWZBlogSetup -> click on Transformation -> click on Edit -> Copy the new source code from the official documentation and search for “SAP Build Work Zone, advanced edition Target System Transformation - Code Sample” and paste it -> Save the settings.
Now click on the Properties tab, and Add the following values in Standard format. To do this, we now need the details from the Work Zone Site Manager (reference Image 27):
The final value should be as shown below.
Perfect we are just a few more steps to complete the Work Zone setup. Now go back to your Source System in IPS Tenant -> click on your source system -> click on Jobs -> you will be able to see Read Job -> click on Run now.
To confirm if the jobs have been executed correctly, click on Job Logs and you should be able to see the Success Message.
Now go back to your IAS Tenent, we need to Add the DWS domain as trusted -> within your IAS tenant click on Application and Resources -> Select Tenant Settings -> enter *.ondemand.com as a wildcard entry -> Save the settings.
iv. We are now ready to run the last step in the SAP Build Work Zone Site Manager. Go back to your Site Manager URL -> select all the checkboxes and click on Step 3.
Congratulations, we can now Open SAP Build Work Zone, Advanced Edition.
You may now get started with your Work Zone developments, add users, etc. To learn more about SAP Build Work Zone I would always recommend visiting the official help guide, developers.sap.com as these blogs are only for the quick guide as this process involves a log of configurations. Hope this blog has been useful.
I would like to express my special thanks to florian.buech for his guidance and support to get this blog posted.
In case of any setup issues and an SAP Customer, you can reach us at sap_btp_onboarding@sap.com and if you are an SAP Partner we recommend reaching the SAP ParnterEdge for support.
Cheers,
Nagesh Caparthy
SAP BTP Customer Onboarding Team
--------------------------------------------------------------------------------------------------------------------------------------
7. Common Issues / Troubleshooting
With the new announcements from SAP TechEd on SAP Build Work Zone, we found it exciting to get our customers, IT Professionals, and line of business experts to easily build and design engaging business sites for your employees, partners, and customers to increase productivity. In short, SAP Build Work Zone offers the following benefits:
- Increase efficiency and productivity of individual users and teams working with SAP apps, processes & self-services
- Empower lines of business to easily build business sites (create content & publish information without IT)
- Boost people's engagement and establish interactive communities
- Foster active knowledge sharing across the enterprise
- Provide a great onboarding and learning experience
The benefits are huge, now the next question is how do you activate these services, and what prerequisites/services are required for you to get started?? Well, from the point of onboarding you to a new service, let us look at how to activate SAP Build Work Zone, advanced edition:
- You are assigned the Global Admin Role in your SAP Business Technology Platform
- Create a Sub-Account and Activate SAP Cloud Identity Service
- Setup Trust between SAP Identity Service - Identity Authentication, and BTP Subaccount
- Run the booster “SAP Build Work Zone Advanced Edition”
- Post Booster Configuration
- Run the configurator, pre-requisite Configure IAS and IPS
- Common Issues/Troubleshooting
While we explain each of the points in detail, please pay close attention to the service configurations specifically on Booster activation, IAS, & IPS Configurations, and Run Configurator steps.
Caution: Scenarios not considered in this blog are, an existing JAM migration, and SAP SuccessFactors WorkZone setup.
Before we get started, here is the official documentation on the SAP Build Work Zone setup. We understand the various needs of our customers, partner, and community and we will explore this in more detail including step-by-step instructions with screenshots & background information.
- You are assigned the Global Admin Role in your SAP Business Technology Platform
As a part of the setup process, you need to have the SAP BTP Global Administrator role to perform the next task. In case you do not have a global admin role, please reach your internal team.
- Create a Sub-Account and, Activate SAP Cloud Identity Service
In this blog, we are considering the setup with a new Global Account, and are therefore going to create a New Sub-account and activate the SAP Cloud Identity Services. In case you have an existing sub-account or an active SAP Cloud Identity Service you may skip the creating/activating steps (a and b).
a. Log in to the SAP BTP Cockpit to create a new sub-account, from the BTP Account Explorer page -> click on Create -> select Subaccount.
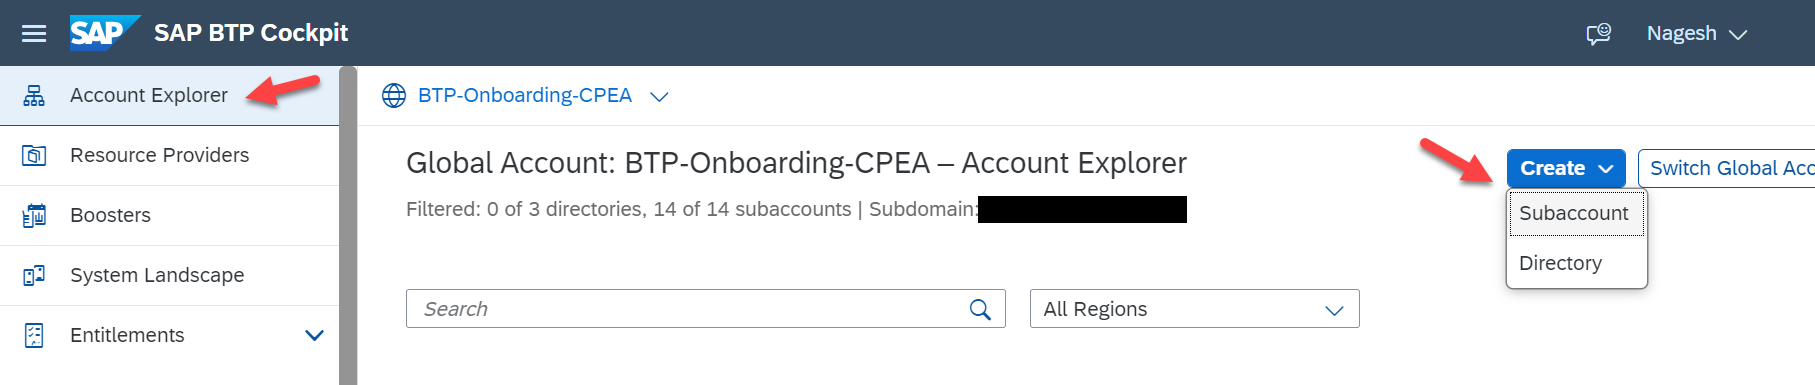
Image 1
Now enter the details to create your subaccount, as displayed below. While selecting your data center, you may select the one nearest to your location to avoid latency or you may pick and choose the data center where SAP Work Zone is supported, the table on the SAP Help page can help to clarify the implications of this selection. I have selected Europe Frankfurt in this demo and I have kept the subdomain with auto-populated value. In case you need to modify it, please do so now as it cannot be edited once the subaccount is created.

Image 2
The new subaccount is created. Since you have created the new subaccount, by default you will be assigned as the subaccount administrator. Click on the subaccount to open it.

Image 3
b. Now let us activate the SAP Cloud Identity Service, and as said before if you have an active SAP Cloud Identity service you may skip this activation step. For the purpose of this blog, I’m using a Cloud Identity Service that has already been set up. Note: SAP Cloud Identity Service is a service included as a part of your overall platform agreement with SAP and no additional charges will be incurred upon activation. For more details, you can refer to the SAP Identity Authentication – tenant model and licensing.
To activate the service, in your subaccount click on Services -> Service Marketplace -> Cloud Identity Services -> click on Create.
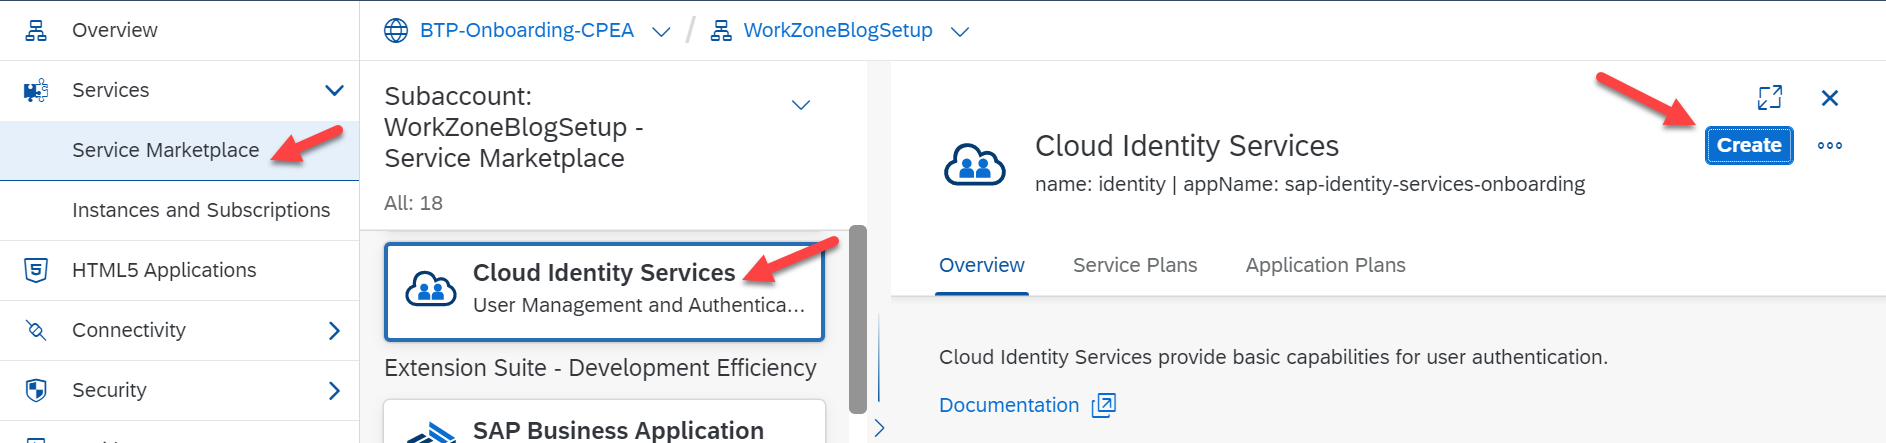
Image 4
The service option should be selected by default to SAP Cloud Identity Service, if not please select it -> Select the service plan “default” and click on Next -> select the service type as TEST (assuming it is a non-production setup) and click on Next and click on Create. The SAP Cloud Identity Services should be activated now, and you should be having access to them.
c. Access to SAP Cloud Identity Services
First, let us get access to the SAP Cloud Identity Services, if you have activated the Identity Service in this subaccount, click on Services -> Instances and Subscription -> click on SAP Cloud Identity Services. This should launch the SAP Cloud Identity Services.
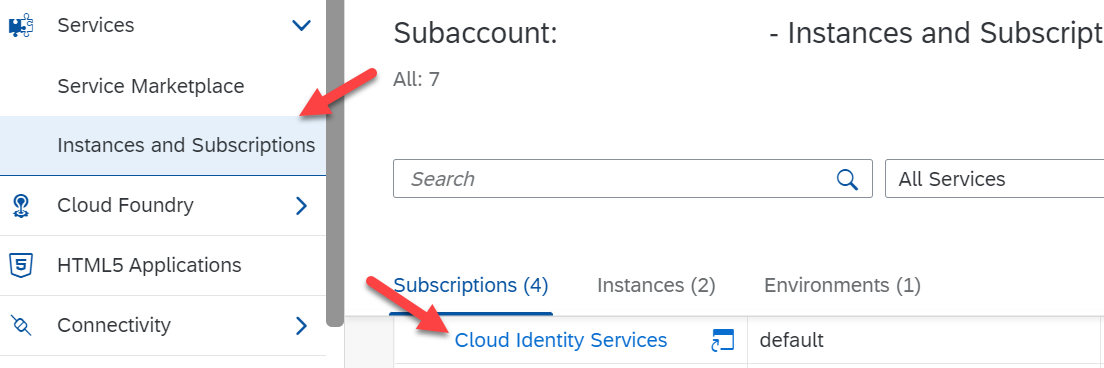
Image 5
To know more about IAS and IPS, please read the blog here.

Image 6
Note: SAP has updated the SAP IDP services. In the new version, IAS & IPS are accessible in the same URL. Most of the screens and steps have been updated.

Image 7
In case you have an existing Identity Service, you may need to find the IDP/IAS link. You can either check internally with the BTP account or you can click on the link for SAP Cloud Identity Services – Tenants which will list all the IAS and IPS services active in your organization.
Once you have Administrative access to the SAP Cloud Identity service, we are now ready to set up Trust between systems.
3. Setup Trust between SAP Identity Service - Identity Authentication, and BTP Subaccount
a. Establish/configure Trust between the SAP Cloud Identity service and the SAP BTP subaccount
Now, let us go back to our subaccount WorkZoneBlogSetup, click on Security ->, and Click on Trust Configuration. This page helps to establish trust between the identity services and the subaccount and it helps in using the existing user base for security. You may learn more about the concepts in our official documentation here.
Here you have two approaches,
- First, if you are setting the trust between the IAS and sub-account for the first time we recommend going with the manual export of SAML Metadata between the systems.
Go to BTP subaccount -> Security -> Trust Configuration -> you can click on SAML Metadata -> XML file downloads which can be imported into the SAP IAS system.

Image 8
Navigate to SAP Cloud Identity Service -> click on Application & Resources -> select Applications -> Click on Create -> enter a display name, I have named it “SAP WorkZoneBlogSetup” and click on Save.

Image 8a
Select your saved entry, SAP WorkZoneBlogSetup -> select SAML 2.0 configuration -> under the option Define from Metadata, click on the Browse button and select the SAML file downloaded from your subaccount and Save the details.
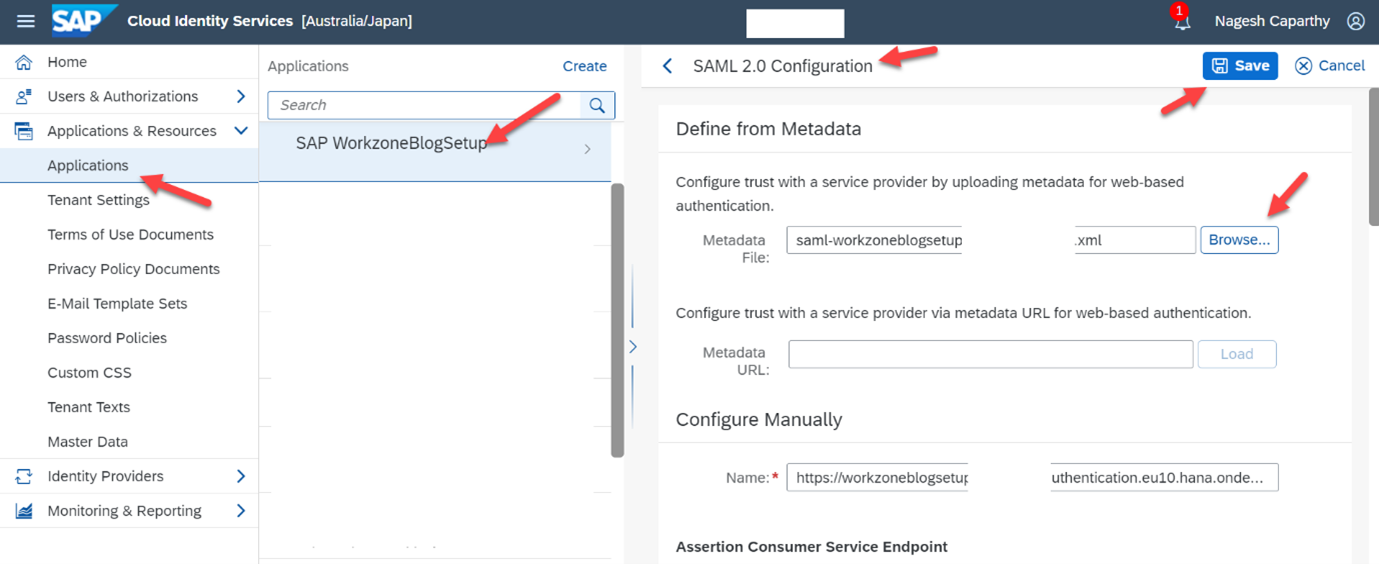
Image 8b
Now, we have to download the SAML metadata from the IAS system and import it to the subaccount. In your IAS system, click on Application and Resources -> click on Tenant Settings -> go to Single Sign-On -> Click on SAML 2.0 Configuration -> click on Download Metadata File.
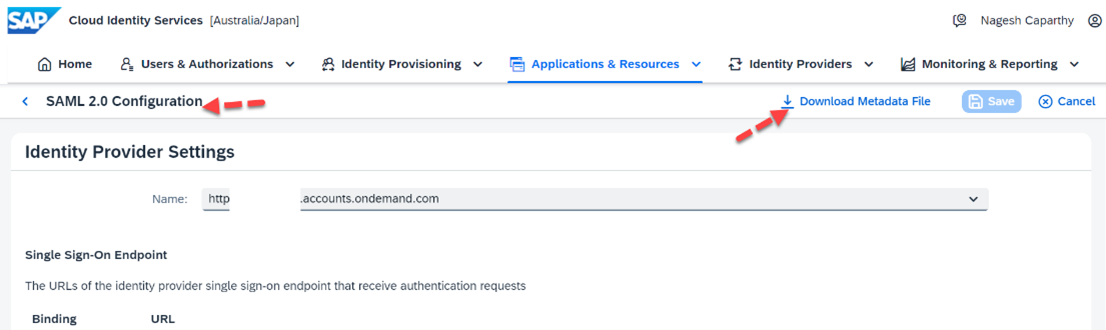
Image 8c
We will need to import this metadata file in the subaccount. In your sub-account -> click on Security -> Click on Trust Configuration -> click on New Trust Configuration -> in the new pop-up window click on Browse -> select the IAS system metadata file which was downloaded and enter the Name as IAS – domain name and Save the details.
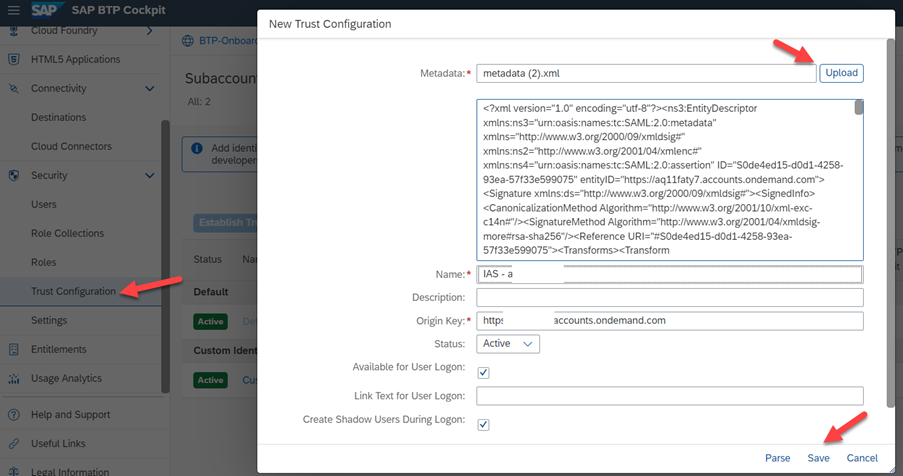
Image 8d
- The second option, (skip this step if you follow the first method), the simplest way if you already have trust setup exchanging metadata files for different subaccounts, you can click on the Establish Trust button (see in Image 8), a new window appears, and select the IAS service URL which you have activated and click on Establish Trust. This will create a new application entry and allow connectivity between a subaccount and the IAS services.
Note: In my case, I have followed the second option and a new application is auto-created with “XSUAA_WorkZoneBlogSetup”.
Now, this establishes trust both ways from Subaccount to Identity Services and vice versa. This can be verified on the same page; a Custom Identity Provider for Application should be listed.

Image 9
We also need to stop the default IDP service from user authentication. Click on the Edit/Pencil icon assigned to Default identity Provider (image 10) -> remove the selection “Available for User Logon” and Save the settings.
To verify the trust set up in the IAS system, go to the IAS tenant URL, and click on Application and Resources -> Applications -> in Bundled Applications, you will be able to see the new entry with the subaccount name which confirms the Trust has been setup successfully.
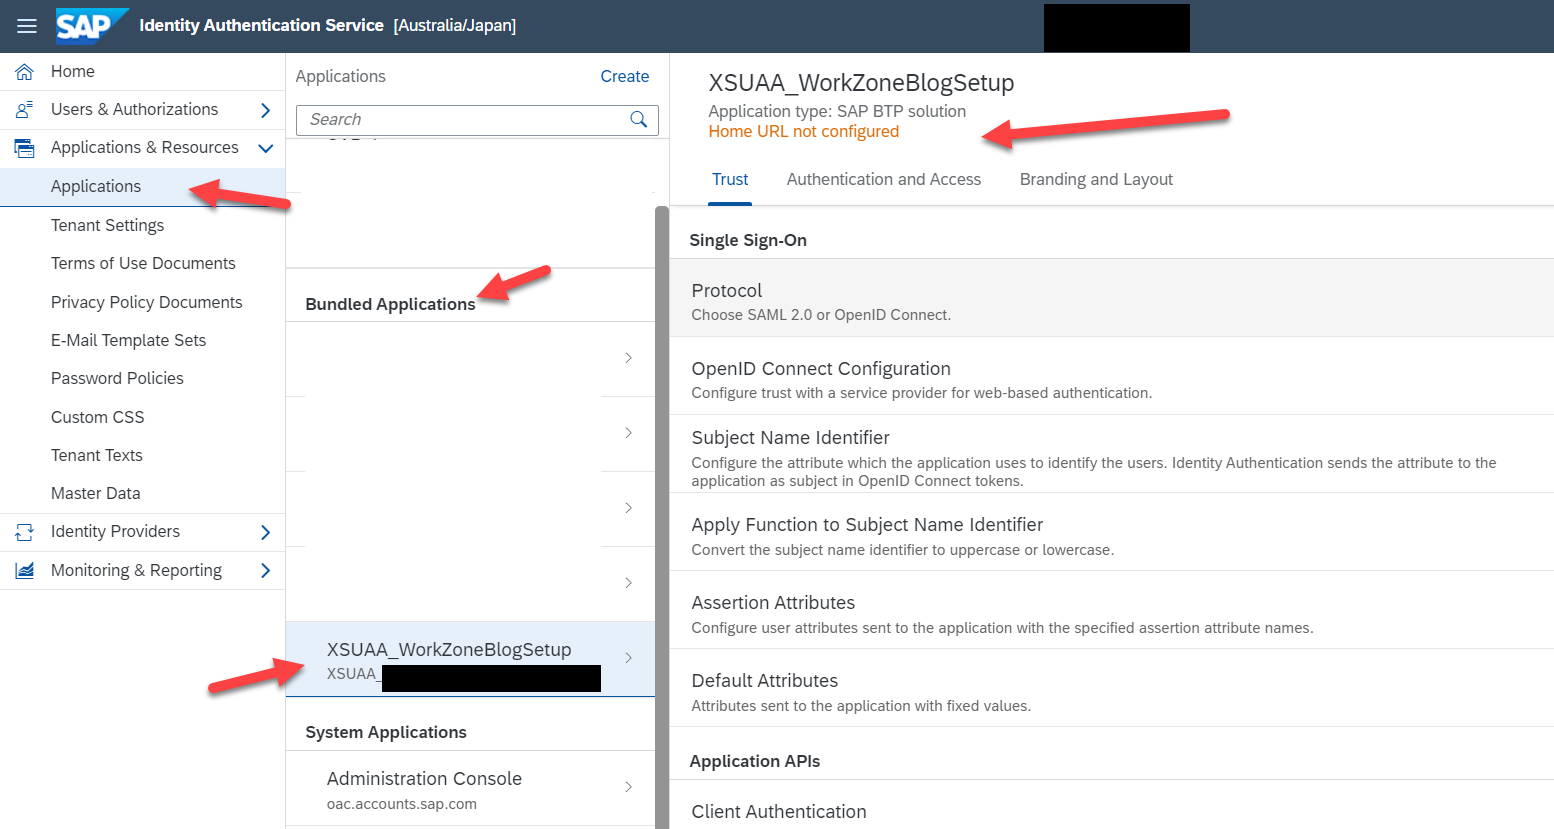
Image 10
- The second option is to set it up manually, from the BTP subaccount -> Security -> Trust Configuration -> you can click on SAML Metadata -> an XML file downloads which can be imported into the SAP IAS system. I will skip this approach as we have simply achieved our requirements.
Before we move to the next step of configuration, we also have to make some changes to the OIDC configurations. Go to your SAP Cloud Identity Services, click on Applications and Resources -> Click on Applications -> in Bundled Applications click your application XSUAA_WorkZoneBlogSetup -> click on Assertion Attributes.

Image 11
Modify the details as shown in Image 13 and ensure to use capitals and lower letters as shown in the image and Save. In case you have additional attributes, you can delete them.

Image 12
Click on the back button as shown in the above image, now click on Default Attributes -> click on Add -> enter the values as in Image 14 and Save the details.
Groups : Workzone_User_Type_${type}

Image 13
b. Adding new Users to IAS (Optional):
You may continue the setup process as you have the Admin role, however, in case you need to add additional employees to give access to your Work Zone, you can add new users to the IDP Services. You may click on Users & Authorizations -> click on User Management -> click on Add User and enter the details required, and in User Type please ensure to select Employee.

Image 14
c. Create groups in the Identity Authentication service and Assign Users:
Here we will create SAP Build Work Zone, advanced edition user group in the Identity Authentication Services (IAS), and assign users to them. Based on these user groups, the user will be authorized for the role.
Open the SAP Cloud Identity Services tenant, click on Users and Authorization -> click User Group -> Click on Create to add the following user groups enter the same values in the Name section and Display Name, and click on Create to save the user groups.
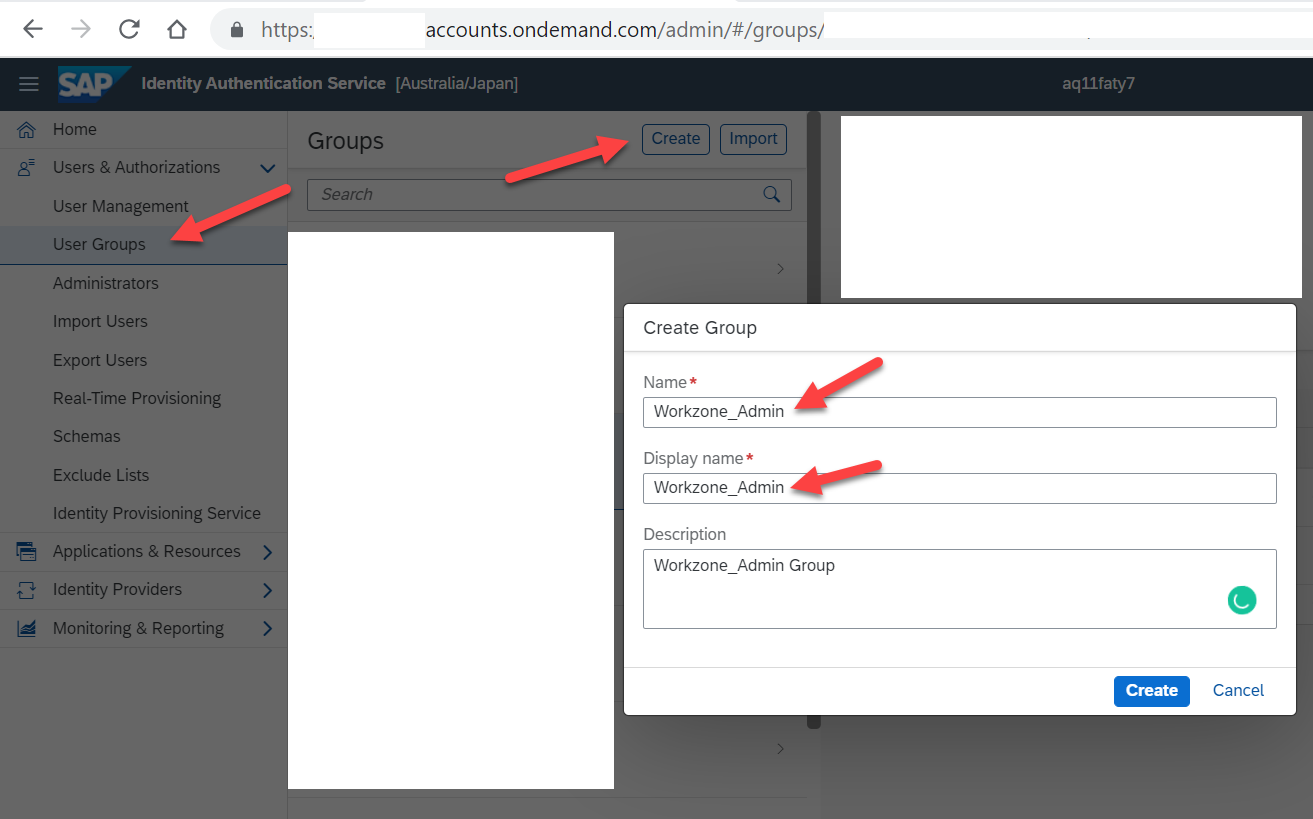
Image 15
Now, click on the user group Workzone_Admin -> click on Add button -> select your ID and the users whom you want to provide this role as shown in image 15. Repeat the same steps and create the following roles in the system.
- Workzone_Admin
- Workzone_Area_Admin
- Workzone_Support_Admin
- Workzone_Page_Content_Admin
- Workzone_End_User
- Workzone_User_Type_public
- Workzone_Advanced_Theming
Please pay attention to the upper case and lower case letters as they are case-sensitive and ensure you have the same value in the display name also.

Image 16
4. Run the booster “SAP Build Work Zone, Advanced Edition”
SAP BTP Boosters helps us to activate the services in the subaccounts. To do this, we would now need to go to our SAP BTP Global Account -> Select Boosters -> Search for Getting Started with SAP Build Work Zone, Advanced Edition, and click on it.
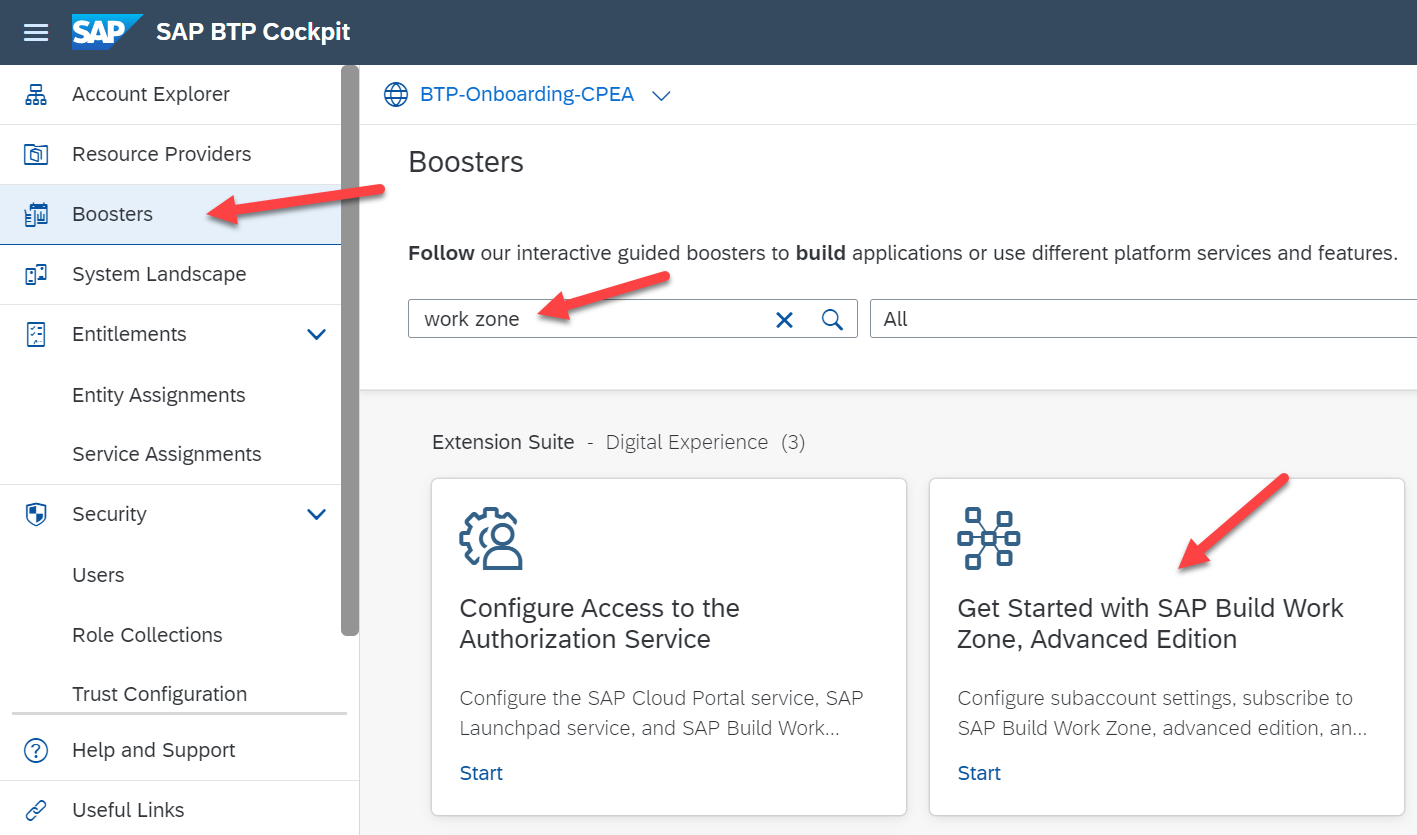
Image 17
Take your time to get familiar with Overview and the Components listed, then click on the Start button -> a new pop-up screen appears click on Continue -> the system checks if the required components are available, and then click on Next.
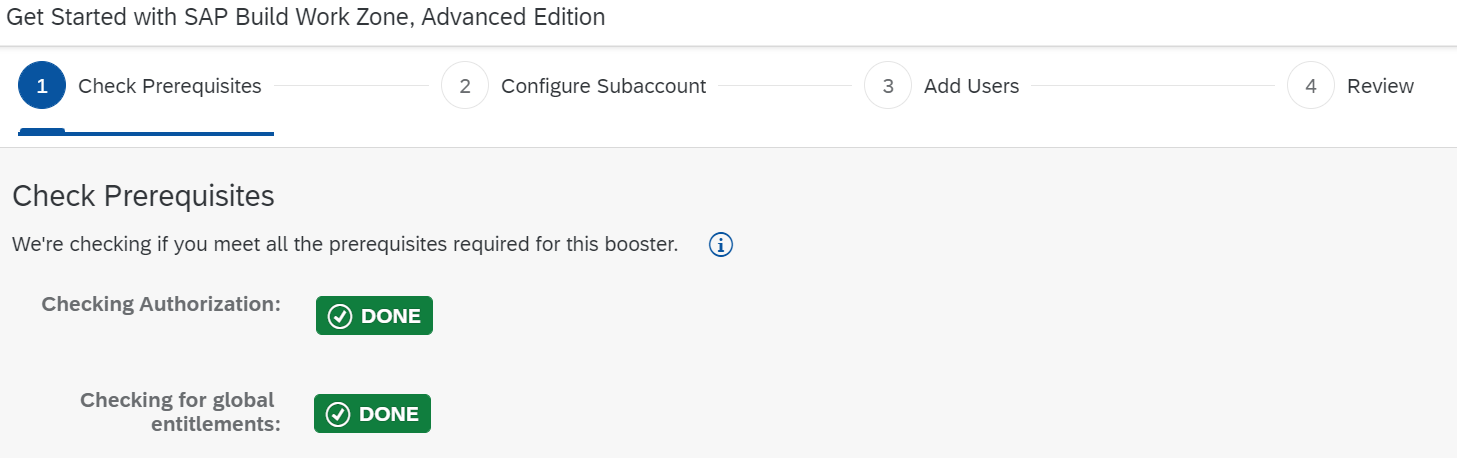
Image 18
In the Configure Subaccount step, please select the subaccount to which you want to run the Work Zone services and the Org and Space should be prefilled as we have not created the Cloud Foundry services, you can leave it to default values and click on Next.
In my case, I have selected the subaccount that we are working on. This will also create a Cloud Foundry environment and a dev space to deploy the apps if not activated previously, and before you click on next, in case you do not want Workflow Service, please delete it and click on next.
Note: SAP Workflow Management is scheduled to be retired as of June 15th, 2023. It will be available until the end of the current subscription term. It will not be available for renewal terms that begin after the retirement date. Workflow Management capabilities can be now found under SAP Build Process Automation.

Image 19
The third step fetches the Identity Services, please ensure the Custom IDP URL matches the configurations which we have done in the above steps as shown below, and enter the additional Administrators and Developers who require access to the system as by default the logged user will be granted both Admin and Developer role, click on Next.

Image 20
Verify the settings and click on Finish. Based on the prerequisites and configurations, the system starts the automation to activate the services, and once completed you should be able to see a success message, click on the Close option.

Image 21
This should activate the required services in the subaccount, you can navigate to your subaccount and validate these service activations.
Note: The Booster services are updated with SAP Cloud Identity Services activation and roles are created in your Trust Center for the Identity Services.
5. Post Booster Configuration
Now, this is where we must pay special attention as we have to configure our Identity Provisioning Service to communicate between systems and take care of the provisioning.
- First Navigate to the SAP subaccount which you have created
- Click on your Services -> click on Instances and Subscriptions
- Click on the SAP Build Work Zone, Advanced Edition to navigate to the Application. It should open a new window with a popup “Getting Started with SAP Build Work Zone, Advanced Edition”.

Image 22
- Click on Configurator Wizard
- This should open the Site Manager Configurator in a new window (make a note of this URL as it will be required for the next steps)
URL structure is generally the Work Zone page with “dt”. In my case, I have the following URL:
https://subdomainname.dt.workzone.cfapps.eu10.hana.ondemand.com/
- Click on Settings and Identity Provisioning and click on Connect
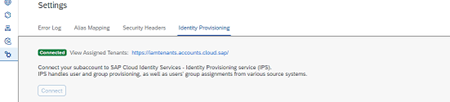
Image 23
6. Run the SAP Build Work Zone, advanced edition – configurator (final setup)
If you have an existing SAP JAM Collaboration and would like to use it, please follow the additional setup details as mentioned on the help page - Step 1.
If you are doing a new setup of SAP Build Work Zone, advanced edition you may skip step 1 on the existing SAP JAM Collaboration page.
We would need to create a destination in the BTP Subaccount.
Navigate to the work zone subaccount -> click on Connectivity -> click on Destinations -> click on Download Trust, this will download the metadata file. Please store this metadata file as we need it in the next steps.

Image 24
- Navigate to the Site Manager URL which we opened as shown in Image 22. Click on the Configurator option -> select the options
- Prerequisites (configure Identity Authentication and trust)
- You have run the booster in SAP BTP cockpit to automatically configure settings.
and
- I want to create a new service instance.
Click on Next as shown in Image 25.

Image 25
- Here, a series of configurations need to be done in your subaccount to allow connectivity and authentication of different components in your environment. Before triggering this action, make sure that you have downloaded the trust from the SAP BTP cockpit - Destinations screen. Click on Trigger Setup
- Upon successful message, click on Step 2. Each of these checkboxes has a configuration separately, let us take a look at them one by one.
i. Select “Create an App in the Identity Authentication Using the Metadata that you download here” and download the metadata file.

Image 26
Open the IAS service URL (reference Image 7) -> click on Application and Resources -> Select Applications -> click on Create button -> enter the Display Name as shown in the Image below and save the settings.

Image 27
Select the newly created application SAP WorkZoneBlogSetup DWS, (DWS - Digital Workspace Service) and click on SAML 2.0 Configuration -> click on Browse and upload the metadata file which we downloaded as shown in Image 27. The details will be auto-populated, now click on Save.

Image 28
Click on SAP WorkZoneBlogSetup DWS, In the Trust tab -> click on search for the option Subject Name Identifier and change the Select a basic attribute value to Global User ID/User UUID and Save the changes.

Image 29
ii. We will now continue with “Set Identity Authentication as a source system”.
As a pre-requisite, first, we need to create a Technical User of type System with a password and generated client ID to communicate between the IAS and the IPS system. (To know more, please refer to the official documentation here.)
Within the IAS service -> Select Users & Authorizations -> click on Administrators -> click on Add and select the type System -> enter a System Display Name as shown below.

Image 30
Select the newly created system user, WorkZoneBlogSetup_Sys_Admin -> click on Secrets -> click on Add -> enter a short description like System User for IAS and IPS Connection, and save it -> we should now be able to see the Client ID and the Client Secret values, please ensure save them as it will be required in the next step.
We are now ready to configure the source and target system in the IPS tenants.
Open the IPS service (reference Image 7) -> click on Source System -> Click on Add -> Select the Type as Identity Authentication -> enter the System Name (IAS/IPS URL) -> enter the Description and click on Save.

Image 31
Once the details are saved, you will be able to see the entry under Customer Managed service, click on the connection which we created -> click on Transformation -> click on Edit. We need to change the default value, to copy the source code please visit the official documentation and look for “Identity Authentication service Source System Transformation (v2) - Code Sample” in option 2 of the setup process. Copy the source copy and paste it into the Transformations and save the new code.
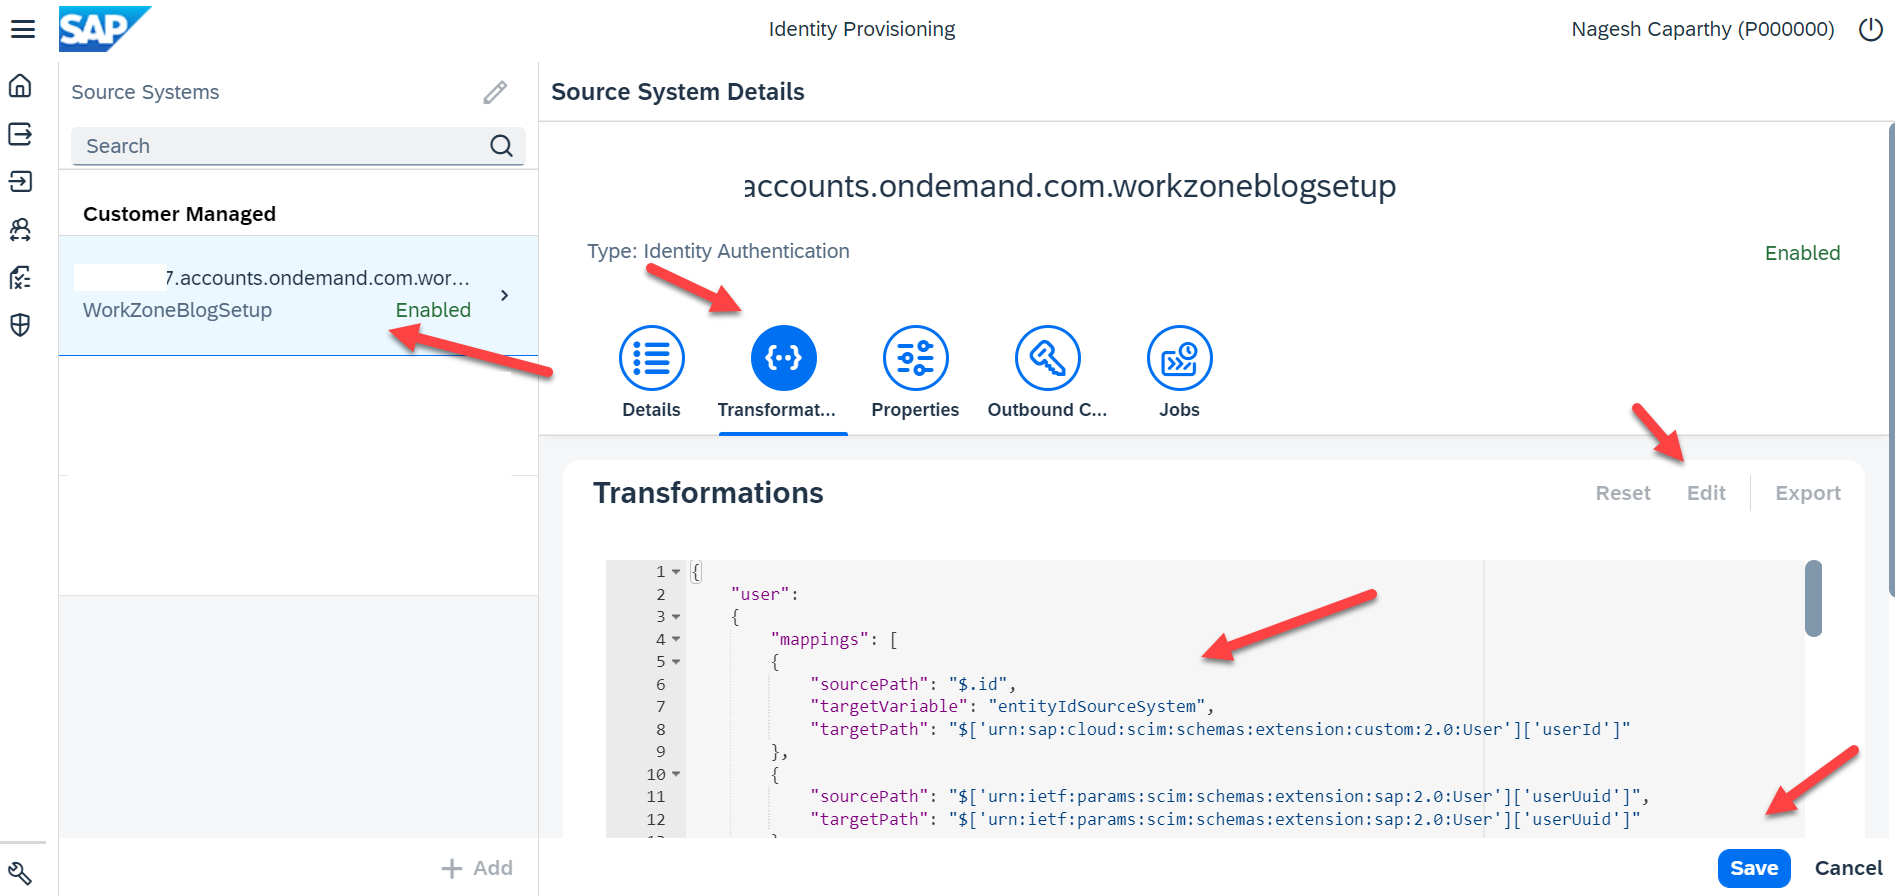
Image 32
Now click on the Properties tab on the same page -> click on Edit and Add type Standard, the following mandatory values which are case sensitive.
| Name | Value |
| Type | HTTP |
| URL | https://abcd.accounts.ondemand.com/ (where abcd is your IDP account ID) |
| ProxyType | Internet |
| Authentication | BasicAuthentication |
| User | Enter Client ID – where we created a system user refers the step after image 33 |
| Password | Enter the Client Secret value |
The final result should be as shown below with case-sensitive values in the properties section.

Image 33
This completes the Source system setup.
iii. Now let us Set SAP Build Work Zone, advanced edition as a target system using oAuth Client Key and Client Secret (reference Image 27):
Within the IPS tenant, click on Target System -> Click on Add -> Select the Type as SAP Work Zone, Advanced Edition -> enter a valid System Name -> Enter Description -> select the Source System which we created in the previous step -> Click on Save.

Image 34
Similar configurations on Transformation and Properties need to be modified in Target System too.
Click on the newly added Target System, DWSWZBlogSetup -> click on Transformation -> click on Edit -> Copy the new source code from the official documentation and search for “SAP Build Work Zone, advanced edition Target System Transformation - Code Sample” and paste it -> Save the settings.
Now click on the Properties tab, and Add the following values in Standard format. To do this, we now need the details from the Work Zone Site Manager (reference Image 27):
| IDP Property Name | Value |
| Type | HTTP |
| URL | Copy this value from the wizard - SAP Jam URL field (New value is Integration Token - Image 26) |
| ProxyType | Internet |
| Authentication | BasicAuthentication |
| User | Copy this value from the wizard - OAuth Client Key field |
| Password | Copy this value from the wizard - OAuth Client Secret field |
| OAuth2TokenServiceURL | Copy this value from the wizard - Token Service URL field |
| ips.failed.request.retry.attempts | 3 |
| ips.failed.request.retry.attempts.interval | 60 |
| ips.delete.existedbefore.entities | true |
| ips.trace.failed.entity.content | true |
The final value should be as shown below.

Image 35
Perfect we are just a few more steps to complete the Work Zone setup. Now go back to your Source System in IPS Tenant -> click on your source system -> click on Jobs -> you will be able to see Read Job -> click on Run now.
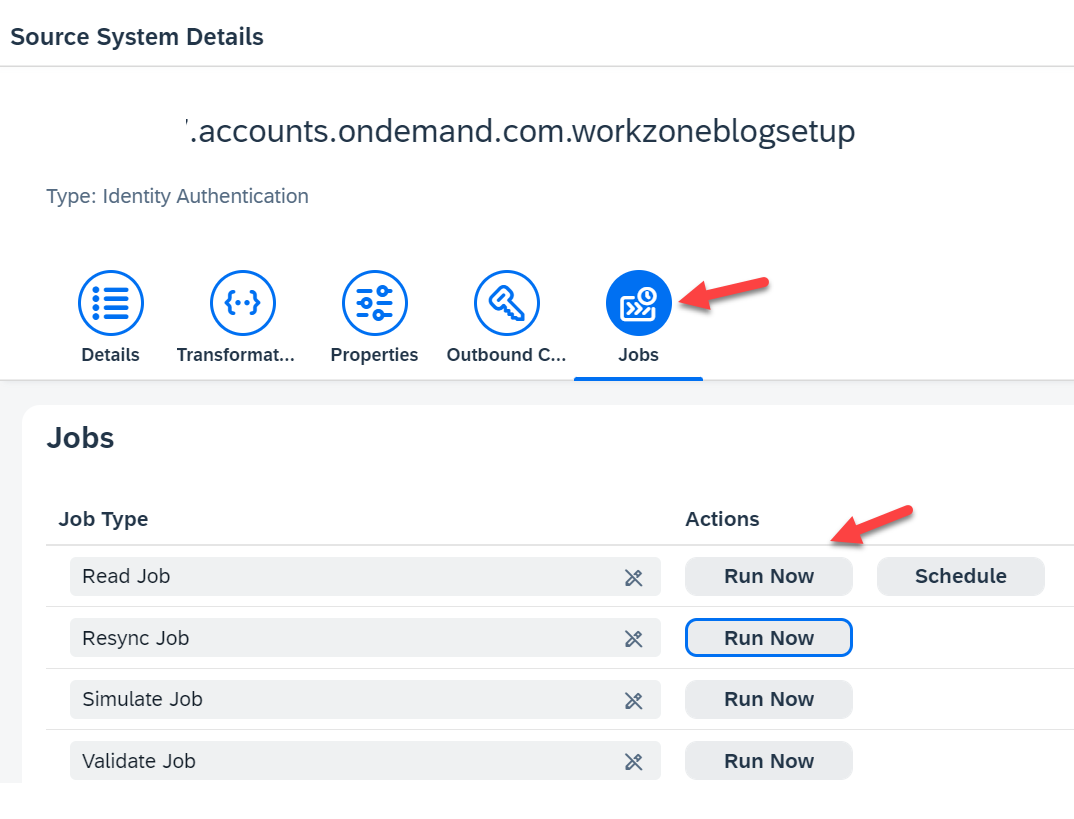
Image 36
To confirm if the jobs have been executed correctly, click on Job Logs and you should be able to see the Success Message.

Image 37
Now go back to your IAS Tenent, we need to Add the DWS domain as trusted -> within your IAS tenant click on Application and Resources -> Select Tenant Settings -> enter *.ondemand.com as a wildcard entry -> Save the settings.

Image 38
iv. We are now ready to run the last step in the SAP Build Work Zone Site Manager. Go back to your Site Manager URL -> select all the checkboxes and click on Step 3.

Image 39
Congratulations, we can now Open SAP Build Work Zone, Advanced Edition.

Image 40
You may now get started with your Work Zone developments, add users, etc. To learn more about SAP Build Work Zone I would always recommend visiting the official help guide, developers.sap.com as these blogs are only for the quick guide as this process involves a log of configurations. Hope this blog has been useful.
I would like to express my special thanks to florian.buech for his guidance and support to get this blog posted.
In case of any setup issues and an SAP Customer, you can reach us at sap_btp_onboarding@sap.com and if you are an SAP Partner we recommend reaching the SAP ParnterEdge for support.
Cheers,
Nagesh Caparthy
SAP BTP Customer Onboarding Team
--------------------------------------------------------------------------------------------------------------------------------------
7. Common Issues / Troubleshooting
- Always pay close attention to the case sensitivity attributes as they may not work in case of a mismatch in entries.
- In case the Booster fails. Please check at what stage it fails, we can also continue the manual approach, please refer to the help documentation. You may have to activate the services manually, and create the Role Collection Mappings in the Trust Configuration: Custom IAS tenant - Role Collection Mappings
- Most of the mistakes are done during the IAS and IPS Configurations, transformation code sample, properties values, etc…
- Refer to the job logs Error Message, for details and expand the Failed Entities for detailed information on the errors. These messages help to identify the configuration mismatch and fix the errors.
- SAP Managed Tags:
- SAP Build Work Zone, advanced edition,
- SAP Build Apps,
- SAP Business Technology Platform
Labels:
35 Comments
You must be a registered user to add a comment. If you've already registered, sign in. Otherwise, register and sign in.
Labels in this area
-
ABAP CDS Views - CDC (Change Data Capture)
2 -
AI
1 -
Analyze Workload Data
1 -
BTP
1 -
Business and IT Integration
2 -
Business application stu
1 -
Business Technology Platform
1 -
Business Trends
1,658 -
Business Trends
95 -
CAP
1 -
cf
1 -
Cloud Foundry
1 -
Confluent
1 -
Customer COE Basics and Fundamentals
1 -
Customer COE Latest and Greatest
3 -
Customer Data Browser app
1 -
Data Analysis Tool
1 -
data migration
1 -
data transfer
1 -
Datasphere
2 -
Event Information
1,400 -
Event Information
67 -
Expert
1 -
Expert Insights
177 -
Expert Insights
311 -
General
1 -
Google cloud
1 -
Google Next'24
1 -
GraphQL
1 -
Kafka
1 -
Life at SAP
780 -
Life at SAP
13 -
Migrate your Data App
1 -
MTA
1 -
Network Performance Analysis
1 -
NodeJS
1 -
PDF
1 -
POC
1 -
Product Updates
4,576 -
Product Updates
354 -
Replication Flow
1 -
REST API
1 -
RisewithSAP
1 -
SAP BTP
1 -
SAP BTP Cloud Foundry
1 -
SAP Cloud ALM
1 -
SAP Cloud Application Programming Model
1 -
SAP Datasphere
2 -
SAP S4HANA Cloud
1 -
SAP S4HANA Migration Cockpit
1 -
Technology Updates
6,873 -
Technology Updates
443 -
Workload Fluctuations
1
Related Content
- Exploring Integration Options in SAP Datasphere with the focus on using SAP extractors - Part II in Technology Blogs by SAP
- SAP BTP Innobytes – March 2024 in Technology Blogs by SAP
- BCP: Business Continuity Planning for SAP S/4HANA - made easy with Enterprise Blockchain 🚀 in Technology Blogs by Members
- SAP BTP - A Deep Dive into SAP Build Capabilities in Technology Blogs by Members
- SAP Enterprise Architecture: Let the Use Case find the Blockchain🚀 in Technology Blogs by Members
Top kudoed authors
| User | Count |
|---|---|
| 18 | |
| 16 | |
| 12 | |
| 11 | |
| 9 | |
| 8 | |
| 8 | |
| 8 | |
| 7 | |
| 7 |