
- SAP Community
- Products and Technology
- Technology
- Technology Blogs by SAP
- SAP BI 4.3 SP2: What’s New In Web Intelligence and...
Technology Blogs by SAP
Learn how to extend and personalize SAP applications. Follow the SAP technology blog for insights into SAP BTP, ABAP, SAP Analytics Cloud, SAP HANA, and more.
Turn on suggestions
Auto-suggest helps you quickly narrow down your search results by suggesting possible matches as you type.
Showing results for
Advisor
Options
- Subscribe to RSS Feed
- Mark as New
- Mark as Read
- Bookmark
- Subscribe
- Printer Friendly Page
- Report Inappropriate Content
12-08-2021
10:12 AM

Since its release in June 2020, the SAP BI 4.3 version of our preferred BI tool has convinced a large number of customers who have already deployed it in production. Its new interface still requires a few adjustments, but it is easier to use, especially since its Support Package 1 was released in December 2020.
Without having to convert or upgrade your existing Web Intelligence documents, this new look and feel:
- Proposes one single experience, common to both the Web and Desktop accesses.
- Simplifies the workflows thanks to highly intuitive interfaces.
- Is aligned with the interfaces and principles of other SAP products.
Its Support Package 2 contains several catch-up features requested by users, optimized user interfaces for better usability and it also introduces some astonishing features. This article is a complement of the official SAP documentation and summarizes these changes for Web Intelligence and Semantic Layer:
- Web Intelligence: Report Description and Hide Report
- Web Intelligence: Presentation Mode
- Web Intelligence: Expose OData
- Web Intelligence: OData Data Source
- Web Intelligence: Google Drive Support
- Web Intelligence: Unified Query Panel
- Web Intelligence: Object Properties
- Web Intelligence: Variable Properties and New Formula Editor
- Web Intelligence: Shared Element
- Web Intelligence: Hyperlink
- Web Intelligence: Usability Enhancements
- Web Intelligence: Accessibility Shortcuts
- Web Intelligence: Rich Client
- Web Intelligence: Customization
- Web Intelligence: SDK
- Web Intelligence: Performance
- Semantic Layer: Data Sources
- Semantic Layer: Geo-Dimension
You can test this Support Package 2 through a pre-configured and ready-to-use instance on SAP Cloud Appliance Library.
Web Intelligence: Report Description and Hide Report ⤒
In Design mode > Build side panel > Format tab > Display sub-tab, you can add a description in the Description text field, with details or comments for your reports (Request 142127). This text is displayed in a tooltip when you hover the mouse over the report’s tab or over its name when it is displayed in any list.

Report Description
In a document, reports can be:
- Always hidden: to hide instructions or intermediate calculations from the user.
- Conditionally hidden: to display a report with additional details depending on the result of a formula (Request 109766).
A document must always have at least one report that is always visible.
To hide a report when users open the document in Reading mode, you must be in Design mode and:
- Select the Hide in the context menu of the report tab.
- Or set the Hide always parameter in the Build side panel > Format tab > Display sub-tab.
To define a formula that hides a report, select the Hide when formula is true check box and enter the formula in the text box of the Build side panel > Format tab > Display sub-tab.

Report: Hide Parameters
In Design mode, even if reports have been defined as hidden, they remain visible. An icon is displayed beside the report name depending on its state:
-
 : Always hidden.
 -
 : Currently hidden, based on a formula.
 -
 : Currently visible, based on a formula.

Design Mode: Hidden Reports
In Reading mode, hidden reports are not displayed and cannot be exported. Conditionally hidden reports are displayed if formula result is false. Otherwise, they are visible and cannot be exported.
Web Intelligence: Presentation Mode ⤒
The Auto-refresh mode that is available since SAP BI 4.2 SP6 allows users to automatically refresh a document and avoid the session to time out. The Auto-refresh mode can be used to show a document on a public screen for an extended period of time, while automatically and regularly refreshing it.
In SAP BI 4.3 SP2, this mode has been improved and renamed into Presentation mode. This new mode proposes new options such as the ability to switch from one report to another (Request 237355) and full-screen display.
In Reading and Design modes, click the Presentation Mode button (
 ) in the Display section of the toolbar. The Presentation Mode dialog box is opened and offers the following properties:
- Auto refresh every: To refresh the document when it is in Presentation mode. If you enable the option, you may define the refresh period.
- Switch reports after: To switch from one report to another when in Presentation mode. If you select this option, you may define the delay between the reports and the list of reports to display.
- Display in full screen: To display the document in full screen mode, without the BI Launch Pad header.
- Show reports tabs: To display the reports tabs.
- Show refresh bar: To display the Refresh bar with the last refresh time.
- If you decided to switch reports, you may define the list of reports to include. An icon is displayed beside the reports which are visible () or not () based on a formula. The result of the formula may change after a refresh and hence the list of visible reports might also change.
You need to select at least one report that is always visible.
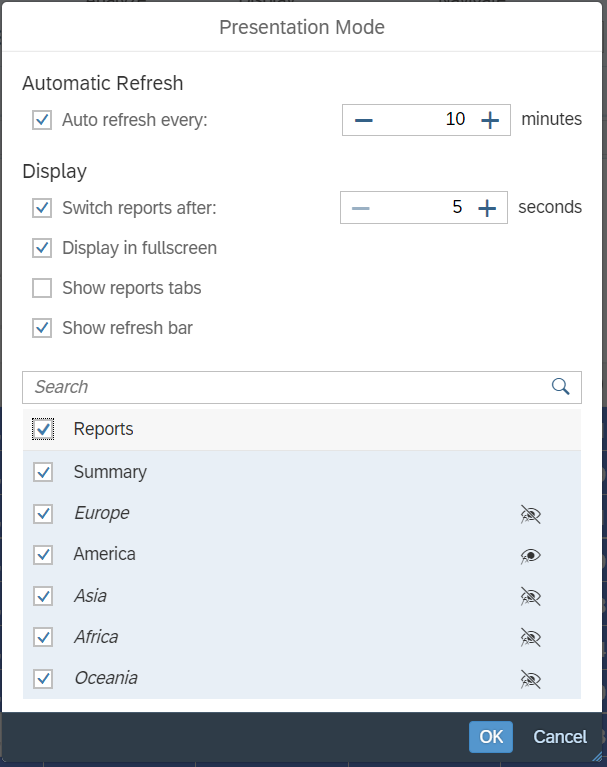
Presentation Mode Dialog Box
Once you have selected your options, click OK. Answer the document’s prompts, if any, and the document is displayed in Presentation mode:
- It is refreshed and its reports are displayed according to the parameters you have selected.
- Warnings are not displayed on the screen.
- You quit the Presentation mode when you press the [Escape] key, click the Exit button (
 ) in the Refresh bar or if an error is raised during a refresh.
Web Intelligence: Expose OData ⤒
To replace the previous Document as a Web Service and Query as a Web Service, Web Intelligence exposes an OData web service.
Generating an OData URL
OData is a standard protocol used by many vendors to exchange and query data. In SAP BI 4.3 SP2, Web Intelligence REST Web Services leverages an OData web service you can use to retrieve the dataset of a Web Intelligence block from the SAP BI 4.3 platform.
To do so, in Design mode, right-click a report element and select Copy Link > OData URL in its context menu. The selected report element cannot be contained in a section.

Copy OData Link
This generates an OData URL that is copied in the clipboard of the operating system. This URL can be used as a data source for another Web Intelligence document, in other tools that can read OData or in a program based on REST web services.
The generated URL calls the REST web services hosted by the web application running the SAP BI Platform. To use the REST web services hosted by the Web Application Container Server (WACS), in this URL, replace the port (8080 if you use the default Tomcat application server) by the WACS port (6405 by default).
This OData service supports a few operators:
- $metadata: Returns a description (object name, type, …) of the OData service.
- $skip=x: Specifies a non-negative integer x that excludes the first x items of the queried collection from the result. The service returns items starting at position x+1.
- $top=n: Specifies a non-negative integer n that limits the number of items returned from a collection. The service returns the number of available items up to but not greater than the specified value n.
- $count=true: Returns the total number of rows returned by this query.
Enabling Basic Authentication
Authentication against this OData service can be done with:
- SAP BI Platform Authentication. You can use BI Platform REST Web Services to request a BI Platform session token to use with the following OData calls.
- Basic Authentication. This authentication must be used with another security protocol to encrypt the HTTP exchanges.
To enable Basic Authentication for the Web Intelligence REST Web Services running on:
- WACS: in the CMC, in the WACS server properties, select the Enable HTTP Basic Authentication checkbox.
- Tomcat:
- Copy the default biprws.properties file from the tomcat\webapps\biprws\WEB-INF\config\default folder.
- Paste it in the tomcat\webapps\biprws\WEB-INF\config\custom folder.
- Edit this copied file and add the Basic_Auth_Supported=true line in it.

CMC: Enable Basic Authentication
Web Intelligence: OData Data Source ⤒
In SAP BI 4.3 SP2, for a more complete support of OData, Web Intelligence can also use an OData service as a data source.
Query Web Intelligence Through OData
In SAP BI 4.3 SP2, Web Intelligence can officially query only OData service exposed by a Web Intelligence document. In next releases, we expect to better comply to the OData specification and extend this support to other OData services.
When creating a document or adding a new query, in the Select a Data Source dialog box, select the Web Services section and then Web Intelligence OData Web Services.

Data Source Selection: OData
In the Enter an OData URL dialog box, enter the URL of the OData service and click OK.

OData URL
The same common Query Panel opens with the objects exposed by the OData service in the left panel. As for all data sources, you may select the objects to add in the query or to use in a filter.
When your query is complete, click Run. Once the query has been run, you can work with the dataset retrieved from the data source on the OData service and format your document.
Authentication and Data Source Reference
If you query a Web Intelligence document stored in the same repository, then the same user’s session is used and there is no need to re-authenticate. If the document to query is stored in another SAP BI Platform repository, then you need to configure how to authenticate against this other repository:
- Enable Basic Authentication in the other BI Platform repository.
- In the CMC, define a Data Source Reference named odata.webintelligence.
- Add this Data Source Reference for the users who connect to this other repository.
- In this Data Source Reference, enters the users’ credentials to this repository, or let them enter them in BI Launch Pad > Settings dialog box > User Account section > Database Credentials tab.
Web Intelligence can also query OData service whose authentication is Anonymous or based on OAuth. In this latter case, its configuration is like the OAuth configuration for Google Drive, except for Type of Resource, where you need to select OData.
Web Intelligence: Google Drive Support ⤒
As a first step to open the BI Platform to other repositories, SAP BI 4.3 SP2 supports Google Drive as a repository for data source and for schedule destination.
Configuring OAuth
To authorize the BI Platform to access and use your Google Drive resources, you must configure the OAuth 2.0 protocol. This is done in the CMC > Applications page > Authentication Server Configuration.
In the toolbar, click Create a New Authentication Server Configuration. In the page that opens:
- Enter a name for the Reference Name.
- By default, Google OAuth 2.0 can be used both for authentications and authorization. If you want to configure the OpenID Connect for authentications:
- Select the Enabled for OpenID Connect Authentication checkbox.
- In the Issuer URI, enter https://accounts.google.com/ and click Get Details. This automatically fills the other fields for the OpenID Connect configuration.
- If it is not yet set, in Authorization Endpoint, enter https://accounts.google.com/o/oauth2/v2/auth
- If it is not yet set, in Token Endpoint, enter https://oauth2.googleapis.com/token
- In Client ID and Client Secret, enter the values the Google Drive administrator has received when creating a client OAuth 2.0 in Google Cloud Platform for SAP BI 4.3 SP2.
- In the Redirect URL, enter the BI Platform callback URL redirected to after your enterprise authentication. For exemple http://localhost:8080/biprws/v1/oauth2/callback (You might replace localhost:8080 by your actual server name and port).
- In the Authorization Scope, enter openid email https://www.googleapis.com/auth/drive.readonly
- In the Type of Resource, select GoogleDrive.
- Click OK.

CMC: Create a New Authentication Server Configuration
Generating OAuth Token
After you have configured OAuth, users who log into the BI Launch Pad can go to the Settings dialog box > User Account section > Authorization Tokens tab to connect to Google Drive and generate a session token that will be used in future connections. In the GoogleDrive line, click Generate.

BI Launch Pad: Authorization Tokens
This opens the dialog box to authenticate to GoogleDrive. This authentication page depends on your organization and how your access to GoogleDrive is configured.
In you do not generate initially this token, this token generation is done when you try to query a data source stored in Google Drive: the authentication page and if you successfully authentication, the token is saved for future uses.
The workflow to generate this token is the same for other data sources for which OAuth is supported (Snowflake, OData,…)
Using Google Drive as Data Source
When you create a document or add a query, click the Google Drive category in the Select a Data Source dialog box, and select the type of document to query: Google spreadsheet, Excel or Text.

Google Drive: Data Source Selection
You can then navigate in the Google Drive repository and select your data source file.

Google Drive: File Selection
If you have selected an Excel or a Text file, you must enter the same file interpretation settings as for the BI Platform repository. If you have selected a Google spreadsheet file, you must also enter the settings that define what data to query.

Google Spreadsheet Settings
The Query Panel which has got the same look no matter the data source you use, is displayed. Select the objects to query or to use in filters.

Google Spreadsheet Query Panel
When your query is complete, click Run. Once the query has been run, you can work with the dataset retrieved from the data source on the Google Drive and format your document.
Schedule Destination
When you schedule a Web Intelligence document, you may select Google Drive as a destination for the generated output (Request 140095). In Google Drive, you can only schedule Excel or Text files. In the Select Destinations dialog box, you can browse the Google Drive and select a destination folder for which you have writing rights.

Schedule to Google Drive: Schedule
Web Intelligence: Unified Query Panel ⤒
In previous releases, the Query Panel used to query Excel or Text files and Free-Hand SQL allows you to rename objects and change their qualification or data type. In SAP BI 4.3 SP2, this Query Panel is replaced by the one used for universes, Web Intelligence documents, SAP HANA, or SAP BW data sources.
This means that in SAP BI 4.3 SP2, there is only one unique Query Panel used for all data sources, including the new OData and Google Spreadsheet data sources. Users are offered a unified experience and common capabilities. Indeed, in this Query Panel, you can select the objects to include in the query, add filters to the query (Request 126377), preview query results, define a maximum number of rows,...
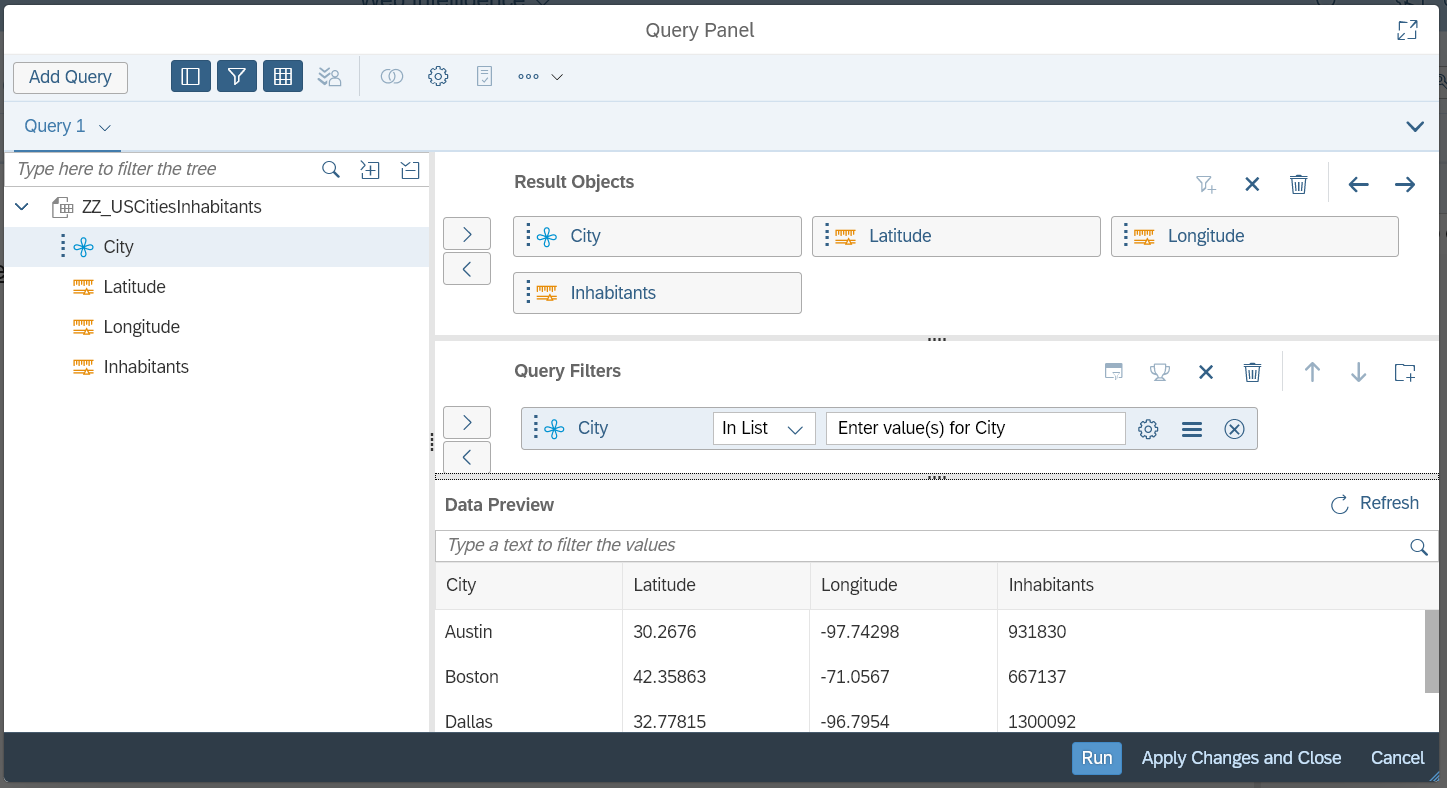
Query Panel for Excel Data Source
For the time being, the following capabilities are not yet supported for the new Text, Excel, Free-Hand SQL, Google Spreadsheet and OData data sources:
- Combined queries,
- Sub-queries and list of values of objects when defining a filter. Only constants and prompts are supported,
- Query stripping,
- Changing the SQL for Free-Hand SQL (Edit: this limitation has been addressed in SAP BI 4.3 SP2 Patch 2),
- Viewing and changing of the settings for Text, Excel, and Google spreadsheet data sources (Edit: this limitation has been addressed in SAP BI 4.3 SP2 Patch 4).
But these capabilities should be available in future releases.
You can change a Text, Excel, Free-Hand SQL and Google spreadsheet resource file by clicking the Browse button (
 ) in the Query Panel toolbar. Note however, that the new data source file must have the same structure as the original one.
Object properties are no longer set in the Query Panel, but in a new Properties tab once you have run the query.
In addition to the unified Query Panel, we also offer the following enhancements:
- When you click an object or a filter used in the Objects Filter pane, the focus is moved on this object or this condition in the data source outline (Request 139388).
- When you add an analysis dimension of a multi-dimensional universe in the Result Objects, the default hierarchy is used.
Web Intelligence: Object Properties ⤒
For Excel, Text and Free-Hand SQL data sources, you previously changed your object properties in the Query Panel. As this Query Panel was replaced to make it unique for all data sources, you now change these properties after having run your query.
Changing the properties in this way has also been extended to other data sources. The precise properties that can be changed depend on the data source and are listed in the following table:
| Excel, Text, Free-Hand SQL, Google Spreadsheet | Universe, Web Intelligence Document, SAP HANA, SAP BW, OData | |
| Name | Yes | Yes |
| Description | Yes | Yes |
| Qualification | Yes | No |
| Associated Dimension (if the object is a detail) | Yes | No |
| Aggregation (if the object is a measure) | Yes | Yes (Request 103278) |
| Data Type | Yes | Number to Decimal/Decimal to Number |
Once the query has been run, select an object in the Main side panel > Objects tab. The properties of object are displayed in the Build side panel > Properties tab. You can modify these properties and click Apply to validate your changes. The Objects tab is updated to reflect these changes.
Changing the qualification, the type, or the aggregation of an object coming from an Excel, text and Free-Hand SQL data sources purges the corresponding query.
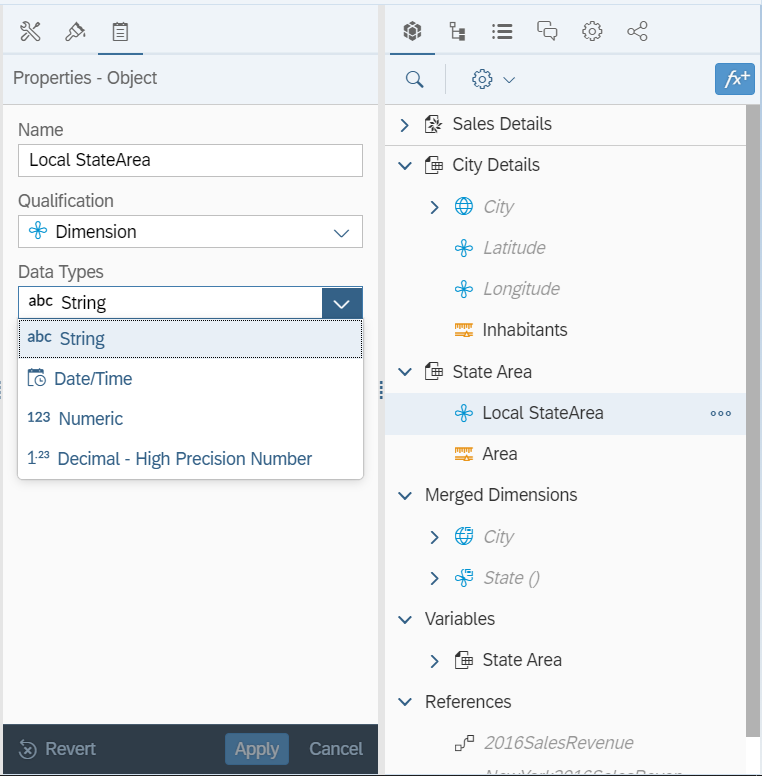
Properties Tab: Object from Excel
You can also modify some properties of an object coming from universes, Web Intelligence documents, SAP HANA, SAP BW or OData locally, i.e., without having to do it in the data source.
To distinguish local change you made from the semantic defined by the data source, an icon (
 ) is displayed beside the object to highlight that it has been modified compared to its data source. Hover the mouse over the object to show its previous and new values. Unselect the Display info icon checkbox in the View modes and settings menu (
 ) to hide this icon. In the Properties tab, the Reset button (
 ) is available beside each changed property. Click it to restore the previous values or click the Revert button on the bottom of the tab to reset them all. In both cases, click Apply to validate your changes.
The context of such changes is the data source: all queries based on this data source benefit from them.

Properties Tab: Object from Universe
Web Intelligence: Variable Properties and New Formula Editor ⤒
Variable Properties
When you select a variable in the Main > Objects tab, you can check its properties (name, qualification, description, and formula) in the Build > Properties tab and modify them on the fly without opening the Formula Editor. Once you have changed a property, click the Apply button to validate them.
If the text field is too small to display the formula, you can open the Formula Editor by right clicking the variable and selecting the Edit variable command, or by clicking the Display the Formula Editor button (
 ) near the formula in the Build > Properties tab.
Formula Editor
The Formula Editor has been improved to simplify formula edition with a more powerful code editor:
- The Objects, Functions and Operators panels have been moved to the left. This leaves more space to display the list in these panels and the Formula field (Request 108889).
- You can display or hide the Objects, Functions and Operators panels through the three buttons at the top right.
- The Operators panel is aligned with the two other panels. The buttons with the basic operators are no longer displayed but you can filter the list.
- Syntax analysis is applied on the fly: the strings in the formulas are colored depending on their type (Request 142159😞 functions, objects, strings, comments... Unrecognized parts are underlined in red.
- Formulas are displayed using a mono-space font (Request 142159); which can be useful for ASCII art.
- When you move the cursor behind a parenthesis, the pairing parenthesis is highlighted (Request 217293).
- Line numbers are displayed in the Formula text field.
- When hovering the mouse over an object or a function in the panels, a tooltip displays the object properties or the function help (Request 236707).
- The Formula text field toolbar contains the following buttons:
- Undo: To cancel the most recent changes in the formula definition (Request 125191).
- Redo: To reverse the most recent changes made with the Undo command.
- Validate Formula: To analyze the formula. To ease formula correction, error messages now contain the line number (Request 241585).
- Cancel Formula: To revert the formula back to its initial definition.
- Wrap text: To wrap long lines or use a horizontal scroll bar to show it.
- Syntax highlighting: To disable the syntax analysis and use the previous code editor. This may be useful to avoid lag when displaying long formulas.
- Shortcuts are supported in the Formula text field:
- On Windows:
- [Ctrl]+[Z], [Ctrl]+[Y] to undo and redo.
- [Ctrl]+[X], [Ctrl]+[C], [Ctrl]+[V] to cut, copy and paste content.
- On iOS:
- [Cmd]+[Z], [Cmd]+[Shift]+[Z]: to undo and redo.
- [Cmd]+[X], [Cmd]+[C], [Cmd]+[V]: to cut, copy and paste content.
- The size of the Formula Editor is persisted beyond the user’s session (Request 108798).

Formula Editor
Web Intelligence: Shared Element ⤒
SAP BI 4.3 SP2 reintroduces the authoring of shared element. Shared elements were introduced in SAP BI 4.2 to ease the report creation through the ability of saving report elements in the repository.
Hence expert designers can save report elements which can then be used by other designers. When a shared element is inserted into a document, a link between this shared element and the document is created. When a document is opened, you can check thanks to this link, whether an updated version of the shared element was published and, if needed, resynchronize the content of the shared element with the document.
Creating and Managing Shared Elements
Any report element can be saved as a shared element. When it is saved, all items required to create this report element are also saved:
- The report element itself and its properties: type, description, …
- The objects and variables (if any) used by the report element,
- The queries used by these objects and variables,
- The data sources of these queries,
- The format defined for the report element: labels, colors, chart, and their properties…
Shared elements can be saved in the public or user folders (or sub-folders) of the repository.
To create a shared element, you must be in Design mode. Right-click a report element and select Shared Element > Save As from its context menu. The Save Shared Element dialog box opens.

Save Shared Element Dialog Box
Select the destination folder, the save options, the categories to assign to the shared element and click Save. The shared element is saved in the repository and can be used in other documents.
Inserting a Shared Element into a Document
To use a shared element in a document, you must be in Design mode. In the toolbar, select Insert > Shared Element. The Insert Shared Element dialog box opens.

Insert Shared Element
Select the shared element and click Insert. In the report, click the place where the shared element must be inserted.
Its full content (report element, query, data source, variable, format) is then copied into the document and the link to the source shared element is created.
The shared elements that are linked to the document are listed in the Shared Elements tab (
 ) of the Main side panel. All occurrences of each shared element in the document are also listed in this tab. Click an occurrence to highlight it in the document.
Shared Elements Tab: Currently Used Shared Elements
You can also insert another occurrence of a shared element that is already used in the document. Just open the shared element’s context menu in the Shared Elements tab, select Insert and click the place where to insert it in the report.
Updating Shared Elements
When a shared element is inserted into a document, its content is explicitly copied into the document. A link between the shared element and the document is created. As this is a copy and not a dynamic reference, some differences may exist between the shared element and its copied content.
When a document is opened, Web Intelligence checks if the version of the shared element’s instance copied in the document is still aligned with the one in the repository. If a shared element version in the repository is different from the one saved in the document, an icon (
 ) is displayed in front of the name of the shared element.
To synchronize the copied content in the document with the updated shared element in the repository, select Update (
 ) in the context menu of the shared element. To update all shared elements in the document, click the Update button in the Shared Elements tab toolbar.
To automatically update shared elements’ occurrences when the document is open, select the Update shared element(s) on open option in the Properties side panel. The Check for Shared Element update on open option available in SAP BI 4.2 does no longer exist as such in SAP BI 4.3 SP2.
To explicitly check whether new versions of the shared elements used in the document exist in the repository, click Check Revision (
 ) in the toolbar.
Unlinking Shared Elements
To remove the link between a shared element and a document, select the shared element in the Shared Elements tab and click the Unlink button (
 ). This unlinks the document from the shared element, but the shared element content remains in the document.
To unlink a specific instance of a shared element:
- Right-click it in the report and select Shared Element > Unlink in the context menu.
- Or in the Shared Elements tab, click the Unlink button beside this specific instance.
Web Intelligence: Hyperlink ⤒
Hyperlink to a Document
In Design mode, when defining a hyperlink to another Web Intelligence document in the Hyperlink dialog box, some options available in SAP BI 4.2 are back (Request 252593😞
- Click Browse to select the document in the BI Platform repository. Once you have selected the document, first click the Customize URL Parameters button to edit the URL, then the Analyze document button to obtain all available document parameters (Request 256915).
- The name of the target document is displayed. The corresponding document path is available in a tooltip.
- You can decide to open the document in the same frame by selecting the Open in Current Window option (Request 252593).
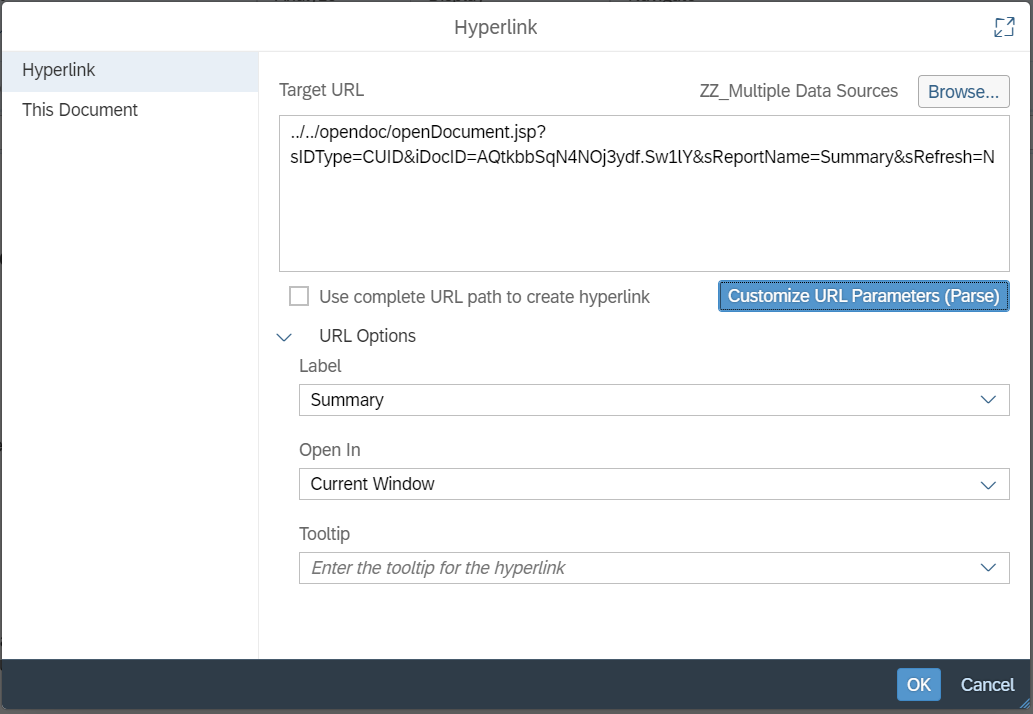
Hyperlink Dialog Box
Intra-Document Link
It is no longer required to activate JavaScript in the CMC to enable intra-document linking.
Open Document URL
When a document is opened through an Open Document URL, the document is refreshed if:
- It is defined as Refresh on open.
- The URL contains the sRefresh=Y option or a prompt (lsS, lsC, lsR, lsM, lsI).
During this refresh, the Prompts dialog box opens and displays all mandatory and optional prompts by default if at least one mandatory prompt is not present in the Open Document URL. Prompts with values passed in the URL are also displayed and are preset with these values. You may modify this behavior using the following options:
- NAll=Y: If at least one mandatory prompt is not present in the URL, the Prompts dialog box opens displaying only the mandatory prompts that are not present in the URL. Mandatory prompts present in the URL and optional prompts are not displayed.
- NAll=A: If at least one mandatory or optional prompt is not present in the URL, the Prompts dialog box opens displaying only the mandatory or optional prompts that are not present in the URL. Mandatory and optional prompts present in the URL are not displayed.
If all mandatory and optional prompts are listed in the URL, the refresh is done without opening the Prompts dialog box.
The sReportMode=light option is also back! With this option, the document is opened in an interface without the toolbar and the side panels. Only the report tabs and the vanishing toolbar with zoom and navigation controls are displayed.
Web Intelligence: Usability Enhancements ⤒
Several enhancements requested by customers have been implemented to simplify the overall experience.
Input Control
If you base an input control on a variable the definition of which is a constant, its scope can be the document or the current report (Request 258835).
An input control that is based on a hierarchy displays the full hierarchy tree and does not oblige you to navigate through the hierarchy level by level, as it is the case in SAP BI 4.3.
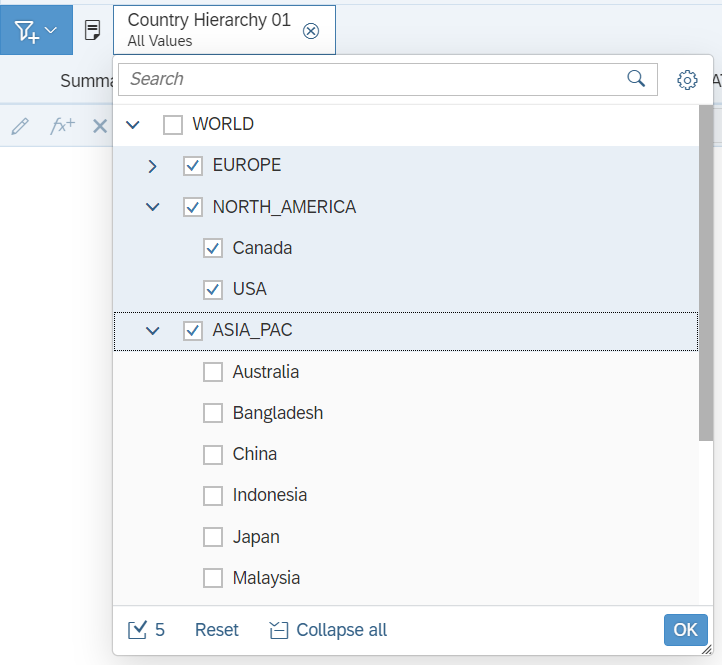
Input Control: Hierarchy
The input control dialog boxes can be resized using the handle at the bottom-right corner.
Freeze Header
The Freeze Header functionality is back (Request 220712) and offers the following improvements:
- It is available in both Reading and Design modes.
- You can enable it for all tables of the report by clicking the Freeze Headers button (
 ) on the toolbar (Request 236696).
- You can enable it for every individual table and additionally define the number of rows or columns you wish to freeze (Request 109531). In Reading or Design mode (Request 218993), click the Freeze Header button () or command in the table’s context menu. This opens the Freeze Header dialog box in which you can define these options.
- Scroll through the report in Freeze Header mode is smoother (Request 236697).

Freeze Header Dialog Box
Data Source Selection
The Data Source Selection dialog box was modified to account for the new Web Intelligence data sources.

Data Source Selection
The following list of locations are offered:
- SAP BI Platform Repository: to select a data source stored in the BI Platform repository: universes, Web Intelligence documents, text files, Excel files or connections. If you want to select a universe, note that you can display them in folder or list mode (Request 101703).
- Local: Web Intelligence Rich Client only, to select a data source saved locally.
- Google Drive: to select a Google spreadsheet, an Excel or text file saved on Google Drive.
- Web Services: to enter an OData flow from a Web Intelligence document.

Universe Selection by Folders
Format Painter
To copy a format and apply it to several report elements, you can use the Format Painter (Request 251821). Select the report element containing the format to copy and select Format Painter in Build panel > Report element format tab > Format Painter drop-down menu.

Format Painter
Click the different elements to which you want to apply the same format. Press the [Escape] key to exit the Format Painter.
To apply a format only once, you may select Copy Format in this menu.
Warning Message Management
When a document is refreshed, several queries may display the same warning message(s), for example No retrieved data or Partial data. These messages are gathered into one group warning allowing users to close all warnings in one shot rather than closing them one by one. The number indicated in the group warning corresponds to the number of queries the warning applies to. Click this number to display the names of all related queries.

Common Warning Messages
If you prefer not to see these warnings, select the Hide refresh warnings messages option in the Main > Properties tab. They will not be displayed after the refresh (Request 259684), however a yellow bullet appears on the Refresh toolbar button if a query was partially refreshed (you can open the Advanced Refresh dialog box to find out which queries were partially refreshed).

Hide Refresh Warning Messages Option
In SAP BI 4.3, you may come across error messages in which you are advised to save your document to improve its next loading time. In SAP BI 4.3 SP2, these messages are replaced by a bullet on the Save button in the toolbar. A tooltip appears when you hover the mouse over the button letting you know why it is recommended to save the document, i.e.:
- either because the was created in a much older release
- or because the document’s data source was modified.
In both cases, the links of the document with the data source are updated thanks to this saving process and have not to be recreated when the document is opened the next time.

Tooltip on the Save Button
Prompts Dialog Box
In SAP BI 4.3, the Prompts dialog box consists of one panel and you need to permanently switch between the list of prompts to answer and the list of values for the selected prompt. To avoid this back and forth, the dialog box was turned into two panels (Request 267422) in SAP BI 4.3 SP2.

Prompts Dialog Box
The left panel displays the list of prompts. An icon displayed before a prompt identifies its type:
 : Mandatory prompt that has been answered.
 : Mandatory prompt that has not been answered.
 : Optional prompt that has been answered.
- No icon is displayed for an optional prompt that has not been answered.
If the prompt has been answered, the number of entered values is displayed beside the prompt name and a preview of its answers is displayed as well.
You may hide or show the optional prompts by clicking the Mandatory button at the bottom of the dialog box.
In the right panel, you can select the answers to the prompt selected in the left panel. Click Reload (
) to display the list of values, if any, for this prompt. You can click these values to select them or use the text field to search or manually enter them. You can copy values from an Excel column or a multi-line text file and paste them in this field (Request 102319); the return character is replaced by the ";" character which is the separator between two values. Once you have answered the prompts, click Run to run the query.
Date Time Selection
When entering a date-time in a prompt selection, an SAP BW or SAP HANA variable, a query or report filter, the calendar picker allows you to also set the time; which was previously not the case.

Date-Time Selection
If you type the date-time manually, an analysis is performed on the fly to highlight syntax errors and auto complete your input when this is possible.
Refresh
When a document refresh is taking long and the Query Panel is not open, you can switch to another document by returning to the BI Launch Pad Home page or, if it is already open, by selecting it in the BI Launch Pad header.
Side Panels
In the Main side panel > Structure tab, the Hidden icon (
) is displayed beside hidden report elements to identify them more easily.In the Build side panel > Data tab, the Feeding sub-tab offers the Apply Now checkbox, that you probably know from the Format tab. Thanks to this checkbox, every single change made in the tab is sent to the server. Unselect this checkbox to explicitly send all changes to the server at once by clicking the Apply button.
Fold/Unfold Break Values
If you have defined beaks on a table, you can fold or unfold all values of a specific break.
After you have selected the Display > Fold/Unfold option in the toolbar, click the icon that opens the Fold/Unfold menu on the table. If your table contains breaks, you fold/unfold all values of a specific break.

Cross-Table Fold Menu
Toolbar
In Reading mode, the toolbar has been reviewed and displays more toolbar buttons at a time.

Reading Toolbar
The File section contains:
 : Opens the menu with the Save and Save As commands. You can directly click the button to save the document.
 : Undoes the last action.
 : Undoes the last undone actions.
 : Opens the Export to dialog box. Previously located in the More menu, it has been moved into the toolbar for faster access (Request 271688). When you export to Excel, you can choose to export the reports’ content or the queries’ dataset.
- : Opens the More menu with Print, Send to BI Inbox, About and Help.
The Query section contains only the Refresh button (
).The Analyze section contains the buttons:
 : Opens or closes the Filter Bar used to display and set filters values.
 : Enable/Disable the drill mode.
 : If the Track Data Changes has been enabled, shows/hides these changes.
 : Opens the Track Data Changes Settings dialog box.
Show Changes and Track Data Changes Settings were previously located in the More menu. They have been moved into the toolbar for faster access (Request 267526).
Finally, the Display section contains:
- : Freeze/Unfreeze table headers.
 : Enable/Disable Fold/Unfold.
- : Start Presentation mode.
In Design mode, you may directly click the Save and Refresh buttons and do not need to open the drop-down menu.
Switching between Reading, Design and Structure modes is possible through the dropdown menu on the right side of the toolbar field indicating the mode you are in. This dropdown menu also contains the custom perspectives in case you deployed one or more of them with an extension. If you wish to return to the previous mode you used, you can go fast and click the mode field name instead of opening the dropdown menu and picking the mode there.
Dialog Boxes
Most dialog boxes can be maximized, resized and moved (Request 270275😞 Query Script (Request 142094), Free-Hand SQL, Hyperlink, Prompts,…
Web Intelligence: Accessibility Shortcuts ⤒
Several shortcuts have been implemented:
| Windows | iOS | Actions |
| Del | delete | Deletes the selected object(s) |
| Alt+Shift+Q | ⌥ ⇧ Q | Opens the Query Panel |
| Ctrl+Z | ⌘ Z | Undoes the latest action |
| Ctrl+Y | ⌘ ⇧ Z | Redoes the latest action |
| Alt+Z | ⌥ Z | Turns the selected report chart or table into report table or chart |
| Ctrl+C | ⌘ C | Copies the selected report element(s) |
| Ctrl+V | ⌘ V | Pastes the selected report element(s) |
| Ctrl+X | ⌘ X | Cuts the selected report element(s) |
| Alt+D | ⌥ D | Opens the Display Settings panel |
| Alt+A | ⌥ A | Opens the Appearance Settings panel |
| Alt+T | ⌥ T | Opens the Text Settings panel |
| Alt+L | ⌥ L | Opens the Layout Settings panel |
| Alt+S | ⌥ S | Opens the Style Settings panel |
| Ctrl+A | ⌘ A | Selects all report elements |
| Ctrl+P | ⌘ P | Prints report(s) |
| Shift+F10 | Fn ⇧ F10 | Opens the contextual menu |
| Alt+1 | ⌥ 1 | Displays the Reading mode |
| Alt+2 | ⌥ 2 | Displays the Design mode |
| Alt+3 | ⌥ 3 | Displays the Structure mode |
Web Intelligence: Rich Client ⤒
HTTP Mode
You can start Web Intelligence Rich Client in HTTP mode, previously known as Zero Administration Business Objects (ZABO) mode. In the BI Launch Pad user settings, you can define in which client to view or edit a document (Request 275236).

BI Launch Pad: Web Intelligence Rich Client Settings
If you select Rich Client in the user settings and then click a document in BI Launch Pad to view or edit it, this document is downloaded and opened in the Rich Client. In this HTTP mode of the Rich Client, documents are refreshed on the server as opposed to the desktop version of the Rich Client in which documents are refreshed on the desktop itself.
Login Page
When you type the system name on the Web Intelligence Rich Client login page, the servers you have used previously are listed for auto-completion. This list is filtered to match the typed characters.
Local Excel and Text Data Sources
In Web Intelligence Rich Client, you can select a local Excel or text file as a data source. In the Select a Data Source dialog box, click the Local category on the left and Excel or Text on the right to browse your file system and select your data source.

Local Data Source Selection
Web Intelligence: Customization ⤒
The customization of Web Intelligence is extended by the following features:
- Location: to hide a specific data source location:
- BI Platform Repository
- Local
- Web Services
- Google Drive
- Data Source: to hide one of the new data sources:
- OData
- Google Spreadsheet
- Document: to hide all shared element features:
- Shared Element
- Generate Link: to hide the commands to generate URL links:
- OpenDoc
- OData
- Schedule and Publishing: to hide the output format when scheduling or publishing a document:
- Export to
- Excel
- HTML
- MHTML
- TXT
- CSV (Request 246537)
Web Intelligence: SDK ⤒
REST Web Services
The Web Intelligence REST Web Services have been enhanced so as to expose new features or improve the existing APIs:
- The shared element APIs have been extended as follows:
- More details are provided when fetching the shared elements from the BI Platform repository.
- Categories can be added when saving or editing a shared element.
- You can directly unlink a shared element from a document, and not only a given occurrence.
- You can use <sharedelement> in /search to search shared elements.
- The report APIs support <description> and <hide> to manage report description and hidden reports.
- New tags (odata, googlesheet) have been added to support the new OData and Google Drive data sources.
- When you add a new line or a new column to a table through the POST /documents/reports/elements call, you can use the listResult=true option to get the ID of the cells that have been added. The allInfo=true option can also be used to return more details about the added cells.
- The maximum number of items that can be returned by a GET call is increased from 50 to 1000, and its default remains 10. This maximum is aligned with the GET /search limit as well as the BI Platform REST Web Services and server limits.
Extension and JavaScript API
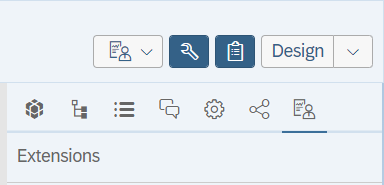
Web Intelligence extensions and JavaScript API are back in SAP BI 4.3 SP2. With extensions, you can write code that implements your logic and calls the Web Intelligence JavaScript API to interact with the document or the application. These extensions can be exposed in three different places in the Web Intelligence interface:
- A new tab in the Main side panel.
- A button or toggle button in a dedicated menu in the toolbar.
- A new perspective that can be selected in the Reading / Design / Structure drop-down menu.
Web Intelligence Extensions
These three end points are equivalent to the previous SAP BI 4.2 side panel, status bar and perspective extensions. The extensions written in SAP BI 4.2 might have to be adjusted before being deployed in SAP BI 4.3 SP2:
- The OSGI framework is no longer supported.
- Only asynchronous Web Intelligence JavaScript API calls are supported.
- It is not possible to retrieve the current user token to reuse it.
- The REST Web Services must be configured to run on the same application server as Web Intelligence and not on the Web Application Container Server (WACS).
Custom Element
In SAP BI 4.3 SP2, custom elements officially support the Web Intelligence JavaScript API.
The Insert Custom Element dialog box that is used in Design mode to insert a custom element offers the following improvements:
- The custom element’s description is displayed at the bottom of the dialog box and may contain a hyperlink.
- If you reopen this dialog box, the current custom element type is selected.

Insert Custom Element (Need4Viz Courtesy)
In Design mode, to take advantage of a custom element supporting user interactions, you need to select the Display > Custom Elements Interactions checkbox in the toolbar. If this option is not selected, the interactions are only handled by Web Intelligence and limited to selecting and resizing the custom element, opening its context menu …
Web Intelligence: Performance ⤒
Thanks to a compiler change, the Web Intelligence server performance is overall 5% faster than in SAP BI 4.3 SP1. In addition, we have made the following specific enhancements to improve the performance:
- OData calls to query a Web Intelligence document are at least two times faster than the equivalent Document as a Data Source calls.
- When querying multiple SAP HANA or SAP BW data sources using direct access, the list of objects displayed in the Query Panel (transient universes) are generated in parallel.
- The settings for query stripping and grouping sets are saved to avoid regenerating the query SQL at each refresh.
- Some specific call sequences have been optimized.
Semantic Layer: Geo-Dimension ⤒
Geo-dimensions can be defined in universes that were created in Information Design Tool (Request 133777), i.e two details of these dimensions are defined as their latitude and longitude.
In the business layer editor, select the dimension.
In the Geo-dimension tab’s drop-down menus, select the two details of the dimension to be used as latitude and longitude. The data type of these details must be Numerical.

Details Defined as Latitude and Longitude in Universe
When you query this published universe in Web Intelligence, the geo-dimension icon is not yet displayed in the Query Panel. But if you select this geo-dimension and run the query, the associated latitude and longitude details are retrieved as well. In the document, the dimension appears as a geo-dimension and you can use it in a geographical chart.

Geo-Dimension in Web Intelligence Query Panel
Semantic Layer: Data Sources ⤒
New Supported Data Sources
In addition to the data sources supported in previous releases, the following additional data sources have been added to the SAP BI 4.3 Product Availability Matrix:
- Amazon Athena (Request 228950),
- Amazon Aurora,
- Denodo 8,
- HP Vertica v10,
- PostgreSQL 13,
- PrestoDB (Request 234312),
- Teradata 17,
- MapR MEP 7.00 support for Apache Hive,
- MapR MEP 7.00 support for Apache Impala,
- MapR MEP 7.00 support for Apache Spark,
- Cloudera Data Platform 7.2 (CDP) for Hive,
- Cloudera Data Platform 7.2 (CDP) for Impala,
- SAP BW 7.5 SP20+,
- SAP BW/4HANA 1.0 SPS20,
- SAP BW/4HANA 2.0 SPS08,
- SAP S/4HANA 1909 SP04,
- SAP S/4HANA 2020 SP01,
- SAP HANA 2.0 SP06.
Snowflake Single Sign-On
The relational connection to Snowflake supports single sign-on. As for Google Drive, it requires to set up OAuth to the Snowflake database in CMC > Applications page > Authorization Server Configurations. Once the BI Platform can authenticate to the Snowflake database, you can select the following options when you define a relational connection to Snowflake in Information Design Tool:
- Use single sign-on when refreshing reports at view time for Authentication Mode.
- The authorized server configuration created in the CMC for Snowflake as the Authorization Reference.
You can connect to the Snowflake database once you have generated your token in BI Launch Pad.
Download OLAP Connection Locally Security Right
As for relational connections, the OLAP Connection supports the security right Download connection locally. It allows you to use this connection offline in Web Intelligence Rich Client.
Labels:
23 Comments
You must be a registered user to add a comment. If you've already registered, sign in. Otherwise, register and sign in.
Labels in this area
-
ABAP CDS Views - CDC (Change Data Capture)
2 -
AI
1 -
Analyze Workload Data
1 -
BTP
1 -
Business and IT Integration
2 -
Business application stu
1 -
Business Technology Platform
1 -
Business Trends
1,658 -
Business Trends
94 -
CAP
1 -
cf
1 -
Cloud Foundry
1 -
Confluent
1 -
Customer COE Basics and Fundamentals
1 -
Customer COE Latest and Greatest
3 -
Customer Data Browser app
1 -
Data Analysis Tool
1 -
data migration
1 -
data transfer
1 -
Datasphere
2 -
Event Information
1,400 -
Event Information
67 -
Expert
1 -
Expert Insights
177 -
Expert Insights
307 -
General
1 -
Google cloud
1 -
Google Next'24
1 -
GraphQL
1 -
Kafka
1 -
Life at SAP
780 -
Life at SAP
13 -
Migrate your Data App
1 -
MTA
1 -
Network Performance Analysis
1 -
NodeJS
1 -
PDF
1 -
POC
1 -
Product Updates
4,576 -
Product Updates
349 -
Replication Flow
1 -
REST API
1 -
RisewithSAP
1 -
SAP BTP
1 -
SAP BTP Cloud Foundry
1 -
SAP Cloud ALM
1 -
SAP Cloud Application Programming Model
1 -
SAP Datasphere
2 -
SAP S4HANA Cloud
1 -
SAP S4HANA Migration Cockpit
1 -
Technology Updates
6,873 -
Technology Updates
436 -
Workload Fluctuations
1
Related Content
- SAP Datasphere + SAP S/4HANA: Your Guide to Seamless Data Integration in Technology Blogs by SAP
- Exploring Integration Options in SAP Datasphere with the focus on using SAP extractors - Part II in Technology Blogs by SAP
- Unify your process and task mining insights: How SAP UEM by Knoa integrates with SAP Signavio in Technology Blogs by SAP
- 10+ ways to reshape your SAP landscape with SAP BTP - Blog 4 Interview in Technology Blogs by SAP
- 10+ ways to reshape your SAP landscape with SAP Business Technology Platform – Blog 4 in Technology Blogs by SAP
Top kudoed authors
| User | Count |
|---|---|
| 24 | |
| 16 | |
| 11 | |
| 10 | |
| 10 | |
| 9 | |
| 9 | |
| 8 | |
| 8 | |
| 7 |