

- SAP Community
- Products and Technology
- Technology
- Technology Blogs by SAP
- Product Reviews Analysis using Generative AI and N...
Technology Blogs by SAP
Learn how to extend and personalize SAP applications. Follow the SAP technology blog for insights into SAP BTP, ABAP, SAP Analytics Cloud, SAP HANA, and more.
Turn on suggestions
Auto-suggest helps you quickly narrow down your search results by suggesting possible matches as you type.
Showing results for
Advisor
Options
- Subscribe to RSS Feed
- Mark as New
- Mark as Read
- Bookmark
- Subscribe
- Printer Friendly Page
- Report Inappropriate Content
01-04-2024
10:38 AM

Introduction:
In today's digital age, customer reviews hold significant power in shaping buying decisions. For businesses striving to understand and improve customer experiences, harnessing the potential of AI becomes a game-changer. Sentiment Analysis is one area which can help businesses understand how customers perceive their products or services.
Based on this analysis, businesses can prioritize improvements, address issues, and make strategic decisions to enhance their offerings. Positive sentiments can be leveraged for marketing purposes, while negative sentiments can indicate areas needing improvement or damage control. At the same time, it helps users make an informed decision on which products they should buy.
There are many tools available today, that can help you build on this use case. However, the purpose of this blog is to showcase how this can be accomplished using No-Code tools and by leveraging SAP AI Core for Generative AI capabilities.
This ensures that citizen developers with no coding expertise or who can sometimes feel overwhelmed by the complexities of programming, are able to build applications within few hours.Also professional developers can quickly prototype with drag and drop ease and minimal configurations.
Today, I will take you through the process of creating a full stack application with SAP Build Apps and Generative AI that helps perform sentiment analysis on product reviews.
Let's quickly dive into the details.
Solution Architecture:
At its core, this app organizes products and their associated reviews, offering a comprehensive overview. It allows users to enter a product review and then categorizes it into positive, negative, or neutral review using Open AI’s ChatGPT to perform sentiment analysis.
The application consists of the following main parts:
- SAP Build Apps – Web and Mobile application for the Frontend.
- SAP Build Apps – Visual Cloud Functions for the Backend.
- SAP AI Core.
Let's get started -
Prerequisites
- You should have access to SAP Build Apps on your SAP BTP Subaccount.
- Pre-created destinations for Northwind OData Service and AI Core in BTP.
First, we will create an application backend for the reviews.
 |  |  |
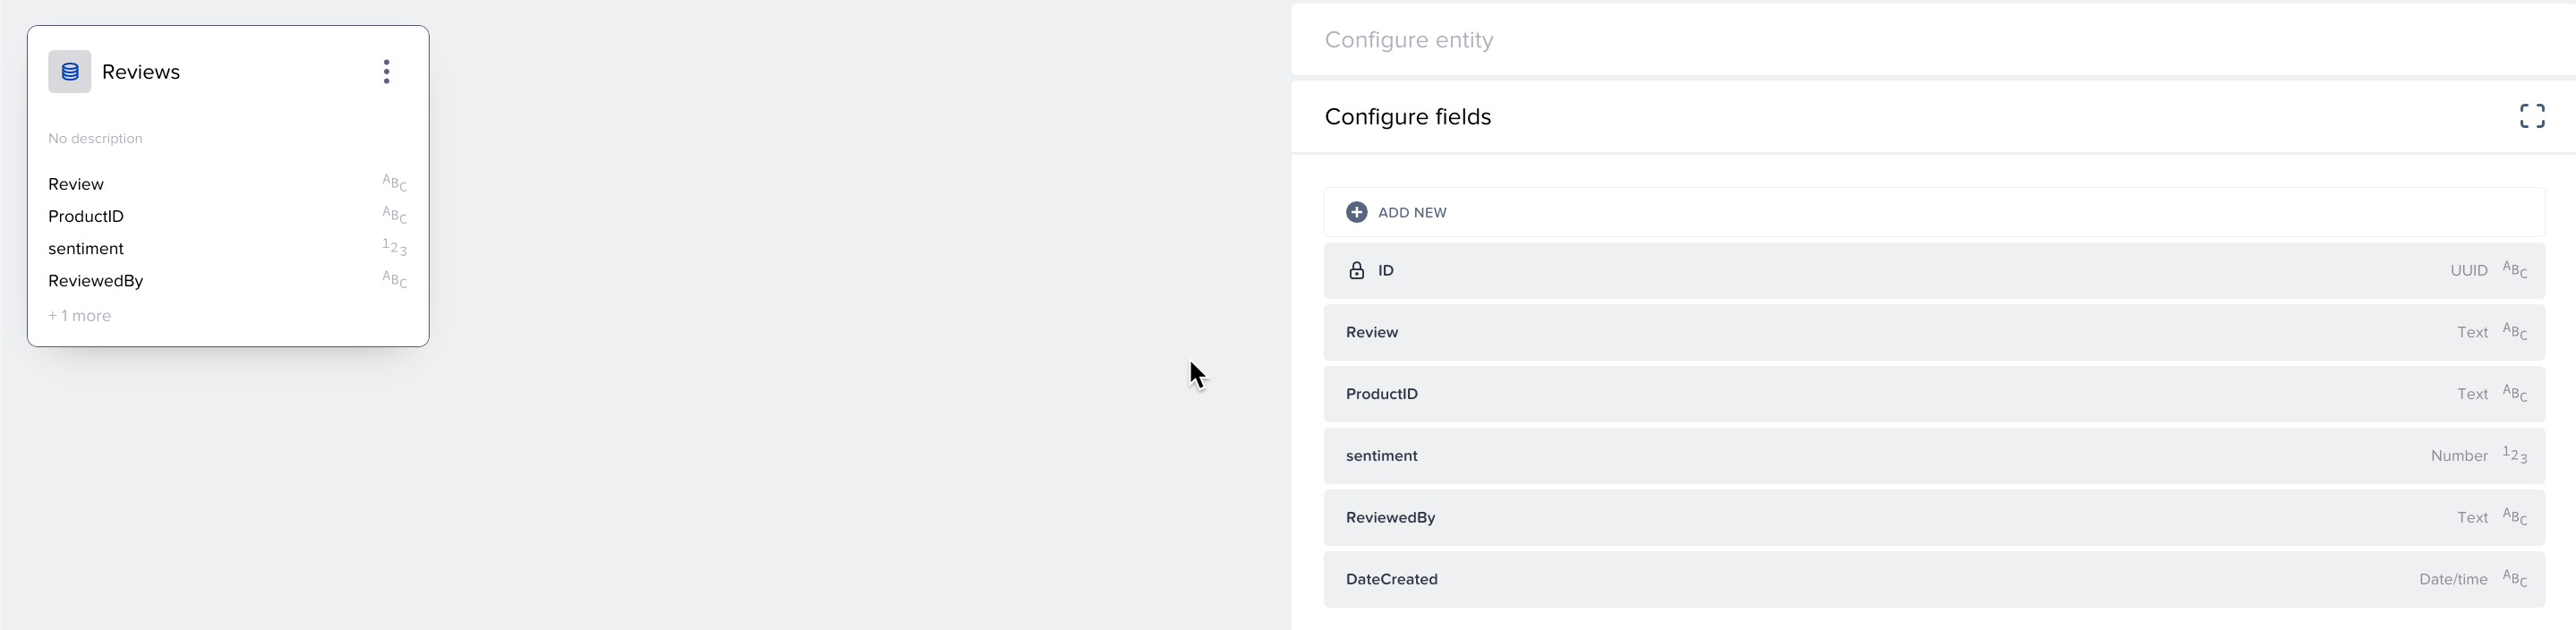
Create an entity Reviews with the following fields.
Create a Visual Cloud Function to return the counts of positive , negative and neutral reviews for each product.
- In the Functions Tab, click on Create New. Set the name to reviewCount.
- Under configuration, select the Reviews Entity.
- Click on End execution (on the right), and then on Execution Finished.
- Under Output values, click Add value, and set the following:

5. Click Set formula and enter the following formula:
GROUP(outputs["List records Reviews / Records listed"].records,item.productId,{productID:key,positive:COUNT(SELECT(items, item.sentiment == 3)), negative:COUNT(SELECT(items, item.sentiment == 1)), neutral: COUNT(SELECT(items, item.sentiment == 2))}) 6. Deploy the backend.
Please refer to this blog for more details on how to create Visual Cloud functions.
Next, we create a web application project from the SAP Build Lobby.
 |  |  |
Enable BTP Authentication.
- Go to the "Auth" Tab in project.
- Select SAP BTP Authentication.
Add integration for the Northwind OData Service.
- Under the "Data" tab, click on "Add Integration".
- Select "BTP Destination".
- Search for the Northwind destination.
- Configure and enable the "Products" entity and save.
Add Integration for AI Core.
- Under the "Data" Tab, click on "Create Data Entity" under SAP Build Apps classic data entities.
- Select BTP Destination Rest API Integration.
- Set Data Entity Name – AICoreLLM.
- Select BTP Destination name.
- Set 2 additional Common Request Headers.
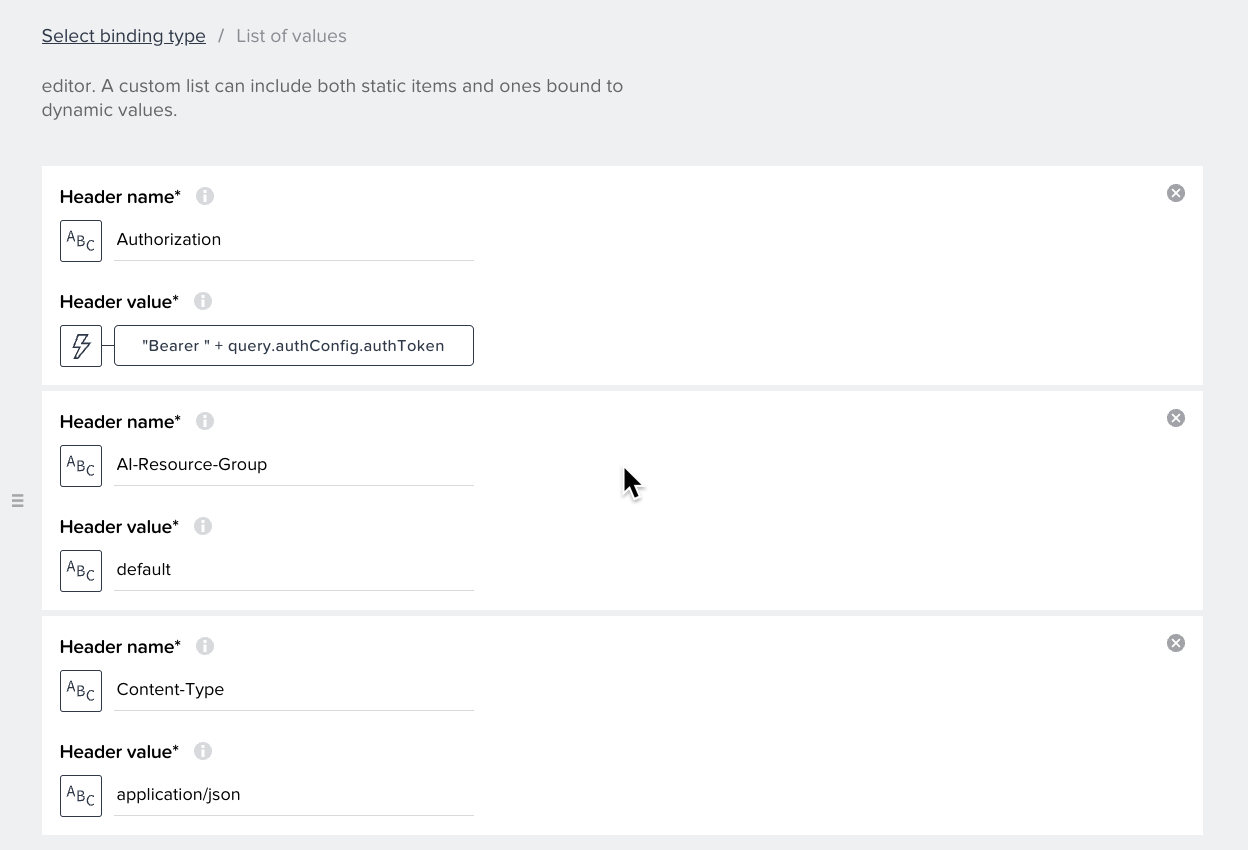
- Enable Create Mode.
- Make following changes and save the entity.

Add Integration for the Reviews backend.
- Under the "Data" tab, click on "Add Integration".
- Select Cloud Functions.
- Select Product Review Analysis Backend.(The project created in step 1).
- Enable the Data Entity and save.
Now, let's build the Products List.
- Create a data variable for the products resource - Products1.
- Create an app variable for the review counts - reviewCounts.
- We will create a composite component for the product.
Refer to this tutorial on how to create one. Instead of the star rating in the above tutorial, we will use counts for positive, negative and neutral reviews. Create properties positiveReviewCount, negativeReviewCount and neutralReviewcount for the component.
- Bind the composite component to the products data.
Field Binding Repeat with The data variable Products1 Title label Data item in repeat: current.ProductName positiveReviewCount DEFAULT(FIND_BY_KEY(appVars.reviewCounts,"ProductID", STRING(repeated.current.ProductID)).positive,0) negativeReviewcount DEFAULT(FIND_BY_KEY(appVars.reviewCounts,"ProductID", STRING(repeated.current.ProductID)).negative,0) neutralReviewcount DEFAULT(FIND_BY_KEY(appVars.reviewCounts,"ProductID", STRING(repeated.current.ProductID)).neutral,0) Image Source You can choose any image of your choice
Products UI should look like this -
Next, we build the Product Details Page.
- Create a new page and name it – Product Details.
- Under "Page Parameter", add the following page parameters.
Field Type Purpose productID Text The product to be displayed on the product page, received when the user clicks on a certain product in the list of products
- Add Data Variable Reviews1 for the resource Reviews.
- Add Data Variable Product1 for a single data record.
- In the logic pane, create the below logic flow.

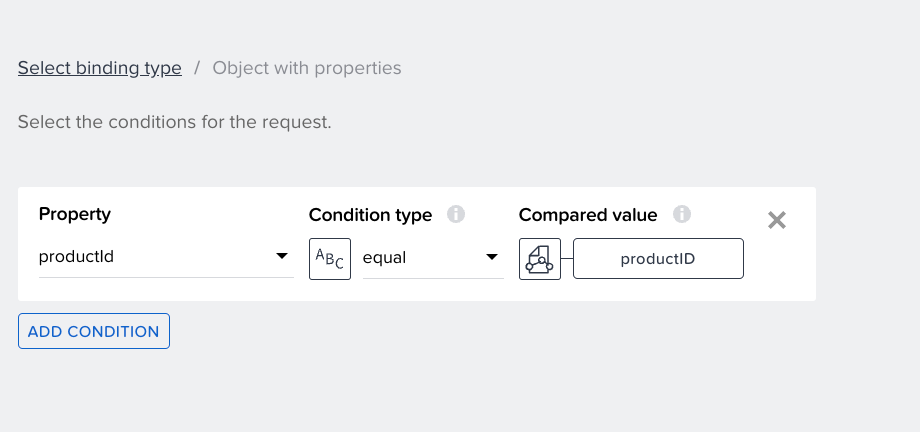
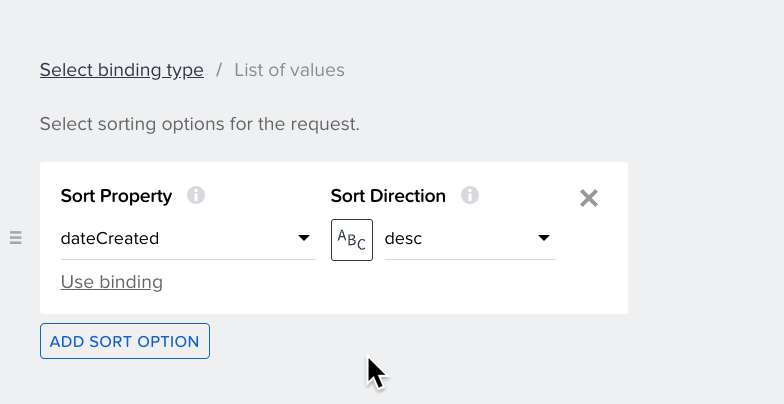
- Add Filtering and Sorting.
- Add Navigation to this Page from the Products Page.
- Add Container Product Details that will hold the details of the product such as name, quantity per unit, units in stock and unit price. Do the necessary bindings.
Field Binding Title Data Variable
Product1.ProductNameText1 Formula
"Quantity Per Unit - "+data.Product1.QuantityPerUnitText2 Formula
"Units in Stock - "+data.Product1.UnitsInStockText3 Formula
"Price - "+data.Product1.UnitPrice
- Add "Add Review" button.
- Add a container – Reviews Section to list all the reviews added so far for the product. Do the necessary bindings.
Property Binding Primary label Data Item in Repeat Secondary Label Formula - " - "+repeated.current.reviewedBy Arrow Visible False Text3 Formula - "Price - "+data.Product1.UnitPrice
- The page should look like this at this point.

Now, the final page - Add Review.
- Create a new page and name it – Add Review.
- Under "Page Variables", add the following page variables:
newReviewSentiment text Store the sentiment of the review given. newReview Text Contains the text the user enters as a new review AIPayload Object Request Payload for the AI Core API
- Under "Page Parameter", add productID parameter.
- Add an input and button. Give the input a label – Add Review.
- The page should look like this -

Component Tap -> Set Page Variable -> Create Record -> Set Page Variable -> Create Record-> Navigate Back
Open the logic pane and create the logic flow for the Submit button.
- Set the properties for each node as follows.
Set Page Variable Variable name – AIPayload
Assigned Value – Object with Properties
max_tokens - 256
top_p - 1
temperature - 0
model - gpt-35-turbo-16k
n - 1
stream - False
messages - List of values[ { role: "system", content: "You are a helpful assistant which does sentiment analysis." }, { role: "assistant", content: "Return 3 for positive, 2 for neutral and 1 for negative." },{ role: "user", content: pageVariable - newReview } ]Create Record Resource – AICoreLLM
Record – Page variable - AIPayloadSet Page Variable Variable Name – newReviewSentiment
Assigned Value – Formula - outputs["Save the AICore Response"].response.choices[0].message.contentCreate Record Resource – Reviews
Reviews – Object with properties
Review – Page Variable – newReview
ProductID – Page Parameter – ProductID
sentiment – Formula - NUMBER(pageVars.newReviewSentiment)
ReviewedBy – your name
DateCreated – Formula - NOW()
Voila! Your application is ready.
Watch the video to see how the application looks and works.
https://sapvideoa35699dc5.hana.ondemand.com/?entry_id=1_k14o8346
Watch the video to see how the application looks and works.
https://sapvideoa35699dc5.hana.ondemand.com/?entry_id=1_k14o8346
Conclusion:
Awesome, we were able to build a full stack application leveraging Gen AI capabilities in very less time. That’s the power of No-Code and Generative AI.
This use case is just an example of how easily one can integrate intelligence in our solutions and create value for customers. One can extend this app to further derive insights on top of the analysis done. For example, create charts / metrics to measure which product is the least or most bought/liked.
This use case is just an example of how easily one can integrate intelligence in our solutions and create value for customers. One can extend this app to further derive insights on top of the analysis done. For example, create charts / metrics to measure which product is the least or most bought/liked.
I would like to thank gunteralbrecht , jayadnure for helping and guiding me in my learning journey. Special thanks to daniel.wroblewski for below blog posts which helped me understand SAP BUILD better –
With that, I come to the end of my very first blog.
Do let me know your thoughts in the comments section.
- SAP Managed Tags:
- SAP AI Core,
- SAP Build Apps,
- SAP Build,
- SAP Business Technology Platform
Labels:
2 Comments
You must be a registered user to add a comment. If you've already registered, sign in. Otherwise, register and sign in.
Labels in this area
-
ABAP CDS Views - CDC (Change Data Capture)
2 -
AI
1 -
Analyze Workload Data
1 -
BTP
1 -
Business and IT Integration
2 -
Business application stu
1 -
Business Technology Platform
1 -
Business Trends
1,658 -
Business Trends
93 -
CAP
1 -
cf
1 -
Cloud Foundry
1 -
Confluent
1 -
Customer COE Basics and Fundamentals
1 -
Customer COE Latest and Greatest
3 -
Customer Data Browser app
1 -
Data Analysis Tool
1 -
data migration
1 -
data transfer
1 -
Datasphere
2 -
Event Information
1,400 -
Event Information
67 -
Expert
1 -
Expert Insights
177 -
Expert Insights
301 -
General
1 -
Google cloud
1 -
Google Next'24
1 -
GraphQL
1 -
Kafka
1 -
Life at SAP
780 -
Life at SAP
13 -
Migrate your Data App
1 -
MTA
1 -
Network Performance Analysis
1 -
NodeJS
1 -
PDF
1 -
POC
1 -
Product Updates
4,577 -
Product Updates
346 -
Replication Flow
1 -
REST API
1 -
RisewithSAP
1 -
SAP BTP
1 -
SAP BTP Cloud Foundry
1 -
SAP Cloud ALM
1 -
SAP Cloud Application Programming Model
1 -
SAP Datasphere
2 -
SAP S4HANA Cloud
1 -
SAP S4HANA Migration Cockpit
1 -
Technology Updates
6,873 -
Technology Updates
429 -
Workload Fluctuations
1
Related Content
- SAP Signavio is the highest ranked Leader in the SPARK Matrix™ Digital Twin of an Organization (DTO) in Technology Blogs by SAP
- Hack2Build on Business AI – Highlighted Use Cases in Technology Blogs by SAP
- SAP Partners unleash Business AI potential at global Hack2Build in Technology Blogs by SAP
- SAP HANA Cloud Vector Engine: Quick FAQ Reference in Technology Blogs by SAP
- 10+ ways to reshape your SAP landscape with SAP Business Technology Platform – Blog 4 in Technology Blogs by SAP
Top kudoed authors
| User | Count |
|---|---|
| 33 | |
| 17 | |
| 15 | |
| 13 | |
| 11 | |
| 9 | |
| 8 | |
| 8 | |
| 8 | |
| 7 |