
- SAP Community
- Products and Technology
- Technology
- Technology Blogs by SAP
- Part 7: Flexible Workflow in Integration Scenario
Technology Blogs by SAP
Learn how to extend and personalize SAP applications. Follow the SAP technology blog for insights into SAP BTP, ABAP, SAP Analytics Cloud, SAP HANA, and more.
Turn on suggestions
Auto-suggest helps you quickly narrow down your search results by suggesting possible matches as you type.
Showing results for
Advisor
Options
- Subscribe to RSS Feed
- Mark as New
- Mark as Read
- Bookmark
- Subscribe
- Printer Friendly Page
- Report Inappropriate Content
12-03-2021
7:53 PM
This is part of a series of articles, which describe the steps to integrate an extension workflow using SAP Workflow Management on Business Technology Platform (BTP Workflow) into a Flexible Workflow in SAP S/4HANA OP.
Part 1: Integrating an Extension Workflow on SAP BTP into a Flexible Workflow
Part 2: SAP BTP Cockpit Configuration for Usage of SAP Workflow Management
Part 3: SAP S/4HANA Backend Configuration to Communicate with SAP BTP
Part 4: User and Roles for SAP BTP Workflow and Flexible Workflow
Part 5: Configure Cloud Connector for Workflow Integration
Part 6: Workflow Scenario with Extension Step
Part 7: Flexible Workflow in Integration Scenario
Part 8: Extension Workflow using SAP Workflow Management on SAP BTP
Part 9: End-to-End Test of Workflow Integration Scenario
Part 10: Problem Solving of Workflow Integration Scenario
1. Missing Backend Objects
... 1.1. Number Range Object
... 1.2. Report to Create a Request
2. Access Manage Workflows App
... 2.1. Access SAP Fiori Launchpad
... 2.2. Access App
3. Create Flexible Workflow
... 3.1. Header
... 3.2. Properties
... 3.3. Start Conditions
... 3.4. Steps
... 3.5. Final Activities
4. Test Workflow
... 4.1. Start
... 4.2. Protocol
To start the flexible workflow, which we will build later in SAP Fiori launchpad via Generic Workflow App, we must create some more things in backend system:
In backend System
Unless there is an app, which provides the feature of triggering a request, the following report can be used:
Transaction SE38, create a report ZCAS_AUDIT_START and copy the code below:
First of all we have to connect to SAP Fiori launchpad (FLP) - according to the backend system.
Check in your FLP, whether you have access to the app Manage Workflows.
If you are able to access this app, then proceed with next section. Otherwise follow this section.
The most common reason why an app is not accessible is, because the user has no sufficient authorizations. Ask the person who is responsible for roles and role-user-assignments if you are allowed to run this app.
If you think that there is no authorization constraint, check the app details and business catalogs/groups in your system following the next sections:
Figure out the technical details of the (any) app.
Usually there are predelivered business catalogs and roles for OData services; however, with this example we have a slightly more complicated use case. Nevertheless, I think talking about this, a technical end user better understands how SAP Fiori apps work in general.
Similar to the SAP Fiori launchpad the URL to access the SAP Fiori launchpad Designer (FLPD) has a generic structure:
plus possibly additional parameters.

The whole process in a single picture:
Remember the new (or existing) group name
Logon to the frontend system with SAP GUI. In case you have an embedded system, this is identical to your SAP S/4HANA backend. Otherwise it is your separate gateway system.
Run transaction PFCG and search for a role, which includes access to the above found group. If you created a new group, you have to create a new role. Then, check, if this role is assigned to your user.
Let's assume you created a new group and have to create a new role. Then, you have to follow these steps:
Now you should be able to see the group group name in SAP Fiori launchpad. If this is not the case, please logout and logon again or use a new browser window in incognito mode.
In case starting the app does not show anything (endless spinning of hourglass), then OData service might not be active.
In frontend system SAP GUI (What is it? Check out the begining of section 2.2.4. Role😞
At this point you are able to run the Manage Workflows app in SAP Fiori launchpad.
Here, you just enter the new workflow name:
Fill fields with meaningful content:
There are no preconditions available. This workflow will always start.
The reason behind it is, that we did not maintain such conditions in scenario builder.
We recap the process picture in Part 1: Integrating an Extension Workflow on BTP into a Flexible Workflow.
Another milestone is to be able to access the external approval step. It will only show up, when all connections from SAP S/4HANA system to BTP are maintained correctly.
All steps in the workflow are created the simplest possible way, because there are no conditions and agents (backend steps). Therefore, use the following screenshot as template for all steps:
Now, the whole workflow should look like:
Going a step back or starting this app again should show an active workflow for our scenario:
Now let's try to run our start report, which was created in section 1.2. Report to Create a Request
In backend system:
We now will check, what happened in background.
If you get a status message like below, check last Part of this blog series: Part 10: Problem Solving of Workflow Integration Scenario, especially 2.1. Event Linkage and 2.2. Event Trace.
Let's continue with transaction SWI6 and get a more detailed impression of the workflow protocol:
I use the personal workflow sessings Technical View - Classic Technical View.
We see the execution of Inform Partner about Request - Action, which was successfully finished. Let's assume the partner received an email.
=> Conclusion: The next step is started but not yet finished. It is intended to call the SAP BTP workflow to get the approval of a partner. Of course this will not do anything since we have not yet created the BTP workflow, which will be done in the next part of this blog.
Part 1: Integrating an Extension Workflow on SAP BTP into a Flexible Workflow
Part 2: SAP BTP Cockpit Configuration for Usage of SAP Workflow Management
Part 3: SAP S/4HANA Backend Configuration to Communicate with SAP BTP
Part 4: User and Roles for SAP BTP Workflow and Flexible Workflow
Part 5: Configure Cloud Connector for Workflow Integration
Part 6: Workflow Scenario with Extension Step
Part 7: Flexible Workflow in Integration Scenario
Part 8: Extension Workflow using SAP Workflow Management on SAP BTP
Part 9: End-to-End Test of Workflow Integration Scenario
Part 10: Problem Solving of Workflow Integration Scenario
Content
1. Missing Backend Objects
... 1.1. Number Range Object
... 1.2. Report to Create a Request
2. Access Manage Workflows App
... 2.1. Access SAP Fiori Launchpad
... 2.2. Access App
3. Create Flexible Workflow
... 3.1. Header
... 3.2. Properties
... 3.3. Start Conditions
... 3.4. Steps
... 3.5. Final Activities
4. Test Workflow
... 4.1. Start
... 4.2. Protocol
1. Missing Backend Objects
To start the flexible workflow, which we will build later in SAP Fiori launchpad via Generic Workflow App, we must create some more things in backend system:
- A number range object for the request IDs
- A report, which is manually started and which throws the event to start a flexible workflow. Later this step could be rebuilt to an app. For our purpose an old-fashioned report is sufficient.
1.1. Number Range Object
In backend System
- Run transaction SNRO
- Create object, sample: ZCAS_AUDIT
- Enter meaningful texts, threshold and buffering information such as in the following screenshots


1.2. Report to Create a Request
Unless there is an app, which provides the feature of triggering a request, the following report can be used:
Transaction SE38, create a report ZCAS_AUDIT_START and copy the code below:
*&---------------------------------------------------------------------*

*& Report ZCAS_AUDIT_START

*&---------------------------------------------------------------------*


REPORT zcas_audit_start.


DATA:

  lv_nr               TYPE char10,

  lv_return           TYPE inri-returncode,

  ls_req              TYPE zcas_audit_trnsp,

  lv_param_name       TYPE swfdname,

  lv_subrc            TYPE sysubrc,

  lv_evtid            TYPE swr_struct-event_id,

  lt_cont             TYPE TABLE OF swr_cont,

  lr_event_parameters TYPE REF TO if_swf_ifs_parameter_container.


CONSTANTS:

  lc_objtype TYPE char30 VALUE 'ZCL_CAS_AUDIT',

  lc_event   TYPE char30 VALUE 'CREATED'.


PARAMETERS:

  gv_part TYPE uname. " Imaginary Partner ID


* ----- Get New Number ----------------------------------------------- *

CALL FUNCTION 'NUMBER_GET_NEXT'

  EXPORTING

    nr_range_nr             = '01'

    object                  = 'ZCAS_AUDIT'

  IMPORTING

    number                  = lv_nr

    returncode              = lv_return

  EXCEPTIONS

    interval_not_found      = 1

    number_range_not_intern = 2

    object_not_found        = 3

    quantity_is_0           = 4

    quantity_is_not_1       = 5

    interval_overflow       = 6

    buffer_overflow         = 7

    OTHERS                  = 8.


IF sy-subrc <> 0.

  WRITE: / 'Error', sy-subrc, 'when creating new number'.

ENDIF.


* ----- Prepare and COMMIT Datenabse Entry --------------------------- *

ls_req = VALUE #( mandt     = sy-mandt

                  reqnr     = lv_nr

                  cust_id   = gv_part

                  credat    = sy-datum

                  creusr    = sy-uname

                  chgdat    = sy-datum

                  chgusr    = sy-uname ).

INSERT zcas_audit_trnsp FROM ls_req.

COMMIT WORK AND WAIT.


* ----- Get Container ------------------------------------------------ *

CALL METHOD cl_swf_evt_event=>get_event_container

  EXPORTING

    im_objcateg  = cl_swf_evt_event=>mc_objcateg_cl

    im_objtype   = lc_objtype

    im_event     = lc_event

  RECEIVING

    re_reference = lr_event_parameters.


TRY.

    CALL METHOD lr_event_parameters->set

      EXPORTING

        name  = 'MV_OBJECT_ID' " Attribute in class

        value = lv_nr.

  CATCH cx_swf_cnt_cont_access_denied .

    MESSAGE 'cx_swf_cnt_cont_access_denied' TYPE 'W'.

  CATCH cx_swf_cnt_elem_access_denied .

    MESSAGE 'cx_swf_cnt_elem_access_denied' TYPE 'W'.

  CATCH cx_swf_cnt_elem_not_found .

    MESSAGE 'cx_swf_cnt_elem_not_found' TYPE 'W'.

  CATCH cx_swf_cnt_elem_type_conflict .

    MESSAGE 'cx_swf_cnt_elem_type_conflict' TYPE 'W'.

  CATCH cx_swf_cnt_unit_type_conflict .

    MESSAGE 'cx_swf_cnt_unit_type_conflict' TYPE 'W'.

  CATCH cx_swf_cnt_elem_def_invalid .

    MESSAGE 'cx_swf_cnt_elem_def_invalid' TYPE 'W'.

  CATCH cx_swf_cnt_container .

    MESSAGE 'cx_swf_cnt_container' TYPE 'W'.

ENDTRY.


* ----- Create BO Start Event ---------------------------------------- *

TRY.

    CALL METHOD cl_swf_evt_event=>raise

      EXPORTING

        im_objcateg        = cl_swf_evt_event=>mc_objcateg_cl  " = 'CL'

        im_objtype         = lc_objtype                        " Classname

        im_event           = lc_event

        im_objkey          = lv_nr                             " object key

        im_event_container = lr_event_parameters.              " event container.


  CATCH cx_swf_evt_invalid_objtype .

    MESSAGE 'cx_swf_evt_invalid_objtype' TYPE 'W'.


  CATCH cx_swf_evt_invalid_event .

    MESSAGE 'cx_swf_evt_invalid_event' TYPE 'W'.

ENDTRY.


COMMIT WORK.


MESSAGE 'Success' TYPE 'I'.- Save and Activate
- Add selection screen text: menu Goto >> Text Symbols (F5)
- Switch to tab Selection Texts
- Add Partner ID in column Text according to parameter GV_PART
- Save and Activate

2. Access Generic Manage Workflows App
2.1. Access SAP Fiori Launchpad
First of all we have to connect to SAP Fiori launchpad (FLP) - according to the backend system.
- In case you have an embedded system - means: gateway system is identical to the SAP S/4HANA system - and you do not know how to access the SAP Fiori launchpad (FLP), then start in your backend system and call transaction /n/UI2/FLP
- Usually the URL looks like this:
https://<domain>:<port>/sap/bc/ui5_ui5/ui2/ushell/shells/abap/FioriLaunchpad.html
- Sometimes additional parameters telling about the client or language follow in this URL
- Call your FLP in a browser
2.2. Access App
Check in your FLP, whether you have access to the app Manage Workflows.
If you are able to access this app, then proceed with next section. Otherwise follow this section.
- Check, if you see the new group and tiles, otherwise add it via app finder in your settings on the upper right corner:

2.2.1. Authorization Issue
The most common reason why an app is not accessible is, because the user has no sufficient authorizations. Ask the person who is responsible for roles and role-user-assignments if you are allowed to run this app.
If you think that there is no authorization constraint, check the app details and business catalogs/groups in your system following the next sections:
2.2.2. Get App Details
Figure out the technical details of the (any) app.
- Go to Fiori Apps Library: https://fioriappslibrary.hana.ondemand.com/
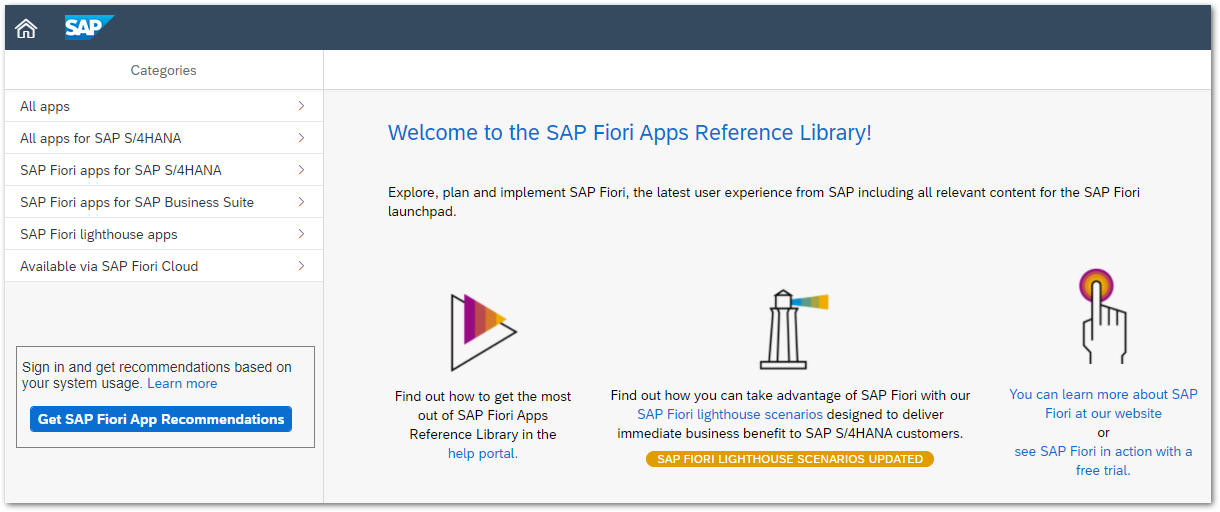
- Choose All Apps
- Search for Manage Workflows app. When searching for details of other apps, you of course have to enter another app name here.

- Find the app and choose your system-related version

- In tab Implementation Information once again choose your system version

- Unfold section Configuration and remember values for
- Technical Catalog: SAP_BASIS_TCR_T
- OData Service: SWF_FLEX_DEF_SRV
- Back-End Authorization Role of OData Service: (none)
- Business Catalog(s): (none)

Usually there are predelivered business catalogs and roles for OData services; however, with this example we have a slightly more complicated use case. Nevertheless, I think talking about this, a technical end user better understands how SAP Fiori apps work in general.
2.2.3. SAP Fiori Launchpad Designer
Similar to the SAP Fiori launchpad the URL to access the SAP Fiori launchpad Designer (FLPD) has a generic structure:
https://<domain>:<port>/sap/bc/ui5_ui5/sap/arsrvc_upb_admn/main.html
plus possibly additional parameters.
- Check in your FLPD, if the above found technical catalog SAP_BASIS_TCR_T is used or if there is another catalog, which includes the app.
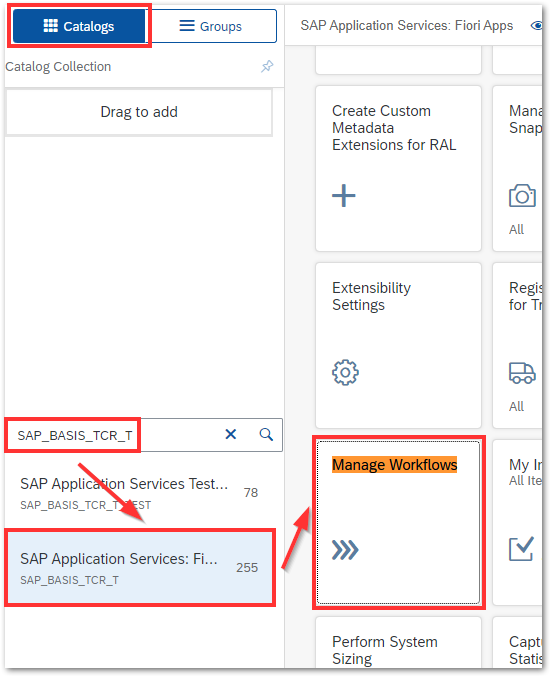
- Switch to Groups tab and check, if there is a group including this app. If you don't find such a group and you have sufficient permissions, then proceed with the following steps
- Create a new group with plus icon at the bottom of left webpage column
- Insert Title and ID

- Add a new tile with plus icon at the right side
- Choose, which catalog includes the new tile that you want to add; in our case this is the technical catalog SAP_BASIS_TCR_T
- Now you should be able to see the generic Manage Workflows app
The whole process in a single picture:

Remember the new (or existing) group name
2.2.4. Role
Logon to the frontend system with SAP GUI. In case you have an embedded system, this is identical to your SAP S/4HANA backend. Otherwise it is your separate gateway system.
Run transaction PFCG and search for a role, which includes access to the above found group. If you created a new group, you have to create a new role. Then, check, if this role is assigned to your user.
Let's assume you created a new group and have to create a new role. Then, you have to follow these steps:
- Insert a new name for this role
- push button to create a Single Role, add description and save

- Switch to tab Menu
- Choose transaction menu >> SAP Fiori Launchpad >> Launchpad Catalog

- Fill fields:
- Catalog Provider is prefilled
- Catalog ID: the technical catalog name SAP_BASIS_TCR_T

- Repeat this for the group: transaction menu >> SAP Fiori Launchpad >> Launchpad Catalog

- Enter the (possibly new) group name, sample ZCAS_AUDIT

- Save
- Switch to tab Authorizations
- Push button Expert Mode for Profile Generation

- Choose the third radiobutton >> ok
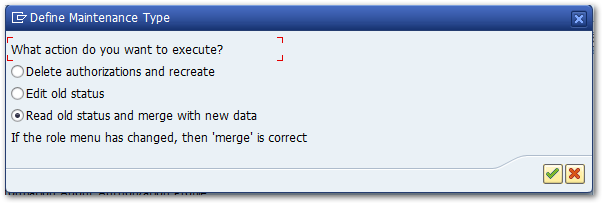
- Push the Generate button (white-red circle)
- Go back >> tab Authorizations is supposed to change to green status
- Switch to tab User
- Add the user(s), who should be assigned to this new role
- Push button User Comparison
Now you should be able to see the group group name in SAP Fiori launchpad. If this is not the case, please logout and logon again or use a new browser window in incognito mode.
2.2.5. Activate OData Service and Assign Alias
In case starting the app does not show anything (endless spinning of hourglass), then OData service might not be active.
In frontend system SAP GUI (What is it? Check out the begining of section 2.2.4. Role😞
- Bring the values from section 2.2.2. Get App Details to mind: OData Service is SWF_FLEX_DEF_SRV
- Run transaction /n/IWFND/MAINT_SERVICES
- Search service SWF_FLEX_DEF_SRV:
- Did you find it? If not, use button Add Service
- Is the node active, see at the bottom, left: status with green icon is fine; otherwise activate it via context menu
- Is the system alias maintained, see at the bottom, right: there must be a valid entry

- In case no system alias is maintained yet, do so via transaction SPRO:

3. Create Flexible Workflow
At this point you are able to run the Manage Workflows app in SAP Fiori launchpad.
- After the start of this app you should see the scenario, which we created in Part 6: Workflow Scenario with Extension Step. Probably there are other scenarios available, too. Being able to access this Scenario is a milestone on our way!

- The text in this app is what we can see in Description field of scenario header data in backend system:

- In the app push Create link on the right side >> afterwards you can see an empty form, which we will fill in the following subsections
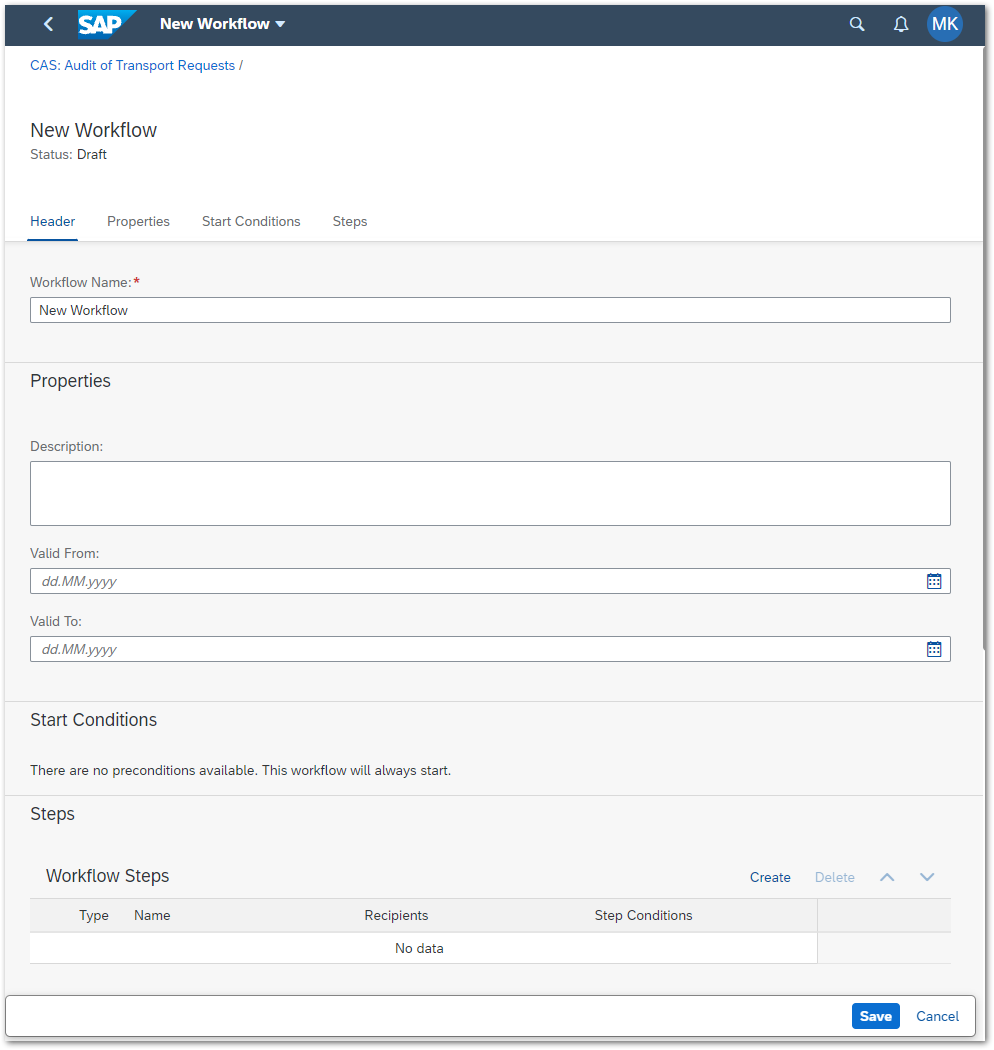
3.1. Header
Here, you just enter the new workflow name:
- Field Workflow Name: a meaningful short description, sample: Workflow with external approval in SAP BTP
3.2. Properties
Fill fields with meaningful content:
- Description: a meaningful long description, optional
- Valid From: date when this workflow is started to be used, optional, sample 01.10.2021
- Valid To: last day when workflow can be used, optional, sample 01.10.2022
3.3. Start Conditions
There are no preconditions available. This workflow will always start.
The reason behind it is, that we did not maintain such conditions in scenario builder.
3.4. Steps
We recap the process picture in Part 1: Integrating an Extension Workflow on BTP into a Flexible Workflow.
- Inform the partner about a new approval request (via email in backend)
- Process the external approval step (BTP workflow)
- If approved, store approval data in database (backend step)
- Inform the requester about decision: approved or rejected (via email in backend)

Another milestone is to be able to access the external approval step. It will only show up, when all connections from SAP S/4HANA system to BTP are maintained correctly.
All steps in the workflow are created the simplest possible way, because there are no conditions and agents (backend steps). Therefore, use the following screenshot as template for all steps:
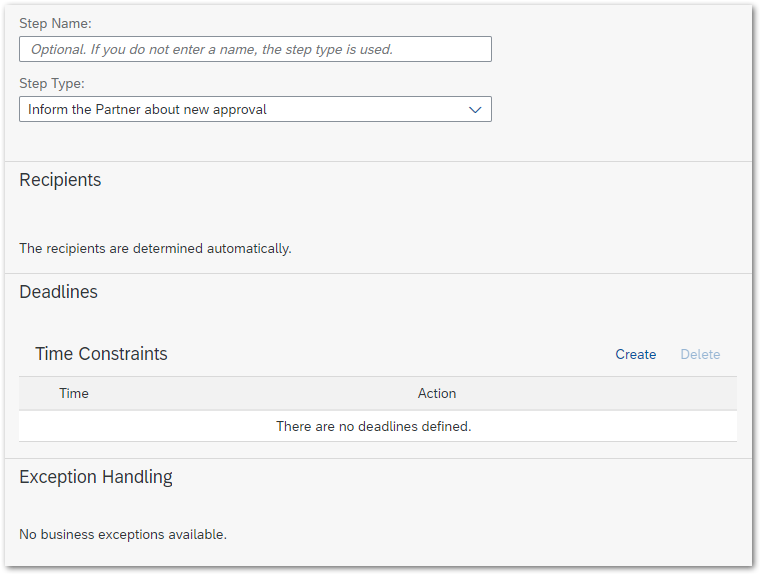
- Choose a Step Type
- Push button Create at the bottom
3.5. Final Activities
Now, the whole workflow should look like:

- Push button Save
- Push button Activate
Going a step back or starting this app again should show an active workflow for our scenario:

4. Test Workflow
4.1. Start
Now let's try to run our start report, which was created in section 1.2. Report to Create a Request
In backend system:
- Run transaction SE38 >> report ZCAS_AUDIT_START >> push button Execute (F8)
- Insert any string in field Partner ID
- Since this field is of type UNAME you may not insert more than 12 alphanumerical signs
- There is no value check against any table

- Push button Execute (F8)
- An information popup must appear saying Success:

We now will check, what happened in background.
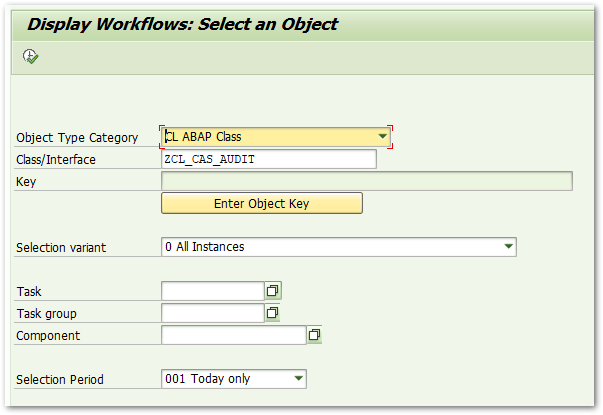
- Check, if the report started a workflow: run transaction SWI6
- Fill fields according to our self created business object and select everything that happened today:
- Object Type Category: ABAP Class
- Class/Interface: classname, sample ZCL_CAS_AUDIT
- Selection variant: All instances
- Selection Period: Today only
If you get a status message like below, check last Part of this blog series: Part 10: Problem Solving of Workflow Integration Scenario, especially 2.1. Event Linkage and 2.2. Event Trace.

4.2. Protocol
Let's continue with transaction SWI6 and get a more detailed impression of the workflow protocol:

I use the personal workflow sessings Technical View - Classic Technical View.

We see the execution of Inform Partner about Request - Action, which was successfully finished. Let's assume the partner received an email.
=> Conclusion: The next step is started but not yet finished. It is intended to call the SAP BTP workflow to get the approval of a partner. Of course this will not do anything since we have not yet created the BTP workflow, which will be done in the next part of this blog.
>> Next: Extension Workflow using SAP Workflow Management on SAP BTP
- SAP Managed Tags:
- SAP Workflow Management,
- SAP Business Workflow
Labels:
You must be a registered user to add a comment. If you've already registered, sign in. Otherwise, register and sign in.
Labels in this area
-
ABAP CDS Views - CDC (Change Data Capture)
2 -
AI
1 -
Analyze Workload Data
1 -
BTP
1 -
Business and IT Integration
2 -
Business application stu
1 -
Business Technology Platform
1 -
Business Trends
1,658 -
Business Trends
110 -
CAP
1 -
cf
1 -
Cloud Foundry
1 -
Confluent
1 -
Customer COE Basics and Fundamentals
1 -
Customer COE Latest and Greatest
3 -
Customer Data Browser app
1 -
Data Analysis Tool
1 -
data migration
1 -
data transfer
1 -
Datasphere
2 -
Event Information
1,400 -
Event Information
74 -
Expert
1 -
Expert Insights
177 -
Expert Insights
348 -
General
1 -
Google cloud
1 -
Google Next'24
1 -
GraphQL
1 -
Kafka
1 -
Life at SAP
780 -
Life at SAP
14 -
Migrate your Data App
1 -
MTA
1 -
Network Performance Analysis
1 -
NodeJS
1 -
PDF
1 -
POC
1 -
Product Updates
4,575 -
Product Updates
391 -
Replication Flow
1 -
REST API
1 -
RisewithSAP
1 -
SAP BTP
1 -
SAP BTP Cloud Foundry
1 -
SAP Cloud ALM
1 -
SAP Cloud Application Programming Model
1 -
SAP Datasphere
2 -
SAP S4HANA Cloud
1 -
SAP S4HANA Migration Cockpit
1 -
Technology Updates
6,871 -
Technology Updates
482 -
Workload Fluctuations
1
Related Content
- SAP BW Bridge – Integrating with On-Premises ECC / BW servers in Technology Blogs by Members
- First steps to work with SAP Cloud ALM Deployment scenario for SAP ABAP systems (7.40 or higher) in Technology Blogs by SAP
- Automated check for SAP HANA Cloud availability with SAP Automation Pilot in Technology Blogs by SAP
- SAP Integration Suite - Design Guidelines in the integration flow editor of SAP Cloud Integration in Technology Blogs by SAP
- SAP Cloud ALM: Requirements Management on Steroids in Technology Blogs by SAP
Top kudoed authors
| User | Count |
|---|---|
| 15 | |
| 11 | |
| 10 | |
| 9 | |
| 8 | |
| 8 | |
| 7 | |
| 7 | |
| 7 | |
| 7 |