
- SAP Community
- Products and Technology
- Technology
- Technology Blogs by SAP
- Next-gen hybrid integration with SAP Integration S...
Technology Blogs by SAP
Learn how to extend and personalize SAP applications. Follow the SAP technology blog for insights into SAP BTP, ABAP, SAP Analytics Cloud, SAP HANA, and more.
Turn on suggestions
Auto-suggest helps you quickly narrow down your search results by suggesting possible matches as you type.
Showing results for
Advisor
Options
- Subscribe to RSS Feed
- Mark as New
- Mark as Read
- Bookmark
- Subscribe
- Printer Friendly Page
- Report Inappropriate Content
11-16-2023
10:01 AM
Announcement
Very happy to share the good news that, Edge Integration Cell is now Generally Available (GA).
Check out these recent announcements:
Introduction
High Level Architecture
Edge Integration Cell runs on compute clusters managed by Kubernetes and consists of the different components as depicted in the picture below.
One of the main component is the Edge Lifecycle Management, which is used to manage the lifecycle of Edge Integration Cell, including download of software from SAP, deployment of Edge Integration Cell solution on your K8s cluster, managing upgrades of Edge Integration Cell, and system level monitoring. It comes with an in-built Cloud Connector to be used specifically for Edge Integration Cell, and establishes a secure tunnel between cloud and edge environments.
For more details on the other components, refer to the help documentation.
Personas & Tasks
There are mainly 3 personas involved with Edge Integration Cell. First is the "System admin", who takes care of provisioning and maintaining the K8s platform and clusters. Second is the "Tenant admin", who is responsible for setting up Edge Integration Cell, monitor, operate and manage upgrades. And the third is the "Integration / API developer", who is responsible for designing, deploying and executing APIs and integrations on Edge Integration Cell.
Licensing Model
The next most frequently asked question around Edge Integration Cell is the licensing, let me give you a overview of the licensing model,
Setup & Installation
Now that we understood what is Edge Integration Cell, its use cases and personas. Let us now dive into the setup and installation steps.
Pre-requisites
To be able to use Edge Integration Cell in your private landscape, you need to make sure you meet these pre-requisites and have these available in your landscape,
For more details on the supported versions of K8s platforms and external storage with its sizing information refer to this SAP note.
1) Prepare Kubernetes Cluster & External Storage
Before setting up a kubernetes cluster & external storage, please check and understand these requirements, and align on them with your System Admin or IT department.
Then proceed with setting up a Kubernetes cluster on one of the supported platforms, by following the steps mentioned here.
2) Configure Edge Integration Cell entitlement
As mentioned in the licensing model above, every SAP Integration Suite tenant gets 1 entitlement of Edge Integration Cell included. So let us now configure the entitlement for Edge Integration Cell.
Navigate to SAP BTP cockpit and select the sub account on which you have the Integration Suite tenant. From the left side menu items, choose Entitlements and then click on "Configure Entitlements"
Click on "Add Service Plans" button and search for Integration Suite. On selection of Integration Suite solution, you will see the set of available plans on the right pane. Select "edge_integration_cell" plan and click on "Add 1 Service Plan" button at the bottom.
After adding the entitlement, click on "Save".
This now provides you with an entitlement to activate and deploy Edge Integration Cell for your SAP Integration Suite tenant.
3) Activate Edge Integration Cell
Now let us proceed with activating Edge Integration cell. In your SAP Integration Suite tenant (standard edition, premium edition, CPEA or PAYG), you will see a new tab called "Runtime" under "Settings". Here you will see the option to activate "Edge Integration Cell". For activating this, you need Integration_Provisioner role assigned to your user.

Upon activation, a subscription to Edge Lifecycle Management service happens in the background and you will get a link to the Edge Lifecycle Management cockpit. Edge Lifecycle Management service is used to manage the lifecycle of Edge Integration Cell, including download of software from SAP, deployment of Edge Integration Cell solution on your K8s cluster, managing upgrades of Edge Integration Cell, and system level monitoring. To access Edge Lifecycle Management cockpit, you will need the role EdgeLMAccess.
Optionally you can create a role collection called EdgeLMAccess and add the roles EdgeLMAccess and Cloud Connector Administrator to this collection. Then assign this role collection to all the users whom you want to give access to Edge Lifecycle Management.
4) Configure Edge Lifecycle Management
After activating Edge Integration Cell in the previous step, click on the URL link to navigate to Edge Lifecycle Management (ELM) cockpit.
Navigate to tenant settings, and in the SAP Business Technology Platform sub tab, provide the P-user credentials. Please ensure that the P-user has the EdgeLMAccess and Cloud Connector Administrator role assigned. This P-user is used by the system to create the SAP Cloud Connector installation needed to establish the bridge between the ELM and the runtime edge location.
In the next sub tab, Repository-Based Shipment Channel, you need to provide the RBSC user credentials.
You can create a RBSC user from SAP Repositories Management (https://ui.repositories.cloud.sap/Information) by logging in with your S-user ID. This user is used to download SAP software using the Repository-based shipment channel and is automatically granted access to the repositories based on the licenses of your S-user.
The last setting is to configure the credentials of an IAS (SAP Identity and Authentication Service) tenant. This is required to enable monitoring and logging of the runtime Kubernetes installation.
5) Creating Edge Node
Next step is to create an Edge Node. Edge node is an abstraction of your Kubernetes cluster.
Navigate to first tab in Edge Lifecycle Management and click on "Add Edge Node".
This will bring up a popup to confirm the pre-requisites, check them and click on "Continue".
Next you will see a wizard, where you need to provide details and configure the Edge node. In the first step, provide a name for the node.
In the second step, enable monitoring and logging. For the rest of the steps, retain the default configurations. At the end, you can review the configuration of the Edge node and confirm.
Navigate back to "Edge Nodes" tab and you will see the newly created Edge node available there and the status of it is "Not Initialized".
6) Setup Cloud Connector
Next we need to setup the Cloud Connector for this Edge Node. Navigate to the tab "Set up Cloud Connector" and follow these steps,
In the first step, upload the kubeconfig file, that you can get from the Kubernetes cluster that you have set up, and provide a context password to encrypt the bootstrapping input file (context.cfg).
Choose "Download Bootstrapping File" to download the Bootstrapping Input file and save it as "context.cfg” on your workstation, This file will be required later to initiate the Cloud Connector via Edge Lifecycle Management Bridge.
After that download the Edge Lifecycle Management Bridge, ELMB00_<Version>-<Extension>.[ZIP|EXE|DMG] for the corresponding operating system (macOS, Windows or Linux) and place it to the same directory where you downloaded the context.cfg file.
Next, run the Edge Lifecycle Management Bridge to perform the initial bootstrapping of the Kubernetes cluster on the Edge Node, using the context.cfg.
For that, go to the download directory where you have the files stored on your workstation and execute the set of commands mentioned in the UI (step 3 onwards), for the corresponding operating system.
Once the bootstrapping is complete, you will see that the Edge Node status changes from "Not Initialized" to "Initializing" and then later to "Available".
7) Deployment of Edge Integration Cell Solution
Next step is to deploy the Edge Integration Cell solution for the Edge Node. Before we proceed with that, please ensure that you have,
Navigate to "Deployments" tab of the Edge Node in Edge Lifecycle Management cockpit, and click on "Deploy Solution"
This opens up a dialog where you need to provide certain details. Under Solution Details, select Edge Integration Cell as the solution name and the version is automatically selected.
In the Solution Properties, the most important configurations are the "Default Virtual Host", which is the custom domain name used for exposing Edge Integration Cell endpoints and "Default Virtual Host Alias", which is the Key pair alias used for TLS enablement. All other configurations can be provided as per your setup and recommendations provided in the help documentation.
After providing the relevant information, choose "Deploy". This will trigger the deployment of Edge Integration Cell along with the dependent services like Istio and Edge Integration Cell Services to the Kubernetes cluster.
8) Upload a Key Pair
After the successful deployment of Edge Integration Cell solution, next step will need to create a key pair and deploy it to Edge Integration Cell runtime. For this navigate to SAP Integration Suite -> Monitor -> Integrations and APIs -> Manage Security -> Keystore. Here you can either use an existing keystore, edit it and assign Edge Integration Cell runtime to it or create a new keystore for Edge Integration Cell runtime.
Once the keystore is created, upload the key pair for the Default Virtual Host into the keystore which you have assigned to the Edge Integration Cell runtime and use the same alias that you specified as the Default Virtual Host Key Alias earlier during the deployment of the ELM solution as your alias.
9) Create a DNS Mapping
Next step is to do the Domain Name Server (DNS) mapping to be able to access the endpoints of deployed integration flows and APis.
You need to get the external IP address of the deployed solution, for that run the following command on the Kubernetes command line:
kubectl -n istio-system get service istio-ingressgateway
This will give you the EXTERNAL-IP value which was assigned by the platform service load balancer. This IP address (for Azure) or hostname (for AWS) has to be used for the DNS mapping.
Then go to your DNS service and create a new entry that associates the domain that you previously defined with the back-end address assigned to the ingress gateway.
After the domain is propagated through the DNS, Edge Integration Cell will be accessible in the browser using the defined Fully Qualified Domain Name (FQDN). To verify if FQDN is accessible, in your browser, open https://<FQDN>;. A valid browser response is: {"error":{"code":"apiProxyNotFound","message":"API proxy not found for the given host and path"}}.
10) Runtime Profile
Navigate back to SAP Integration Suite tenant and under "Settings" -> "Integrations" you will now see a new Runtime Profile available having the name "Edge Integration Cell - <name of your edge node>". This runtime profile will be used to design, deploy and monitor integrations and APIs across runtimes.
If you click on this runtime profile, you will see the list of adapters, flow steps and their versions supported by this runtime.
This completes the setup of Edge Integration Cell for your SAP Integration Suite tenant.
Next Steps
After you have setup Edge Integration Cell, you can now design, deploy and run integrations and APIs on this optional runtime, within your private landscape.
Check out this blog from ashutosh.kumar.singh02 on how you can design, deploy and manage APIs on Edge Integration Cell.
If you still have some questions, check out this Frequently Asked Questions (FAQ) blog on Edge Integration Cell and hopefully this already answers most of your questions.
Additional Resources
Conclusion
Hope this blog helped you get an overview of Edge Integration Cell, the use cases, pre-requisites and steps involved in its setup and installation.
Let me know if you have questions or feedback in the comments section.
Very happy to share the good news that, Edge Integration Cell is now Generally Available (GA).
Check out these recent announcements:
- by Juergen Mueller, Chief Technology Officer and Member of the Executive Board of SAP in his Executive Keynote (check out the video from 41:15 - 42:45 mins) at SAP TechEd 2023.

- by piyush.gakhar, Head of Product Management & Strategy, Integration Platform at SAP, via this blog.
Introduction
“Edge Integration Cell” is the new flexible hybrid integration runtime, offered as an optional extension to SAP Integration Suite, enabling customers to manage APIs and run their integration scenarios within customer-managed private landscapes.
Key Highlights:
- Flexible deployment option in customer managed private kubernetes environments (Azure AKS, Amazon EKS, SUSE Rancher)
- Supports use cases of data compliance and governance by processing data locally
- Design, configure and monitor APIs and integrations in the cloud but run them within your private landscape
- Configure and manage multiple Edge Integration Cells with an SAP Integration Suite cloud tenant
- Ensures business continuity during temporary connectivity loss*
- Offers a migration path for PI/PO customers, to move to SAP Integration Suite, and still be able to run scenarios within their private landscape

High Level Architecture
Edge Integration Cell runs on compute clusters managed by Kubernetes and consists of the different components as depicted in the picture below.
One of the main component is the Edge Lifecycle Management, which is used to manage the lifecycle of Edge Integration Cell, including download of software from SAP, deployment of Edge Integration Cell solution on your K8s cluster, managing upgrades of Edge Integration Cell, and system level monitoring. It comes with an in-built Cloud Connector to be used specifically for Edge Integration Cell, and establishes a secure tunnel between cloud and edge environments.

For more details on the other components, refer to the help documentation.
Personas & Tasks
There are mainly 3 personas involved with Edge Integration Cell. First is the "System admin", who takes care of provisioning and maintaining the K8s platform and clusters. Second is the "Tenant admin", who is responsible for setting up Edge Integration Cell, monitor, operate and manage upgrades. And the third is the "Integration / API developer", who is responsible for designing, deploying and executing APIs and integrations on Edge Integration Cell.

Licensing Model
The next most frequently asked question around Edge Integration Cell is the licensing, let me give you a overview of the licensing model,
- Every SAP Integration Suite licensed tenant (via standard edition, premium edition, CPEA and PAYG) gets one entitlement of Edge Integration Cell included.
- Additional Edge Integration Cell entitlements can be acquired through a separate add-on SKU.
- Messages flowing through Edge Integration Cell(s) will be metered but only 50% of them are chargeable.

Setup & Installation
Now that we understood what is Edge Integration Cell, its use cases and personas. Let us now dive into the setup and installation steps.
Pre-requisites
To be able to use Edge Integration Cell in your private landscape, you need to make sure you meet these pre-requisites and have these available in your landscape,
- SAP Integration Suite license (standard edition, premium edition, CPEA or PAYG)
- Kubernetes cluster (Azure AKS, Amazon EKS or SUSE Rancher)
- External storage (PostgreSQL and Redis)
- Technical user (P-user) ID
- Support user (S-user) ID with download permissions
For more details on the supported versions of K8s platforms and external storage with its sizing information refer to this SAP note.
1) Prepare Kubernetes Cluster & External Storage
Before setting up a kubernetes cluster & external storage, please check and understand these requirements, and align on them with your System Admin or IT department.
Then proceed with setting up a Kubernetes cluster on one of the supported platforms, by following the steps mentioned here.
2) Configure Edge Integration Cell entitlement
As mentioned in the licensing model above, every SAP Integration Suite tenant gets 1 entitlement of Edge Integration Cell included. So let us now configure the entitlement for Edge Integration Cell.
Navigate to SAP BTP cockpit and select the sub account on which you have the Integration Suite tenant. From the left side menu items, choose Entitlements and then click on "Configure Entitlements"

Click on "Add Service Plans" button and search for Integration Suite. On selection of Integration Suite solution, you will see the set of available plans on the right pane. Select "edge_integration_cell" plan and click on "Add 1 Service Plan" button at the bottom.

After adding the entitlement, click on "Save".
This now provides you with an entitlement to activate and deploy Edge Integration Cell for your SAP Integration Suite tenant.
3) Activate Edge Integration Cell
Now let us proceed with activating Edge Integration cell. In your SAP Integration Suite tenant (standard edition, premium edition, CPEA or PAYG), you will see a new tab called "Runtime" under "Settings". Here you will see the option to activate "Edge Integration Cell". For activating this, you need Integration_Provisioner role assigned to your user.
Upon activation, a subscription to Edge Lifecycle Management service happens in the background and you will get a link to the Edge Lifecycle Management cockpit. Edge Lifecycle Management service is used to manage the lifecycle of Edge Integration Cell, including download of software from SAP, deployment of Edge Integration Cell solution on your K8s cluster, managing upgrades of Edge Integration Cell, and system level monitoring. To access Edge Lifecycle Management cockpit, you will need the role EdgeLMAccess.
Optionally you can create a role collection called EdgeLMAccess and add the roles EdgeLMAccess and Cloud Connector Administrator to this collection. Then assign this role collection to all the users whom you want to give access to Edge Lifecycle Management.

4) Configure Edge Lifecycle Management
After activating Edge Integration Cell in the previous step, click on the URL link to navigate to Edge Lifecycle Management (ELM) cockpit.
Navigate to tenant settings, and in the SAP Business Technology Platform sub tab, provide the P-user credentials. Please ensure that the P-user has the EdgeLMAccess and Cloud Connector Administrator role assigned. This P-user is used by the system to create the SAP Cloud Connector installation needed to establish the bridge between the ELM and the runtime edge location.

In the next sub tab, Repository-Based Shipment Channel, you need to provide the RBSC user credentials.
You can create a RBSC user from SAP Repositories Management (https://ui.repositories.cloud.sap/Information) by logging in with your S-user ID. This user is used to download SAP software using the Repository-based shipment channel and is automatically granted access to the repositories based on the licenses of your S-user.

The last setting is to configure the credentials of an IAS (SAP Identity and Authentication Service) tenant. This is required to enable monitoring and logging of the runtime Kubernetes installation.

5) Creating Edge Node
Next step is to create an Edge Node. Edge node is an abstraction of your Kubernetes cluster.
Navigate to first tab in Edge Lifecycle Management and click on "Add Edge Node".

This will bring up a popup to confirm the pre-requisites, check them and click on "Continue".

Next you will see a wizard, where you need to provide details and configure the Edge node. In the first step, provide a name for the node.

In the second step, enable monitoring and logging. For the rest of the steps, retain the default configurations. At the end, you can review the configuration of the Edge node and confirm.

Navigate back to "Edge Nodes" tab and you will see the newly created Edge node available there and the status of it is "Not Initialized".

6) Setup Cloud Connector
Next we need to setup the Cloud Connector for this Edge Node. Navigate to the tab "Set up Cloud Connector" and follow these steps,
In the first step, upload the kubeconfig file, that you can get from the Kubernetes cluster that you have set up, and provide a context password to encrypt the bootstrapping input file (context.cfg).
- Make sure that you remember this password as you cannot reset it. You will need this password later during the initial bootstrapping via Edge Lifecycle Management Bridge.
- If you have more than one context in the uploaded kubeconfig file, then you will have to select your context from the Context dropdown list.
Choose "Download Bootstrapping File" to download the Bootstrapping Input file and save it as "context.cfg” on your workstation, This file will be required later to initiate the Cloud Connector via Edge Lifecycle Management Bridge.

After that download the Edge Lifecycle Management Bridge, ELMB00_<Version>-<Extension>.[ZIP|EXE|DMG] for the corresponding operating system (macOS, Windows or Linux) and place it to the same directory where you downloaded the context.cfg file.
- It is recommended to rename the downloaded ELMB00_<Version>-<Extension>.[EXE|DMG] file to “elm” (on MacOS) and respectively “elm.exe” (on Windows).
Next, run the Edge Lifecycle Management Bridge to perform the initial bootstrapping of the Kubernetes cluster on the Edge Node, using the context.cfg.
For that, go to the download directory where you have the files stored on your workstation and execute the set of commands mentioned in the UI (step 3 onwards), for the corresponding operating system.
Once the bootstrapping is complete, you will see that the Edge Node status changes from "Not Initialized" to "Initializing" and then later to "Available".

7) Deployment of Edge Integration Cell Solution
Next step is to deploy the Edge Integration Cell solution for the Edge Node. Before we proceed with that, please ensure that you have,
a custom domain name to be used for exposing the Edge Integration Cell endpoints.
a load balancer as part of the Kubernetes infrastructure, to be used for exposing the Edge Integration Cell endpoints.
set up external services for PostgreSQL and Redis for production environments.
set up storage classes for dynamic provisioning.
Navigate to "Deployments" tab of the Edge Node in Edge Lifecycle Management cockpit, and click on "Deploy Solution"

This opens up a dialog where you need to provide certain details. Under Solution Details, select Edge Integration Cell as the solution name and the version is automatically selected.
In the Solution Properties, the most important configurations are the "Default Virtual Host", which is the custom domain name used for exposing Edge Integration Cell endpoints and "Default Virtual Host Alias", which is the Key pair alias used for TLS enablement. All other configurations can be provided as per your setup and recommendations provided in the help documentation.

After providing the relevant information, choose "Deploy". This will trigger the deployment of Edge Integration Cell along with the dependent services like Istio and Edge Integration Cell Services to the Kubernetes cluster.

8) Upload a Key Pair
After the successful deployment of Edge Integration Cell solution, next step will need to create a key pair and deploy it to Edge Integration Cell runtime. For this navigate to SAP Integration Suite -> Monitor -> Integrations and APIs -> Manage Security -> Keystore. Here you can either use an existing keystore, edit it and assign Edge Integration Cell runtime to it or create a new keystore for Edge Integration Cell runtime.
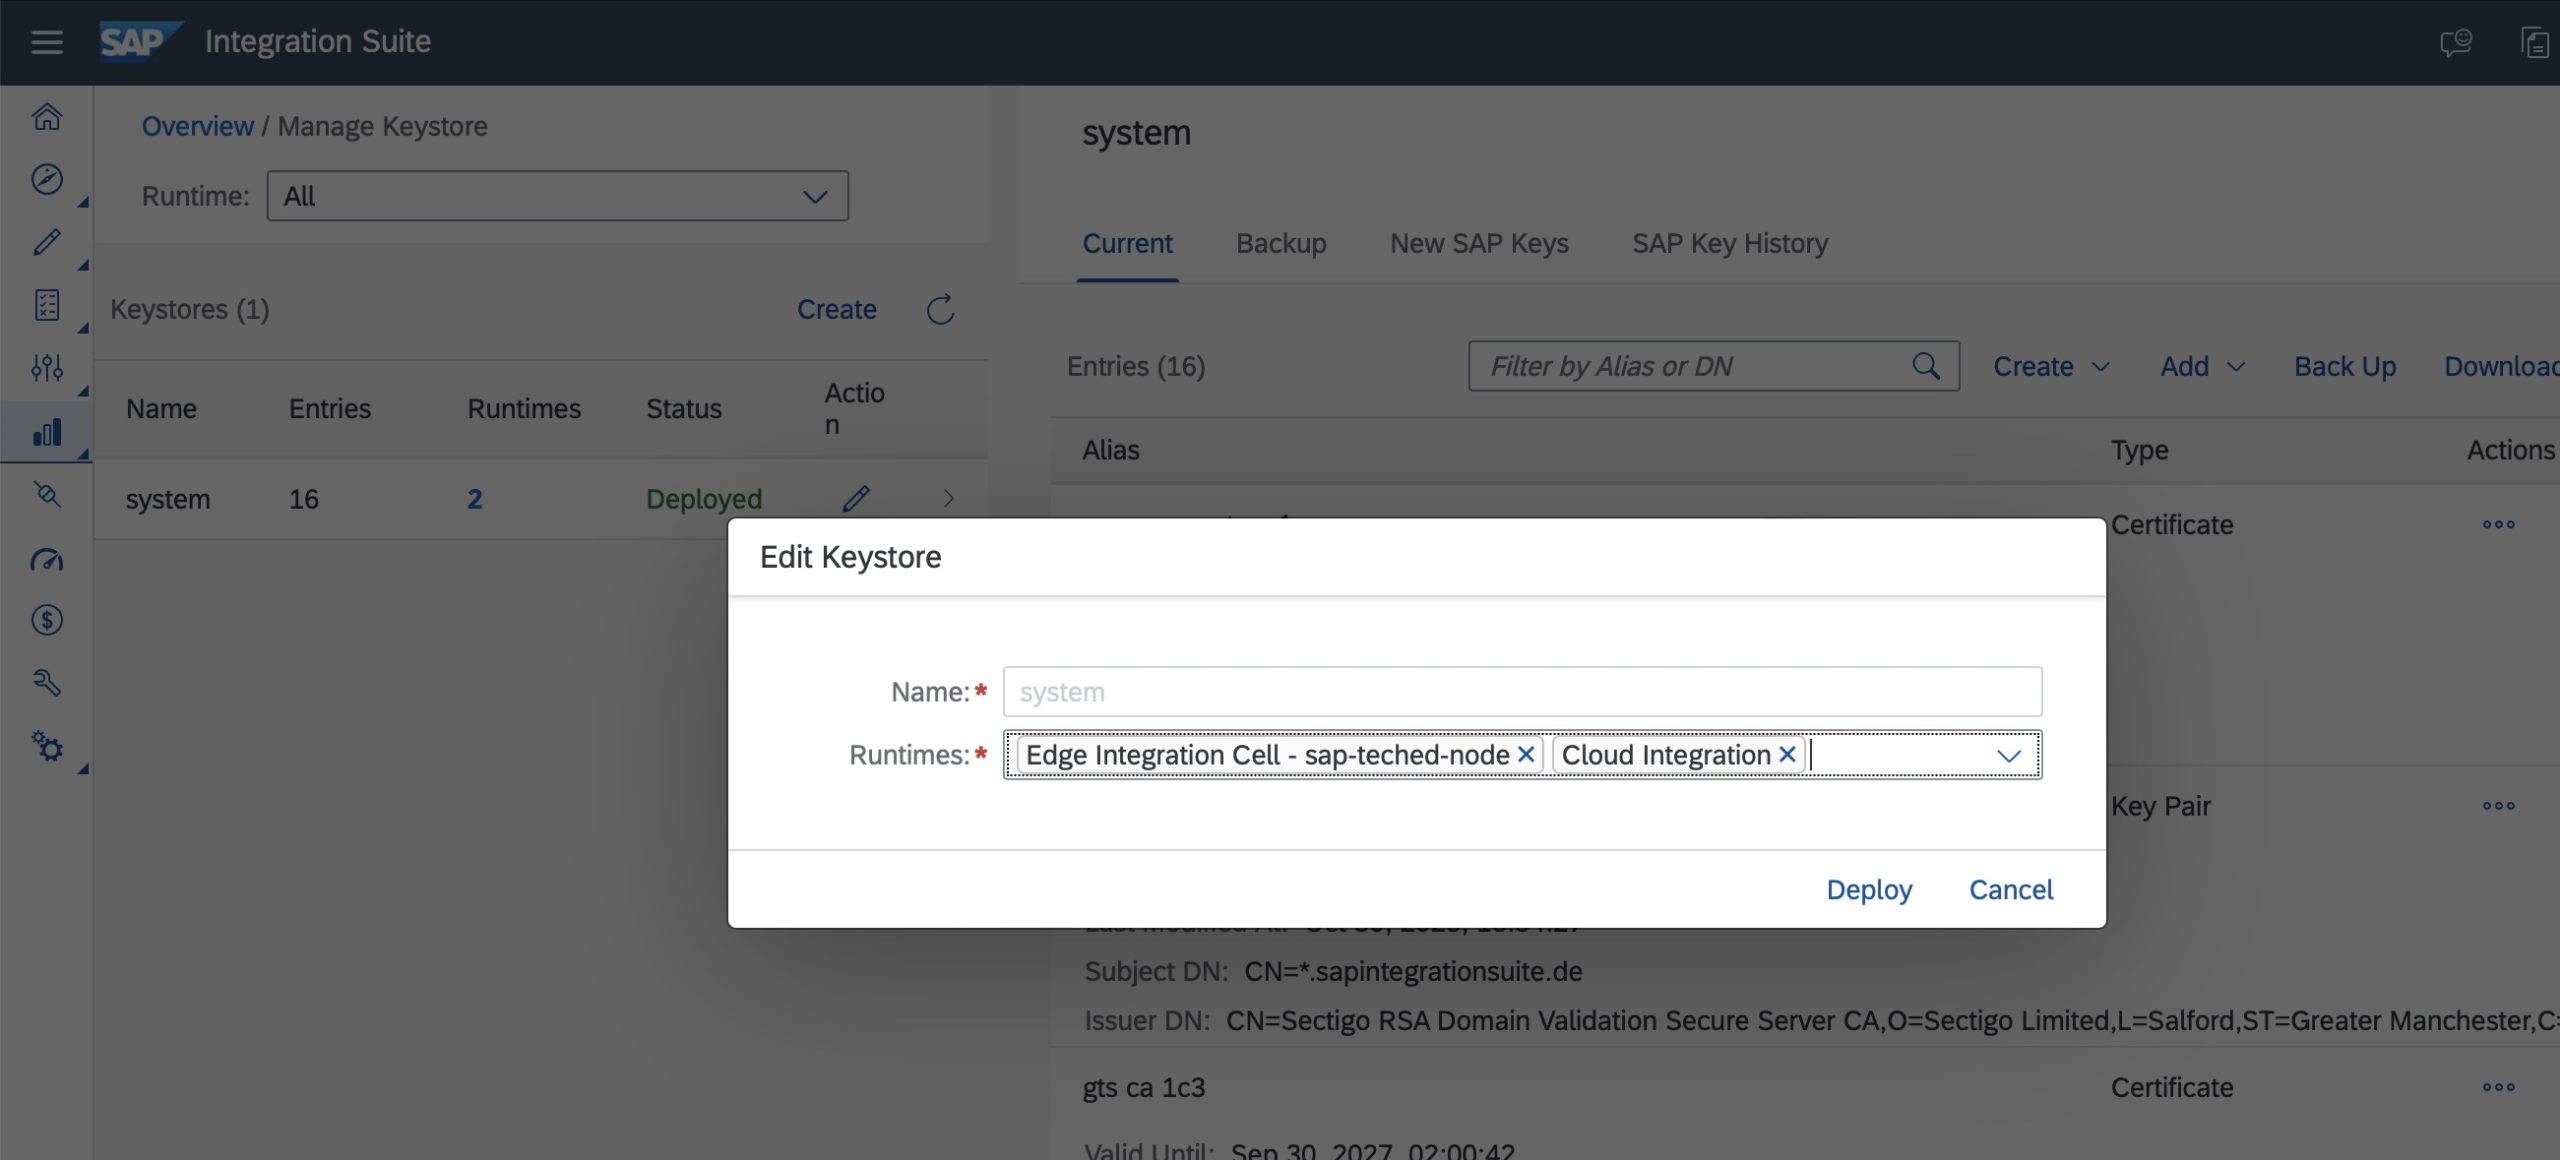

Once the keystore is created, upload the key pair for the Default Virtual Host into the keystore which you have assigned to the Edge Integration Cell runtime and use the same alias that you specified as the Default Virtual Host Key Alias earlier during the deployment of the ELM solution as your alias.

9) Create a DNS Mapping
Next step is to do the Domain Name Server (DNS) mapping to be able to access the endpoints of deployed integration flows and APis.
You need to get the external IP address of the deployed solution, for that run the following command on the Kubernetes command line:
kubectl -n istio-system get service istio-ingressgateway
This will give you the EXTERNAL-IP value which was assigned by the platform service load balancer. This IP address (for Azure) or hostname (for AWS) has to be used for the DNS mapping.
Then go to your DNS service and create a new entry that associates the domain that you previously defined with the back-end address assigned to the ingress gateway.
After the domain is propagated through the DNS, Edge Integration Cell will be accessible in the browser using the defined Fully Qualified Domain Name (FQDN). To verify if FQDN is accessible, in your browser, open https://<FQDN>;. A valid browser response is: {"error":{"code":"apiProxyNotFound","message":"API proxy not found for the given host and path"}}.
10) Runtime Profile
Navigate back to SAP Integration Suite tenant and under "Settings" -> "Integrations" you will now see a new Runtime Profile available having the name "Edge Integration Cell - <name of your edge node>". This runtime profile will be used to design, deploy and monitor integrations and APIs across runtimes.

If you click on this runtime profile, you will see the list of adapters, flow steps and their versions supported by this runtime.

This completes the setup of Edge Integration Cell for your SAP Integration Suite tenant.
Next Steps
After you have setup Edge Integration Cell, you can now design, deploy and run integrations and APIs on this optional runtime, within your private landscape.
Check out this blog from ashutosh.kumar.singh02 on how you can design, deploy and manage APIs on Edge Integration Cell.
If you still have some questions, check out this Frequently Asked Questions (FAQ) blog on Edge Integration Cell and hopefully this already answers most of your questions.
Additional Resources
Conclusion
Hope this blog helped you get an overview of Edge Integration Cell, the use cases, pre-requisites and steps involved in its setup and installation.
Let me know if you have questions or feedback in the comments section.
- SAP Managed Tags:
- SAP Integration Suite,
- API Management,
- Cloud Integration,
- SAP Process Integration,
- SAP Process Orchestration
Labels:
10 Comments
You must be a registered user to add a comment. If you've already registered, sign in. Otherwise, register and sign in.
Labels in this area
-
ABAP CDS Views - CDC (Change Data Capture)
2 -
AI
1 -
Analyze Workload Data
1 -
BTP
1 -
Business and IT Integration
2 -
Business application stu
1 -
Business Technology Platform
1 -
Business Trends
1,658 -
Business Trends
93 -
CAP
1 -
cf
1 -
Cloud Foundry
1 -
Confluent
1 -
Customer COE Basics and Fundamentals
1 -
Customer COE Latest and Greatest
3 -
Customer Data Browser app
1 -
Data Analysis Tool
1 -
data migration
1 -
data transfer
1 -
Datasphere
2 -
Event Information
1,400 -
Event Information
67 -
Expert
1 -
Expert Insights
177 -
Expert Insights
301 -
General
1 -
Google cloud
1 -
Google Next'24
1 -
GraphQL
1 -
Kafka
1 -
Life at SAP
780 -
Life at SAP
13 -
Migrate your Data App
1 -
MTA
1 -
Network Performance Analysis
1 -
NodeJS
1 -
PDF
1 -
POC
1 -
Product Updates
4,577 -
Product Updates
346 -
Replication Flow
1 -
REST API
1 -
RisewithSAP
1 -
SAP BTP
1 -
SAP BTP Cloud Foundry
1 -
SAP Cloud ALM
1 -
SAP Cloud Application Programming Model
1 -
SAP Datasphere
2 -
SAP S4HANA Cloud
1 -
SAP S4HANA Migration Cockpit
1 -
Technology Updates
6,873 -
Technology Updates
430 -
Workload Fluctuations
1
Related Content
- Update Public/Private Key in SFTP adapter in Technology Q&A
- Sapphire 2024 user experience and application development sessions in Technology Blogs by SAP
- How to add SAP Datasphere as a datastore in Cloud Integration for data services? in Technology Q&A
- Using Integration Suite API's with Basic Auth in Technology Q&A
- SAP BW/4 - revamp and true to the line 2024 in Technology Blogs by Members
Top kudoed authors
| User | Count |
|---|---|
| 28 | |
| 17 | |
| 15 | |
| 13 | |
| 11 | |
| 9 | |
| 8 | |
| 8 | |
| 8 | |
| 7 |