

- SAP Community
- Products and Technology
- Technology
- Technology Blogs by SAP
- How To Upload Data to a Public or Private Planning...
Technology Blogs by SAP
Learn how to extend and personalize SAP applications. Follow the SAP technology blog for insights into SAP BTP, ABAP, SAP Analytics Cloud, SAP HANA, and more.
Turn on suggestions
Auto-suggest helps you quickly narrow down your search results by suggesting possible matches as you type.
Showing results for
Product and Topic Expert
Options
- Subscribe to RSS Feed
- Mark as New
- Mark as Read
- Bookmark
- Subscribe
- Printer Friendly Page
- Report Inappropriate Content
11-03-2023
12:15 PM
Purpose
This blog outlines how customers or partners can use the File Upload Custom Widget to call our new Data Import Service API to upload data from an MS Excel Worksheet or CSV file to a Public Version or to their own Private Version within a Story that has Optimized Story Experience enabled.
The sample code may be downloaded and customized further to meet specific customer needs.
Check out our short video containing the File Upload Custom Widget highlights.
Prerequisites
- The File Upload Custom Widget may be installed on a SAP Analytics Cloud, Cloud Foundry environment.
- SAP Analytics Cloud revision 2023 Q4 or higher.
- The new model type that supports measures and accounts.
- The story must have Optimized Story Experience enabled.
- One widget per page may be used.
- Widget should be installed separately on each tenant.
- Importing to dimensions that contain hierarchies is not currently supported.
Overview
The steps to upload data from an MS Excel Worksheet, or CSV file, to a Public Version or to a user owned Private Version / Public Edit Version can be broken down into the following 8 easy to follow steps:
Prepare the source data.
- Assign authorizations.
- Install the File Upload Custom Widget.
- Add the File Upload Custom Widget to an Optimized Design Experience Story.
- Create an explicit Private Version (optional).
- Configure the File Upload Custom Widget.
- Run the import data job.
- Review the results.
Let’s take a closer look at each step in greater detail.
1. Prepare the source data.
The MS Excel Worksheet or CSV file should contain one column for each dimension and measure in the model. Each column should have a name in the header, that can be later used for mapping.
In the following example, the first 5 columns in this worksheet represent dimensions that exist within a Planning model in SAP Analytics Cloud. Column 6 onwards, are pivot columns as they consist of fact data, including dates.

Figure 1: Sample Excel Worksheet Extract
It is helpful to assign a name to the worksheet and to also make note of the pivot column number that contains your fact data, as this information will be used later in the Job Settings configuration section of the File Upload properties panel.
In this example, column 6 is the starting pivot column number containing the fact data.
2. Assign authorizations.
Supported models are Planning and Analytic models that contain both measures and accounts.
There are 3 personas that are used for this process.
- The Administrator who installs the custom widget.
- The Story Designer who creates the story and configures the widget. This user requires design rights for the story or application.
- The BI or Planner End-User requires READ and MAINTAIN rights on the model.

Figure 2: Read and Maintain Access Rights on the Model
3. Install the File Upload Custom Widget.
Download the File Upload Custom Widget json and zip files from the file-upload-widget versions folder in GitHub. Ensure to review the README.md prior to installation.
In SAP Analytics Cloud, select Stories and choose the Custom Widgets tab. Press + to open the Upload File dialog.

Figure 3: Add Custom Widgets
Choose File Upload Widget json and zip file within the Upload File dialog and select OK.

Figure 4: Upload File Dialog
Your File Upload Widget should be ready for use within an Optimized Design Experience Story.
4. Add the File Upload Custom Widget to an Optimized Design Experience Story.
Create or open an Optimized Design Experience Story.
Under the View section of the Toolbar, select the Left-Side Panel icon to open the Assets Panel.
Expand on Custom Widgets in the panel and select the File Upload Widget v*.*.*.
Drag the widget onto the workspace.
Expand the width of the widget to leave sufficient space to view job status information.
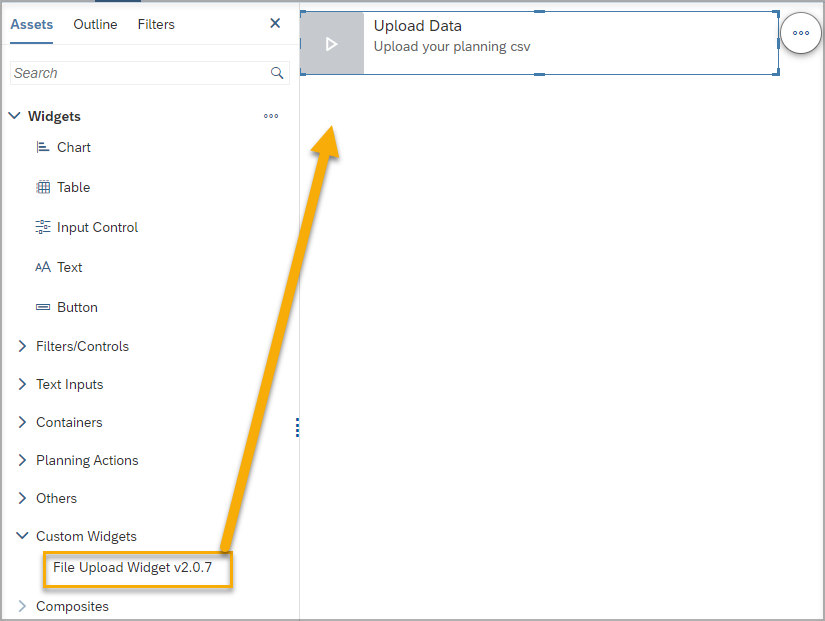
Figure 5: Add File Upload Widget to Workspace
5. Create an explicit Private Version. (Optional)
This step is optional for Planners who wish to upload data to their own Private Version. As an alternative, an existing Public Version may be used instead.
Within the Optimized Design Experience Story create an explicit Private Version.
See Creating Blank Public or Private Versions in SAP Analytics Cloud Help for details on Version Management.
6. Configure the File Upload Custom Widget.
The next stage is to configure the File Upload Custom Widget, in advance of running the data import job.
Select the widget on the dashboard, to highlight it.
Under the View section of the Toolbar, select the Right-Side Panel icon to open the File Upload builder panel.
Under Model Selection choose the name of the source model where the data shall be uploaded to.
Under Import Type, there are 2 Import Type options to choose from:
A. Fact Data.
Choose Fact Data in the drop down for upload of data to Public Versions.
B. Private Fact Data.
Choose Private Fact Data in the drop down for upload of data to Private Versions. Note that if the Story Designer has chosen “Private Fact Data” and the end user selects a Public Version in the upload, then the data will be written to the Public Edit Version.

Figure 6: Private Fact Data Import Type
Select Open Data Mappings Dialog from Data Mappings and either enter the column names from the file directly or choose Upload Template within Data Mappings dialog.
Choose the source worksheet name from the drop-down list.
Automatic mapping of columns should appear in the dialog. Carefully review these mappings and configure further mappings to the corresponding worksheet columns, as required.
Click Save when mappings have been successfully made.
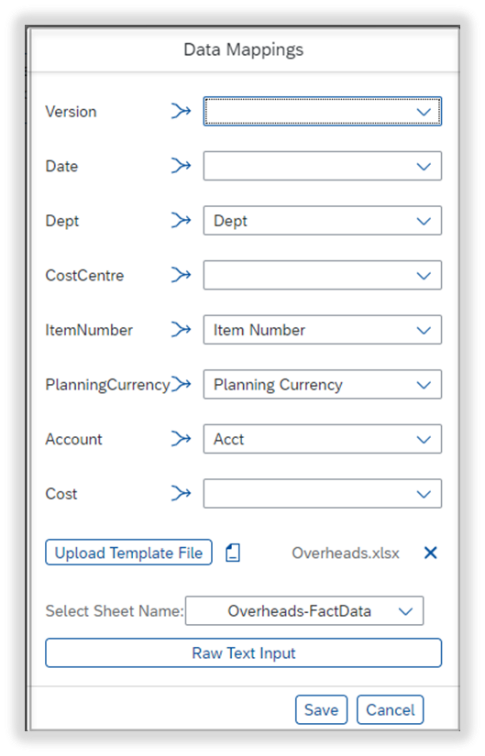
Figure 7: Data Mappings Dialog Containing Worksheet Name
Select Default Values for further optional configuration of default values. The default value will be used for any measures or dimensions that have not been manually mapped or if the uploaded file does not contain a value for the measure or dimension.
When the version is specified as a default value, or if it is mapped, this version is displayed automatically as an option to users when running the upload job. If the version is not mapped in the file and if no default value is set, then the end user can select the version during the upload.
Next, select Job Settings.
Choosing the Reverse Account Sign checkbox reverses the sign of all fact data imported into models containing an Account dimension with an account type of Income (INC) or Expense (EXP). This option is available for Fact Data only.
Choosing the Execute With Failed Rows option writes only correct records to the specified version. Leaving this option unchecked means that data will be uploaded, only when all records pass correctness checks.
Choosing Ignore Additional Columns ignores columns in the file that are not required during the import process.
Choosing the Enable Pivot Settings option expands the pivot settings. This is a similar concept to using Pivot Tables in MS Excel.
Enter the Pivot Column Start number as the pivot column of the worksheet fact data, the Pivot Key and Pivot Value.
For example, in the below screenshot, Pivot Column Start is 6, as this is the first column containing fact data. Pivot Key is Date and Pivot Value is Cost.

Figure 8: Job Settings Sample Configuration
The Enable Date Format Settings allows custom date formatting to be applied to the data. If unchecked and no value is specified, then the date format in the source file must match the date format in the SAP Analytics Cloud model. For example, if the ‘Date’ dimension in the model is in the format ‘YYYY-MM’, then the date format of the source data must also be ‘YYYY-MM’.
Checking the Enable Date Format Settings box provides additional date flexibility, by allowing the administrator to specify the date type format in the source file, which will be converted to the date dimension configuration of the SAP Analytics Cloud model. This option is available for Fact Data only.
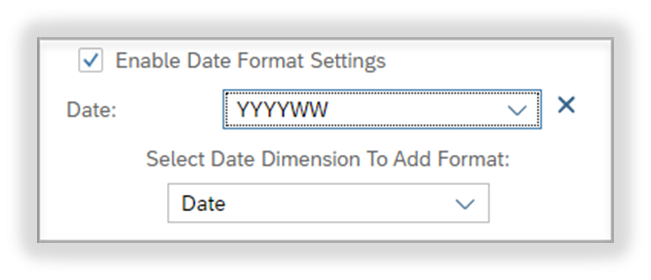
Figure 9: Custom Date Format Settings
7. Run the import data job.
Save the story and switch to Optimized View Mode.
The Upload Data button should contain a blue arrow to indicate that the widget is enabled.

Figure 10: Upload Data Widget Appearance in Story Optimized View Mode
Click the Upload Data action button and select the Source file.
Choose the preferred Public or Private Version from the Target Version drop-down, where the data shall be uploaded to, or see the default Version name that has been pre-selected in Default Values of the File Upload Panel, along with the source file and worksheet name.
Any errors found in the worksheet are displayed in the Upload Data dialog.

Figure 11: Upload Data Dialog Containing Sample Error Messages
In the above example, a different worksheet was selected, compared to what was previously mapped, resulting in errors.
Once errors are resolved with the source worksheet, choose Run to upload data to the specified version.

Figure 12: Upload Data Dialog Containing No Errors

Figure 13: Running Import Job
The File Upload widget provides an indication of a successful import of data.

Figure 14: Import Success Status
Select the information icon to view more details on the successful or failed import.
For failed records, a CSV file containing a rejection reason for each failed row of data, can be downloaded, and reviewed, to help resolve any errors found in the source file.

Figure 15: Download CSV Option for Failed Import Analysis
Troubleshooting Tips:
- Expand the Jobs Timeline and select "Copy Invalid Rows URL". Paste into a new browser page to see failed record information.
- A commonly experienced error is "Temporary storage does not contain valid records [1011]". In order to help diagnose this error further, a useful method is to switch the importing option from 'Fact Data' to 'Private Fact Data'. Some additional error messages is generally provided using this option through a download file containing a list of failed records and a corresponding failure explanation for each row.
8. Review the results.
Following a successful import into a Public or Private Version, it should now be possible to see the same fact data from the source worksheet within SAP Analytics Cloud.
![]()
Figure 16: Empty Private Version

Figure 17: Private Version Containing Uploaded Data
It is now possible to analyse, compare and maintain this data within this Private Version as desired.
Conclusion
The File Upload Custom Widget solution provides an example of how a custom widget can be created and used to upload data into SAP Analytics Cloud. The sample code, found in the file-upload-widget GitHub folder, may be downloaded and customized further to meet specific customer needs. A standard solution within the product is planned. Follow the SAP Analytics Cloud Roadmap for details of when this solution will be made available in the product.
Useful Links
Check out our technical blog on how to further develop custom widgets File Upload Widget - How to develop custom widgets with the react framework
See SAP Analytics Cloud Custom Widget Developer Guide, to learn about how to extend Custom Widgets within SAP Analytics Cloud
See the Custom Widget Developer Guide section Learn about the restrictions in custom widgets
For more information on Version Management see Create, Publish, and Manage Versions of Planning Data within SAP Analytics Cloud Help.
See Enable Optimized Story Experience within SAP Analytics Cloud Help for guidelines on how to enable Optimized Design Experience for Stories.
Attributes of an Account Dimension within SAP Analytics Cloud Help provides information on Account Types in a model.
Object Type Permissions within SAP Analytics Cloud Help outlines the Maintain permission meaning.
Custom Widgets code can be found at Custom Widget Samples.
Find out more about our Data Import Service API.
SAP Analytics Cloud Roadmap
Find some more great content on SAP Analytics Cloud Custom Widget Framework below:
How to use Linked Analysis with Custom Widget
Announcing Custom Widgets Data Binding in SAP Analytics Cloud – Analytics Designer
Demystifying Custom Widgets for SAP Analytics Cloud
SAP Analytics Cloud – Widget Analysis
Unifying Story and Analytic Application with the New Optimized Story Experience in SAP Analytics Clo...
Bringing ChatGPT in SAP Analytics Cloud using Custom Widget
Leveraging ChatGPT to Create Custom Widgets for SAP Analytics Cloud
Quickly integrate SAP Analytics Cloud with other systems using custom widgets
If you have any questions, feel free to comment below or post a question to our SAP Analytics Cloud Questions & Answers forum.
Thanks for reading!
Labels:
109 Comments
- « Previous
-
- 1
- 2
- 3
- Next »
You must be a registered user to add a comment. If you've already registered, sign in. Otherwise, register and sign in.
Labels in this area
-
ABAP CDS Views - CDC (Change Data Capture)
2 -
AI
1 -
Analyze Workload Data
1 -
BTP
1 -
Business and IT Integration
2 -
Business application stu
1 -
Business Technology Platform
1 -
Business Trends
1,658 -
Business Trends
93 -
CAP
1 -
cf
1 -
Cloud Foundry
1 -
Confluent
1 -
Customer COE Basics and Fundamentals
1 -
Customer COE Latest and Greatest
3 -
Customer Data Browser app
1 -
Data Analysis Tool
1 -
data migration
1 -
data transfer
1 -
Datasphere
2 -
Event Information
1,400 -
Event Information
67 -
Expert
1 -
Expert Insights
177 -
Expert Insights
301 -
General
1 -
Google cloud
1 -
Google Next'24
1 -
GraphQL
1 -
Kafka
1 -
Life at SAP
780 -
Life at SAP
13 -
Migrate your Data App
1 -
MTA
1 -
Network Performance Analysis
1 -
NodeJS
1 -
PDF
1 -
POC
1 -
Product Updates
4,577 -
Product Updates
346 -
Replication Flow
1 -
REST API
1 -
RisewithSAP
1 -
SAP BTP
1 -
SAP BTP Cloud Foundry
1 -
SAP Cloud ALM
1 -
SAP Cloud Application Programming Model
1 -
SAP Datasphere
2 -
SAP S4HANA Cloud
1 -
SAP S4HANA Migration Cockpit
1 -
Technology Updates
6,873 -
Technology Updates
429 -
Workload Fluctuations
1
Related Content
- SAP BW/4 - revamp and true to the line 2024 in Technology Blogs by Members
- Creating a Custom Navigation Side Panel in SAP Analytics Cloud (Optimized Story Experience) in Technology Blogs by SAP
- SAP Fiori for SAP S/4HANA - Empowering Your Homepage: Enabling My Home for SAP S/4HANA 2023 FPS01 in Technology Blogs by SAP
- 入門!SAP Analytics Cloud for planning 機能紹介シリーズ - 通貨換算 in Technology Blogs by SAP
- SAP Analytics Cloud for planning - Set Advanced Filters on Date and Version in Technology Q&A
Top kudoed authors
| User | Count |
|---|---|
| 34 | |
| 17 | |
| 15 | |
| 14 | |
| 11 | |
| 9 | |
| 8 | |
| 8 | |
| 8 | |
| 7 |