
- SAP Community
- Products and Technology
- Technology
- Technology Blogs by SAP
- How to move a clustered SAP system into another do...
Technology Blogs by SAP
Learn how to extend and personalize SAP applications. Follow the SAP technology blog for insights into SAP BTP, ABAP, SAP Analytics Cloud, SAP HANA, and more.
Turn on suggestions
Auto-suggest helps you quickly narrow down your search results by suggesting possible matches as you type.
Showing results for
Advisor
Options
- Subscribe to RSS Feed
- Mark as New
- Mark as Read
- Bookmark
- Subscribe
- Printer Friendly Page
- Report Inappropriate Content
07-22-2022
9:06 AM
This blog describes the steps how to move a clustered SAP (A)SCS instance from one Windows domain (= Active Directory) to another.
The procedure to recreate the Failover cluster and the SAP related resources, can be also used in disaster/emergency situations, for example, if both cluster nodes are lost. In such situations create a new cluster, restore the file systems from backup and recreate the SAP related resources.
There are several ways to migrate Failover cluster roles (cluster groups).
Official documentation from Microsoft can be found here: https://docs.microsoft.com/en-us/windows-server/failover-clustering/cluster-domain-migration
This blog shows the fastest solution.
We have a Failover cluster with a SAP cluster group:
The cluster consists of two cluster nodes which should be reused in the new Windows domain.
The old domain name is: abc.domain.corp
The new domain name should be: new.domain.corp
In this example we have a file-share cluster configuration, not a shared-disk cluster. Make a screenshot of the SAP service and the instance cluster resource properties. If you have changed the default values, for example parameters like "AcceptableYellowTime", then these values must be set when recreating the resources.
Two screenshots of above SAP CIA 00 Service (SAP SID = CIA, instance number = 00) resource and the instance resource:
Stop SAP System with all instances. Stop all related SAP services. Stop the SAP cluster group.
Delete the SAP cluster group (cluster role):
If you remove the cluster group, the related AD object for the (A)SCS network name resource will not be automatically removed in the Windows domain, as you will be informed in the next dialog. Remove the AD objects manually afterwards.
If the cluster is empty, you can destroy it.
Use Failover Cluster Manager to destroy the cluster.
At this point, the Windows hosts are no longer part of a cluster. The Windows cluster service has been changed to "disabled" and is no longer running.
Note:
If you destroy a cluster, the related computer accout AD object (for the cluster name) will not be automatically deleted in AD. Remove the AD object manually afterwards.
This is the bullet-proof method to join the both cluster nodes (which are no cluster nodes anymore, at this point in time) to the new Windows domain:
1. Create three objects in the new domain:
Domain user: SAPService<SID>
Domain user: <SID>adm
Domain group: SAP_<SID>_GlobalAdmin
(add both domain users to this domain group)
2. Local groups:
Add domain group "SAP_<SID>_GlobalAdmin" to the local user group "SAP_<SID>_LocalAdmin" on both cluster nodes:
Add domain group "SAP_<SID>_GlobalAdmin" to the local user group "SAP_LocalAdmin":
3. File system permissions:
The old AD SIDs are shown as SID leftovers. You can safely remove them:
Add domain group "SAP_<SID>_GlobalAdmin" to the ACLs of SAPLOC share and SAPMNT share and give full permissions:
Warning!
Keep an eye on <sapglobalhost>\sapmnt\<SID>\sys\global\security folder! This special folder does not inherit the permissions from the upper folder (\global). Make sure that the current domain\SAP_<SID>_GlobalAdmin group has full control permissions! Remove old AD SID leftovers.
4. Service credentials:
Change the service credentials (<new domain>\SAPService<SID> user):
You have to repeat the steps 2 - 4 on all cluster nodes, application servers, standalone gateways and Web Dispatcher hosts.
Use PowerShell or Failover Cluster Manager tool to create a new cluster. The cluster name can be different than the old one, depending on your naming convention for clusters. You can keep the old name, but it's not mandatory. The cluster name is not used by any SAP applications.
Don't forget to configure a quorum witness!
Download latest ntclust.sar package (see SAP note 1596496). Extract the content to a directory, for example c:\temp.
Run the installer application "insaprct.exe -install -yes" on one cluster node, like in this example:
If you have already an open Failover Cluster Manager running, close it and reopen it again.
Add the permissions for <domain>\SAP_<SID>_GlobalAdmin group in the cluster permissions:
Remove the AD SID leftovers in above example and add the new one with full control permissions:
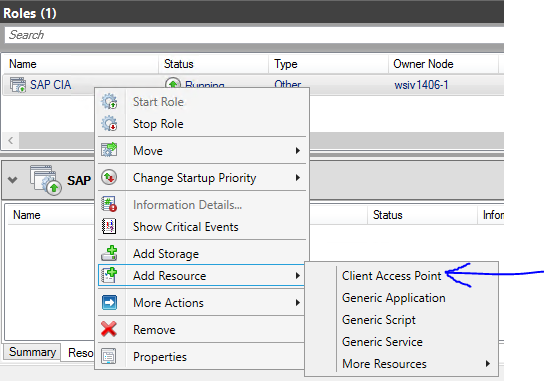
In the new cluster we create an empty cluster group and rename it to "SAP <SID>":
Then we create the cluster resource "Client Access Point" (network name and IP address resources):
And bring the cluster group online:
If you use a shared disk for sapmnt share, then you have to create the FileServer cluster resource with sapmnt share.
If you use a file-share cluster, then you can continue with the step "Create the SAP Service resource".
The next two screenshots explain a cluster configuration with a shared disk:
The cluster resource "SAP <SID> FileServer" depends on the network name.
You can now create the file share "sapmnt":
Change the security settings (access permissions) of the share and add these groups/users:
and more, depending on the number of cluster nodes you use.
Here is an example:
Change the name to "SAP <SID> <instance number> Service", like in this example. Replace <SID> and <instance number> with the appropriate values for your installation.
Navigate to "Dependencies" tab.
Add the dependency for the network name. If you have a shared-disk cluster, add the dependency to the fileserver cluster resource here.
Navigate to Policies tab, change "Maximum restarts in the specified period:" to 0. Do not use the default value of 1.
Navigate to Advanced Policies tab, enable the checkbox "Run this resource in a separate Resource Monitor".
Navigate to Properties tab, enter the correct Windows service name here (SAP<SID>_<instance number>). If you have changed other parameters in your old system (take a look on the screenshots you made ...), then change them accordingly.
Press Ok and bring online the new cluster resource:
Change the name to "SAP <SID> <instance number> Instance".
Navigate to Dependencies tab, add the dependency to the SAP service.
Navigate to Policies tab, change "Maximum restarts in the specified period:" to 0. Do not use the default value of 1.
Navigate to Advanced Policies tab, enable the checkbox "Run this resource in a separate Resource Monitor".
Navigate to Properties tab, enter the SAP SID here (Property "SAPSystemName"). If you have changed other parameters in your old system (take a look at the screenshots you made ...), then change them accordingly.
Note:
SAPSystem means the instance number of the ASCS instance.
Press OK and bring the resource online:
The (A)SCS instance is running again, see SAP MMC which will show this for proof:
The procedure to recreate the Failover cluster and the SAP related resources, can be also used in disaster/emergency situations, for example, if both cluster nodes are lost. In such situations create a new cluster, restore the file systems from backup and recreate the SAP related resources.
There are several ways to migrate Failover cluster roles (cluster groups).
Official documentation from Microsoft can be found here: https://docs.microsoft.com/en-us/windows-server/failover-clustering/cluster-domain-migration
This blog shows the fastest solution.
Prerequisites
We have a Failover cluster with a SAP cluster group:

The cluster consists of two cluster nodes which should be reused in the new Windows domain.
The old domain name is: abc.domain.corp
The new domain name should be: new.domain.corp
In this example we have a file-share cluster configuration, not a shared-disk cluster. Make a screenshot of the SAP service and the instance cluster resource properties. If you have changed the default values, for example parameters like "AcceptableYellowTime", then these values must be set when recreating the resources.
Two screenshots of above SAP CIA 00 Service (SAP SID = CIA, instance number = 00) resource and the instance resource:


Destroy the cluster
Stop SAP System with all instances. Stop all related SAP services. Stop the SAP cluster group.
Delete the SAP cluster group (cluster role):

If you remove the cluster group, the related AD object for the (A)SCS network name resource will not be automatically removed in the Windows domain, as you will be informed in the next dialog. Remove the AD objects manually afterwards.

If the cluster is empty, you can destroy it.
Use Failover Cluster Manager to destroy the cluster.

At this point, the Windows hosts are no longer part of a cluster. The Windows cluster service has been changed to "disabled" and is no longer running.
Note:
If you destroy a cluster, the related computer accout AD object (for the cluster name) will not be automatically deleted in AD. Remove the AD object manually afterwards.
Move Windows hosts to new Windows Domain
This is the bullet-proof method to join the both cluster nodes (which are no cluster nodes anymore, at this point in time) to the new Windows domain:
- Leave the current domain and enter a "workgroup" temporary.

Reboot Windows. - Logon with build in administrator account (or any other local account which has admin rights).
- Join the host to the new Windows domain. Provide credentials of a domain user, who has the
permission to join the host. - Reboot Windows.
- Logon with a domain user of the new domain.
Apply changes with new domain credentials
1. Create three objects in the new domain:
Domain user: SAPService<SID>
Domain user: <SID>adm
Domain group: SAP_<SID>_GlobalAdmin
(add both domain users to this domain group)
2. Local groups:
Add domain group "SAP_<SID>_GlobalAdmin" to the local user group "SAP_<SID>_LocalAdmin" on both cluster nodes:

Add domain group "SAP_<SID>_GlobalAdmin" to the local user group "SAP_LocalAdmin":

3. File system permissions:
The old AD SIDs are shown as SID leftovers. You can safely remove them:

Add domain group "SAP_<SID>_GlobalAdmin" to the ACLs of SAPLOC share and SAPMNT share and give full permissions:

Warning!
Keep an eye on <sapglobalhost>\sapmnt\<SID>\sys\global\security folder! This special folder does not inherit the permissions from the upper folder (\global). Make sure that the current domain\SAP_<SID>_GlobalAdmin group has full control permissions! Remove old AD SID leftovers.

4. Service credentials:
Change the service credentials (<new domain>\SAPService<SID> user):

You have to repeat the steps 2 - 4 on all cluster nodes, application servers, standalone gateways and Web Dispatcher hosts.
Recreate the cluster
Use PowerShell or Failover Cluster Manager tool to create a new cluster. The cluster name can be different than the old one, depending on your naming convention for clusters. You can keep the old name, but it's not mandatory. The cluster name is not used by any SAP applications.
Don't forget to configure a quorum witness!
Download latest ntclust.sar package (see SAP note 1596496). Extract the content to a directory, for example c:\temp.
Run the installer application "insaprct.exe -install -yes" on one cluster node, like in this example:

If you have already an open Failover Cluster Manager running, close it and reopen it again.
Add the permissions for <domain>\SAP_<SID>_GlobalAdmin group in the cluster permissions:

Remove the AD SID leftovers in above example and add the new one with full control permissions:

Create the new SAP cluster role (= cluster group)
In the new cluster we create an empty cluster group and rename it to "SAP <SID>":
![]()
Then we create the cluster resource "Client Access Point" (network name and IP address resources):
And bring the cluster group online:

If you use a shared disk for sapmnt share, then you have to create the FileServer cluster resource with sapmnt share.
If you use a file-share cluster, then you can continue with the step "Create the SAP Service resource".
The next two screenshots explain a cluster configuration with a shared disk:

The cluster resource "SAP <SID> FileServer" depends on the network name.
You can now create the file share "sapmnt":

Change the security settings (access permissions) of the share and add these groups/users:
- domain group: <domain>\SAP_<SID>_GlobalAdmin
- local group: SAP_SAP_GlobalAdmin
- local group: SAP_LocalAdmin
- and the two cluster node domain accounts (AD computer accounts):
- <windows_clusternode1_hostname>$
- <windows_clusternode2_hostname>$
and more, depending on the number of cluster nodes you use.
Here is an example:

Create the SAP Service resource:

Configure the SAP Service resource
Change the name to "SAP <SID> <instance number> Service", like in this example. Replace <SID> and <instance number> with the appropriate values for your installation.

Navigate to "Dependencies" tab.
Add the dependency for the network name. If you have a shared-disk cluster, add the dependency to the fileserver cluster resource here.

Navigate to Policies tab, change "Maximum restarts in the specified period:" to 0. Do not use the default value of 1.

Navigate to Advanced Policies tab, enable the checkbox "Run this resource in a separate Resource Monitor".

Navigate to Properties tab, enter the correct Windows service name here (SAP<SID>_<instance number>). If you have changed other parameters in your old system (take a look on the screenshots you made ...), then change them accordingly.

Press Ok and bring online the new cluster resource:

Create the SAP (instance) resource:
Change the name to "SAP <SID> <instance number> Instance".

Navigate to Dependencies tab, add the dependency to the SAP service.

Navigate to Policies tab, change "Maximum restarts in the specified period:" to 0. Do not use the default value of 1.

Navigate to Advanced Policies tab, enable the checkbox "Run this resource in a separate Resource Monitor".

Navigate to Properties tab, enter the SAP SID here (Property "SAPSystemName"). If you have changed other parameters in your old system (take a look at the screenshots you made ...), then change them accordingly.
Note:
SAPSystem means the instance number of the ASCS instance.

Press OK and bring the resource online:

Congratulations!
The (A)SCS instance is running again, see SAP MMC which will show this for proof:

- SAP Managed Tags:
- Windows Server
Labels:
2 Comments
You must be a registered user to add a comment. If you've already registered, sign in. Otherwise, register and sign in.
Labels in this area
-
ABAP CDS Views - CDC (Change Data Capture)
2 -
AI
1 -
Analyze Workload Data
1 -
BTP
1 -
Business and IT Integration
2 -
Business application stu
1 -
Business Technology Platform
1 -
Business Trends
1,658 -
Business Trends
95 -
CAP
1 -
cf
1 -
Cloud Foundry
1 -
Confluent
1 -
Customer COE Basics and Fundamentals
1 -
Customer COE Latest and Greatest
3 -
Customer Data Browser app
1 -
Data Analysis Tool
1 -
data migration
1 -
data transfer
1 -
Datasphere
2 -
Event Information
1,400 -
Event Information
68 -
Expert
1 -
Expert Insights
177 -
Expert Insights
311 -
General
1 -
Google cloud
1 -
Google Next'24
1 -
GraphQL
1 -
Kafka
1 -
Life at SAP
780 -
Life at SAP
13 -
Migrate your Data App
1 -
MTA
1 -
Network Performance Analysis
1 -
NodeJS
1 -
PDF
1 -
POC
1 -
Product Updates
4,576 -
Product Updates
355 -
Replication Flow
1 -
REST API
1 -
RisewithSAP
1 -
SAP BTP
1 -
SAP BTP Cloud Foundry
1 -
SAP Cloud ALM
1 -
SAP Cloud Application Programming Model
1 -
SAP Datasphere
2 -
SAP S4HANA Cloud
1 -
SAP S4HANA Migration Cockpit
1 -
Technology Updates
6,873 -
Technology Updates
444 -
Workload Fluctuations
1
Related Content
- IPS conditional mapping of personal vs. business email from SF User to IAS User email in Technology Q&A
- Cannot find logon data from successfactors on sac in Technology Q&A
- Certificate file content disappeared from the ICM trace level 3 in ABAP 7.58 in Technology Q&A
- How to embed SWZ portal into an iFrame? in Technology Blogs by SAP
- Consuming SAP with SAP Build Apps - Mobile Apps for iOS and Android in Technology Blogs by SAP
Top kudoed authors
| User | Count |
|---|---|
| 17 | |
| 17 | |
| 12 | |
| 11 | |
| 9 | |
| 9 | |
| 8 | |
| 8 | |
| 7 | |
| 7 |