
- SAP Community
- Products and Technology
- Technology
- Technology Blogs by SAP
- Free SAP HANA Cloud Trial – How to set it up / reg...
Technology Blogs by SAP
Learn how to extend and personalize SAP applications. Follow the SAP technology blog for insights into SAP BTP, ABAP, SAP Analytics Cloud, SAP HANA, and more.
Turn on suggestions
Auto-suggest helps you quickly narrow down your search results by suggesting possible matches as you type.
Showing results for
former_member36
Participant
Options
- Subscribe to RSS Feed
- Mark as New
- Mark as Read
- Bookmark
- Subscribe
- Printer Friendly Page
- Report Inappropriate Content
12-02-2020
5:30 PM
In this tutorial, you will learn how to set up a SAP HANA Cloud database. The free trial allows you to test SAP HANA Cloud for 30 days. You can renew the trial period every month until you reach 360 days.
SAP HANA Cloud is a service available in the SAP Bussiness Technology Platform (BTP) and is based on SAP HANA. This means that you get to use all the capabilities HANA offers, combined with the flexibility and other advantages of a cloud product.
We will cover the following 6 steps in this tutorial:
Register using the link provided and confirm your e-mail address. Remember the password and e-mail you used for registration. You will use it to access your SAP Business Technology Platform account where your SAP HANA Cloud will be based.
After you successfully registered for your SAP Business Technology Platform Account, you will be asked to choose the closest region. This will trigger the creation of your SAP Business Technology Platform account structure, which will automatically be generated in the background. After about 2-3 minutes, everything has been created, and you can now select the “Confirm” button.
Congratulations! You successfully registered for an SAP Business Technology Platform, which is the basis for using HANA Cloud.
If you click on “Enter Your Trial Account” on the main page, you can enter your freshly created SAP Business Technology Platform. Here we will create and manage our HANA Cloud.
You have already successfully set up your SAP Business Technology Platform account, and you are currently logged in and entered your trial account.
The screen you see should look like this:
What you see is the SAP Business Technology Platform (BTP). This is the area in which you can organize and manage every service the SCP is providing.
On the left side (red), you see different options that change, depending on which subaccount and space you are currently in.
You see a navigation bar (green) at the top, which works like a tree table. It shows you which subaccount/space you are currently in. In our case, we are currently on a global account level. The “Trial Home” will navigate you back to the start screen with the tutorials.
Navigate to the dedicated space for your SAP HANA Cloud
We will navigate to the already created subaccount called “trial” to open up the “dev”-space, in which we will create our SAP HANA Cloud instance. To do so, simply click on the square tile called trial (blue).
You are now in your subaccount. As you can see, the options on the left changed, and the navigation bar on top updated itself. You get some basic information about the spaces within the subaccount and the active environments and entitlements on the trial-subaccount overview page.
Select the “dev” space to go even deeper into the structure. The smallest possible granularity within the BTP is a space. This is where we will create the services, in our case, SAP HANA Cloud.
Create the SAP HANA Cloud instance
To create an SAP HANA Cloud instance, select the SAP HANA Cloud option on the right. This will open a blank canvas in which you see all your HC instances. So far, it's empty. To create an instance, click on “Create Database” on the top right.
Follow along with the setup; most of it is self-explanatory. One thing to keep in mind is choosing the DBADMIN password carefully since you will need this user in the future. Choose a password you will remember/note down. If you entered all the necessary information, the second step will be clickable.
Here you can configure the size of your SAP HANA Cloud. Since we are using a trial version, we can’t change anything here. Normally, you would be able to change your SAP HANA Cloud size, depending on your use case.
The third step is optional but important. Here you define the type of connections you want to allow. In our scenario, it is easiest to simply click on “Allow all IP addresses”, so no problems will occur in the future.
In the last step, you will be able to create a data lake, this is optional and can also be done afterward. In our case, we create the data lake by clicking the toggle switch and naming it.
Click on “Create Instance” to create your SAP HANA Cloud instance and data lake. This process takes around 10 minutes. You can see the creation's status in the “Monitor Landscape” dashboard, which opened up automatically after you clicked on “Create Instance”.
When you switch to your subaccount space view, you will see your SAP HANA Cloud instance.
You did it! You set up your first HANA Cloud instance! Let's get ready to use it 🙂
SAP HANA Cloud comes with a set of tools, which will allow you to monitor, administer and work with it. To open one of the provided tools, click on "Actions".
Copy SQL Endpoint / Instance ID
These two options allow you to copy the SQL Endpoint of your SAP HANA Cloud. You can use it to execute SQL on database objects in your HANA Cloud from different applications or IDEs.
Monitor landscape with SAP HANA Cloud Central
The monitor landscape screen displays the status of all your SAP HANA Cloud and data lake instances. You can change the status here and start, stop or delete an instance. An existing instance can also be edited to subsequently increase the memory or change the type of connection. The copy function provides all information to connect to an instance, like SQL Endpoint and Instance ID.
From here you also have the possibility to call the SAP HANA Cockpit and the Database Explorer. You don't have to start from the overview page to open the different tools.
Administer – SAP HANA Cockpit
SAP HANA Cockpit is a web-based tool for the administration of your SAP HANA Cloud. Everything in here, from database users, role management, and storage capacities up to SQL queries' performance, can be analyzed here.
The SAP HANA Cockpit also links directly to the Database Explorer.
Execute – Database Explorer
The Database Explorer is another web application, which allows you to execute SQL statements and view database objects.
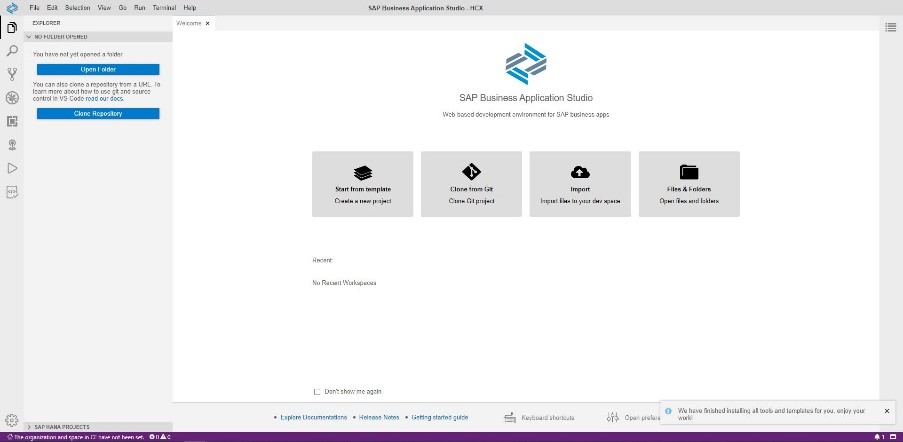
To finally start working with SAP HANA Cloud and build your own projects, you will need to set up an IDE. The choice is yours, you can either use SAP WEB IDE or SAP Business Application Studio (BAS). The recommended IDE for SAP HANA Cloud is Business Application Studio.
For now, we will set up Business Application Studio. This will be the IDE we will use in the following tutorials around SAP HANA Cloud.
To add a service to your subaccount, you will need to subscribe to it. Subscriptions are handled on the subaccount levels. This means that you will need to use the navigation bar on top, to move out of the “dev” space. When you are on the subaccount level, you will be able to add a service.
Click on “Subscriptions” on the left and search for SAP Business Application Studio. Click on the tile to be able to subscribe to it. After you successfully subscribed to the service, you will be able to click “Go to Application” to open the Business Application Studio.
If you use bookmarks, now is a good time to set one.
To work with your SAP HANA Cloud in Business Application Studio, you will need to set your Cloud Foundry Space. Open up BAS and create a new development space. Give your Dev Space a name, and make sure to select SAP HANA Native Application and click on create.
Your Dev Space is being created right now. It roughly takes 3 minutes until it switches from STARTING to RUNNING and the space name becomes clickable.
To set your Cloud Foundry Space, click on the bottom left part of BAS and click on the text in the purple area "The organization and space in CF have not been set".
A text box at the top opens in which you need to confirm your Cloud Foundry Endpoint by pressing enter. After that, you will need to enter your user credentials and select your HANA Cloud subaccount.
You set your Cloud Foundry Space successfully, as indicated in the lower-left area (Targeting CF YourSubbaccount/YourDevSpaceinCF).
You are all set; now it is time to create your first project!
To be able to use our SAP HANA Cloud, we will need to add our database. If it is your first time starting the SAP Web IDE, you will be notified that you have not added any systems yet. It will automatically open the Add Database – window in which you can enter all the details. In case you accidentally closed the message or already have worked with the IDE before, simply click on the + next to the refresh symbol to open the dialog again.
It is time to add your database!
To find your SAP HANA Cloud database's details, open the monitor landscape screen in a different tab. Click on the instance you want to know the details of. In the section Copy > SQL Endpoint, you can get the host address with port. Copy it into the field and delete the port behind it.
Provided the details of the database user you want to use. Since we haven’t created any users yet, we will simply use the DBADMIN and the password we defined when we created the instance.
You can change the name of your database. This makes sense if you are using multiple databases or different users on the same database.
Click on OK to add your database to the SAP Web IDE.
You are all set!
SAP HANA Cloud is a service available in the SAP Bussiness Technology Platform (BTP) and is based on SAP HANA. This means that you get to use all the capabilities HANA offers, combined with the flexibility and other advantages of a cloud product.
We will cover the following 6 steps in this tutorial:
- Register for the free SAP HANA Cloud trial
- Set up your SAP HANA Cloud instance
- How to open the SAP HANA Cockpit and Database Explorer
- Set up Business Application Studio (BAS)
- Connect to HANA Cloud via Business Application Studio
- (Optional) Add a database to SAP Web IDE
1. Register for the free SAP HANA Cloud trial
Click here to register for the free trial
Register using the link provided and confirm your e-mail address. Remember the password and e-mail you used for registration. You will use it to access your SAP Business Technology Platform account where your SAP HANA Cloud will be based.
After you successfully registered for your SAP Business Technology Platform Account, you will be asked to choose the closest region. This will trigger the creation of your SAP Business Technology Platform account structure, which will automatically be generated in the background. After about 2-3 minutes, everything has been created, and you can now select the “Confirm” button.
Congratulations! You successfully registered for an SAP Business Technology Platform, which is the basis for using HANA Cloud.
If you click on “Enter Your Trial Account” on the main page, you can enter your freshly created SAP Business Technology Platform. Here we will create and manage our HANA Cloud.
2. Set up your SAP HANA Cloud Instance
You have already successfully set up your SAP Business Technology Platform account, and you are currently logged in and entered your trial account.
The screen you see should look like this:

SAP BTP Cockpit
What you see is the SAP Business Technology Platform (BTP). This is the area in which you can organize and manage every service the SCP is providing.
On the left side (red), you see different options that change, depending on which subaccount and space you are currently in.
You see a navigation bar (green) at the top, which works like a tree table. It shows you which subaccount/space you are currently in. In our case, we are currently on a global account level. The “Trial Home” will navigate you back to the start screen with the tutorials.
Navigate to the dedicated space for your SAP HANA Cloud
We will navigate to the already created subaccount called “trial” to open up the “dev”-space, in which we will create our SAP HANA Cloud instance. To do so, simply click on the square tile called trial (blue).
You are now in your subaccount. As you can see, the options on the left changed, and the navigation bar on top updated itself. You get some basic information about the spaces within the subaccount and the active environments and entitlements on the trial-subaccount overview page.
Select the “dev” space to go even deeper into the structure. The smallest possible granularity within the BTP is a space. This is where we will create the services, in our case, SAP HANA Cloud.
Create the SAP HANA Cloud instance
To create an SAP HANA Cloud instance, select the SAP HANA Cloud option on the right. This will open a blank canvas in which you see all your HC instances. So far, it's empty. To create an instance, click on “Create Database” on the top right.

SAP HANA Cloud - Create Instance
Follow along with the setup; most of it is self-explanatory. One thing to keep in mind is choosing the DBADMIN password carefully since you will need this user in the future. Choose a password you will remember/note down. If you entered all the necessary information, the second step will be clickable.
Here you can configure the size of your SAP HANA Cloud. Since we are using a trial version, we can’t change anything here. Normally, you would be able to change your SAP HANA Cloud size, depending on your use case.
The third step is optional but important. Here you define the type of connections you want to allow. In our scenario, it is easiest to simply click on “Allow all IP addresses”, so no problems will occur in the future.
In the last step, you will be able to create a data lake, this is optional and can also be done afterward. In our case, we create the data lake by clicking the toggle switch and naming it.
Click on “Create Instance” to create your SAP HANA Cloud instance and data lake. This process takes around 10 minutes. You can see the creation's status in the “Monitor Landscape” dashboard, which opened up automatically after you clicked on “Create Instance”.
When you switch to your subaccount space view, you will see your SAP HANA Cloud instance.
You did it! You set up your first HANA Cloud instance! Let's get ready to use it 🙂
3. How to open the Monitor Landscape, SAP HANA Cockpit, and Database Explorer
SAP HANA Cloud comes with a set of tools, which will allow you to monitor, administer and work with it. To open one of the provided tools, click on "Actions".
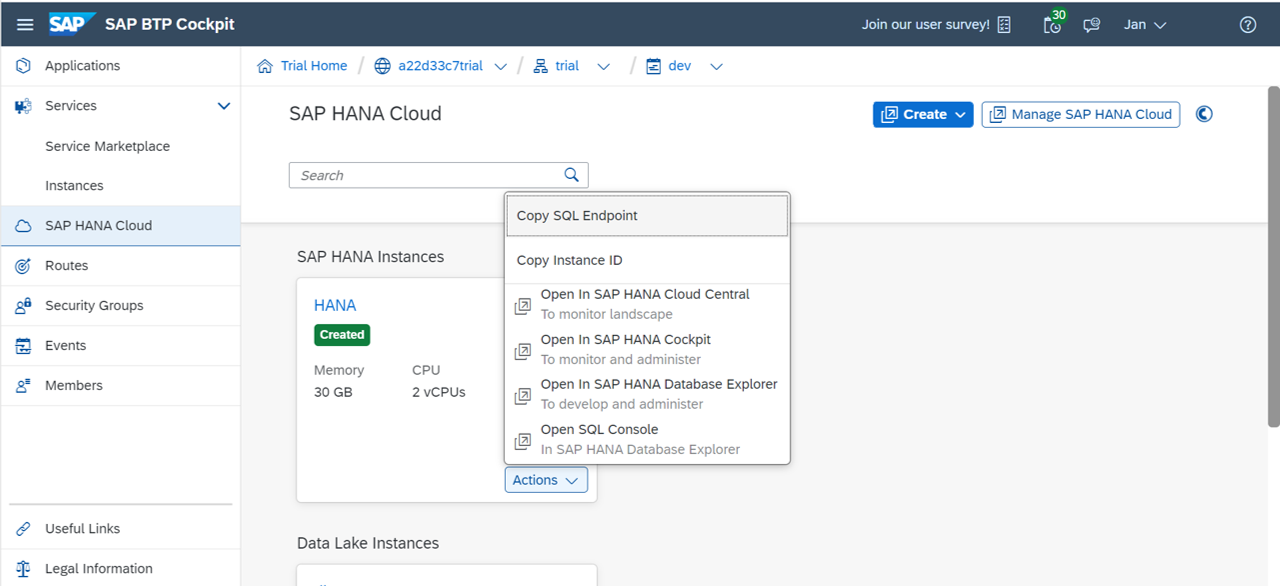
HANA Cloud Actions
Copy SQL Endpoint / Instance ID
These two options allow you to copy the SQL Endpoint of your SAP HANA Cloud. You can use it to execute SQL on database objects in your HANA Cloud from different applications or IDEs.
Monitor landscape with SAP HANA Cloud Central
The monitor landscape screen displays the status of all your SAP HANA Cloud and data lake instances. You can change the status here and start, stop or delete an instance. An existing instance can also be edited to subsequently increase the memory or change the type of connection. The copy function provides all information to connect to an instance, like SQL Endpoint and Instance ID.
From here you also have the possibility to call the SAP HANA Cockpit and the Database Explorer. You don't have to start from the overview page to open the different tools.
Administer – SAP HANA Cockpit
SAP HANA Cockpit is a web-based tool for the administration of your SAP HANA Cloud. Everything in here, from database users, role management, and storage capacities up to SQL queries' performance, can be analyzed here.
The SAP HANA Cockpit also links directly to the Database Explorer.
Execute – Database Explorer
The Database Explorer is another web application, which allows you to execute SQL statements and view database objects.
4. Set up Business Application Studio (BAS)
To finally start working with SAP HANA Cloud and build your own projects, you will need to set up an IDE. The choice is yours, you can either use SAP WEB IDE or SAP Business Application Studio (BAS). The recommended IDE for SAP HANA Cloud is Business Application Studio.
For now, we will set up Business Application Studio. This will be the IDE we will use in the following tutorials around SAP HANA Cloud.

Add SAP Business Application Studio Service
To add a service to your subaccount, you will need to subscribe to it. Subscriptions are handled on the subaccount levels. This means that you will need to use the navigation bar on top, to move out of the “dev” space. When you are on the subaccount level, you will be able to add a service.
Click on “Subscriptions” on the left and search for SAP Business Application Studio. Click on the tile to be able to subscribe to it. After you successfully subscribed to the service, you will be able to click “Go to Application” to open the Business Application Studio.
If you use bookmarks, now is a good time to set one.
5. Connect to HANA Cloud via Business Application Studio
To work with your SAP HANA Cloud in Business Application Studio, you will need to set your Cloud Foundry Space. Open up BAS and create a new development space. Give your Dev Space a name, and make sure to select SAP HANA Native Application and click on create.

Create a dev space in BAS
Your Dev Space is being created right now. It roughly takes 3 minutes until it switches from STARTING to RUNNING and the space name becomes clickable.
Set your Cloud Foundry Space in BAS
To set your Cloud Foundry Space, click on the bottom left part of BAS and click on the text in the purple area "The organization and space in CF have not been set".
A text box at the top opens in which you need to confirm your Cloud Foundry Endpoint by pressing enter. After that, you will need to enter your user credentials and select your HANA Cloud subaccount.
You set your Cloud Foundry Space successfully, as indicated in the lower-left area (Targeting CF YourSubbaccount/YourDevSpaceinCF).
You are all set; now it is time to create your first project!
6. (Optional) Add HANA Cloud to SAP Web IDE
To be able to use our SAP HANA Cloud, we will need to add our database. If it is your first time starting the SAP Web IDE, you will be notified that you have not added any systems yet. It will automatically open the Add Database – window in which you can enter all the details. In case you accidentally closed the message or already have worked with the IDE before, simply click on the + next to the refresh symbol to open the dialog again.
It is time to add your database!

Add your database to SAP Web IDE
To find your SAP HANA Cloud database's details, open the monitor landscape screen in a different tab. Click on the instance you want to know the details of. In the section Copy > SQL Endpoint, you can get the host address with port. Copy it into the field and delete the port behind it.
Provided the details of the database user you want to use. Since we haven’t created any users yet, we will simply use the DBADMIN and the password we defined when we created the instance.
You can change the name of your database. This makes sense if you are using multiple databases or different users on the same database.
Click on OK to add your database to the SAP Web IDE.
You are all set!
- SAP Managed Tags:
- SAP Business Application Studio,
- SAP HANA Cloud,
- SAP Business Technology Platform
Labels:
21 Comments
You must be a registered user to add a comment. If you've already registered, sign in. Otherwise, register and sign in.
Labels in this area
-
ABAP CDS Views - CDC (Change Data Capture)
2 -
AI
1 -
Analyze Workload Data
1 -
BTP
1 -
Business and IT Integration
2 -
Business application stu
1 -
Business Technology Platform
1 -
Business Trends
1,658 -
Business Trends
110 -
CAP
1 -
cf
1 -
Cloud Foundry
1 -
Confluent
1 -
Customer COE Basics and Fundamentals
1 -
Customer COE Latest and Greatest
3 -
Customer Data Browser app
1 -
Data Analysis Tool
1 -
data migration
1 -
data transfer
1 -
Datasphere
2 -
Event Information
1,400 -
Event Information
74 -
Expert
1 -
Expert Insights
177 -
Expert Insights
348 -
General
1 -
Google cloud
1 -
Google Next'24
1 -
GraphQL
1 -
Kafka
1 -
Life at SAP
780 -
Life at SAP
14 -
Migrate your Data App
1 -
MTA
1 -
Network Performance Analysis
1 -
NodeJS
1 -
PDF
1 -
POC
1 -
Product Updates
4,575 -
Product Updates
391 -
Replication Flow
1 -
REST API
1 -
RisewithSAP
1 -
SAP BTP
1 -
SAP BTP Cloud Foundry
1 -
SAP Cloud ALM
1 -
SAP Cloud Application Programming Model
1 -
SAP Datasphere
2 -
SAP S4HANA Cloud
1 -
SAP S4HANA Migration Cockpit
1 -
Technology Updates
6,871 -
Technology Updates
482 -
Workload Fluctuations
1
Related Content
- Using Postgresql Database in Cloud Application Programming model in Technology Blogs by Members
- IoT: RFID integration with SAP HANA Cloud via SAP BTP in Technology Blogs by Members
- Setup Synthetic user Monitoring in SAP Cloud ALM with On-Prem Runner in Technology Blogs by Members
- First steps to work with SAP Cloud ALM Deployment scenario for SAP ABAP systems (7.40 or higher) in Technology Blogs by SAP
- Establishing Trust with Custom Identity Provider for Platform Users failed in Technology Q&A
Top kudoed authors
| User | Count |
|---|---|
| 15 | |
| 11 | |
| 10 | |
| 9 | |
| 8 | |
| 8 | |
| 7 | |
| 7 | |
| 7 | |
| 7 |