
- SAP Community
- Products and Technology
- Technology
- Technology Blogs by Members
- Timesheet Management with CAP & Trello ⏱️ - Build...
Technology Blogs by Members
Explore a vibrant mix of technical expertise, industry insights, and tech buzz in member blogs covering SAP products, technology, and events. Get in the mix!
Turn on suggestions
Auto-suggest helps you quickly narrow down your search results by suggesting possible matches as you type.
Showing results for
vvdries
Contributor
Options
- Subscribe to RSS Feed
- Mark as New
- Mark as Read
- Bookmark
- Subscribe
- Printer Friendly Page
- Report Inappropriate Content
08-09-2020
9:57 AM
Hello there!
This is goanna be the blog for the UI5ers among us!
Welcome back to the fourth hands-on blog of this “Timesheet Management with CAP & Trello ⏱️” blog series. In this blog “Build the Trello Timesheet HTML5 Module #4” we will create our Timesheet App inside an HTML5 Module in the MTA project.
If you missed some other blogs of this series, you can find them here:
The GitHub Repository is available here:
Inside our Multi Target Application (MTA) we created a Node.js, database (CDS), Service (OData V4) and HTML5 Module so far. But we did not develop our HTML5 App yet, we will develop it now and it will serve as our UI5 Timesheet Application. The HTML5 Module will request data from the “TrellAuthorizer” and “Service” (OData V4) Module via the Approuter.
In both blogs (Node.js TrelloAuthorizer & Database with Service) we added a route to the Approuter its “xs-app.json” file. This way the Approuter knows where to direct the request to.
The development of our UI5 Application will also take place inside our MTA project. This in the “TimesheetManager” directory, which holds a UI5 application.
Before we start the development of this UI5 App, make sure your “TrelloAuthorizer” and “OData V4 Service” are up and running. This because we will authorize ourselves against Trello to consume Trello information and to store “SpentHours” on Trello cards inside our database.
But first things first, let us have a look at the folder of your HTML5 Module.
Your HTML5 “TimesheetManager” directory looks like this at the moment:
Here we will add the following 4 directories inside the “webapp” directory:
Obviously the “images” folder will hold our images and such. Inside our “service” directory we will create services to perform requests to our “TrelloAuthorizer” Node.js service and the OData V4 service which exposes our database content. These services will be called from our states, we will have different states inside our “state” directory. Once those requests are finished, we will convert those responses to objects with getters and setters. Those classes that will allow us to create objects from the appropriate response are defined inside the “object” directory.
More information about such a setup can be found here in the “UI5 Advanced Programming Model” by my good friend c3d1947136cd4c748a7aa794001af496 !
In this Timesheet application we will perform our requests via HTTP and not via OData. Both are possible, but I chose the HTTP one because it will make the development a lot easier since we are working with OData V4 services and a basic REST API exposed by our “TrelloAuthorizer”.
Inside our “service” directory we create the “CoreService.js” file. This will be the core to send our HTTP requests.
This file holds the following code:
This “CoreService” allows us to perform a get, post, update and delete “XMLHttpRequest”. It will dynamically handle URL parameters and passed data objects. This is the base for all the services we will create from now on.
Now that our “CoreService” is setup, it is time to create our “TrelloService” that will inherit from the “CoreService”. Create the “TrelloService.js” file inside the “service” directory. This “TrelloService” holds the following code:
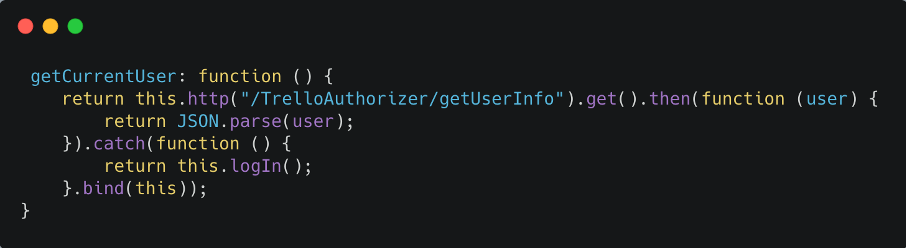
This “TrelloService” has a function “setModel” that could be used if we were working with OData requests. But since we are not, we do not pay attention to this function. Two important functions inside this “TrelloService” are the “login” and “getCurrentUser” function. You will see that the “getCurrentUser” is calling the “login” in the catch function.
Now why is this? When we start the application, we will try to request the user information via the “getCurrentUser” function. This function will call our “TrelloAuthorizer” its “getUserInfo” endpoint. The first time that we open our Timesheet app, we do not have the Trello OAuth access tokens cached in our “TrelloAuthorizer” Node.js application. This also applies when our tokens are expired, they will be removed from the cache and are no longer valid nor present. When we perform our “getCurrentUser” function during such a moment the service will return with “Unauthorized” like we implemented in our “TrelloAuthorizer”.
If the cache has the token, which also means it is still valid, it will return the user information. If this is not the case, it will return the “unauthorizedAgainstTrello” function.
In this case we return a status “401” with an “Unauthorized message”.
This will throw an error and we will arrive in our “.catch“ function, which means we have to login.
The “login” function, which looks like this:
It will call the “login” endpoint of our “TrelloAuthorizer” which will return the Trello OAuth screen. We can open this OAuth window with al lot of different parameters. The most known ones are “_blank” and “_self”. The “_blank” one will open the OAuth window in a new tab, which I personally do not like. The “_self” one will open it in the current window which brings the advantage of an easy return to our Timesheet app, after we approved usage of our Trello information in the OAuth window.
Like I mentioned earlier, we will not access our services directly but via our states. This means that our controllers will call our state and the state will call the service afterwards. Our “TrelloService” will be the service to request all our Trello information. Getting the logged in Trello user his user information will pass via this service. This via the “getCurrentUser” function. This function is called from the “UserState”.
Let us create this “UserState.js” file inside our “state” directory. This state holds the following code:
We import the “BaseObject”, “TrelloService” and “UserObject” inside our “define” function. Our “UserState” inherits from this “BaseObject” and in the “constructor” function we call the “BaseObject” so we can initialize it. Above our “constructor” we define our “oUser” variable which is default null. In the end our “UserState” is returned.
This also means we still have to create this “BaseObject” and “UserObject”. First, we create the “BaseObject.js” file inside our “object” directory. This “BaseObject.js” holds the following code:
It will initialize the object in the “constructor” and returns 3 main functions. The “getModel”, “updateModel” and “getData” function. This will allow us to get the model of our “UserState”, to update it and to request all the data of our “UserState”.
Since we want to make a “UserObject” out of our “getCurrentUser” function its response, we need to create a “UserObject.js” file inside our “object” directory.
This file will hold the following code:
We created a getter for the full name, which will obviously return the user his full name. When we initialize the “UserObject”, we convert the “avatarUrl” property, to build to correct path to the location of the user his Trello avatar. This correct path is the original path + “/50.png”. With this we created our required “BaseObject” and “UserObject”. Let us return to the “UserState”.
As you can see this “UserState” has a “getCurrentUser” and a “setCurrentUser” to get the current user from our state or to set it to our state.
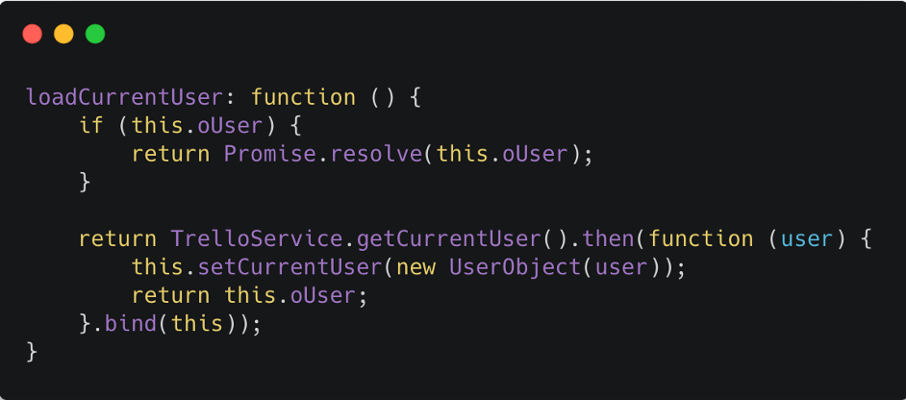
This “UserState” its last function is the “loadCurrentUser” function. With this function we will get the current logged in user via our “TrelloService”. Notice that we only get the user if we do not already have it in our state. In case we already have the user, we return a promise and resolve the user. Otherwise we call it via our “TrelloService” with the “getCurrentUser” function inside this “TrelloService”. When we retrieve the current user from the service, we create a “UserObject” out of it and we set it to our state with the “setCurrentUser” function of our state. Finally, we return this retrieved user.
Like I mentioned earlier, we will call our services via the states. The controllers and “Component.js” file will call these services via the appropriate state.
The first request we will perform is the “getCurrentuser” service function. Since we want to login our user and fetch his user information when he starts the app, we call this “loadCurrentUser” from our “UserState”in the “Component.js” file. Which will eventually call the “getCurrentuser” function of our “TrelloService”.
The code of your “Component.js” file looks like this:
As you can see we import our “UserState” in the “sap.ui.define” and we set the “UserState” as a model. Once it is set, we also call the “loadCurrentUser” function directly from our state. Eventually we also set the “SAP Fiori 3 Quartz Dark theme”, which is optionally. The “Dark Theme” needs a SAPUI5 minimum version of “1.72” that’s why I told you in the beginning to take at least the “1.72” version.
This function will call the service to retrieve the current user and his Trello information. If this succeed, it means the user is logged in, if not he needs to login and the catch function in our service will make us login via the Trello OAuth screen.
Now our user can be logged in via our service and his Trello user information can be retrieved, we will start to prepare our home screen. For this we will first structure our application its views.
At the moment our “Boards.view.xml” file looks like this:
Adjust this file so the code looks like this:
We removed the “Shell”, “App” and “pages” control from our “Boards.view.xml” file. This because we will create a root “App.view.xml” file which will hold all our other views. Next we added the “sap.f” library so we can use the “Avatar” control inside our “Toolbar” control. Inside the “content > Toolbar” we bound the user his full name and picture to the view. This via our “UserState” its “oUser” object.
The next thing we want to adjust is the “Boards.controller.js” file. We do not want to extend from the “Controller” lib/control, but from a “BaseController.js” file that we will create our self.
Create this “BaseController.js” file inside your “webapp” its “controller” directory.
Add the following code to the “BaseController.js” file:
This “BaseController.js” file will hold all the common functions we can reuse in our other controllers. At the end there is a fragment function available to easily call and open the fragments you will need later on in the application. This function shared by c3d1947136cd4c748a7aa794001af496.
More information about this fragment function can be found here:
https://blogs.sap.com/2017/03/09/ui5-fragments-and-dialogs/
Now that we have our “BaseController.js” file available we will make our “Boards.controller.js” file extend from this BaseController.js” file instead of the “Controller”.
Your “Boards.controller.js” file should look like this:
We changed the import and usage of the “Controller” to “BaseController”. This was possible because we changed the “sap.ui.define” function so it imports from the same directory the “BaseController”. All the controllers inside our app will always extend from the “BaseController.js” file.
Like I mentioned before we will create an “App.view.xml” file which will be the root view for all our other views. Create the file inside the “view” directory together with the appropriate “App.controller.js” file inside the “controller” directory.
In the “App.view.xml” file we add the following code:
In the “App.controller.js” file we add the following code:
As you can see, this will be the wrapper for our app because we will define it in the “manifest.json” file and because it does not contain any code.
There will be some small adjustments to make to our “manifest.json” file since we added the “App.view.xml“ file to our project and because we want to make it our root view.
Change the “rootView” object of the “sap.ui5” object inside your “manifest.json” file so it looks like this:
As you can see, we make the “App” our “viewName” and set the “id” to “App”.
The second change in the “manifest.json” file is in the “routes”. Change it so it points to the “Boards” and clear the pattern.
This means we will also have to adjust our target, so it targets the “Boards” and it looks like this:
With this we prepared all the necessary steps to structure our app, fetch the user information and handle Trello OAuth login screens.
This means it is time to run our application for the first time.
To run our UI5 application we will open the “”Run Configurations” from our left side menu and we press the “+-sign” to add a new configuration:
This will open a pop-up window in the command pallet where you select your HTML5 module from the list:
Next you select “No” because we do not want to run from our build folder. Quiet obvious since we would not have our just applied changes in that case:
Once we answered the previous question, we select the “index.html” file as runnable file:
We select the “latest” UI5 version (as long as you have a minimum of 1.72 you are good to use the “SAP Fiori 3 Quartz Dark theme”):
We finish by agreeing or providing a run-configuration name:
You will see that your run-configurations has been created. Select the UAA service below it and press the “bind” button to bind you UAA service to it:
This will open up the command pallet again where you can choose your UAA service. We select the “LOCAL” service:
Once the service is bound you will see the following success message:
You can also verify it in the run configuration itself via the connected icon on the left:
If you have a look at your “TimesheetManager” HTML5 Module directory, you will see that a “.env1” file was created to hold you UAA configuration.
Now you are ready to run your application. Select your run configuration and press the “run” button:
This will ask you for an optional description for the app to run. Let’s call it “TimesheetmanagerApp”:
Once started the Business Application Studio will ask us again to expose and Open the service/app. We press the “Expose and open” button to open our App:
Sadly enough our app will not work at the moment…
Now the reason for this error is that our app tries to login via the “TrelloAuthorizer”, but it is routed to the UI5 app itself. This makes sense since we are not using our Approuter in this run configuration. An HTML5 Module has its own “xs-app.json” file which is used in this case since we are not navigating via the Approuter.
If we have a look at this “xs-app.json” file inside our HTML5 Module, we will see that it looks like this:
We see immediately that some routes are missing here. With this configuration all the requests that our app tries to make would be forwarded to the “html5-apps-repo-rt” service. There is obviously no “TrelloAuthorizer” endpoint to be found.
We add the following 2 temporary routes above this “html5-apps-repo-rt” service route:
At this point the “xs-app.json” would have a matched route when our app would try to call the “TrelloAuthoirzer” endpoint. This because we have our routes, but we did not provide the destination configuration itself like we did for our Approuter.
So we create a “default-env.json” file inside our HTML5 Module and we add the following destinations to it just like we did for our Approuter:
Now we are almost there, but we have to make 2 small temporary adjustments to our “TrelloAuthorizer” Node.JS Module inside the “trello.js” file. The first one takes place inside our constructor, here we change the following line in our constructor:
To actually the whole same line except for the second last parameter, the login callback URL. Here we provide the full URL where our HTML5 Module is available with the following path:
You can find this URL in the browser where your app is open obviously or via the command pallet with Ports:Preview.
Your oAuth should look like this now:
By calling the “/TrelloAuthorizer/loginCallback” URL, the route in our HTML5 Module its “xs-app.json” file will be matched and the request will be forwarded to our “TrelloAuthorizer” Module.
The second temporary change is to be performed inside the “loginCallback” method also inside the “trello.js” file. Here we change our “res.redirect” URL to the same URL (HTML5 Module) used above, but without URL paths:
When we are authorized by Trello the Node Module will redirect us to our development HTML5 module instead of the deployed HTML5 Module (since this was coming from the destination service and would go over the Approuter).
Now make sure you restart the “TrelloAuthorizer’ and restart the HTML5 Module by just pressing the “run” button again in the “run-configurations”. You should get the Trello Authorization screen this time:
Once you pressed the “Allow” button you should be redirected to your development UI5 app. Here you would enjoy the “SAP Fiori 3 Quartz Dark theme” along with your Trello name and avatar retrieved via the “TrelloAuthorizer” Node.JS Module:
Awesome!
As you can see the title of our app is “Title” at the moment. This because we did not adjust the i18n file yet. I will just provide the full i18n file bellow because we are not going to spend all our time about an i18n file.
Copy paste the following I18n content into your I18n file and refresh your application.
When you run the application again you will see your provided i18n texts in the application:
Looks good right?
Time to fill this welcome page with all our Trello Boards.
To call these Trello Boards we will add the “getBoards” function to our “webapp > service > TrelloService.js” file. Just like the following function:
This will allow us to call the “getAllBoards” endpoint and function of our “TrelloAuthorizer” Node.js app inside our MTA project. This will return our Trello boards obviously and this function will be called from our “BoardState”.
Indeed “BoardState”, we want to organize and separate this “UserState” and “BoardState” to have some clean code right there.
Create the “BoardState.js” file inside your “webapp > state” directory.
Inside this “BoardState.js” file you paste the following code:
On top of the file under “sap.ui.define” you see we import the “BaseObject” and “TrelloService” just like we did for our “UserState”. Instead of importing the “UserObject” we import the “BoardObject” because we want to make “BoardObjects” out of our retrieved Boards.
We declare an array called “aBoards” where we will store all these “BoardObjects”.
Next we define our “constructor” just like we did for our “UserState”.
With the “loadBoards” function we will retrieve all our Trello Boards via our “TrelloService.” This function will be called from our “BoardsController.js” file afterwards. If our “aBoards” already contains “BoardObjects” we return a promise and we resolve all our boards. If this is not the case, we will request them via our service and we will “.map” our result so we can create a “BoardObject” out of every board we retrieved. Once the whole response is “converted” to “BoardObjects” we use the “setBoards” function to store these boards into our earlier declared “aBoards” array. Once those are stored, we update our model, which will make sure our view is update later on and the boards are shown in the view.
Let us create this “BoardObject.js” file in the same directory where we stored all our other objects. Create a new file inside the “webpp > object” directory called “BoardObject.js” so it looks like this:
Next you paste the following code inside the file:
These getters will allow us to get the “id”, “name” and “url” of our Trello “BoardObjects”.
Now we are able to call our Trello Boards via our “BoardState” that will call our “TrelloService”. Our “Boards.controller.js” file can now call our “BoardState” its “loadBoards” function.
Copy paste the following code inside your “Boards.controller.js” file so it looks like this:
In our “Boards.controller.js” file we imported the “BoardState” and “Formatter” inside our “sap.ui.define” function. The “Formatter” will allow us to make some changes to the control based on the value passed to it. We will create this file afterwards. We declare this “formatter” inside our “Boards” controller so we can use it later on in our view.
In the “onInit” function of our controller we set our “BoardState” to our view as a model and we call it “BoardState”. Once this model has been set, the router will trigger the “_onRouteMatched” function and it will call our “BoardState” its “loadBoards” function to retrieve our Trello Boards.
The last function “toTrelloBoard” will open read out the current “bindingContext“ and will get the board its “url”, so it can open it in a new tab.
Now we want to create this so called “Formatter.js” file inside our “webapp > model” directory. Inside this file we place the following code:
This formatter function “getTrelloIcon” will be called in our “Boards.view.xml” file to find the relative path to our image dynamically when we deploy and run it as a Fiori Launchpad Application. This means you have to store a Trello Icon image called “trello-mark-blue.png” inside the images directory inside the “webapp” directory.
(Please follow the Trello Brand Guidelines when using these images)
Now that we created our formatter, it can be used in our view.
Inside your “Boards.view.xml” file add the following code inside your “content” control bellow the “Toolbar”:
This will create a “Panel” with a “GridList” inside that will display all your Trello Boards, since we bound it to our “BoardState” model its “aBoards” property.
It will display the board information and it uses “expression binding” to decide which colors or texts should be shown based on certain values. The Trello icon is bound to the board its “url” property and can open the board inside a new tab in the Trello Website Application. We already imported the “sap.f” library/namespace to use the “Avatar” control inside our “Toolbar” so we do not have to do that again.
But what we do have to add are the following to “namespaces”:
This because we want to use the “GridBoxLayout” and “InfoLabel” control.
Now it is time to run our application again so refresh the page and we should see all our Trello Boards inside the application like this:
Amazing! All your Trello Boards inside your SAPUI5 Fiori Application! With the sweet Dark Theme applied!
The next thing we want to do is to navigate to a second screen where our Board its Cards will be shown, once we select it.
We do this by adding the following function to our “Board.controller.js” file:
This function will be triggered once you select a Board (tile) in the main Boards screen. This function is called once we press our “CustomListItem”, like we declared in our “Boards.view.xml” file.
This function will get the selected board via the “bindingContext” and set it as the “currentBoard” inside our “BoardState” via the “setCurrentBoard” function of the “BoardState”. Once the selected board has been set as the current board the router will route us to the second view (the Cards view) and it will pass the “boardId”, so the route pattern knows which board we are talking about.
To be able to use the “setCurrentBoard” function of the “BoardState” it needs to be declared there, which is not the case yet.
Open your “BoardState” and add the following function:
This function will receive the “selected board” as parameter and set it in our state in the “oCurrentBoard” object. Once it is set it will update the model. To be able to set this current board, we have to declare the “oCurrentBoard” inside our state. This can be done by placing the following declaration just under the “aBoards” array:
Now you know the current board in your “BoardState” and It can be used later on inside your detail view, along with the board its cards.
Now that we told our “Boards.controller.js” file that it has to route to the “Cards.view.xml” view file, it needs to exist and the route and target pattern needs to be declared in the “manifest.json” file.
Open your “manifest.json” file and add the following route to your “routes” array:
This is a route to the “Cards” target (which we will create after) and it requires a pattern which holds your “boardId” so it knows which board and related cards it should load if we load the page from the “Cards” view. This way we can read of the URL pattern and load the required board and cards inside the view.
Last but not least it needs the “Cards” target to know which view this route is related to. For this you add the following target inside your “targets” object.
Here we declare that we want to have the “Cards” view loaded when this target is targeted.
Your “manifest.json” file its routes and targets should look like this:
For those who want a Full Screen experience when they use the app in the “Fiori Launchpad mode”, you can set the “fullWidth” under “sap.ui” to “true”.
Now that our “manifest.json” file knows the route and pattern and target to our “Cards” view we can created this “Cards.view.xml” file inside our “webapp > view” directory.
Inside this view you paste the following xml:
This xml will separate our “Cards” view in a “Master” and “Detail” page view.
We bind the “oCurrentBoard” from our “BoardState” its name to our “MasterPage” and we place a “List” control inside this “MasterPage”. This list will hold all our board its cards and will sort it ascending. It provides a search bar and the possibility to select a card. For every card we display the name and description of the card.
Now again first things first, rerunning our app at this point would not make any difference. We did not create a controller for this “Cards” view yet and we did not fetch our board its cards.
Let us create this “Cards.controller.js” file inside our “webapp > controller” directory
Add the following code to your “Cards.controller.js” file:
As you can see, we extend our “Cards” controller again from our “BaseController” and we import our “UserState” and “BoardState” again. These states our both set as a model on our view inside the “onInit” function. We imported and declared our formatter again, just like we did for our “Boards” controller. In this function we added an “_onRouteMatched” again. When the router equals to “Cards” this function will be triggered which will read out the “boardId” from our URL parameters, so it can use the id to retrieve the board if it was not yet loaded. When would we have such a scenario? If someone sends you the URL of page 2 and you open this URL the board needs to be loaded along with its cards.
This is why we have this “loadCurrentBoard“ function. If it was already loaded, it will resolve this “CurrentBoard“ inside the promise so it would not be fetched again. This means the board will be loaded either if we come from our “Boards” view or we go to the “Cards” view immediately.
This means we have to add this “loadCurrentBoard” also to our “BoardState”. This function looks like this:
It will resolve and return the current board if it was already loaded or it will call the board by its ID if it was not yet present. This with the function “getCurrentBoardById” that we also need to declare in our “BoardState”. This function looks like this:
This function will call our “TrelloService” its “getBoardById” function and will create a “BoardObject” out of it and finally it will set it as the current board inside the “oCurrentBoard” via the “setCurrentBoard” function. To be able to call the “getBoardById” inside our “TrelloService” we need to declare and implement it over there too.
Inside your “webapp > service > TrelloService.js” file you add the following function:
It will call the “getBoardById” endpoint and function we implemented in our “TrelloAuthorizer” Node.js Application.
Now time to step back to our “Cards.controller.js” file. If we have our current board already or we loaded our board, we will continue by retrieving our current board its cards. We do this once our board is retrieved, so inside our “.then” function of the promise holding the “loadCurrentBoard” function.
The cards are loaded via the “loadBoardCards” function inside our “BoardState”, which means have to create this function over there.
Add the following function to your “BoardState”:
This function will check if our “BoardObject” has cards already and will resolve them if it does and otherwise it will request the cards via our service again. Once retrieved it will create “CardObjects” out of it and set it to our “BoardObject” via the “setBoardCards” function which looks like this and should be added to your “BoardState”:
This will get the current board with the function “getCurrentBoard”, which has to be added to our “BoardState” and which looks like this:
This function will return the current board as a “BoardObject”. This is why we can call the “setCards” method on it and pass the cards. We will extend our “BoardObject.js” file with this method in a few moments. These 2 sentences mean we have to implement a getter and setter for our “BoardObject” according to the cards and we have to create a “CardObject”.
We create the “CardObject.js” file inside our “webapp > object” directory.
Now that we created this “CardObject” we can import it in our “BoardState” on top inside our “sap.ui.define” like this:
We also pass it to our “constructor”, so it looks like this:
Now we extend our “BoardObject.js” file with the getter and setter for the cards like this:
The getter will return our board its cards and the setter will create cards out of all the cards passed in the “aCards” parameter. This means we also have to import it on top of our “BoardObject.js” file so it looks like this:
We paste the following code inside our “CardObject.js” file:
This just returns a getter for our card “id” and “url”.
One last thing we have to do is to add the following function to our “TrelloService.js” file inside the “webapp > service” directory:
This function will call our “TrelloAuthoirzer” its “getCardsByBoardId” endpoint and function to retrieve the board its cards. We called this function from our state, but it was not declared and implemented inside our “TrelloService.js” file.
Time to go back to our “Cards.controller.js” file. We have to functions left to discuss here. The “onNavBack” function will bring us back once step in history if there is one available (which is the reason it was imported on top) and if there is none available it will route you to the “Boards” view. The last one is the “onCardSearch” function will locally filter on your cards inside the array of cards by passing the filters to the list. This is the reason we imported the “Filters” and “FilterOperators” on top. We allow the filtering on the card name and description.
If we refresh our app again, and we select a board, we will be routed to the “Cards” view and we will get our board its cards displayed in the list inside our master page.
If we search inside our list via the search bar our cards will be filtered on their card name and description:
Pretty cool right?!
Cool but not there yet! This detail screen is way to empty for the moment, let us fill this space with some Trello Card information.
Past the following code between your “<semantic:content>” control of your “<semantic:DetailPage>” control:
This xml will display a “MessagePage” if no Trello Card was selected. If a Card has been selected it will show us an “ObjectHeader” control holding the Trello Icon and the card its Name, last activity and card due date.
This xml part is also using the 5 following formatters:
These formatters will help us define the text to show or the color of the control.
This means we will add these 4 new formatter functions to our “Formatter.js” file inside our “webapp > model” directory.
These functions look like this:
These formatters just check the passed value and depending on a date that is empty or passed it will adjust the text or the color of the control.
Restarting and testing our application at this moment would not display this information in the detail page, this since we did not implement our “onCardSelect” function yet. We defined it in our xml already but now we still have to at it to our “Cards.controller.js” file. Add the following function to your “Cards” controller:
This function will read out the “oEvent” its source and will get the selected card out the “oEvent” its “selectedItem” its “bindingContext”. Once this selected card has been retrieved, it will be passed to our “BoardState” its “setCurrentCard” function.
Indeed, this means we have to define and implement this function inside our “BoardState.js” file again.
Add the following function to your “BoardState.js” file:
As you can see this selected card is stored in a property called “oCurrentCard”, this means we have to declare this variable inside our “BoardState” as well. So, it looks like this:
We set this “oCurrentCard” to “null”, so we can use it later on in an expression binding to check if we have to show a page that says “no card selected” or the selected card.
I know defining this is not necessary, but it gives you a clean overview of all your available properties inside your “BoardState”. Nice way to model and structure your whole app, right?
As you can see this “setCurrentCard” also calls the “SpentHours” on a card. Let us comment out this whole “getCardSpentHours” function for now and change it to “this.updateModel()”.
This means your function looks like this:
We will implement this “getCardSpentHours” afterwards, we want to check if our detail view is displayed correctly at this point.
If you want to open the current card in Trello when you press the Trello icon in the “Cards” view, just add the following code to your “Cards” controller:
It works just the same way as the function to open the board in Trello in the “Boards” controller.
Time to run our application again!
Our application its detail page looks like this if we did not select any card:
But if we do select a card, our page looks like this:
For those who are paying attention really close, you will see the text “Timeline spent hours”. Indeed, we will use the “Timeline” control to display all our “SpentHours” on a card. Awesome!
With this we finished the implementation of the consumption of all our required Trello information via our “TrelloAuthorizer” Node.js Application.
Now that we have all our required Trello information available inside our HTML5 application, we can start consuming our “OData V4 Service” to store “SpentHours” on Trello Cards inside our database. If we can store them, we also can read them via our service and map them to the corresponding Trello board and card. Once we read and created them, we will provide a way to edit an delete them too.
Let us take off where we left, you remember the “getCardSpentHours” function in our “BoardState” its “setCurrentCard” function? We commented it to test our UI, but we will uncomment it now since we want to request the “SpentHours” on the selected card.
This means your function should look like this again:
As you can see this “getCardSpentHours” is called from “this” which means it is another function inside our “BoardState”. Add this function to the state and make sure it looks like this:
If the card has “SpentHours” it will resolve and return them. It fetches the “currentCard” via the function “getCurrentCard” we still have to add and looks like this:
It will only return the “oCurrentCard” object.
If these “SpentHours” are not present yet, it will call them via our “OData V4 Service” from our database. You see this “TimesheetManagementService” which is a new service inside our “webapp > service” directory. We will implement it in a minute, but first let us extend our “CardObject.js” file with this “getSpentHours” method. If we are implementing this getter, we will later on need a setter for this one too. Let us define them both together.
The getter will return our card its “SpentHours” while the setter will receive an array of “SpentHours” from our service and map them to “SpentHourObjects”.
This means we have to import this “SpentHourObject” on top of our file and pass it to our constructor:
This means we will also have to create this “SpentHourObject.js” file inside our “webapp > object” directory.
Inside this “SpentHourObject.js” file you paste the following code:
This “SpentHourObject” has some getters and setters for the properties/fields the service and database require. As last it has a “getJSON“ method which will return the “SpentHourObject” as a correct JSON object that we can pass to our service to create the “SpentHour” inside our database.
Speaking of such a service, lets implement it. To do so you create the “TimesheetManagementService.js” file inside your “webapp > service“ directory.
Inside this “TimesheetManagementService.js” file add the following code
This service provides the “getCardSpentHours” function which will call our “OData V4 service” to read from our database. It knows that this request needs to go to the database OData V4 Service because we prefix the path with “/timesheetService/” followed by the entity to retrieve. The name of the service “timesheet-management” was already declared in the target in the route and is extended with “$1” which is in this case “SpentHours”. We declared this path in our Approuter its “xs-app.json” file, just like we did for our “TelloService”. Remember the “xs-app.json” file of your Approuter:
The route directs you to the right service.
Now this “getCardSpentHours” function will call our service its “SpentHours” entity and it will filter on the “boardId” and “cardId” to retrieve the card its related “SpentHours”.
There last us one thing to do, importing this created “TimesheetManagementService” in our “BoardState”. It should look like this:
Now your Trello Card its related “SpentHours” can be read from your database its OData V4 service.
Now we want to show this data in a “Timeline” control remember? Let’s add this control to our “Cards.view.xml” file.
Just below your “Toolbar” control inside your “<semantic:DetailPage>” its “<semantic:content>” add the following xml:
As you can see this “Timeline” control comes from the “common” namespace/lib, which means we have to import it on top of our xml file as well. Add the following namespace:
This “Timeline” control will display our “SpentHours” from most recent to oldest. It knows how to display all the “SpentHours” because we provided the following “binding path”: {BoardState>/oCurrentCard/spentHours}
It will show who created the “SpentHour” and all the other properties/field we declared in our database. All the date displayed in a nice way. It also comes with a new and last formatter we have to add to our “Formatter.js” file inside our “webapp > model” directory. The “spentHourStatus” formatter, add it to the file:
It will return the right “i18n” text for the status of the “SpentHour”.
Let us implement the functionality to add “SpentHours” to cards and so to our database. For this we create the following 2 functions inside our “Cards.controller.js” file:
This “onAddSpentHour” will open a new fragment called “DialogAddSpentHour” which we will create in a minute and it has a callback function called “addSpentHour” which will call our “BoardState” to create the “SpentHour”.
The “onAddSpentHour” will be bound to an “Add” button we will place in the footer of our “Cards.view.xml” file. This will make your “Cards.view.xml” file inside your “webapp > view” directory its “<semantic:customFooterContent>” look like this:
Now we will create this “addSpentHour” function inside our “BoardState” and it looks like this:
This function requires that we imported the “SpentHourObject” and “UserState” so it looks like this:
This function will set the user information to the “SpentHour” object and will call the service to create this record in the database. If this was successful it will add the “SpentHour” to the array of the current card and it will be displayed in the timeline. Also, the “ID” the “UUID” will be returned by the service so we can later on delete or edit the created record with this “ID”. When this fails an error will be logged.
The function to add this “SpentHour” inside our “TimesheetManagementService“ service looks like this:
It will pass the object to the service, but first it will call the “getJSON” method of the object to retrieve a valid JSON object to send.
Now we have to add our fragment to the “webapp > view > fragments” directory which we still need to create.
Add this file called “DialogAddSpentHour.fragment.xml” to the directory:
Inside this fragment file you add the following xml:
This fragment provides some input fields, so you can provide all the required and optional fields for the “SpentHour”. It will also display some user information and card information retrieve from the states.
Next we create a controller for this fragment called “DialogAddSpentHour.controller.js” so your “webapp > controller > fragments” directory
The code inside this controller looks like this:
This controller will create a “JSON model” to provide the select options for your “combobox”. This way you can select a status for your “SpentHour” from a “Combobox”. It also has a function “spentHourIsValid” to check if everything you entered is valid and a “handleSpentHoursDateChange” to handle the “DatePicker” control its change events. The “submitForm” function will close the form and call the callback “addSpentHour” function to create the “SpentHour”.
With this we implemented our functionality to add “SpentHours” to a Trello card inside our database.
Time to refresh our application and test it! Select a board and a card in the application. Once you did, press the “Add spent hour” button in the lower right corner:
This will open the following pop-up where we can provide all the details for our “SpentHour”.
When we press the “Save” button it should be saved in the app and in the database. But I will already warn you, it’s going to fail… Open the console and network tab of your browser. Once you opened them press the “Save” button.
You will see the following error in the network tab for your “POST” request on the “SpentHours” entity.
It shows the error message: “Error while deserializing payload. An error occurred during deserialization of the entity. A JSON number is not supported as Edm.Decimal value.”.
It is saying there is a problem with the OData “Edm.Decimal” value. Which is actually not the case on the one hand, but on the other hand it is a problem. Because OData and JSON are “not understanding” each other here due to encoding of this payload. Let us add the following “Content-type” request headers to our “CoreService.js” file inside our “webapp > service” directory:
So, the following code looks like this:
You changed the “client.setRequestHeader(“content-type”, “application/json;charset=UTF-8;IEEE754Compatible=true”);” line here to understand this encoding correctly.
If we would not be using “XMLHttpRequest” and execute our calls via the OData V4 Model, we would not be having this issue. But since we started with the “XMLHttpRequest” for our “TrelloAuthorizer” we continued this way and we make it work!
Refresh the app and try it again!
When I press the “Save” button this time….
It works!
Also, when we refresh the page and select the Card again, our added “SpentHour” will be visible since it was stored in the database.

So far so good! But what if we create a “SpentHour” and we made a mistake? Let’s say we did not work, we were wrong ooops. Then we want to delete the “SpentHour” from the “Timeline” control and so from our database.
This will be done by the “Trash/delete” icon inside the timeline items.
To make this possible we add the following code to our “Cards.controller.js” file:
This will get our selected “SpentHour” and set it to the “BoardState” via the “setCurrentSpenthour” function. This means we also have to create this function in our “BoardState.js” file like this:
To make it clear and have a good overview we add this “oCurrentSpentHour” property on top of our state too, so it looks like this:
Once it is set it will open the “DialogDeleteSpentHour” fragment. For this fragment we will create a view and controller. We will open it with the function “openFragment” that we declared inside our “BaseController.js” file.
We pass a callback function that we create in our “Cards.controller.js” file to this “openFragment” function named “deleteSpentHour” which looks like this:
It will call the “getCurrentSpentHour” function of the “BoardState”, which looks like this and has to be added:
This way it can retrieve the current “SpentHour”.
Next it will call the “BoardState” its “deleteSpentHour” function which will receive a “SpentHour” object. It will get the “id” from this object and it will pass it to the “TimesheetManagementService” its “deleteSpentHour” function to delete the record in the database. Once it is deleted it will delete the “SpentHour” from the current Card its “SpentHours” array property and it will update the model so it will not be displayed any longer in our “Timeline” Add the following function to your “BoardState”:
Thus, we create the “deleteSpentHour” function inside our “TimesheetManagementService” and it looks like this:
It will take the “id” of the “SpentHour” and perform a delete HTTP request on our “srv” Module its “OData V4 Service”.
Add the “DialogDeleteSpentHour.fragment.xml” file to your “view” directory its “fragments” directory:
Inside this “DialogDeleteSpentHour.fragment.xml” file you add the following xml:
It will show you a confirmation text and provides a “Yes” and “No” button whether you want to continue with the deletion or not.
Inside you “controller > fragments” directory you add a controller called “DialogDeleteSpentHour.controller.js” for our fragment. Inside this file we add the following code:
This will take in all the parameters that were passed by the “openFragment” function in the controller and it will use it in the “onBeforeShow” function to set it as properties. We create a model called “SpentHourModel” to display our “SpentHour” data (title) and we declare and implement a function to close the dialog if the user answers “No” or to execute the deletion with the callback function if he answers “Yes”.
Time to run our application again! If you press the “Trash/delete-icon” to delete the “SpentHour” from the timeline, you will be asked if you really want to delete it. If you say “No” the dialog will just close and if your press “Yes” the “SpentHour” will be deleted from the timeline and it will be removed from the database.
As we can see the Spent Hours was removed from the timeline and when we refresh the page, we will no longer see the Spent hour since it was deleted from the database:
Now the lest “CRUD” operation that is left to implement is the edit/update operation of a “SpentHour”. This just works the same way it did for the deletion and creation of a “SpentHour”. Add the following 2 functions to your “Cards.controller.js” file:
You will see it reuses the “DialogAddSpentHour” fragment to show the data and it provides a way to update them, this is handled in the “DialogAddSpentHour” fragment view and controller.
Since the callback function “editSpentHour” is called when the changes are saved, and it calls the “editSpentHour” function of our “BoardState” we have to implement it over there too. It looks like this:
It passed the changed/updated “SpentHour” from the controller to the service its “editSpentHour” function to update it. This means we have to create the function there too and it looks like this:
It passed the “id” as the key for the “SpentHour” and along it provides the content for the change as body in the “PUT” method.
Time to refresh the application again!
Start by adding a “SpentHour” to a card and then press the “edit-icon”.
Let’s say we change the comment to “Is updated!” and the status to “DONE” and we press the “Save” button.
As you can see it has been updated in our app and also when we refresh the app to double check!
This brings us to the actual end of the implementation and development of our UI5 Timesheet Application. But since we want to make and keep everybody happy, we also think about the people who love their good old-school spreadsheet files. This way they can do an export of these “SpentHours” at the end of the month and it will build the log/timesheet spreadsheet file just the way they wanted it in the past. They receive the file they want, and we do never have to open nor fill in those spreadsheet files!
Let us perform a last development to create a spreadsheet file out of all our data!
We will add the following function to our “Cards.controller.js” file:
This will create the column configuration for the Spreadsheet control/worker, and it will request this column configuration from our “BoardState” via the “getColumnConfig” function. It will create the name for the file dynamicalaly with the board name and finally it will call the “BoardState” its “getMonthlyExcelExportData” to get the data for the spreadsheet file. This data is the data of the current month.
Once the file/export is ready a “MessageToast” will be shown that the export is ready. To be able to use that “MessageToast and “Spreadsheet” control we have to import hem both like this:
Now let us create this “getColumnConfig” and “getMonthlyExcelExportData” function inside our “BoardState”:
The “getColumnConfig” will return the whole column configuration with labels, properties and types. While the “getMonthlyExcelExportData” will call the “getMonthlyExcelExportData” of our “TimesheetManagementService”. Once this data is retrieved it will map the “SpentHours” to the correct “Cards” and “Boards”. Add this function to your “BoardState”:
This means we also have to add this “getMonthlyExcelExportData” to our “TimesheetManagementService.js” file and it looks like this:
We apply the correct “boardId” as a filter since we want all the cards of the board in our spreadsheet afterwards and then some data filters for a range “between” so we get the data of the current month.
Now we only have to make this export button visible in our “Cards.view.xml” file, for that we add the following button to our footer:
Time to restart and run the application for the last time in this blog!
As you can see our “Export to Excel” button is now available:
When we press it, the spreadsheet file will be exported:
If we open the exported file, we see that our added “SpentHours” are stored in the spreadsheet file just the way the spreadsheet lovers want it!
This card happened to have no description. A nice test could be updating it in Trello, to refresh the app and export the file again. Let me know if it worked! ?
With this you really finished the UI5 development of the Timesheet application, good job!
Now we do want to test this application too once it is deployed. So, let us prepare our MTA for deployment.
The first thing we will do is restore the “xs-app.json” file inside our HTML5 Module / “TimesheetManager” directory. Remove all the content and place the following original configuration inside:
Now the reason for this is simple, we want to use our Approuter to take care of the traffic and the resources to access and not our HTML5 Module.
Remember the changes we applied to our “TrelloAuthorizer” its “trello.js” file? Also these changes need to be undone.
Replace your “this.oAuth” line in the constructor with the following original line:
This way the Node Module can return us to the original Node Module after the authorization process, but again via the Approuter.
The last change we will perform is still in this “trello.js” file. Inside the “loginCallback“ method we replace the “res.redirect” line again with the original line:
This so we can be redirected again to our HTML5 Module via the Approuter, coming from our destination service.
Now we will build our MTA project again by executing the following command in our MTA project its root directory:
Once the MTA project is built, we deploy it again with the following command:
Do not forget to update your User provided Instance again if you did not place the keys inside the “Trello-API-Keys.json” file. Here is the command once more:
And if you had to update them again, do not forget to restart your “TrelloAuthorizer” Node Module again (see explanations in previous blog):
Now open your deployed Approuter again and test the app!
(if you still see the old UI, try to clear your cache or open a private window)
Looks good right? ?
Okay now something that would help us in the future. We can all imagine that we have to adapt the UI from time to time. When we do this, we do not want to redeploy our full MTA project. We want to keep all our services inside this MTA project to keep running while we redeploy our UI.
That’s why we have the following cloud foundry CLI plugin “CF HTML5 Applications Repository CLI Plugin”.
More information about this plugin can be found here:
https://github.com/SAP/cf-html5-apps-repo-cli-plugin
To install this plugin, execute the following command:
Once installed execute the following command to retrieve the list of all your HTML5 applications:
This will display all your html5-applications on the terminal:
Copy this “app-host-id“ since we will use it to deploy our HTML5 App directly.
Inside your HTML5 Module / TimesheetManager directory execute the following command to build your project (always necessary before deploying with html5-push):
This will create a “dist“ folder inside your HTML5 Module / TimesheetManager directory with your built project inside.
Next you execute the following command to deploy the “dist” folder to the HTML5 repository:
Obviously, this deployment process is 10 times faster than redeploying your full MTA project.
It redeployed your HTML5 Module without stopping other services.
In this blog we created our HTML5 Module which serves the purpose of the consumable timesheet application. It handles the Trello OAuth pop-up in a proper way and allows you to consume the Trello APIs via your created “TrelloAuthorizer”.
Apart of consuming the Trello information, you developed and implemented a solution to retrieve, create, update and delete the data (being “SpentHours”) via your created “srv” Module inside your database. You learned a trick to approach your OData V4 service via an “XmlHttpRequest” and you implemented a way to export all your “SpentHours” on Trello cards into a timesheet spreadsheet file.
Last but not least you can now redeploy your HTML5 Module without redeploying your full MTA project.
We described the following requirements from the beginning and implemented the following ones:
Now it is time to add a Fiori Launchpad Module to our Multi Target Application!
See you in the next blog Timesheet Management with CAP & Trello ⏱️ - Add a Fiori Launchpad Site Module #5. Where we will add and configure a Fiori Launchpad Site and register our app to it
Kind regards,
Dries
This is goanna be the blog for the UI5ers among us!
Welcome back to the fourth hands-on blog of this “Timesheet Management with CAP & Trello ⏱️” blog series. In this blog “Build the Trello Timesheet HTML5 Module #4” we will create our Timesheet App inside an HTML5 Module in the MTA project.
If you missed some other blogs of this series, you can find them here:
| Timesheet Management with CAP & Trello ⏱️ |
| Timesheet Management with CAP & Trello ⏱️ – Setup the IDE & MTA Project #1 |
| Timesheet Management with CAP & Trello ⏱️ – Setup a Database and Service Module #2 |
| Timesheet Management with CAP & Trello ⏱️ – Connect to Trello API’s via a Node.js Module #3 |
| Timesheet Management with CAP & Trello ⏱️ – Build the Trello Timesheet HTML5 Module #4 (this blog) |
| Timesheet Management with CAP & Trello ⏱️ – Add a Fiori Launchpad Site Module #5 |
The GitHub Repository is available here:
Timesheet Management with CAP & Trello ⏱️ GitHub Repository
Introduction
Inside our Multi Target Application (MTA) we created a Node.js, database (CDS), Service (OData V4) and HTML5 Module so far. But we did not develop our HTML5 App yet, we will develop it now and it will serve as our UI5 Timesheet Application. The HTML5 Module will request data from the “TrellAuthorizer” and “Service” (OData V4) Module via the Approuter.
In both blogs (Node.js TrelloAuthorizer & Database with Service) we added a route to the Approuter its “xs-app.json” file. This way the Approuter knows where to direct the request to.
Develop the HTML5 Module
The development of our UI5 Application will also take place inside our MTA project. This in the “TimesheetManager” directory, which holds a UI5 application.
Before we start the development of this UI5 App, make sure your “TrelloAuthorizer” and “OData V4 Service” are up and running. This because we will authorize ourselves against Trello to consume Trello information and to store “SpentHours” on Trello cards inside our database.
But first things first, let us have a look at the folder of your HTML5 Module.
Your HTML5 “TimesheetManager” directory looks like this at the moment:

Here we will add the following 4 directories inside the “webapp” directory:
- images
- object
- service
- state
Obviously the “images” folder will hold our images and such. Inside our “service” directory we will create services to perform requests to our “TrelloAuthorizer” Node.js service and the OData V4 service which exposes our database content. These services will be called from our states, we will have different states inside our “state” directory. Once those requests are finished, we will convert those responses to objects with getters and setters. Those classes that will allow us to create objects from the appropriate response are defined inside the “object” directory.
More information about such a setup can be found here in the “UI5 Advanced Programming Model” by my good friend c3d1947136cd4c748a7aa794001af496 !
In this Timesheet application we will perform our requests via HTTP and not via OData. Both are possible, but I chose the HTTP one because it will make the development a lot easier since we are working with OData V4 services and a basic REST API exposed by our “TrelloAuthorizer”.
Inside our “service” directory we create the “CoreService.js” file. This will be the core to send our HTTP requests.
This file holds the following code:
sap.ui.define([

	"sap/ui/base/Object"

], function (Object) {

	"use strict";


	var Service = Object.extend("cap.trello.TimesheetManager.service.CoreService", {

		constructor: function () {},


		http: function (url) {

			var core = {

				ajax: function (method, url, headers, args, mimetype) {

					var promise = new Promise(function (resolve, reject) {

						var client = new XMLHttpRequest();

						var uri = url;

						if (args && method === 'GET') {

							uri += '?';

							var argcount = 0;

							for (var key in args) {

								if (args.hasOwnProperty(key)) {

									if (argcount++) {

										uri += '&';

									}

									uri += encodeURIComponent(key) + '=' + encodeURIComponent(args[key]);

								}

							}

						}

						if (args && (method === 'POST' || method === 'PUT')) {

							var data = {};

							for (var keyp in args) {

								if (args.hasOwnProperty(keyp)) {

									data[keyp] = args[keyp];

								}

							}

						}

						client.open(method, uri);

						if (method === 'POST' || method === 'PUT') {

							client.setRequestHeader("accept", "application/json");

							client.setRequestHeader("content-type", "application/json");

						}

						for (var keyh in headers) {

							if (headers.hasOwnProperty(keyh)) {

								client.setRequestHeader(keyh, headers[keyh]);

							}

						}

						if (data) {

							client.send(JSON.stringify(data));

						} else {

							client.send();

						}

						client.onload = function () {

							if (this.status === 200 || this.status === 201 || this.status === 204) {

								resolve(this.response);

							} else {

								reject(this.statusText);

							}

						};

						client.onerror = function () {

							reject(this.statusText);

						};

					});

					return promise;

				}

			};


			return {

				'get': function (headers, args) {

					return core.ajax('GET', url, headers, args);

				},

				'post': function (headers, args) {

					return core.ajax('POST', url, headers, args);

				},

				'put': function (headers, args) {

					return core.ajax('PUT', url, headers, args);

				},

				'delete': function (headers, args) {

					return core.ajax('DELETE', url, headers, args);

				}

			};

		}

	});

	return Service;

});
This “CoreService” allows us to perform a get, post, update and delete “XMLHttpRequest”. It will dynamically handle URL parameters and passed data objects. This is the base for all the services we will create from now on.
Consuming the “TrelloAuthorizer” Node.js Application
Now that our “CoreService” is setup, it is time to create our “TrelloService” that will inherit from the “CoreService”. Create the “TrelloService.js” file inside the “service” directory. This “TrelloService” holds the following code:
sap.ui.define([

	"./CoreService",

	"sap/ui/model/Filter",

	"sap/ui/model/FilterOperator"

], function (CoreService, Filter, FilterOperator) {

	"use strict";


	var TrelloService = CoreService.extend("cap.trello.TimesheetManager.service.TrelloService", {


		constructor: function () {},


		setModel: function (model) {

			this.model = model;

		},


		logIn: function () {

			return window.open("/TrelloAuthorizer/login", "_self");

		},


		getCurrentUser: function () {

			return this.http("/TrelloAuthorizer/getUserInfo").get().then(function (user) {

				return JSON.parse(user);

			}).catch(function(){

				return this.logIn();

			}.bind(this));

		}

	});

	return new TrelloService();

});
This “TrelloService” has a function “setModel” that could be used if we were working with OData requests. But since we are not, we do not pay attention to this function. Two important functions inside this “TrelloService” are the “login” and “getCurrentUser” function. You will see that the “getCurrentUser” is calling the “login” in the catch function.
Now why is this? When we start the application, we will try to request the user information via the “getCurrentUser” function. This function will call our “TrelloAuthorizer” its “getUserInfo” endpoint. The first time that we open our Timesheet app, we do not have the Trello OAuth access tokens cached in our “TrelloAuthorizer” Node.js application. This also applies when our tokens are expired, they will be removed from the cache and are no longer valid nor present. When we perform our “getCurrentUser” function during such a moment the service will return with “Unauthorized” like we implemented in our “TrelloAuthorizer”.
If the cache has the token, which also means it is still valid, it will return the user information. If this is not the case, it will return the “unauthorizedAgainstTrello” function.

In this case we return a status “401” with an “Unauthorized message”.

This will throw an error and we will arrive in our “.catch“ function, which means we have to login.
The “login” function, which looks like this:

It will call the “login” endpoint of our “TrelloAuthorizer” which will return the Trello OAuth screen. We can open this OAuth window with al lot of different parameters. The most known ones are “_blank” and “_self”. The “_blank” one will open the OAuth window in a new tab, which I personally do not like. The “_self” one will open it in the current window which brings the advantage of an easy return to our Timesheet app, after we approved usage of our Trello information in the OAuth window.
Like I mentioned earlier, we will not access our services directly but via our states. This means that our controllers will call our state and the state will call the service afterwards. Our “TrelloService” will be the service to request all our Trello information. Getting the logged in Trello user his user information will pass via this service. This via the “getCurrentUser” function. This function is called from the “UserState”.
Let us create this “UserState.js” file inside our “state” directory. This state holds the following code:
/* global _:true */

sap.ui.define([

	"../object/BaseObject",

	"../service/TrelloService",

	"../object/UserObject"

], function (BaseObject, TrelloService, UserObject) {

	"use strict";

	var UserState = BaseObject.extend("cap.trello.TimesheetManager.state.UserState", {


		oUser: null,


		constructor: function (data) {

			BaseObject.call(this, data);

		},


		setUser: function (oUser) {

			this.oUser = oUser;

			this.updateModel();

		},


		getCurrentUser: function () {

			return this.oUser;

		},


		loadCurrentUser: function () {

			if (this.oUser) {

				return Promise.resolve(this.oUser);

			}


			return TrelloService.getCurrentUser().then(function (user) {

				this.setUser(new UserObject(user));

				return this.oUser;

			}.bind(this));

		}


	});

	return new UserState();

});
We import the “BaseObject”, “TrelloService” and “UserObject” inside our “define” function. Our “UserState” inherits from this “BaseObject” and in the “constructor” function we call the “BaseObject” so we can initialize it. Above our “constructor” we define our “oUser” variable which is default null. In the end our “UserState” is returned.

This also means we still have to create this “BaseObject” and “UserObject”. First, we create the “BaseObject.js” file inside our “object” directory. This “BaseObject.js” holds the following code:
sap.ui.define([

	"sap/ui/base/Object",

	"sap/ui/model/json/JSONModel"

], function(Object, JSONModel) {

	"use strict";

	return Object.extend("cap.trello.TimesheetManager.object.BaseObject", {

		constructor: function(data) {

			if(data){

				for (var field in data) {

					switch (typeof(data[field])) {

						case "object":

							if(data[field] && data[field]["results"]){

								this[field] = data[field]["results"];

							} else if(data[field]) { // If it is a date object

								this[field] = data[field];

							}

							break;

						default:

							this[field] = data[field];

					}

				}

			}

		},

		getModel: function() {

			if (!this.model) {

				this.model = new JSONModel(this,true);

				//this.model.setData(this);

			}

			return this.model;

		},

		updateModel:function(bHardRefresh){

			if(this.model){

				this.model.refresh(bHardRefresh?true:false);

			}

		},

		getData:function(){

			var req = jQuery.extend({},this);

			delete req["model"];

			return req;

		}

	});

});
It will initialize the object in the “constructor” and returns 3 main functions. The “getModel”, “updateModel” and “getData” function. This will allow us to get the model of our “UserState”, to update it and to request all the data of our “UserState”.

Since we want to make a “UserObject” out of our “getCurrentUser” function its response, we need to create a “UserObject.js” file inside our “object” directory.
This file will hold the following code:
/* global _:true */

sap.ui.define([

	"./BaseObject",

], function (BaseObject) {

	"use strict";

	return BaseObject.extend("cap.trello.TimesheetManager.object.UserObject", {

		constructor: function (data) {

			// When a user object is created the url for the avatar need to be extended with "/50.png"

			// This to point to the correct avatar url. Because there are multiple sizes available.

			data.avatarUrl = this.convertAvatarUrl50(data.avatarUrl);

			BaseObject.call(this, data);

		},


		convertAvatarUrl50: function(avatarUrl) {

			return avatarUrl + "/50.png";

		},


		getFullName: function() {

			return this.fullName;

		}


	});

});
We created a getter for the full name, which will obviously return the user his full name. When we initialize the “UserObject”, we convert the “avatarUrl” property, to build to correct path to the location of the user his Trello avatar. This correct path is the original path + “/50.png”. With this we created our required “BaseObject” and “UserObject”. Let us return to the “UserState”.
As you can see this “UserState” has a “getCurrentUser” and a “setCurrentUser” to get the current user from our state or to set it to our state.

This “UserState” its last function is the “loadCurrentUser” function. With this function we will get the current logged in user via our “TrelloService”. Notice that we only get the user if we do not already have it in our state. In case we already have the user, we return a promise and resolve the user. Otherwise we call it via our “TrelloService” with the “getCurrentUser” function inside this “TrelloService”. When we retrieve the current user from the service, we create a “UserObject” out of it and we set it to our state with the “setCurrentUser” function of our state. Finally, we return this retrieved user.
Like I mentioned earlier, we will call our services via the states. The controllers and “Component.js” file will call these services via the appropriate state.
The first request we will perform is the “getCurrentuser” service function. Since we want to login our user and fetch his user information when he starts the app, we call this “loadCurrentUser” from our “UserState”in the “Component.js” file. Which will eventually call the “getCurrentuser” function of our “TrelloService”.
The code of your “Component.js” file looks like this:
sap.ui.define([

	"sap/ui/core/UIComponent",

	"sap/ui/Device",

	"cap/trello/TimesheetManager/model/models",

	"cap/trello/TimesheetManager/state/UserState"

], function (UIComponent, Device, models, UserState) {

	"use strict";


	return UIComponent.extend("cap.trello.TimesheetManager.Component", {


		metadata: {

			manifest: "json"

		},

		init: function () {

			// call the base component's init function

			UIComponent.prototype.init.apply(this, arguments);


			// enable routing

			this.getRouter().initialize();


			// set the device model

			this.setModel(models.createDeviceModel(), "device");


			// Set the model and get the current user, if model not set here avatar picture not set

			this.setModel(UserState.getModel(), "UserState");

			UserState.loadCurrentUser();


			// force fiori 3 dark in Fiori Launchpad Sandbox environment

			sap.ui.getCore().applyTheme("sap_fiori_3_dark");

		}

	});

});
As you can see we import our “UserState” in the “sap.ui.define” and we set the “UserState” as a model. Once it is set, we also call the “loadCurrentUser” function directly from our state. Eventually we also set the “SAP Fiori 3 Quartz Dark theme”, which is optionally. The “Dark Theme” needs a SAPUI5 minimum version of “1.72” that’s why I told you in the beginning to take at least the “1.72” version.

This function will call the service to retrieve the current user and his Trello information. If this succeed, it means the user is logged in, if not he needs to login and the catch function in our service will make us login via the Trello OAuth screen.
Now our user can be logged in via our service and his Trello user information can be retrieved, we will start to prepare our home screen. For this we will first structure our application its views.
At the moment our “Boards.view.xml” file looks like this:

Adjust this file so the code looks like this:
<mvc:View controllerName="cap.trello.TimesheetManager.controller.Boards" xmlns:mvc="sap.ui.core.mvc" displayBlock="true"

    xmlns="sap.m" xmlns:f="sap.f">

    <Page id="page" title="{i18n>title}">

        <content>

            <Toolbar design="Transparent" style="Clear" height="auto" class="sapUiSmallMarginTop">

                <Title text="{i18n>welcome}" class="sapUiSmallMarginBegin"/>

                <ToolbarSpacer/>

                <Title text="{UserState>/oUser/fullName}" class="sapUiSmallMarginTop sapUiSmallMarginEnd" visible="{= !${device>/system/phone}}"/>

                <f:Avatar src="{UserState>/oUser/avatarUrl}" displaySize="XS" class="sapUiSmallMarginTop sapUiSmallMarginEnd borderAvatar"

                    visible="{= !${device>/system/phone} }"/>

            </Toolbar>

        </content>

    </Page>

</mvc:View>
We removed the “Shell”, “App” and “pages” control from our “Boards.view.xml” file. This because we will create a root “App.view.xml” file which will hold all our other views. Next we added the “sap.f” library so we can use the “Avatar” control inside our “Toolbar” control. Inside the “content > Toolbar” we bound the user his full name and picture to the view. This via our “UserState” its “oUser” object.
The next thing we want to adjust is the “Boards.controller.js” file. We do not want to extend from the “Controller” lib/control, but from a “BaseController.js” file that we will create our self.
Create this “BaseController.js” file inside your “webapp” its “controller” directory.
Add the following code to the “BaseController.js” file:
/*global history */

var _fragments = [];

sap.ui.define([

	"sap/ui/core/mvc/Controller",

	"sap/ui/core/routing/History",

	'sap/m/Button',

	'sap/m/Dialog'

], function (Controller, History, Button, Dialog) {

	"use strict";


	return Controller.extend("cap.trello.TimesheetManager.controller.BaseController", {


		onInit: function () {},

		/**

		 * Convenience method for accessing the router in every controller of the application.

		 * @public

		 * @returns {sap.ui.core.routing.Router} the router for this component

		 */

		getRouter: function () {

			return this.getOwnerComponent().getRouter();

		},

		getEventBus: function () {

			return this.getOwnerComponent().getEventBus();

		},


		/**

		 * Convenience method for getting the view model by name in every controller of the application.

		 * @public

		 * @param {string} sName the model name

		 * @returns {sap.ui.model.Model} the model instance

		 */

		getModel: function (sName) {

			return this.getView().getModel(sName);

		},


		/**

		 * Convenience method for setting the view model in every controller of the application.

		 * @public

		 * @param {sap.ui.model.Model} oModel the model instance

		 * @param {string} sName the model name

		 * @returns {sap.ui.mvc.View} the view instance

		 */

		setModel: function (oModel, sName) {

			return this.getView().setModel(oModel, sName);

		},


		/**

		 * Convenience method for getting the resource bundle.

		 * @public

		 * @returns {sap.ui.model.resource.ResourceModel} the resourceModel of the component

		 */

		getResourceBundle: function () {

			return this.getOwnerComponent().getModel("i18n").getResourceBundle(); // this.getView().getModel("i18n"); //

		},


		/**

		 * Event handler for navigating back.

		 * It there is a history entry or an previous app-to-app navigation we go one step back in the browser history

		 * If not, it will replace the current entry of the browser history with the master route.

		 * @public

		 */

		onNavBack: function () {

			var sPreviousHash = History.getInstance().getPreviousHash();

			try {

				var oCrossAppNavigator = sap.ushell.Container.getService("CrossApplicationNavigation");

			} catch (ex) {

				this.getRouter().navTo("master", {}, true);

				return;

			}

			if (sPreviousHash !== undefined || !oCrossAppNavigator.isInitialNavigation()) {

				history.go(-1);

			} else {

				this.getRouter().navTo("master", {}, true);

			}

		},


		i18n: function (sProperty) {

			return this.getResourceBundle().getText(sProperty);

		},


		fnMetadataLoadingFailed: function () {

			var dialog = new Dialog({

				title: 'Error',

				type: 'Message',

				state: 'Error',

				content: new Text({

					text: 'Metadata loading failed. Please refresh you page.'

				}),

				beginButton: new Button({

					text: 'OK',

					press: function () {

						dialog.close();

					}

				}),

				afterClose: function () {

					dialog.destroy();

				}

			});


			dialog.open();

		},


		openFragment: function (sName, model, updateModelAlways, callback, data) {

			if (sName.indexOf(".") > 0) {

				var aViewName = sName.split(".");

				sName = sName.substr(sName.lastIndexOf(".") + 1);

			} else { //current folder

				aViewName = this.getView().getViewName().split("."); // view.login.Login

			}

			aViewName.pop();

			var sViewPath = aViewName.join("."); // view.login

			if (sViewPath.toLowerCase().indexOf("fragments") > 0) {

				sViewPath += ".";

			} else {

				sViewPath += ".fragments.";

			}

			var id = this.getView().getId() + "-" + sName;

			if (!_fragments[id]) {

				//create controller

				var sControllerPath = sViewPath.replace("view", "controller");

				try {

					var controller = sap.ui.controller(sControllerPath + sName);

				} catch (ex) {

					controller = this;

				}

				_fragments[id] = {

					fragment: sap.ui.xmlfragment(

						id,

						sViewPath + sName,

						controller

					),

					controller: controller

				};

				if (model && !updateModelAlways) {

					_fragments[id].fragment.setModel(model);

				}

				// version >= 1.20.x

				this.getView().addDependent(_fragments[id].fragment);

			}

			var fragment = _fragments[id].fragment;

			if (model && updateModelAlways) {

				fragment.setModel(model);

			}

			if (_fragments[id].controller && _fragments[id].controller !== this) {

				_fragments[id].controller.onBeforeShow(this, fragment, callback, data);

			}


			setTimeout(function () {

				fragment.open();

			}, 100);

		},


		closeFragments: function () {

			for (var f in _fragments) {

				if (_fragments[f]["fragment"] && _fragments[f].fragment["isOpen"] && _fragments[f].fragment.isOpen()) {

					_fragments[f].fragment.close();

				}

			}

		},


		getFragmentControlById: function (parent, id) {

			var latest = this.getMetadata().getName().split(".")[this.getMetadata().getName().split(".").length - 1];

			return sap.ui.getCore().byId(parent.getView().getId() + "-" + latest + "--" + id);

		},


		showBusyIndicator: function () {

			return sap.ui.core.BusyIndicator.show();

		},


		hideBusyIndicator: function () {

			return sap.ui.core.BusyIndicator.hide();

		}


	});


});
This “BaseController.js” file will hold all the common functions we can reuse in our other controllers. At the end there is a fragment function available to easily call and open the fragments you will need later on in the application. This function shared by c3d1947136cd4c748a7aa794001af496.
More information about this fragment function can be found here:
https://blogs.sap.com/2017/03/09/ui5-fragments-and-dialogs/
Now that we have our “BaseController.js” file available we will make our “Boards.controller.js” file extend from this BaseController.js” file instead of the “Controller”.
Your “Boards.controller.js” file should look like this:
sap.ui.define([

	"./BaseController"

], function (BaseController) {

	"use strict";


	return BaseController.extend("cap.trello.TimesheetManager.controller.Boards", {

		onInit: function () {


		}

	});

});
We changed the import and usage of the “Controller” to “BaseController”. This was possible because we changed the “sap.ui.define” function so it imports from the same directory the “BaseController”. All the controllers inside our app will always extend from the “BaseController.js” file.
Like I mentioned before we will create an “App.view.xml” file which will be the root view for all our other views. Create the file inside the “view” directory together with the appropriate “App.controller.js” file inside the “controller” directory.
In the “App.view.xml” file we add the following code:
<mvc:View controllerName="cap.trello.TimesheetManager.controller.App" xmlns:html="http://www.w3.org/1999/xhtml" xmlns:mvc="sap.ui.core.mvc"

	displayBlock="true" xmlns="sap.m">

	<App id="app"></App>

</mvc:View>
In the “App.controller.js” file we add the following code:
sap.ui.define([

	"./BaseController"

], function(BaseController) {

	"use strict";


	return BaseController.extend("cap.trello.TimesheetManager.controller.App", {


	});

});
As you can see, this will be the wrapper for our app because we will define it in the “manifest.json” file and because it does not contain any code.
There will be some small adjustments to make to our “manifest.json” file since we added the “App.view.xml“ file to our project and because we want to make it our root view.
Change the “rootView” object of the “sap.ui5” object inside your “manifest.json” file so it looks like this:

As you can see, we make the “App” our “viewName” and set the “id” to “App”.
The second change in the “manifest.json” file is in the “routes”. Change it so it points to the “Boards” and clear the pattern.

This means we will also have to adjust our target, so it targets the “Boards” and it looks like this:
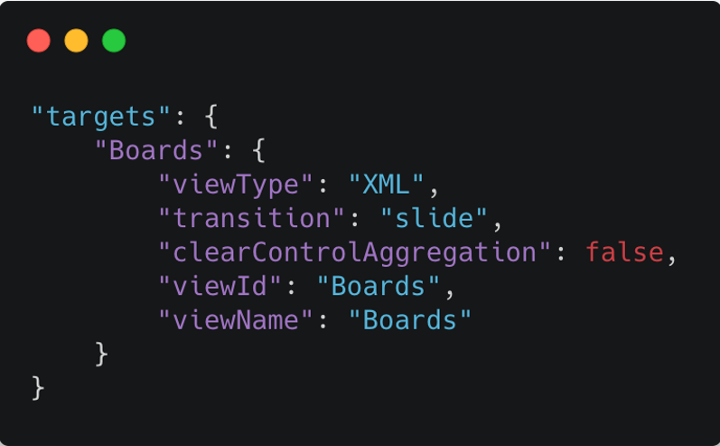
With this we prepared all the necessary steps to structure our app, fetch the user information and handle Trello OAuth login screens.
This means it is time to run our application for the first time.
Running the HTML5 Module
To run our UI5 application we will open the “”Run Configurations” from our left side menu and we press the “+-sign” to add a new configuration:

This will open a pop-up window in the command pallet where you select your HTML5 module from the list:

Next you select “No” because we do not want to run from our build folder. Quiet obvious since we would not have our just applied changes in that case:

Once we answered the previous question, we select the “index.html” file as runnable file:

We select the “latest” UI5 version (as long as you have a minimum of 1.72 you are good to use the “SAP Fiori 3 Quartz Dark theme”):

We finish by agreeing or providing a run-configuration name:

You will see that your run-configurations has been created. Select the UAA service below it and press the “bind” button to bind you UAA service to it:
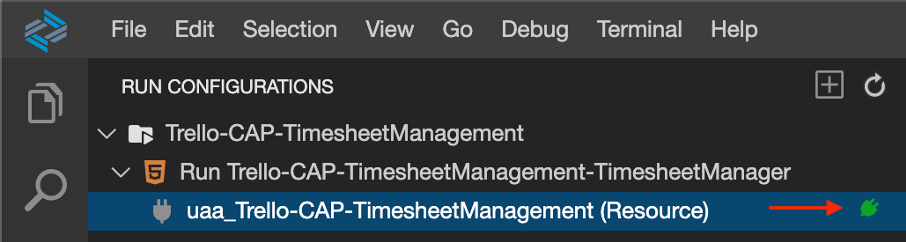
This will open up the command pallet again where you can choose your UAA service. We select the “LOCAL” service:

Once the service is bound you will see the following success message:

You can also verify it in the run configuration itself via the connected icon on the left:

If you have a look at your “TimesheetManager” HTML5 Module directory, you will see that a “.env1” file was created to hold you UAA configuration.
Now you are ready to run your application. Select your run configuration and press the “run” button:

This will ask you for an optional description for the app to run. Let’s call it “TimesheetmanagerApp”:

Once started the Business Application Studio will ask us again to expose and Open the service/app. We press the “Expose and open” button to open our App:

Sadly enough our app will not work at the moment…
Now the reason for this error is that our app tries to login via the “TrelloAuthorizer”, but it is routed to the UI5 app itself. This makes sense since we are not using our Approuter in this run configuration. An HTML5 Module has its own “xs-app.json” file which is used in this case since we are not navigating via the Approuter.
If we have a look at this “xs-app.json” file inside our HTML5 Module, we will see that it looks like this:

We see immediately that some routes are missing here. With this configuration all the requests that our app tries to make would be forwarded to the “html5-apps-repo-rt” service. There is obviously no “TrelloAuthorizer” endpoint to be found.
We add the following 2 temporary routes above this “html5-apps-repo-rt” service route:
{

    "source": "^/timesheetService/(.*)$",

    "target": "/timesheet-management/$1",

    "authenticationType": "xsuaa",

    "destination": "srv_api",

    "csrfProtection": false

},

{

    "source": "/TrelloAuthorizer/(.*)$",

    "target": "$1",

    "authenticationType": "xsuaa",

    "destination": "TrelloAuthorizer_api",

    "csrfProtection": false

}
At this point the “xs-app.json” would have a matched route when our app would try to call the “TrelloAuthoirzer” endpoint. This because we have our routes, but we did not provide the destination configuration itself like we did for our Approuter.
So we create a “default-env.json” file inside our HTML5 Module and we add the following destinations to it just like we did for our Approuter:
{

    "destinations": [

        {

            "name": "srv_api",

            "url": "http://localhost:4004",

            "forwardAuthToken": true

        },

        {

            "name": "TrelloAuthorizer_api",

            "url": "http://localhost:3002",

            "forwardAuthToken": true

        }

    ]

}
Now we are almost there, but we have to make 2 small temporary adjustments to our “TrelloAuthorizer” Node.JS Module inside the “trello.js” file. The first one takes place inside our constructor, here we change the following line in our constructor:

To actually the whole same line except for the second last parameter, the login callback URL. Here we provide the full URL where our HTML5 Module is available with the following path:
https://{subdomain}-workspaces-ws-{workspace-id}-app{id}.eu10.trial.applicationstudio.cloud.sap/Trel...You can find this URL in the browser where your app is open obviously or via the command pallet with Ports:Preview.
Your oAuth should look like this now:

By calling the “/TrelloAuthorizer/loginCallback” URL, the route in our HTML5 Module its “xs-app.json” file will be matched and the request will be forwarded to our “TrelloAuthorizer” Module.
The second temporary change is to be performed inside the “loginCallback” method also inside the “trello.js” file. Here we change our “res.redirect” URL to the same URL (HTML5 Module) used above, but without URL paths:
https://{subdomain}-workspaces-ws-{workspace-id}-app{id}.eu10.trial.applicationstudio.cloud.sap When we are authorized by Trello the Node Module will redirect us to our development HTML5 module instead of the deployed HTML5 Module (since this was coming from the destination service and would go over the Approuter).
Now make sure you restart the “TrelloAuthorizer’ and restart the HTML5 Module by just pressing the “run” button again in the “run-configurations”. You should get the Trello Authorization screen this time:

Once you pressed the “Allow” button you should be redirected to your development UI5 app. Here you would enjoy the “SAP Fiori 3 Quartz Dark theme” along with your Trello name and avatar retrieved via the “TrelloAuthorizer” Node.JS Module:

Awesome!
As you can see the title of our app is “Title” at the moment. This because we did not adjust the i18n file yet. I will just provide the full i18n file bellow because we are not going to spend all our time about an i18n file.
Copy paste the following I18n content into your I18n file and refresh your application.
title=Timesheet Application

appTitle=Timesheet Application

appDescription=Timesheet Application


welcome=Welcome to the Timesheet Application ⏱️


appIcon=App icon


selectBoard=SELECT A BOARD TO GET STARTED


active=Active

closed=Closed


openBoardOnTrello=Open board in Trello


board=board

cards=Cards


cardInfo=Card Information


Yes=Yes

No=No


noCardSelectedTitle=No Trello card selected

noCardSelectedDesc=Please select a card to add your spent time.


noDeadLineSet=No deadline set


spentHoursTimeline=Timeline spent hours

timelineTitle=The spent time on:

noHoursSpent=No hours spent on card.

addSpentHour=Add spent hour

AddSpentHourTooltip=Add spent hour

deleteSpentHour=Delete spent hour

editSpentHour=Edit spent hour


duePassed=Deadline expired

dueNotPassed=Deadline not expired yet

noDeadLineSet=No deadline set


toExcel=Export to Excel

toExcelTooltip=Export all cards timesheets to Excel


deletionConfirmationText=Are you sure you want to delete this spent hour?


Save=Save

Update=Update

Comment=Comment

Status=Status

SpentHours=Spent hours

SpentOnDate=Spent on


Done=Done

Ongoing=Ongoing

OnHold=On hold


TimesheetExportFinished=Timesheet export has Finished.


cardName=Card name

cardDesc=Card description

date=Date

fullName=User

hours=Hours

status=Status

comment=Comment


errorAddingSpentHour=Could not add Spent hour.

fillInRequiredFieldsSpentHour=Please fill in all the required fields.
When you run the application again you will see your provided i18n texts in the application:

Looks good right?
Time to fill this welcome page with all our Trello Boards.
To call these Trello Boards we will add the “getBoards” function to our “webapp > service > TrelloService.js” file. Just like the following function:
getBoards: function () {

    return this.http("/TrelloAuthorizer/getAllBoards").get().then(function (boards) {

        return JSON.parse(boards);

    });

}
This will allow us to call the “getAllBoards” endpoint and function of our “TrelloAuthorizer” Node.js app inside our MTA project. This will return our Trello boards obviously and this function will be called from our “BoardState”.
Indeed “BoardState”, we want to organize and separate this “UserState” and “BoardState” to have some clean code right there.
Create the “BoardState.js” file inside your “webapp > state” directory.
Inside this “BoardState.js” file you paste the following code:
/* global _:true */

sap.ui.define([

	"../object/BaseObject",

	"../service/TrelloService",

	"../object/BoardObject"

], function (BaseObject, TrelloService, BoardObject) {

	"use strict";

	var BoardState = BaseObject.extend("cap.trello.TimesheetManager.state.BoardState", {


		aBoards: [],


		constructor: function (data) {

			BaseObject.call(this, data);

		},


loadBoards: function () {

			if (this.aBoards.length > 0) {

				return Promise.resolve(this.aBoards);

			}

			return TrelloService.getBoards().then(function (boards) {

				var aBoards = boards.map(function (oBoard) {

					return new BoardObject(oBoard);

				});

				this.setBoards(aBoards);

				return this.aBoards;

			}.bind(this));

		},


		setBoards: function (boards) {

			this.aBoards = boards;

			this.updateModel();

		}

	});

	return new BoardState();

});
On top of the file under “sap.ui.define” you see we import the “BaseObject” and “TrelloService” just like we did for our “UserState”. Instead of importing the “UserObject” we import the “BoardObject” because we want to make “BoardObjects” out of our retrieved Boards.
We declare an array called “aBoards” where we will store all these “BoardObjects”.
Next we define our “constructor” just like we did for our “UserState”.
With the “loadBoards” function we will retrieve all our Trello Boards via our “TrelloService.” This function will be called from our “BoardsController.js” file afterwards. If our “aBoards” already contains “BoardObjects” we return a promise and we resolve all our boards. If this is not the case, we will request them via our service and we will “.map” our result so we can create a “BoardObject” out of every board we retrieved. Once the whole response is “converted” to “BoardObjects” we use the “setBoards” function to store these boards into our earlier declared “aBoards” array. Once those are stored, we update our model, which will make sure our view is update later on and the boards are shown in the view.
Let us create this “BoardObject.js” file in the same directory where we stored all our other objects. Create a new file inside the “webpp > object” directory called “BoardObject.js” so it looks like this:
Next you paste the following code inside the file:
/* global _:true */

sap.ui.define([

	"./BaseObject"

], function (BaseObject) {

	"use strict";

	return BaseObject.extend("cap.trello.TimesheetManager.object.BoardObject", {

		constructor: function (data) {

			BaseObject.call(this, data);

		},


		getId: function () {

			return this.id;

		},


		getName: function () {

			return this.name;

		},


		getUrl: function() {

			return this.url;

		}

	});

});
These getters will allow us to get the “id”, “name” and “url” of our Trello “BoardObjects”.
Now we are able to call our Trello Boards via our “BoardState” that will call our “TrelloService”. Our “Boards.controller.js” file can now call our “BoardState” its “loadBoards” function.
Copy paste the following code inside your “Boards.controller.js” file so it looks like this:
sap.ui.define([

	"./BaseController",

	"../state/BoardState",

	"../model/Formatter"

], function (BaseController, BoardState, Formatter) {

	"use strict";


	return BaseController.extend("cap.trello.TimesheetManager.controller.Boards", {


		formatter: Formatter,


		onInit: function () {

			// Set baord state to the view

			this.setModel(BoardState.getModel(), "BoardState");


			var oRouter = this.getRouter();

			oRouter.getRoute("Boards").attachMatched(this._onRouteMatched, this);

		},


		_onRouteMatched: function (oEvent) {

			this.showBusyIndicator();

			// Get all the user's boards

			BoardState.loadBoards().then(function () {

				this.hideBusyIndicator();

			}.bind(this));

		},

toTrelloBoard: function (oEvent) {

			var oSource = oEvent.getSource();

			var trelloBoardUrl = oSource.getBindingContext("BoardState").getObject().getUrl();

			window.open(trelloBoardUrl, '_blank');

		},

	});

});
In our “Boards.controller.js” file we imported the “BoardState” and “Formatter” inside our “sap.ui.define” function. The “Formatter” will allow us to make some changes to the control based on the value passed to it. We will create this file afterwards. We declare this “formatter” inside our “Boards” controller so we can use it later on in our view.
In the “onInit” function of our controller we set our “BoardState” to our view as a model and we call it “BoardState”. Once this model has been set, the router will trigger the “_onRouteMatched” function and it will call our “BoardState” its “loadBoards” function to retrieve our Trello Boards.
The last function “toTrelloBoard” will open read out the current “bindingContext“ and will get the board its “url”, so it can open it in a new tab.
Now we want to create this so called “Formatter.js” file inside our “webapp > model” directory. Inside this file we place the following code:
/* global moment: true */

sap.ui.define([], function () {

	"use strict";

	return {

	    getTrelloIcon: function (oCurrentCard) {

		  return sap.ui.require.toUrl("cap/trello/TimesheetManager/images/trello-mark-blue.png");

             }

	};

});
This formatter function “getTrelloIcon” will be called in our “Boards.view.xml” file to find the relative path to our image dynamically when we deploy and run it as a Fiori Launchpad Application. This means you have to store a Trello Icon image called “trello-mark-blue.png” inside the images directory inside the “webapp” directory.
(Please follow the Trello Brand Guidelines when using these images)
Now that we created our formatter, it can be used in our view.
Inside your “Boards.view.xml” file add the following code inside your “content” control bellow the “Toolbar”:
<Panel>

    <content>

        <f:GridList id="gridListBoards" headerText="{i18n>selectBoard}" items="{BoardState>/aBoards}">

            <f:customLayout>

                <grid:GridBoxLayout boxMinWidth="17rem"/>

            </f:customLayout>

            <CustomListItem press=".onBoardPress" type="Active">

                <VBox height="100%">

                    <VBox class="sapUiSmallMargin">

                        <layoutData>

                            <FlexItemData growFactor="1" shrinkFactor="0"/>

                        </layoutData>

                        <Title text="{BoardState>name}" class="sapUiSmallMarginBottom"/>

                        <VBox height="60px">

                            <Label text="{BoardState>desc}" wrapping="true" class="sapUiSmallMarginBottom"/>

                        </VBox>

                        <tnt:InfoLabel text="{= ${BoardState>closed} ? ${i18n>closed} : ${i18n>active}}" colorScheme="{= ${BoardState>closed} ? 3 : 8}" displayOnly="true"/>

                        <Toolbar style="Clear">

                            <Text text="{path: 'BoardState>dateLastActivity', type: 'sap.ui.model.type.DateTime', formatOptions: { source : { pattern : 'yyyy-MM-ddTHH:mm:ssZ' }, pattern: 'yyyy-MM-dd HH:mm:ss'}}"/>

                            <ToolbarSpacer/>

                            <Image src="{path: 'BoardState>id', formatter: '.formatter.getTrelloIcon'}" width="20px" press=".toTrelloBoard" tooltip="{i18n>openBoardOnTrello}"/>

                        </Toolbar>

                    </VBox>

                </VBox>

            </CustomListItem>

        </f:GridList>

    </content>

</Panel>
This will create a “Panel” with a “GridList” inside that will display all your Trello Boards, since we bound it to our “BoardState” model its “aBoards” property.
It will display the board information and it uses “expression binding” to decide which colors or texts should be shown based on certain values. The Trello icon is bound to the board its “url” property and can open the board inside a new tab in the Trello Website Application. We already imported the “sap.f” library/namespace to use the “Avatar” control inside our “Toolbar” so we do not have to do that again.
But what we do have to add are the following to “namespaces”:
- xmlns:grid=”sap.ui.layout.cssgrid”
- xmlns:tnt=”sap.tnt”
This because we want to use the “GridBoxLayout” and “InfoLabel” control.
Now it is time to run our application again so refresh the page and we should see all our Trello Boards inside the application like this:

Amazing! All your Trello Boards inside your SAPUI5 Fiori Application! With the sweet Dark Theme applied!
The next thing we want to do is to navigate to a second screen where our Board its Cards will be shown, once we select it.
We do this by adding the following function to our “Board.controller.js” file:
onBoardPress: function (oEvent) {

    this.showBusyIndicator();


    // Get the selected board object from the BoardState based on its bindingContext against the ovent source

    var oBoard = oEvent.getSource().getBindingContext("BoardState").getObject();


    // Set the current board in the board state

    BoardState.setCurrentBoard(oBoard);


    // Next nav to the detail page with all the card

    var oRouter = sap.ui.core.UIComponent.getRouterFor(this);

    oRouter.navTo("Cards", {

        boardId: oBoard.id

    });

}
This function will be triggered once you select a Board (tile) in the main Boards screen. This function is called once we press our “CustomListItem”, like we declared in our “Boards.view.xml” file.

This function will get the selected board via the “bindingContext” and set it as the “currentBoard” inside our “BoardState” via the “setCurrentBoard” function of the “BoardState”. Once the selected board has been set as the current board the router will route us to the second view (the Cards view) and it will pass the “boardId”, so the route pattern knows which board we are talking about.
To be able to use the “setCurrentBoard” function of the “BoardState” it needs to be declared there, which is not the case yet.
Open your “BoardState” and add the following function:
setCurrentBoard: function (oBoard) {

    this.oCurrentBoard = oBoard;

    this.updateModel();

}
This function will receive the “selected board” as parameter and set it in our state in the “oCurrentBoard” object. Once it is set it will update the model. To be able to set this current board, we have to declare the “oCurrentBoard” inside our state. This can be done by placing the following declaration just under the “aBoards” array:
oCurrentBoard: null,Now you know the current board in your “BoardState” and It can be used later on inside your detail view, along with the board its cards.
Now that we told our “Boards.controller.js” file that it has to route to the “Cards.view.xml” view file, it needs to exist and the route and target pattern needs to be declared in the “manifest.json” file.
Open your “manifest.json” file and add the following route to your “routes” array:
{

	"name": "Cards",

	"pattern": "board/{boardId}/cards",

	"target": ["Cards"]

}
This is a route to the “Cards” target (which we will create after) and it requires a pattern which holds your “boardId” so it knows which board and related cards it should load if we load the page from the “Cards” view. This way we can read of the URL pattern and load the required board and cards inside the view.
Last but not least it needs the “Cards” target to know which view this route is related to. For this you add the following target inside your “targets” object.
"Cards": {

    "viewType": "XML",

    "transition": "slide",

    "clearControlAggregation": false,

    "viewId": "Cards",

    "viewName": "Cards"

}
Here we declare that we want to have the “Cards” view loaded when this target is targeted.
Your “manifest.json” file its routes and targets should look like this:

For those who want a Full Screen experience when they use the app in the “Fiori Launchpad mode”, you can set the “fullWidth” under “sap.ui” to “true”.
Now that our “manifest.json” file knows the route and pattern and target to our “Cards” view we can created this “Cards.view.xml” file inside our “webapp > view” directory.
Inside this view you paste the following xml:
<mvc:View controllerName="cap.trello.TimesheetManager.controller.Cards" xmlns:mvc="sap.ui.core.mvc" displayBlock="true"

	xmlns="sap.m" xmlns:semantic="sap.m.semantic">

	<Page id="page" title="{i18n>title}" showNavButton="true" navButtonPress=".onNavBack">

		<content>

			<SplitContainer>

				<masterPages>

					<semantic:MasterPage title="{BoardState>/oCurrentBoard/name}">

						<semantic:content>

							<List id="listCards" selectionChange=".onCardSelect" items="{ path: 'BoardState>/oCurrentBoard/cards', sorter: { path: 'name', descending: false }}"

								mode="{= ${device>/system/phone} ? 'None' : 'SingleSelectMaster'}" growing="true" growingScrollToLoad="true">

								<headerToolbar>

									<Toolbar>

										<SearchField width="100%" liveChange="onCardSearch" search="onCardSearch"/></Toolbar>

								</headerToolbar>

								<items>

									<ObjectListItem type="Active" title="{BoardState>name}">

										<attributes>

											<ObjectAttribute text="{BoardState>desc}"/>

										</attributes>

									</ObjectListItem>

								</items>

							</List>

						</semantic:content>

					</semantic:MasterPage>

				</masterPages>

				<detailPages>

					<semantic:DetailPage title="{i18n>cardInfo}">

						<semantic:content>

						</semantic:content>

						<semantic:customFooterContent>


						</semantic:customFooterContent>

					</semantic:DetailPage>

				</detailPages>

			</SplitContainer>

		</content>

	</Page>

</mvc:View>
This xml will separate our “Cards” view in a “Master” and “Detail” page view.
We bind the “oCurrentBoard” from our “BoardState” its name to our “MasterPage” and we place a “List” control inside this “MasterPage”. This list will hold all our board its cards and will sort it ascending. It provides a search bar and the possibility to select a card. For every card we display the name and description of the card.
Now again first things first, rerunning our app at this point would not make any difference. We did not create a controller for this “Cards” view yet and we did not fetch our board its cards.
Let us create this “Cards.controller.js” file inside our “webapp > controller” directory
Add the following code to your “Cards.controller.js” file:
sap.ui.define([

	"./BaseController",

	"../state/UserState",

	"../state/BoardState",

	"sap/ui/core/routing/History",

	"../model/Formatter",

	'sap/ui/model/Filter',

	"sap/ui/model/FilterOperator"

], function (BaseController, UserState, BoardState, History, Formatter, Filter, FilterOperator) {

	"use strict";


	return BaseController.extend("cap.trello.TimesheetManager.controller.Cards", {


		formatter: Formatter,


		onInit: function () {

			// Set the user model to the view

			this.setModel(UserState.getModel(), "UserState");


			// Set the board model to the view

			this.setModel(BoardState.getModel(), "BoardState");


			// Attach a private event listener function _onRouteMatched to the matched event of this route.

			var oRouter = this.getOwnerComponent().getRouter();

			oRouter.getRoute("Cards").attachMatched(this._onRouteMatched, this);

		},


		_onRouteMatched: function (oEvent) {

			// Get the current user

			UserState.loadCurrentUser();

			var boardId = oEvent.getParameter("arguments").boardId;

			BoardState.loadCurrentBoard(boardId).then(function (board) {

				BoardState.loadBoardCards(board.getId()).then(function () {

					this.hideBusyIndicator();

				}.bind(this));

			}.bind(this));

		},


		// Navigate back

		onNavBack: function () {

			this.showBusyIndicator();

			var oHistory = History.getInstance();

			var sPreviousHash = oHistory.getPreviousHash();

			if (sPreviousHash !== undefined) {

				window.history.go(-1);

			} else {

				var oRouter = sap.ui.core.UIComponent.getRouterFor(this);

				oRouter.navTo("Boards", true);

			}

		},


		onCardSearch: function (oEvent) {

			// add filter for search

			var aFilters = [];

			var sQuery = oEvent.getSource().getValue();

			if (sQuery && sQuery.length > 0) {


				var filter = new Filter({

					filters: [

						new Filter("name", FilterOperator.Contains, sQuery),

						new Filter("desc", FilterOperator.Contains, sQuery)

					],

					and: false

				});

				aFilters.push(filter);

			}

			// update list binding

			var list = this.byId("listCards");

			var binding = list.getBinding("items");

			binding.filter(aFilters, "Application");

		}

	});

});
As you can see, we extend our “Cards” controller again from our “BaseController” and we import our “UserState” and “BoardState” again. These states our both set as a model on our view inside the “onInit” function. We imported and declared our formatter again, just like we did for our “Boards” controller. In this function we added an “_onRouteMatched” again. When the router equals to “Cards” this function will be triggered which will read out the “boardId” from our URL parameters, so it can use the id to retrieve the board if it was not yet loaded. When would we have such a scenario? If someone sends you the URL of page 2 and you open this URL the board needs to be loaded along with its cards.
This is why we have this “loadCurrentBoard“ function. If it was already loaded, it will resolve this “CurrentBoard“ inside the promise so it would not be fetched again. This means the board will be loaded either if we come from our “Boards” view or we go to the “Cards” view immediately.
This means we have to add this “loadCurrentBoard” also to our “BoardState”. This function looks like this:
loadCurrentBoard: function (boardId) {

	if (this.oCurrentBoard) {

		return Promise.resolve(this.oCurrentBoard);

	}

	return this.getCurrentBoardById(boardId);

},
It will resolve and return the current board if it was already loaded or it will call the board by its ID if it was not yet present. This with the function “getCurrentBoardById” that we also need to declare in our “BoardState”. This function looks like this:
getCurrentBoardById: function (boardId) {

	return TrelloService.getBoardById(boardId).then(function (board) {

		var oBoard = new BoardObject(board);

		this.setCurrentBoard(oBoard);

		return this.oCurrentBoard;

	}.bind(this));

}
This function will call our “TrelloService” its “getBoardById” function and will create a “BoardObject” out of it and finally it will set it as the current board inside the “oCurrentBoard” via the “setCurrentBoard” function. To be able to call the “getBoardById” inside our “TrelloService” we need to declare and implement it over there too.
Inside your “webapp > service > TrelloService.js” file you add the following function:
getBoardById: function (boardId) {

    return this.http("/TrelloAuthorizer/getBoardById?boardId=" + boardId).get().then(function (board) {

        return JSON.parse(board);

    });

}
It will call the “getBoardById” endpoint and function we implemented in our “TrelloAuthorizer” Node.js Application.
Now time to step back to our “Cards.controller.js” file. If we have our current board already or we loaded our board, we will continue by retrieving our current board its cards. We do this once our board is retrieved, so inside our “.then” function of the promise holding the “loadCurrentBoard” function.
The cards are loaded via the “loadBoardCards” function inside our “BoardState”, which means have to create this function over there.
Add the following function to your “BoardState”:
loadBoardCards: function (boardId) {

	return this.loadCurrentBoard(boardId).then(function (board) {

		if (board.getCards()) {

			return Promise.resolve(this.oCurrentBoard);

	        }

	        return TrelloService.getBoardCards(boardId).then(function (cards) {

			var aCards = cards.map(function (oCard) {

				return new CardObject(oCard);

			});

			return this.setBoardCards(aCards);

		}.bind(this));

	}.bind(this));

}
This function will check if our “BoardObject” has cards already and will resolve them if it does and otherwise it will request the cards via our service again. Once retrieved it will create “CardObjects” out of it and set it to our “BoardObject” via the “setBoardCards” function which looks like this and should be added to your “BoardState”:
setBoardCards: function (aCards) {

	this.getCurrentBoard().setCards(aCards);

	this.updateModel();

}
This will get the current board with the function “getCurrentBoard”, which has to be added to our “BoardState” and which looks like this:
getCurrentBoard: function () {

    return this.oCurrentBoard;

}
This function will return the current board as a “BoardObject”. This is why we can call the “setCards” method on it and pass the cards. We will extend our “BoardObject.js” file with this method in a few moments. These 2 sentences mean we have to implement a getter and setter for our “BoardObject” according to the cards and we have to create a “CardObject”.
We create the “CardObject.js” file inside our “webapp > object” directory.
Now that we created this “CardObject” we can import it in our “BoardState” on top inside our “sap.ui.define” like this:
"../object/CardObject"We also pass it to our “constructor”, so it looks like this:
function (BaseObject, TrelloService, HrTimesheetService, BoardObject, CardObject)Now we extend our “BoardObject.js” file with the getter and setter for the cards like this:
getCards: function () {

	return this.cards;

},


setCards: function (aCards) {

	this.cards = aCards.map(function (card) {

		return new CardObject(card);

	});

}
The getter will return our board its cards and the setter will create cards out of all the cards passed in the “aCards” parameter. This means we also have to import it on top of our “BoardObject.js” file so it looks like this:
sap.ui.define([

	"./BaseObject",

	"./CardObject"

], function (BaseObject, CardObject) {
We paste the following code inside our “CardObject.js” file:
/* global _:true */

sap.ui.define([

	"./BaseObject"

], function (BaseObject) {

	"use strict";

	return BaseObject.extend("cap.trello.TimesheetManager.object.CardObject", {

		constructor: function (data) {

			BaseObject.call(this, data);

		},


		getId: function () {

			return this.id;

		},


		getUrl: function() {

			return this.url;

		}

	});

});
This just returns a getter for our card “id” and “url”.
One last thing we have to do is to add the following function to our “TrelloService.js” file inside the “webapp > service” directory:
getBoardCards: function (boardId) {

  return this.http("/TrelloAuthorizer/getCardsByBoardId?boardId=" + boardId).get().then(function (cards) {

	return JSON.parse(cards);

  });

}
This function will call our “TrelloAuthoirzer” its “getCardsByBoardId” endpoint and function to retrieve the board its cards. We called this function from our state, but it was not declared and implemented inside our “TrelloService.js” file.
Time to go back to our “Cards.controller.js” file. We have to functions left to discuss here. The “onNavBack” function will bring us back once step in history if there is one available (which is the reason it was imported on top) and if there is none available it will route you to the “Boards” view. The last one is the “onCardSearch” function will locally filter on your cards inside the array of cards by passing the filters to the list. This is the reason we imported the “Filters” and “FilterOperators” on top. We allow the filtering on the card name and description.
If we refresh our app again, and we select a board, we will be routed to the “Cards” view and we will get our board its cards displayed in the list inside our master page.
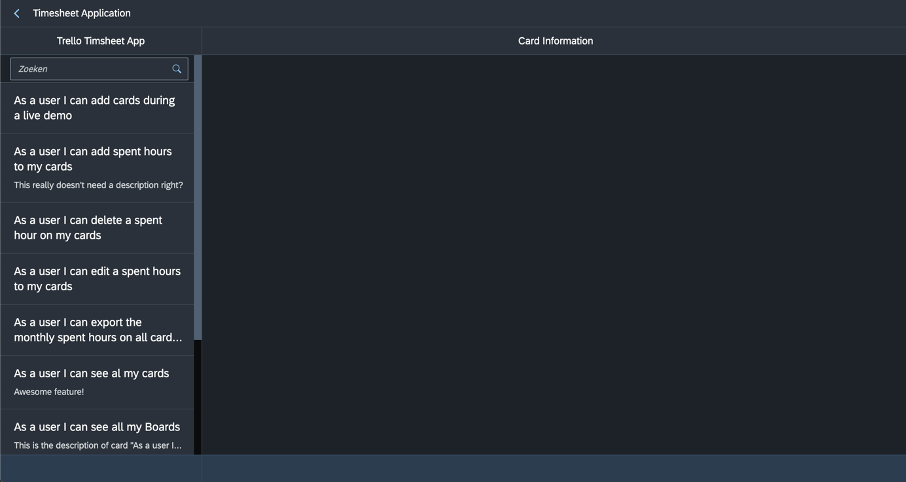
If we search inside our list via the search bar our cards will be filtered on their card name and description:

Pretty cool right?!
Cool but not there yet! This detail screen is way to empty for the moment, let us fill this space with some Trello Card information.
Past the following code between your “<semantic:content>” control of your “<semantic:DetailPage>” control:
<MessagePage text="{i18n>noCardSelectedTitle}" description="{i18n>noCardSelectedDesc}" showHeader="false" icon="sap-icon://timesheet" visible="{= !${BoardState>/oCurrentCard} ? true : false}"/>

<ObjectHeader id="oHeaderCard" binding="{BoardState>/oCurrentCard}" visible="{= ${BoardState>/oCurrentCard} ? true : false}" responsive="true" icon="{path: 'BoardState>/oCurrentCard/id', formatter: '.formatter.getTrelloIcon'}" iconTooltip="{i18n>openCardOnTrello}" intro="{BoardState>desc}" title="{BoardState>name}" backgroundDesign="Translucent" iconActive="true" iconPress=".toTrelloCard">

    <attributes>

        <ObjectAttribute title="{i18n>dateLastActivity}" text="{path: 'BoardState>dateLastActivity', type: 'sap.ui.model.type.DateTime', formatOptions: { source : { pattern : 'yyyy-MM-ddTHH:mm:ssZ' }, pattern: 'yyyy-MM-dd HH:mm:ss'}}"/>

    </attributes>

    <statuses>

        <ObjectStatus title="{i18n>due}" text="{path: 'BoardState>due', formatter: '.formatter.emptyDueDate', type: 'sap.ui.model.type.DateTime', formatOptions: { source : { pattern : 'yyyy-MM-ddTHH:mm:ssZ' }, pattern: 'yyyy-MM-dd HH:mm:ss'}}" state="{path: 'BoardState>due', formatter: '.formatter.checkDueDateStatus'}"/>

        <ObjectStatus class="sapUiSmallMarginBottom" text="{path: 'BoardState>due', formatter: '.formatter.checkDueDateText'}" inverted="true" state="{path: 'BoardState>due', formatter: '.formatter.checkDueDateStatusInverted'}"/>

    </statuses>

</ObjectHeader>

<Toolbar style="Clear" class="sapUiSmallMarginTop">

    <ObjectHeader title="{i18n>spentHoursTimeline}" visible="{= ${BoardState>/oCurrentCard} ? true : false}"/>

    <ToolbarSpacer/>

</Toolbar>
This xml will display a “MessagePage” if no Trello Card was selected. If a Card has been selected it will show us an “ObjectHeader” control holding the Trello Icon and the card its Name, last activity and card due date.
This xml part is also using the 5 following formatters:
- getTrelloIcon (already implemented)
- emptyDueDate
- checkDueDateStatus
- checkDueDateText
- checkDueDateStatusInverted
These formatters will help us define the text to show or the color of the control.
This means we will add these 4 new formatter functions to our “Formatter.js” file inside our “webapp > model” directory.
These functions look like this:
// Set sate color for due date if expired or not

		checkDueDateStatus: function (dueDate) {

			if (dueDate) {

				var oDueDate = new Date(dueDate);

				if (new Date() > oDueDate) {

					return "Error";

				} else {

					return "Warning";

				}

			}

			return "Success";

		},


		// Set sate inverted color for due date if expired or not

		checkDueDateStatusInverted: function (dueDate) {

			if (dueDate) {

				var oDueDate = new Date(dueDate);

				if (new Date() > oDueDate) {

					return "Indication01";

				} else {

					return "Indication03";

				}

			}

			return "Indication04";

		},


		checkDueDateText: function (dueDate) {

			var i18n = this.getOwnerComponent().getModel("i18n").getResourceBundle();

			if (dueDate) {

				var oDueDate = new Date(dueDate);

				if (new Date() > oDueDate) {

					return i18n.getText("duePassed");

				} else {

					return i18n.getText("dueNotPassed");

				}

			}

			return i18n.getText("noDeadLineSet");

		},


		emptyDueDate: function (dueDate) {

			var i18n = this.getOwnerComponent().getModel("i18n").getResourceBundle();

			if (dueDate) {

				return dueDate;

			}

			return i18n.getText("noDeadLineSet");

		},
These formatters just check the passed value and depending on a date that is empty or passed it will adjust the text or the color of the control.
Restarting and testing our application at this moment would not display this information in the detail page, this since we did not implement our “onCardSelect” function yet. We defined it in our xml already but now we still have to at it to our “Cards.controller.js” file. Add the following function to your “Cards” controller:
// On card select show details

onCardSelect: function (oEvent) {

	var oSource = oEvent.getSource();

	var oCard = oSource.getSelectedItem().getBindingContext("BoardState").getObject();

	BoardState.setCurrentCard(oCard);

},
This function will read out the “oEvent” its source and will get the selected card out the “oEvent” its “selectedItem” its “bindingContext”. Once this selected card has been retrieved, it will be passed to our “BoardState” its “setCurrentCard” function.
Indeed, this means we have to define and implement this function inside our “BoardState.js” file again.
Add the following function to your “BoardState.js” file:
setCurrentCard: function (oCard) {

	this.oCurrentCard = oCard;

	this.getCardSpentHours(this.oCurrentBoard.getId(), this.oCurrentCard.getId()).then(function (spentHours) {

		this.updateModel();

		return spentHours;

	}.bind(this));

}
As you can see this selected card is stored in a property called “oCurrentCard”, this means we have to declare this variable inside our “BoardState” as well. So, it looks like this:
aBoards: [],

oCurrentBoard: null,

oCurrentCard: null,
We set this “oCurrentCard” to “null”, so we can use it later on in an expression binding to check if we have to show a page that says “no card selected” or the selected card.
I know defining this is not necessary, but it gives you a clean overview of all your available properties inside your “BoardState”. Nice way to model and structure your whole app, right?
As you can see this “setCurrentCard” also calls the “SpentHours” on a card. Let us comment out this whole “getCardSpentHours” function for now and change it to “this.updateModel()”.
This means your function looks like this:
setCurrentCard: function (oCard) {

	this.oCurrentCard = oCard;

	this.updateModel();

}
We will implement this “getCardSpentHours” afterwards, we want to check if our detail view is displayed correctly at this point.
If you want to open the current card in Trello when you press the Trello icon in the “Cards” view, just add the following code to your “Cards” controller:
toTrelloCard: function (oEvent) {

	var oSource = oEvent.getSource();

	var trelloCardUrl = oSource.getBindingContext("BoardState").getObject().getUrl();

	window.open(trelloCardUrl, '_blank');

},
It works just the same way as the function to open the board in Trello in the “Boards” controller.
Time to run our application again!
Our application its detail page looks like this if we did not select any card:

But if we do select a card, our page looks like this:

For those who are paying attention really close, you will see the text “Timeline spent hours”. Indeed, we will use the “Timeline” control to display all our “SpentHours” on a card. Awesome!
With this we finished the implementation of the consumption of all our required Trello information via our “TrelloAuthorizer” Node.js Application.
Consuming the “OData V4 Timesheet-Management Service”
Now that we have all our required Trello information available inside our HTML5 application, we can start consuming our “OData V4 Service” to store “SpentHours” on Trello Cards inside our database. If we can store them, we also can read them via our service and map them to the corresponding Trello board and card. Once we read and created them, we will provide a way to edit an delete them too.
Let us take off where we left, you remember the “getCardSpentHours” function in our “BoardState” its “setCurrentCard” function? We commented it to test our UI, but we will uncomment it now since we want to request the “SpentHours” on the selected card.
This means your function should look like this again:
setCurrentCard: function (oCard) {

    this.oCurrentCard = oCard;

    this.getCardSpentHours(this.oCurrentBoard.getId(), this.oCurrentCard.getId()).then(function (spentHours) {

        this.updateModel();

	return spentHours;

    }.bind(this));

}
As you can see this “getCardSpentHours” is called from “this” which means it is another function inside our “BoardState”. Add this function to the state and make sure it looks like this:
getCardSpentHours: function (boardId, cardId) {

	if (this.getCurrentCard().getSpentHours()) {

		return Promise.resolve(this.getCurrentCard().getSpentHours());

	}

	return TimesheetManagementService.getCardSpentHours(boardId, cardId).then(function (aSpentHours) {

		this.oCurrentCard.setSpentHours(aSpentHours);

		return this.oCurrentCard.getSpentHours();

	}.bind(this));

}
If the card has “SpentHours” it will resolve and return them. It fetches the “currentCard” via the function “getCurrentCard” we still have to add and looks like this:
getCurrentCard: function () {

	return this.oCurrentCard;

},
It will only return the “oCurrentCard” object.
If these “SpentHours” are not present yet, it will call them via our “OData V4 Service” from our database. You see this “TimesheetManagementService” which is a new service inside our “webapp > service” directory. We will implement it in a minute, but first let us extend our “CardObject.js” file with this “getSpentHours” method. If we are implementing this getter, we will later on need a setter for this one too. Let us define them both together.
getSpentHours: function () {

	return this.spentHours;

},


setSpentHours: function (aSpentHours) {

	this.spentHours = aSpentHours.map(function (spentHour) {

		// spentHour.date = new Date(spentHour.date);

		return new SpentHourObject(spentHour);

	});

}
The getter will return our card its “SpentHours” while the setter will receive an array of “SpentHours” from our service and map them to “SpentHourObjects”.
This means we have to import this “SpentHourObject” on top of our file and pass it to our constructor:
/* global _:true */

sap.ui.define([

	"./BaseObject",

	"./SpentHourObject"

], function (BaseObject, SpentHourObject) {
This means we will also have to create this “SpentHourObject.js” file inside our “webapp > object” directory.
Inside this “SpentHourObject.js” file you paste the following code:
/* global _:true */

sap.ui.define([

	"./BaseObject"

], function (BaseObject) {

	"use strict";

	return BaseObject.extend("cap.trello.TimesheetManager.object.SpentHourObject", {

		constructor: function (data) {

			BaseObject.call(this, data);

			if (data) {

				this.date = new Date(data.date);

			}

		},


		getId: function () {

			return this.ID;

		},


		setId: function (ID) {

			this.ID = ID;

		},


		setBoardId: function (boardId) {

			this.boardId = boardId;

		},


		setCardId: function (cardId) {

			this.cardId = cardId;

		},


		setFullName: function (fullName) {

			this.fullName = fullName;

		},


		getJSON: function() {

			return {

				boardId : this.boardId,

				cardId : this.cardId,

				date: this.date,

				fullName: this.fullName,

				hours: this.hours.toString(),

				status: this.status,

				comment: this.comment

			};

		}


	});

});
This “SpentHourObject” has some getters and setters for the properties/fields the service and database require. As last it has a “getJSON“ method which will return the “SpentHourObject” as a correct JSON object that we can pass to our service to create the “SpentHour” inside our database.
Speaking of such a service, lets implement it. To do so you create the “TimesheetManagementService.js” file inside your “webapp > service“ directory.
Inside this “TimesheetManagementService.js” file add the following code
sap.ui.define([

	"./CoreService",

	"sap/ui/model/Filter",

	"sap/ui/model/FilterOperator"

], function (CoreService, Filter, FilterOperator) {

	"use strict";


	var TimesheetManagementService = CoreService.extend("cap.trello.TimesheetManager.service.TimesheetManagementService", {


		constructor: function () {},


		setModel: function (model) {

			this.model = model;

		},


		getCardSpentHours: function (boardId, cardId) {

			return this.http("/timesheetService/SpentHours?$filter=boardId eq '" + boardId + "' and cardId eq '" + cardId + "'").get()

				.then(function (

					aSpentHours) {

					return JSON.parse(aSpentHours).value;

				});

		}

	});

	return new TimesheetManagementService();

});
This service provides the “getCardSpentHours” function which will call our “OData V4 service” to read from our database. It knows that this request needs to go to the database OData V4 Service because we prefix the path with “/timesheetService/” followed by the entity to retrieve. The name of the service “timesheet-management” was already declared in the target in the route and is extended with “$1” which is in this case “SpentHours”. We declared this path in our Approuter its “xs-app.json” file, just like we did for our “TelloService”. Remember the “xs-app.json” file of your Approuter:

The route directs you to the right service.
Now this “getCardSpentHours” function will call our service its “SpentHours” entity and it will filter on the “boardId” and “cardId” to retrieve the card its related “SpentHours”.
There last us one thing to do, importing this created “TimesheetManagementService” in our “BoardState”. It should look like this:
/* global _:true */

sap.ui.define([

	"../object/BaseObject",

	"../service/TrelloService",

	"../object/BoardObject",

	"../object/CardObject",

	"../service/TimesheetManagementService"

], function (BaseObject, TrelloService, BoardObject, CardObject, TimesheetManagementService) {
Now your Trello Card its related “SpentHours” can be read from your database its OData V4 service.
Now we want to show this data in a “Timeline” control remember? Let’s add this control to our “Cards.view.xml” file.
Just below your “Toolbar” control inside your “<semantic:DetailPage>” its “<semantic:content>” add the following xml:
<commons:Timeline id="idTimeline" showFilterBar="false" noDataText="{i18n>noHoursSpent}" enableDoubleSided="false" content="{BoardState>/oCurrentCard/spentHours}" visible="{= ${BoardState>/oCurrentCard} ? true : false}">

    <commons:content>

        <commons:TimelineItem dateTime="{path: 'BoardState>date', type: 'sap.ui.model.type.DateTime', pattern: 'yyyy-MM-dd HH:mm:ss'}" userName="{BoardState>hours} {i18n>hours}" title="{BoardState>fullName}" icon="sap-icon://per-diem">

            <VBox>

                <Text text="{BoardState>comment}"/>

                <OverflowToolbar style="Clear">

                    <ObjectStatus class="sapUiTinyMarginTop" title="{i18n>Status}" text="{path: 'BoardState>status', formatter: '.formatter.spentHourStatus'}" state="{= ${BoardState>status} === 'Done' ? 'Success' : ${BoardState>status} === 'OnHold' ? 'Error' : 'Warning'}"/>

                    <ToolbarSpacer/>

                    <Button tooltip="{i18n>deleteSpentHour}" icon="sap-icon://delete" type="Transparent" press=".onDeleteSpentHour"/>

                    <Button tooltip="{i18n>editSpentHour}" icon="sap-icon://edit" type="Transparent" press=".onEditSpentHour"/>

                </OverflowToolbar>

            </VBox>

        </commons:TimelineItem>

    </commons:content>

</commons:Timeline>
As you can see this “Timeline” control comes from the “common” namespace/lib, which means we have to import it on top of our xml file as well. Add the following namespace:
xmlns:commons="sap.suite.ui.commons"This “Timeline” control will display our “SpentHours” from most recent to oldest. It knows how to display all the “SpentHours” because we provided the following “binding path”: {BoardState>/oCurrentCard/spentHours}
It will show who created the “SpentHour” and all the other properties/field we declared in our database. All the date displayed in a nice way. It also comes with a new and last formatter we have to add to our “Formatter.js” file inside our “webapp > model” directory. The “spentHourStatus” formatter, add it to the file:
spentHourStatus: function(status){

	var i18n = this.getOwnerComponent().getModel("i18n").getResourceBundle();

	return i18n.getText(status);

},
It will return the right “i18n” text for the status of the “SpentHour”.
Add SpentHours to HANA DB
Let us implement the functionality to add “SpentHours” to cards and so to our database. For this we create the following 2 functions inside our “Cards.controller.js” file:
onAddSpentHour: function (oEvent) {

	var i18n = this.getModel("i18n").getResourceBundle();

	this.openFragment(

		"DialogAddSpentHour",

		null,

		true,

		this.addSpentHour,

        {

		  title: i18n.getText("addSpentHour"),

		  isNewSpentHour: true

		}

    );

},


addSpentHour: function (oSpentHour) {

	BoardState.addSpentHour(oSpentHour).then(function (response) {

		this.hideBusyIndicator();

	}.bind(this));

},
This “onAddSpentHour” will open a new fragment called “DialogAddSpentHour” which we will create in a minute and it has a callback function called “addSpentHour” which will call our “BoardState” to create the “SpentHour”.
The “onAddSpentHour” will be bound to an “Add” button we will place in the footer of our “Cards.view.xml” file. This will make your “Cards.view.xml” file inside your “webapp > view” directory its “<semantic:customFooterContent>” look like this:
<semantic:customFooterContent>

    <Button text="{i18n>addSpentHour}" visible="{= ${BoardState>/oCurrentCard} ? true : false}" icon="sap-icon://create-entry-time" tooltip="{i18n>AddSpentHourTooltip}" press=".onAddSpentHour"/>

</semantic:customFooterContent>
Now we will create this “addSpentHour” function inside our “BoardState” and it looks like this:
addSpentHour: function (oSpentHour) {

	oSpentHour = new SpentHourObject(oSpentHour);

	// oSpentHour.setId("0");

	oSpentHour.setBoardId(this.getCurrentBoard().getId());

	oSpentHour.setCardId(this.getCurrentCard().getId());

	oSpentHour.setFullName(UserState.getCurrentUser().getFullName());

	return TimesheetManagementService.addSpentHour(oSpentHour).then(function (response) {

		response = JSON.parse(response);

		oSpentHour.setId(response.ID);

		this.getCurrentCard().getSpentHours().push(oSpentHour);

		this.updateModel();

		return this.getCurrentCard();

	}.bind(this)).catch(function (oError) {

		console.log(oError.message);

	}.bind(this));

},
This function requires that we imported the “SpentHourObject” and “UserState” so it looks like this:
/* global _:true */

sap.ui.define([

	"../object/BaseObject",

	"../service/TrelloService",

	"../object/BoardObject",

	"../object/CardObject",

	"../service/TimesheetManagementService",

	"../object/SpentHourObject",

	"./UserState",

], function (BaseObject, TrelloService, BoardObject, CardObject, TimesheetManagementService, SpentHourObject, UserState) {
This function will set the user information to the “SpentHour” object and will call the service to create this record in the database. If this was successful it will add the “SpentHour” to the array of the current card and it will be displayed in the timeline. Also, the “ID” the “UUID” will be returned by the service so we can later on delete or edit the created record with this “ID”. When this fails an error will be logged.
The function to add this “SpentHour” inside our “TimesheetManagementService“ service looks like this:
addSpentHour: function (oSpentHour) {

	return this.http("/timesheetService/SpentHours").post(false, oSpentHour.getJSON());

}
It will pass the object to the service, but first it will call the “getJSON” method of the object to retrieve a valid JSON object to send.
Now we have to add our fragment to the “webapp > view > fragments” directory which we still need to create.
Add this file called “DialogAddSpentHour.fragment.xml” to the directory:
Inside this fragment file you add the following xml:
<core:FragmentDefinition xmlns="sap.m"

    xmlns:f="sap.ui.layout.form"

    xmlns:core="sap.ui.core">

    <Dialog title="{DialogAddSpentHourModel>/title}">

        <f:SimpleForm editable="true" layout="ResponsiveGridLayout">

            <f:content>

                <VBox>

                    <ObjectAttribute title="{i18n>Board}" text="{BoardState>/oCurrentBoard/name}"/>

                    <ObjectAttribute title="{i18n>Card}" text="{BoardState>/oCurrentCard/name}"/>

                    <ObjectAttribute title="{i18n>User}" text="{UserState>/oUser/fullName}"/>

                </VBox>

                <Label text="{i18n>SpentOnDate}" required="true"/>

                <DateTimePicker value="{DialogAddSpentHourModel>/oSpentHour/date}" placeholder="Select the date..." change="handleSpentHoursDateChange" class="sapUiSmallMarginBottom"/>

                <Label text="{i18n>SpentHours}" required="true"/>

                <Input value="{DialogAddSpentHourModel>/oSpentHour/hours}" type="Number" placeholder="Enter the spent hours..."/>

                <Label text="{i18n>Status}" required="true"/>

                <Select forceSelection="false" selectedKey="{DialogAddSpentHourModel>/oSpentHour/status}" items="{ path: 'DialogAddSpentHourModel>/possibleStatus', sorter: { path: 'status' } }">

                    <core:Item key="{DialogAddSpentHourModel>id}" text="{DialogAddSpentHourModel>status}"/>

                </Select>

                <Label text="{i18n>Comment}"/>

                <TextArea value="{DialogAddSpentHourModel>/oSpentHour/comment}" width="100%"/>

            </f:content>

        </f:SimpleForm>

        <buttons>

            <Button text="{i18n>cancel}" press=".onClose" type="Reject"/>

            <Button text="{= ${DialogAddSpentHourModel>/isNewSpentHour} ? ${i18n>Save} : ${i18n>Update}}" press=".submitForm" type="Accept"/>

        </buttons>

    </Dialog>

</core:FragmentDefinition>
This fragment provides some input fields, so you can provide all the required and optional fields for the “SpentHour”. It will also display some user information and card information retrieve from the states.
Next we create a controller for this fragment called “DialogAddSpentHour.controller.js” so your “webapp > controller > fragments” directory
The code inside this controller looks like this:
sap.ui.define([

    "../BaseController",

    "sap/ui/model/json/JSONModel",

    "../../state/BoardState",

    "sap/m/MessageBox"

], function (BaseController, JSONModel, BoardState, MessageBox) {

    "use strict";

    return BaseController.extend("cap.trello.TimesheetManager.controller.fragments.DialogAddSpentHour", {

        onBeforeShow: function (parent, fragment, callback, data) {

            this.parent = parent;

            this.fragment = fragment;

            this.callback = callback;


            this.i18n = this.parent.getModel("i18n").getResourceBundle();


            var oSpentHour = data.isNewSpentHour === true ? {} : data.oSpentHour;


            var dialogmodel = new JSONModel({

                title: data.title,

                isNewSpentHour: data.isNewSpentHour,

                oSpentHour: oSpentHour,

                possibleStatus: [{

                    id: "Done",

                    status: this.i18n.getText("Done")

                }, {

                    id: "Ongoing",

                    status: this.i18n.getText("Ongoing")

                }, {

                    id: "OnHold",

                    status: this.i18n.getText("OnHold")

                }]

            });

            this.fragment.setModel(dialogmodel, "DialogAddSpentHourModel");

        },


        submitForm: function () {

            if (this.spentHourIsValid()) {

                var oSpentHour = this.fragment.getModel("DialogAddSpentHourModel").getProperty("/oSpentHour");

                this.showBusyIndicator();

                this.fragment.close();

                return this.callback.call(this.parent, oSpentHour);

            }


            var me = this;

            return MessageBox.error(me.i18n.getText("fillInRequiredFieldsSpentHour"));

        },


        spentHourIsValid: function () {

            var date = this.fragment.getModel("DialogAddSpentHourModel").getProperty("/oSpentHour/date");

            var hours = this.fragment.getModel("DialogAddSpentHourModel").getProperty("/oSpentHour/hours");

            var status = this.fragment.getModel("DialogAddSpentHourModel").getProperty("/oSpentHour/status");


            return date && hours && status ? true : false;

        },


        // Set the selecte date time on change

        handleSpentHoursDateChange: function (oEvent) {

            var oSpendHour = oEvent.getSource().getModel("DialogAddSpentHourModel").getContext("/oSpentHour").getObject();

            oSpendHour.date = oEvent.getSource().getDateValue();

        },


        onClose: function () {

            this.fragment.close();

        }

    });

});
This controller will create a “JSON model” to provide the select options for your “combobox”. This way you can select a status for your “SpentHour” from a “Combobox”. It also has a function “spentHourIsValid” to check if everything you entered is valid and a “handleSpentHoursDateChange” to handle the “DatePicker” control its change events. The “submitForm” function will close the form and call the callback “addSpentHour” function to create the “SpentHour”.
With this we implemented our functionality to add “SpentHours” to a Trello card inside our database.
Time to refresh our application and test it! Select a board and a card in the application. Once you did, press the “Add spent hour” button in the lower right corner:

This will open the following pop-up where we can provide all the details for our “SpentHour”.
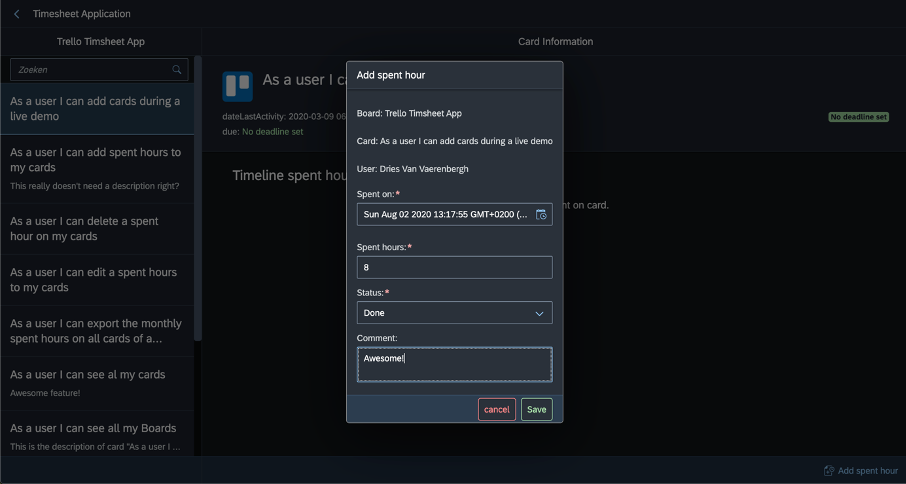
When we press the “Save” button it should be saved in the app and in the database. But I will already warn you, it’s going to fail… Open the console and network tab of your browser. Once you opened them press the “Save” button.
You will see the following error in the network tab for your “POST” request on the “SpentHours” entity.

It shows the error message: “Error while deserializing payload. An error occurred during deserialization of the entity. A JSON number is not supported as Edm.Decimal value.”.
It is saying there is a problem with the OData “Edm.Decimal” value. Which is actually not the case on the one hand, but on the other hand it is a problem. Because OData and JSON are “not understanding” each other here due to encoding of this payload. Let us add the following “Content-type” request headers to our “CoreService.js” file inside our “webapp > service” directory:
charset=UTF-8;IEEE754Compatible=trueSo, the following code looks like this:
if (method === 'POST' || method === 'PUT') {

	client.setRequestHeader("accept", "application/json");

	client.setRequestHeader("content-type", "application/json;charset=UTF-8;IEEE754Compatible=true");

}
You changed the “client.setRequestHeader(“content-type”, “application/json;charset=UTF-8;IEEE754Compatible=true”);” line here to understand this encoding correctly.
If we would not be using “XMLHttpRequest” and execute our calls via the OData V4 Model, we would not be having this issue. But since we started with the “XMLHttpRequest” for our “TrelloAuthorizer” we continued this way and we make it work!
Refresh the app and try it again!
When I press the “Save” button this time….

It works!
Also, when we refresh the page and select the Card again, our added “SpentHour” will be visible since it was stored in the database.
Delete SpentHours from HANA DB
So far so good! But what if we create a “SpentHour” and we made a mistake? Let’s say we did not work, we were wrong ooops. Then we want to delete the “SpentHour” from the “Timeline” control and so from our database.
This will be done by the “Trash/delete” icon inside the timeline items.
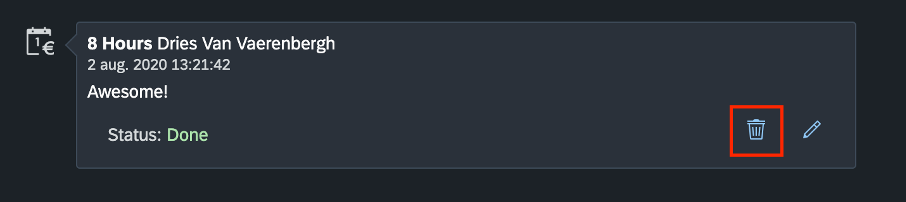
To make this possible we add the following code to our “Cards.controller.js” file:
onDeleteSpentHour: function (oEvent) {

	var i18n = this.getModel("i18n").getResourceBundle();

	var oSpentHour = oEvent.getSource().getBindingContext("BoardState").getObject();

	BoardState.setCurrentSpenthour(oSpentHour);

	this.openFragment(

		"DialogDeleteSpentHour",

		null,

		true,

		this.deleteSpentHour,

        {

		    title: i18n.getText("deleteSpentHour")

	    }

        );

}
This will get our selected “SpentHour” and set it to the “BoardState” via the “setCurrentSpenthour” function. This means we also have to create this function in our “BoardState.js” file like this:
setCurrentSpenthour: function (oSpentHour) {

	this.oCurrentSpentHour = oSpentHour;

	this.updateModel();

},
To make it clear and have a good overview we add this “oCurrentSpentHour” property on top of our state too, so it looks like this:
aBoards: [],

oCurrentBoard: null,

oCurrentCard: null,

oCurrentSpentHour : null,
Once it is set it will open the “DialogDeleteSpentHour” fragment. For this fragment we will create a view and controller. We will open it with the function “openFragment” that we declared inside our “BaseController.js” file.
We pass a callback function that we create in our “Cards.controller.js” file to this “openFragment” function named “deleteSpentHour” which looks like this:
deleteSpentHour: function () {

	var oSpentHour = BoardState.getCurrentSpentHour();

	BoardState.deleteSpentHour(oSpentHour).then(function (response) {

		this.hideBusyIndicator();

	}.bind(this));

},
It will call the “getCurrentSpentHour” function of the “BoardState”, which looks like this and has to be added:
getCurrentSpentHour: function () {

	return this.oCurrentSpentHour;

},
This way it can retrieve the current “SpentHour”.
Next it will call the “BoardState” its “deleteSpentHour” function which will receive a “SpentHour” object. It will get the “id” from this object and it will pass it to the “TimesheetManagementService” its “deleteSpentHour” function to delete the record in the database. Once it is deleted it will delete the “SpentHour” from the current Card its “SpentHours” array property and it will update the model so it will not be displayed any longer in our “Timeline” Add the following function to your “BoardState”:
deleteSpentHour: function (oSpentHour) {

	return TimesheetManagementService.deleteSpentHour(oSpentHour.getId()).then(function (response) {

		var aSpentHours = this.getCurrentCard().getSpentHours();

		var index = aSpentHours.map(function (spentHour) {

			return spentHour.ID;

		}).indexOf(oSpentHour.getId());

		aSpentHours.splice(index, 1);

		this.updateModel();

		return this.getCurrentCard();

	}.bind(this, oSpentHour.getId()));

}
Thus, we create the “deleteSpentHour” function inside our “TimesheetManagementService” and it looks like this:
deleteSpentHour: function (spentHourId) {

	return this.http("/timesheetService/SpentHours(" + spentHourId + ")").delete();

}
It will take the “id” of the “SpentHour” and perform a delete HTTP request on our “srv” Module its “OData V4 Service”.
Add the “DialogDeleteSpentHour.fragment.xml” file to your “view” directory its “fragments” directory:
Inside this “DialogDeleteSpentHour.fragment.xml” file you add the following xml:
<core:FragmentDefinition xmlns="sap.m"

    xmlns:core="sap.ui.core">

    <Dialog title="{DialogDeleteSpentHourModel>/title}" showHeader="true">

        <content>

            <Label text="{i18n>deletionConfirmationText}" class="sapUiTinyMarginBegin sapUiTinyMarginTop"/>

        </content>

        <buttons>

            <Button text="{i18n>Yes}" press=".onDeleteSpentHour" type="Reject"/>

            <Button text="{i18n>No}" press=".onClose" type="Ghost"/>

        </buttons>

    </Dialog>

</core:FragmentDefinition>
It will show you a confirmation text and provides a “Yes” and “No” button whether you want to continue with the deletion or not.
Inside you “controller > fragments” directory you add a controller called “DialogDeleteSpentHour.controller.js” for our fragment. Inside this file we add the following code:
sap.ui.define([

	"../BaseController",

	"sap/ui/model/json/JSONModel",

	"../../state/BoardState",

], function (BaseController, JSONModel, BoardState) {

	"use strict";

	return BaseController.extend("cap.trello.TimesheetManager.controller.fragments.DialogDeleteSpentHour", {

		onBeforeShow: function (parent, fragment, callback, data) {

			this.parent = parent;

			this.fragment = fragment;

			this.callback = callback;


			var dialogmodel = new JSONModel({

				title: data.title

			});

			this.fragment.setModel(dialogmodel, "DialogDeleteSpentHourModel");


			//read label control from dialog in fragment

			//var label = this.getFragmentControlById(this.parent, "label1");

		},


		onDeleteSpentHour: function () {

			this.showBusyIndicator();

			this.fragment.close();

			this.callback.call(this.parent);

		},


		onClose: function () {

			this.fragment.close();

		}

	});

});
This will take in all the parameters that were passed by the “openFragment” function in the controller and it will use it in the “onBeforeShow” function to set it as properties. We create a model called “SpentHourModel” to display our “SpentHour” data (title) and we declare and implement a function to close the dialog if the user answers “No” or to execute the deletion with the callback function if he answers “Yes”.
Time to run our application again! If you press the “Trash/delete-icon” to delete the “SpentHour” from the timeline, you will be asked if you really want to delete it. If you say “No” the dialog will just close and if your press “Yes” the “SpentHour” will be deleted from the timeline and it will be removed from the database.

As we can see the Spent Hours was removed from the timeline and when we refresh the page, we will no longer see the Spent hour since it was deleted from the database:
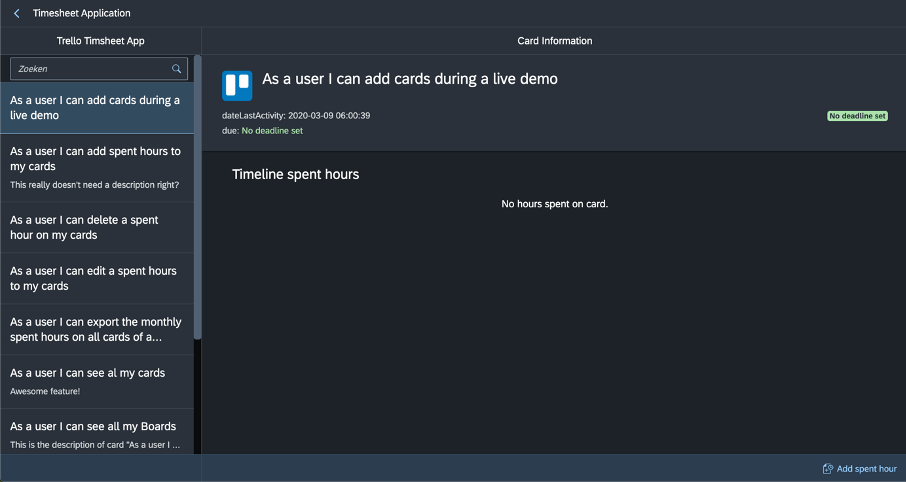
Update SpentHours from HANA DB
Now the lest “CRUD” operation that is left to implement is the edit/update operation of a “SpentHour”. This just works the same way it did for the deletion and creation of a “SpentHour”. Add the following 2 functions to your “Cards.controller.js” file:
onEditSpentHour: function (oEvent) {

        var oSpentHour = oEvent.getSource().getBindingContext("BoardState").getObject();

        BoardState.setCurrentSpenthour(oSpentHour);

        var i18n = this.getModel("i18n").getResourceBundle();

        this.openFragment(

            "DialogAddSpentHour",

            null,

            true,

            this.editSpentHour, {

                title: i18n.getText("editSpentHour"),

                isNewSpentHour: false,

                oSpentHour: oSpentHour

            });

    },


    editSpentHour: function (oSpentHour) {

        BoardState.editSpentHour(oSpentHour).then(function (response) {

            this.hideBusyIndicator();

        }.bind(this));

    },
You will see it reuses the “DialogAddSpentHour” fragment to show the data and it provides a way to update them, this is handled in the “DialogAddSpentHour” fragment view and controller.
Since the callback function “editSpentHour” is called when the changes are saved, and it calls the “editSpentHour” function of our “BoardState” we have to implement it over there too. It looks like this:
editSpentHour: function (oSpentHour) {

	return TimesheetManagementService.editSpentHour(oSpentHour).then(function (response) {

		this.updateModel();

		return this.getCurrentCard();

	}.bind(this));

},
It passed the changed/updated “SpentHour” from the controller to the service its “editSpentHour” function to update it. This means we have to create the function there too and it looks like this:
editSpentHour: function (oSpentHour) {

	return this.http("/timesheetService/SpentHours(" + oSpentHour.getId() + ")").put(false, oSpentHour.getJSON());

}
It passed the “id” as the key for the “SpentHour” and along it provides the content for the change as body in the “PUT” method.
Time to refresh the application again!
Start by adding a “SpentHour” to a card and then press the “edit-icon”.

Let’s say we change the comment to “Is updated!” and the status to “DONE” and we press the “Save” button.

As you can see it has been updated in our app and also when we refresh the app to double check!
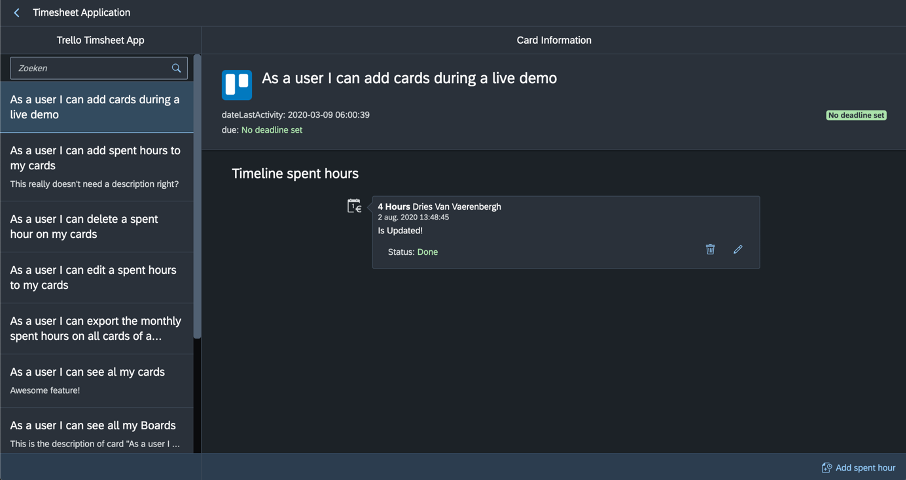
This brings us to the actual end of the implementation and development of our UI5 Timesheet Application. But since we want to make and keep everybody happy, we also think about the people who love their good old-school spreadsheet files. This way they can do an export of these “SpentHours” at the end of the month and it will build the log/timesheet spreadsheet file just the way they wanted it in the past. They receive the file they want, and we do never have to open nor fill in those spreadsheet files!
Let us perform a last development to create a spreadsheet file out of all our data!
We will add the following function to our “Cards.controller.js” file:
onExcelExport: function () {

	var aCols = BoardState.getColumnConfig();

	var date = new Date().toLocaleDateString();

	var fileName = BoardState.getCurrentBoard().getName() + " - " + date + ".xlsx";

	var me = this;

	BoardState.getMonthlyExcelExportData().then(function (result) {

		var oSettings = {

			workbook: {

				columns: aCols

			},

			dataSource: result,

			fileName: fileName

		};

		var oSheet = new Spreadsheet(oSettings);

		// Build and export spreadsheet

		oSheet.build().then(function () {

			var i18n = me.getModel("i18n").getResourceBundle();

			MessageToast.show(i18n.getText("TimesheetExportFinished"));

		}.bind(this)).finally(function () {

		    oSheet.destroy();

		});

	});

},
This will create the column configuration for the Spreadsheet control/worker, and it will request this column configuration from our “BoardState” via the “getColumnConfig” function. It will create the name for the file dynamicalaly with the board name and finally it will call the “BoardState” its “getMonthlyExcelExportData” to get the data for the spreadsheet file. This data is the data of the current month.
Once the file/export is ready a “MessageToast” will be shown that the export is ready. To be able to use that “MessageToast and “Spreadsheet” control we have to import hem both like this:
sap.ui.define([

	"./BaseController",

	"../state/UserState",

	"../state/BoardState",

	"sap/ui/core/routing/History",

	"../model/Formatter",

	'sap/ui/model/Filter',

	"sap/ui/model/FilterOperator",

	'sap/ui/export/Spreadsheet',

	"sap/m/MessageToast"

], function (BaseController, UserState, BoardState, History, Formatter, Filter, FilterOperator, Spreadsheet, MessageToast) {
Now let us create this “getColumnConfig” and “getMonthlyExcelExportData” function inside our “BoardState”:
getColumnConfig: function () {

    var columnConfig = [{

            label: 'Card name',

            property: 'cardName',

            type: 'String'

        }, {

            label: 'Card description',

            property: 'cardDesc',

            type: 'String'

        },

        {

            label: 'Spent date',

            property: 'date',

            type: 'datetimeoffset'

        },

        {

            label: 'Spent hours',

            property: 'hours',

            type: 'Number'

        },

        {

            label: 'Current status',

            property: 'status',

            type: 'String'

        },

        {

            label: 'Spent by user',

            property: 'fullName',

            type: 'String'

        },

        {

            label: 'Comment',

            property: 'comment',

            type: 'String'

        }

    ];


    return columnConfig;

},
The “getColumnConfig” will return the whole column configuration with labels, properties and types. While the “getMonthlyExcelExportData” will call the “getMonthlyExcelExportData” of our “TimesheetManagementService”. Once this data is retrieved it will map the “SpentHours” to the correct “Cards” and “Boards”. Add this function to your “BoardState”:
getMonthlyExcelExportData: function () {

    return TimesheetManagementService.getMonthlyExcelExportData(this.getCurrentBoard().getId()).then(function (aSpentHours) {

        aSpentHours = JSON.parse(aSpentHours).value;

        var aCards = this.getCurrentBoard().getCards();


        var aResult = aSpentHours.map(function (oSpentHour) {

            var indexCard = aCards.map(function (card) {

                return card.id;

            }).indexOf(oSpentHour.cardId);

            oSpentHour.cardName = aCards[indexCard].name;

            oSpentHour.cardDesc = aCards[indexCard].desc;

            return oSpentHour;

        });


        return aResult;

    }.bind(this));

}
This means we also have to add this “getMonthlyExcelExportData” to our “TimesheetManagementService.js” file and it looks like this:
getMonthlyExcelExportData: function (boardId) {

    var date = new Date();

    var firstDay = new Date(date.getFullYear(), date.getMonth(), 1).toISOString();

    var lastDay = new Date(date.getFullYear(), date.getMonth() + 1, 0).toISOString();

    var aFilters = [];

    var oFilter = new Filter({

        filters: [

            new Filter("boardId", FilterOperator.EQ, boardId),

            new Filter("date", FilterOperator.GE, firstDay),

            new Filter("date", FilterOperator.LT, lastDay)

        ],

        and: true

    });


    aFilters.push(oFilter);


    var args = {

        "$filter": "boardId eq '" + boardId + "' and date gt " + firstDay + " and date lt " + lastDay

    };


    return this.http("/timesheetService/SpentHours").get(false, args);

}
We apply the correct “boardId” as a filter since we want all the cards of the board in our spreadsheet afterwards and then some data filters for a range “between” so we get the data of the current month.
Now we only have to make this export button visible in our “Cards.view.xml” file, for that we add the following button to our footer:
<Button text="{i18n>toExcel}" icon="sap-icon://excel-attachment" tooltip="{i18n>toExcelTooltip}" press=".onExcelExport" visible="{= ${BoardState>/oCurrentBoard/cards}.length > 0 ? true : false}"/>Time to restart and run the application for the last time in this blog!
As you can see our “Export to Excel” button is now available:

When we press it, the spreadsheet file will be exported:

If we open the exported file, we see that our added “SpentHours” are stored in the spreadsheet file just the way the spreadsheet lovers want it!

This card happened to have no description. A nice test could be updating it in Trello, to refresh the app and export the file again. Let me know if it worked! ?
With this you really finished the UI5 development of the Timesheet application, good job!
Deploy the MTA with the HTML5 Module
Now we do want to test this application too once it is deployed. So, let us prepare our MTA for deployment.
The first thing we will do is restore the “xs-app.json” file inside our HTML5 Module / “TimesheetManager” directory. Remove all the content and place the following original configuration inside:
{

    "welcomeFile": "/index.html",

    "authenticationMethod": "route",

    "logout": {

        "logoutEndpoint": "/do/logout"

    },

    "routes": [

        {

            "source": "^(.*)$",

	    "target": "$1",

	    "service": "html5-apps-repo-rt",

	    "authenticationType": "xsuaa"

        }

    ]

}
Now the reason for this is simple, we want to use our Approuter to take care of the traffic and the resources to access and not our HTML5 Module.
Remember the changes we applied to our “TrelloAuthorizer” its “trello.js” file? Also these changes need to be undone.
Replace your “this.oAuth” line in the constructor with the following original line:
this.oAuth = new OAuth(this.getRequestURL(), this.getAccessURL(), this.getTrelloApiKey(), this.getTrelloApiSecret(), "1.0A", this.getLoginCallbackURL(), "HMAC-SHA1");This way the Node Module can return us to the original Node Module after the authorization process, but again via the Approuter.
The last change we will perform is still in this “trello.js” file. Inside the “loginCallback“ method we replace the “res.redirect” line again with the original line:
res.redirect(this.config.approuterUrl);This so we can be redirected again to our HTML5 Module via the Approuter, coming from our destination service.
Now we will build our MTA project again by executing the following command in our MTA project its root directory:
mbt buildOnce the MTA project is built, we deploy it again with the following command:
cf deploy mta_archives/Trello-CAP-TimesheetManagement_0.0.1.mtar --delete-servicesDo not forget to update your User provided Instance again if you did not place the keys inside the “Trello-API-Keys.json” file. Here is the command once more:
cf uups Trello-API-Keys -p '{"desc": "Trello credentials","api-key": "{your-key}","api-secret": "{your-secret}", "appName": "TrelloCAPauthorizer", "scope": "read", "expiration": "1hour"}'And if you had to update them again, do not forget to restart your “TrelloAuthorizer” Node Module again (see explanations in previous blog):
cf restart TrelloAuthorizer Now open your deployed Approuter again and test the app!
(if you still see the old UI, try to clear your cache or open a private window)
Looks good right? ?
Redeploy the HTML5 Module
Okay now something that would help us in the future. We can all imagine that we have to adapt the UI from time to time. When we do this, we do not want to redeploy our full MTA project. We want to keep all our services inside this MTA project to keep running while we redeploy our UI.
That’s why we have the following cloud foundry CLI plugin “CF HTML5 Applications Repository CLI Plugin”.
More information about this plugin can be found here:
https://github.com/SAP/cf-html5-apps-repo-cli-plugin
To install this plugin, execute the following command:
cf install-plugin -r CF-Community "html5-plugin"Once installed execute the following command to retrieve the list of all your HTML5 applications:
cf html5-listThis will display all your html5-applications on the terminal:

Copy this “app-host-id“ since we will use it to deploy our HTML5 App directly.
Inside your HTML5 Module / TimesheetManager directory execute the following command to build your project (always necessary before deploying with html5-push):
ui5 buildThis will create a “dist“ folder inside your HTML5 Module / TimesheetManager directory with your built project inside.
Next you execute the following command to deploy the “dist” folder to the HTML5 repository:
cf html5-push dist {your-app-host-id}Obviously, this deployment process is 10 times faster than redeploying your full MTA project.
It redeployed your HTML5 Module without stopping other services.
Wrap Up ?
In this blog we created our HTML5 Module which serves the purpose of the consumable timesheet application. It handles the Trello OAuth pop-up in a proper way and allows you to consume the Trello APIs via your created “TrelloAuthorizer”.
Apart of consuming the Trello information, you developed and implemented a solution to retrieve, create, update and delete the data (being “SpentHours”) via your created “srv” Module inside your database. You learned a trick to approach your OData V4 service via an “XmlHttpRequest” and you implemented a way to export all your “SpentHours” on Trello cards into a timesheet spreadsheet file.
Last but not least you can now redeploy your HTML5 Module without redeploying your full MTA project.
We described the following requirements from the beginning and implemented the following ones:
- A Multi Target Application (MTA) project
- An Approuter
- An xsuaa instance/service
- Appropriate roles assigned by role collections (xsuaa)
- A HANA database (via CDS)
- An OData V4 service (via CDS)
- A Node.js application to authenticate and authorize against Trello
- A User-Provided Service to store the Trello API Keys.
- A UI5 App
- A Fiori Launchpad Module
Now it is time to add a Fiori Launchpad Module to our Multi Target Application!
See you in the next blog Timesheet Management with CAP & Trello ⏱️ - Add a Fiori Launchpad Site Module #5. Where we will add and configure a Fiori Launchpad Site and register our app to it
Kind regards,
Dries
You must be a registered user to add a comment. If you've already registered, sign in. Otherwise, register and sign in.
Labels in this area
-
"automatische backups"
1 -
"regelmäßige sicherung"
1 -
"TypeScript" "Development" "FeedBack"
1 -
505 Technology Updates 53
1 -
ABAP
14 -
ABAP API
1 -
ABAP CDS Views
2 -
ABAP CDS Views - BW Extraction
1 -
ABAP CDS Views - CDC (Change Data Capture)
1 -
ABAP class
2 -
ABAP Cloud
3 -
ABAP Development
5 -
ABAP in Eclipse
1 -
ABAP Platform Trial
1 -
ABAP Programming
2 -
abap technical
1 -
abapGit
1 -
absl
2 -
access data from SAP Datasphere directly from Snowflake
1 -
Access data from SAP datasphere to Qliksense
1 -
Accrual
1 -
action
1 -
adapter modules
1 -
Addon
1 -
Adobe Document Services
1 -
ADS
1 -
ADS Config
1 -
ADS with ABAP
1 -
ADS with Java
1 -
ADT
2 -
Advance Shipping and Receiving
1 -
Advanced Event Mesh
3 -
Advanced formula
1 -
AEM
1 -
AI
8 -
AI Launchpad
1 -
AI Projects
1 -
AIML
9 -
Alert in Sap analytical cloud
1 -
Amazon S3
1 -
Analytical Dataset
1 -
Analytical Model
1 -
Analytics
1 -
Analyze Workload Data
1 -
annotations
1 -
API
1 -
API and Integration
3 -
API Call
2 -
API security
1 -
Application Architecture
1 -
Application Development
5 -
Application Development for SAP HANA Cloud
3 -
Applications and Business Processes (AP)
1 -
Artificial Intelligence
1 -
Artificial Intelligence (AI)
5 -
Artificial Intelligence (AI) 1 Business Trends 363 Business Trends 8 Digital Transformation with Cloud ERP (DT) 1 Event Information 462 Event Information 15 Expert Insights 114 Expert Insights 76 Life at SAP 418 Life at SAP 1 Product Updates 4
1 -
Artificial Intelligence (AI) blockchain Data & Analytics
1 -
Artificial Intelligence (AI) blockchain Data & Analytics Intelligent Enterprise
1 -
Artificial Intelligence (AI) blockchain Data & Analytics Intelligent Enterprise Oil Gas IoT Exploration Production
1 -
Artificial Intelligence (AI) blockchain Data & Analytics Intelligent Enterprise sustainability responsibility esg social compliance cybersecurity risk
1 -
ASE
1 -
ASR
2 -
ASUG
1 -
Attachments
1 -
Authorisations
1 -
Automating Processes
1 -
Automation
2 -
aws
2 -
Azure
1 -
Azure AI Studio
1 -
Azure API Center
1 -
Azure API Management
1 -
B2B Integration
1 -
Backorder Processing
1 -
Backup
1 -
Backup and Recovery
1 -
Backup schedule
1 -
BADI_MATERIAL_CHECK error message
1 -
Bank
1 -
Bank Communication Management
1 -
BAS
1 -
basis
2 -
Basis Monitoring & Tcodes with Key notes
2 -
Batch Management
1 -
BDC
1 -
Best Practice
1 -
bitcoin
1 -
Blockchain
3 -
bodl
1 -
BOP in aATP
1 -
BOP Segments
1 -
BOP Strategies
1 -
BOP Variant
1 -
BPC
1 -
BPC LIVE
1 -
BTP
13 -
BTP AI Launchpad
1 -
BTP Destination
2 -
Business AI
1 -
Business and IT Integration
1 -
Business application stu
1 -
Business Application Studio
1 -
Business Architecture
1 -
Business Communication Services
1 -
Business Continuity
1 -
Business Data Fabric
3 -
Business Fabric
1 -
Business Partner
12 -
Business Partner Master Data
10 -
Business Technology Platform
2 -
Business Trends
4 -
BW4HANA
1 -
CA
1 -
calculation view
1 -
CAP
4 -
Capgemini
1 -
CAPM
1 -
Catalyst for Efficiency: Revolutionizing SAP Integration Suite with Artificial Intelligence (AI) and
1 -
CCMS
2 -
CDQ
12 -
CDS
2 -
Cental Finance
1 -
Certificates
1 -
CFL
1 -
Change Management
1 -
chatbot
1 -
chatgpt
3 -
CL_SALV_TABLE
2 -
Class Runner
1 -
Classrunner
1 -
Cloud ALM Monitoring
1 -
Cloud ALM Operations
1 -
cloud connector
1 -
Cloud Extensibility
1 -
Cloud Foundry
4 -
Cloud Integration
6 -
Cloud Platform Integration
2 -
cloudalm
1 -
communication
1 -
Compensation Information Management
1 -
Compensation Management
1 -
Compliance
1 -
Compound Employee API
1 -
Configuration
1 -
Connectors
1 -
Consolidation Extension for SAP Analytics Cloud
2 -
Control Indicators.
1 -
Controller-Service-Repository pattern
1 -
Conversion
1 -
Cosine similarity
1 -
cryptocurrency
1 -
CSI
1 -
ctms
1 -
Custom chatbot
3 -
Custom Destination Service
1 -
custom fields
1 -
Customer Experience
1 -
Customer Journey
1 -
Customizing
1 -
cyber security
4 -
cybersecurity
1 -
Data
1 -
Data & Analytics
1 -
Data Aging
1 -
Data Analytics
2 -
Data and Analytics (DA)
1 -
Data Archiving
1 -
Data Back-up
1 -
Data Flow
1 -
Data Governance
5 -
Data Integration
2 -
Data Quality
12 -
Data Quality Management
12 -
Data Synchronization
1 -
data transfer
1 -
Data Unleashed
1 -
Data Value
8 -
database tables
1 -
Dataframe
1 -
Datasphere
3 -
datenbanksicherung
1 -
dba cockpit
1 -
dbacockpit
1 -
Debugging
2 -
Defender
1 -
Delimiting Pay Components
1 -
Delta Integrations
1 -
Destination
3 -
Destination Service
1 -
Developer extensibility
1 -
Developing with SAP Integration Suite
1 -
Devops
1 -
digital transformation
1 -
Documentation
1 -
Dot Product
1 -
DQM
1 -
dump database
1 -
dump transaction
1 -
e-Invoice
1 -
E4H Conversion
1 -
Eclipse ADT ABAP Development Tools
2 -
edoc
1 -
edocument
1 -
ELA
1 -
Embedded Consolidation
1 -
Embedding
1 -
Embeddings
1 -
Employee Central
1 -
Employee Central Payroll
1 -
Employee Central Time Off
1 -
Employee Information
1 -
Employee Rehires
1 -
Enable Now
1 -
Enable now manager
1 -
endpoint
1 -
Enhancement Request
1 -
Enterprise Architecture
1 -
ESLint
1 -
ETL Business Analytics with SAP Signavio
1 -
Euclidean distance
1 -
Event Dates
1 -
Event Driven Architecture
1 -
Event Mesh
2 -
Event Reason
1 -
EventBasedIntegration
1 -
EWM
1 -
EWM Outbound configuration
1 -
EWM-TM-Integration
1 -
Existing Event Changes
1 -
Expand
1 -
Expert
2 -
Expert Insights
2 -
Exploits
1 -
Fiori
14 -
Fiori Elements
2 -
Fiori SAPUI5
12 -
first-guidance
1 -
Flask
1 -
FTC
1 -
Full Stack
8 -
Funds Management
1 -
gCTS
1 -
GenAI hub
1 -
General
1 -
Generative AI
1 -
Getting Started
1 -
GitHub
9 -
Grants Management
1 -
groovy
1 -
GTP
1 -
HANA
6 -
HANA Cloud
2 -
Hana Cloud Database Integration
2 -
HANA DB
2 -
Hana Vector Engine
1 -
HANA XS Advanced
1 -
Historical Events
1 -
home labs
1 -
HowTo
1 -
HR Data Management
1 -
html5
8 -
HTML5 Application
1 -
Identity cards validation
1 -
idm
1 -
Implementation
1 -
Infuse AI
1 -
input parameter
1 -
instant payments
1 -
Integration
3 -
Integration Advisor
1 -
Integration Architecture
1 -
Integration Center
1 -
Integration Suite
1 -
intelligent enterprise
1 -
iot
1 -
Java
1 -
job
1 -
Job Information Changes
1 -
Job-Related Events
1 -
Job_Event_Information
1 -
joule
4 -
Journal Entries
1 -
Just Ask
1 -
Kerberos for ABAP
8 -
Kerberos for JAVA
8 -
KNN
1 -
Launch Wizard
1 -
Learning Content
2 -
Life at SAP
5 -
lightning
1 -
Linear Regression SAP HANA Cloud
1 -
Loading Indicator
1 -
local tax regulations
1 -
LP
1 -
Machine Learning
4 -
Marketing
1 -
Master Data
3 -
Master Data Management
14 -
Maxdb
2 -
MDG
1 -
MDGM
1 -
MDM
1 -
Message box.
1 -
Messages on RF Device
1 -
Microservices Architecture
1 -
Microsoft Universal Print
1 -
Middleware Solutions
1 -
Migration
5 -
ML Model Development
1 -
Modeling in SAP HANA Cloud
8 -
Monitoring
3 -
MTA
1 -
Multi-Record Scenarios
1 -
Multilayer Perceptron
1 -
Multiple Event Triggers
1 -
Myself Transformation
1 -
Neo
1 -
Neural Networks
1 -
New Event Creation
1 -
New Feature
1 -
Newcomer
1 -
NodeJS
3 -
ODATA
2 -
OData APIs
1 -
odatav2
1 -
ODATAV4
1 -
ODBC
1 -
ODBC Connection
1 -
Onpremise
1 -
open source
2 -
OpenAI API
1 -
Oracle
1 -
PaPM
1 -
PaPM Dynamic Data Copy through Writer function
1 -
PaPM Remote Call
1 -
Partner Built Foundation Model
1 -
PAS-C01
1 -
Pay Component Management
1 -
PGP
1 -
Pickle
1 -
PLANNING ARCHITECTURE
1 -
Popup in Sap analytical cloud
1 -
PostgrSQL
1 -
POSTMAN
1 -
Prettier
1 -
Process Automation
2 -
Product Updates
6 -
PSM
1 -
Public Cloud
1 -
Python
4 -
python library - Document information extraction service
1 -
Qlik
1 -
Qualtrics
1 -
RAP
3 -
RAP BO
2 -
Record Deletion
1 -
Recovery
1 -
recurring payments
1 -
redeply
1 -
Release
1 -
Remote Consumption Model
1 -
Replication Flows
1 -
research
1 -
Resilience
1 -
REST
1 -
REST API
1 -
Retagging Required
1 -
Risk
1 -
Rolling Kernel Switch
1 -
route
1 -
rules
1 -
S4 HANA
1 -
S4 HANA Cloud
1 -
S4 HANA On-Premise
1 -
S4HANA
4 -
S4HANA Cloud
1 -
S4HANA_OP_2023
2 -
SAC
10 -
SAC PLANNING
9 -
SAP
4 -
SAP ABAP
1 -
SAP Advanced Event Mesh
1 -
SAP AI Core
9 -
SAP AI Launchpad
8 -
SAP Analytic Cloud Compass
1 -
Sap Analytical Cloud
1 -
SAP Analytics Cloud
4 -
SAP Analytics Cloud for Consolidation
3 -
SAP Analytics Cloud Story
1 -
SAP analytics clouds
1 -
SAP API Management
1 -
SAP BAS
1 -
SAP Basis
6 -
SAP BODS
1 -
SAP BODS certification.
1 -
SAP BTP
22 -
SAP BTP Build Work Zone
2 -
SAP BTP Cloud Foundry
6 -
SAP BTP Costing
1 -
SAP BTP CTMS
1 -
SAP BTP Generative AI
1 -
SAP BTP Innovation
1 -
SAP BTP Migration Tool
1 -
SAP BTP SDK IOS
1 -
SAP BTPEA
1 -
SAP Build
11 -
SAP Build App
1 -
SAP Build apps
1 -
SAP Build CodeJam
1 -
SAP Build Process Automation
3 -
SAP Build work zone
10 -
SAP Business Objects Platform
1 -
SAP Business Technology
2 -
SAP Business Technology Platform (XP)
1 -
sap bw
1 -
SAP CAP
2 -
SAP CDC
1 -
SAP CDP
1 -
SAP CDS VIEW
1 -
SAP Certification
1 -
SAP Cloud ALM
4 -
SAP Cloud Application Programming Model
1 -
SAP Cloud Integration for Data Services
1 -
SAP cloud platform
8 -
SAP Companion
1 -
SAP CPI
3 -
SAP CPI (Cloud Platform Integration)
2 -
SAP CPI Discover tab
1 -
sap credential store
1 -
SAP Customer Data Cloud
1 -
SAP Customer Data Platform
1 -
SAP Data Intelligence
1 -
SAP Data Migration in Retail Industry
1 -
SAP Data Services
1 -
SAP DATABASE
1 -
SAP Dataspher to Non SAP BI tools
1 -
SAP Datasphere
9 -
SAP DRC
1 -
SAP EWM
1 -
SAP Fiori
3 -
SAP Fiori App Embedding
1 -
Sap Fiori Extension Project Using BAS
1 -
SAP GRC
1 -
SAP HANA
1 -
SAP HANA PAL
1 -
SAP HANA Vector
1 -
SAP HCM (Human Capital Management)
1 -
SAP HR Solutions
1 -
SAP IDM
1 -
SAP Integration Suite
9 -
SAP Integrations
4 -
SAP iRPA
2 -
SAP LAGGING AND SLOW
1 -
SAP Learning Class
1 -
SAP Learning Hub
1 -
SAP Master Data
1 -
SAP Odata
2 -
SAP on Azure
2 -
SAP PAL
1 -
SAP PartnerEdge
1 -
sap partners
1 -
SAP Password Reset
1 -
SAP PO Migration
1 -
SAP Prepackaged Content
1 -
SAP Process Automation
2 -
SAP Process Integration
2 -
SAP Process Orchestration
1 -
SAP S4HANA
2 -
SAP S4HANA Cloud
1 -
SAP S4HANA Cloud for Finance
1 -
SAP S4HANA Cloud private edition
1 -
SAP Sandbox
1 -
SAP STMS
1 -
SAP successfactors
3 -
SAP SuccessFactors HXM Core
1 -
SAP Time
1 -
SAP TM
2 -
SAP Trading Partner Management
1 -
SAP UI5
1 -
SAP Upgrade
1 -
SAP Utilities
1 -
SAP-GUI
8 -
SAP_COM_0276
1 -
SAPBTP
1 -
SAPCPI
1 -
SAPEWM
1 -
sapfirstguidance
1 -
SAPHANAService
1 -
SAPIQ
1 -
sapmentors
1 -
saponaws
2 -
SAPS4HANA
1 -
SAPUI5
5 -
schedule
1 -
Script Operator
1 -
Secure Login Client Setup
8 -
security
9 -
Selenium Testing
1 -
Self Transformation
1 -
Self-Transformation
1 -
SEN
1 -
SEN Manager
1 -
service
1 -
SET_CELL_TYPE
1 -
SET_CELL_TYPE_COLUMN
1 -
SFTP scenario
2 -
Simplex
1 -
Single Sign On
8 -
Singlesource
1 -
SKLearn
1 -
Slow loading
1 -
soap
1 -
Software Development
1 -
SOLMAN
1 -
solman 7.2
2 -
Solution Manager
3 -
sp_dumpdb
1 -
sp_dumptrans
1 -
SQL
1 -
sql script
1 -
SSL
8 -
SSO
8 -
Substring function
1 -
SuccessFactors
1 -
SuccessFactors Platform
1 -
SuccessFactors Time Tracking
1 -
Sybase
1 -
system copy method
1 -
System owner
1 -
Table splitting
1 -
Tax Integration
1 -
Technical article
1 -
Technical articles
1 -
Technology Updates
15 -
Technology Updates
1 -
Technology_Updates
1 -
terraform
1 -
Threats
2 -
Time Collectors
1 -
Time Off
2 -
Time Sheet
1 -
Time Sheet SAP SuccessFactors Time Tracking
1 -
Tips and tricks
2 -
toggle button
1 -
Tools
1 -
Trainings & Certifications
1 -
Transformation Flow
1 -
Transport in SAP BODS
1 -
Transport Management
1 -
TypeScript
3 -
ui designer
1 -
unbind
1 -
Unified Customer Profile
1 -
UPB
1 -
Use of Parameters for Data Copy in PaPM
1 -
User Unlock
1 -
VA02
1 -
Validations
1 -
Vector Database
2 -
Vector Engine
1 -
Vectorization
1 -
Visual Studio Code
1 -
VSCode
2 -
VSCode extenions
1 -
Vulnerabilities
1 -
Web SDK
1 -
work zone
1 -
workload
1 -
xsa
1 -
XSA Refresh
1
- « Previous
- Next »
Related Content
- Improving Time Management in SAP S/4HANA Cloud: A GenAI Solution in Technology Blogs by SAP
- Fiori Approve Timesheets Version 3 show AWART text in Technology Q&A
- Salesforce Advantco to Rojo Adapter Migration in Technology Blogs by SAP
- Task UI in SAP BPA in Technology Q&A
- CAT Timesheet Approval #COE, #DE01 in Technology Q&A
Top kudoed authors
| User | Count |
|---|---|
| 10 | |
| 5 | |
| 4 | |
| 4 | |
| 4 | |
| 4 | |
| 4 | |
| 3 | |
| 3 | |
| 2 |