
- SAP Community
- Products and Technology
- Technology
- Technology Blogs by Members
- SAPCC, NW ABAP, SAPCP config for the Identity Prov...
Technology Blogs by Members
Explore a vibrant mix of technical expertise, industry insights, and tech buzz in member blogs covering SAP products, technology, and events. Get in the mix!
Turn on suggestions
Auto-suggest helps you quickly narrow down your search results by suggesting possible matches as you type.
Showing results for
NabiZamani
Contributor
Options
- Subscribe to RSS Feed
- Mark as New
- Mark as Read
- Bookmark
- Subscribe
- Printer Friendly Page
- Report Inappropriate Content
09-30-2018
4:01 PM
In the last two parts of the blog series you’ve installed both an SAP Cloud Connector (SAPCC) and a NW ABAP 7.51 SP02 Trial into Docker running on your own machine. After having connected your two Docker containers you’ve also learned how to configure everything to get Principal Propagation to work. We've validated that Principal Propagation works by creating a simple Fiori Launchpad (FLP) using the Portal Service of our own trial account on the SAP Cloud Platform (SAPCP). Inside that FLP we deployed a simple UI5 application which we generated using the SAP Web IDE. This little application calls an OData service on our NW ABAP running inside our Docker container on localhost. Isn't it cool that your UI5 app deployed to the SAPCP accesses your own laptop for the business logic implemented inside NW ABAP?
However, there is one issue: everyone who accesses our SAPCP FLP will see our little UI5 app. We want to change this by assigning certain roles to users in SU01 of our NW ABAP which authorizes them to see our UI5 app in the SAPCP FLP. But wait... How the heck do the ABAP roles get into the SAPCP in a way that the SAPCP FLP understands what apps to display for a certain authenticated user? The SAPCP Identity Provisioning Service (IPS) handles the magic for us and in this blog you'll learn how to setup everything. Both as an ABAP and SAPCP developer you're going to love the IPS. For me it's one of the most important SAPCP services available and you're going to see how things are wired together!

Having read the previous parts, you should see the difference of the image above compared to the image of the last part of this blog series. So far, the users access our app which is deployed to the FLP. Everyone who has the link to our FLP can access the FLP after SAML authentication thanks to the SAPCP Authentication service. We didn't have to do much for that, it just worked out of the box; per default the SAP ID Service is a trusted Identity Provider (of course that's customizable, but that's worth another tutorial).
The SAPCP has its own user store which includes users, groups, and roles. Every time a new user authenticates and accesses your SAPCP account a basic user record gets created in your SAPCP's account user store containing the UserID. You can also create users manually using the SAPCP Cockpit. This user store can be used by the different SAPCP services, i.e. by the Portal Service in order to decide what apps a user can see; well, more accurately: which catalogs/groups a user can see, while apps can be assigned to multiple catalogs/groups. In other words: if a certain user has the authorization for a certain FLP catalog/group then the user is allowed to see/access the contained apps.
Our goal is to change the default behavior. In other words, while any authenticated user should be able to access our FLP, only those of them with the right authorization should be able to see our little app on the FLP. Don't mix this with backend authorization, i.e. for the OData services - in your OData services you'll still have to check the authorizations at runtime, else you might have a security issue (out of scope in this blog).
If you're familiar with the SAPCP, one option to make this happen would be specifying/creating a required role for the FLP catalog/group (our app is assigned to the catalog/group) and then assigning the users of your choice to that role manually in the SAPCP. So in our scenario that would mean certain authorizations are assigned on ABAP side (i.e. in SU01/PFCG, maybe for you OData services *Hint Hint*) while the FLP authorizations are assigned on the frontend. Raise your hands if you don't like this approach (I just raised mine)! Wouldn't it be great if we could simply handle the authorization related stuff on our backend, where we have decades of experience with ABAP authorizations as well as well established processes and tools for authorization handling? And then automatically the FLP in the SAPCP knows via telemetry how the authorizations look like? Please raise your hand again if that'S what you want! Oops, telemetry is a little difficult, but here come the magic of the IPS:
The IPS is basically basically a Java based SAPCP service which gets users from a given source system according to own rules and writes them to a configured target system, again according to own rules. In our case, the source system is NW ABAP, while our target system is our own SAPCP trial account. More precisely, in our showcase the IPS reads our users from the SU01 of our NW ABAP running in Docker (source system) according to rules which we want to define. Then, these users are written to our SAPCP trial account (target system) according to another set of rules which we define. Both the source system and target system will have an own destination in the SAPCP: for reading the users/roles from SU01 the IPS will use an RFC connection, while for writing the user identities to the SAPCP user store an HTTP destination is used. The good thing is that the IPS does not have to be triggered manually each time a new user was created in the SU01. Instead, we can configure it to run the sync as a job, i.e. let's say very 15 minutes (if you want).
I've just mentioned several strange terms without explaining why: sync, user, role, group. When talking to colleagues, I typically say the IPS is syncing the users from SU01 to the SAPCP. The techie word for that is Provisioning. All that happens based on rules we can define, i.e. "Get all users having a role starting with ZMANAGER* and assign them to the SAPCP group called Manager". Using this approach, we can simply assign all needed SAPCP roles to the group manually in the SAPCP Cockpit, while everyone assigned to the group will get all the contained roles.
All you should have understood so far is by using the IPS we can manage all User authorizations on ABAP, i.e. changes in SU01 get reflected in the SACP user store. In case I've lost you please make sure to watch the video a few times. I gave my best to add lots of details. Now let's start with the work.
Hint: When I say syncing users from ABAP to SAPCP or provisioning of ABAP users to SAPCP it's actually a 1-way direction: changes on ABAP side get reflected on SAPCP, but changes on SAPCP users (i.e. new users or changed roles) do not get synced to ABAP. In fact, at the time of writing the IPS does not support writing authorization objects to SAP NW ABAP (AFAIK this is because NW ABAP doesn't support SCIM). Furthermore, when I say syncing users I should actually say syncing identities or provisioning identities. Got curious and want to learn more about what Identity Provisioning actually means? Google for it or have a look at Identity Provisioning for Dummies (don't take the title personal). Well, and that was a little disclaimer for not being 100% scientifically correct with the terms I use 🙂
Before you continue make sure you've started both your NW ABAP Docker container as well as your SAPCC Docker container (see the previous parts of the blog series). Then login to your SAPCC and create a system mapping by choosing Cloud To On-Premisefrom the left side menu and then clicking the Access Controltab:

The already existing mapping was created in a previous step of the blog series. You can check its connection by pressing the corresponding action button. We could now add the mapping we need manually, or we could simply upload a file containing the configuration for the new mapping (both options are demonstrated in the video). We’ll use the file upload here because is faster, and for exactly that purpose I’ve prepared the following file for you (sapcc_access_control_rfc_only.json😞
The SAPCC understands the JSON file from above. However, we can’t simply upload this as is because SAPCC expects a zip file which contains a JSON file called access_control.json! So let’s fulfill this requirement by creating the right zip file with the following commands (or do in manually):
Finally, we can press the upload button (see screenshot above) and choose the zip file we just created for the upload. Upon successful upload, a new RFC mapping is created and visible in the list of mappings. Now it’s the right time to check its connection by pressing the corresponding action icon/button; this should return the check result “Reachable” which means the RFC connection to your ABAP system is fine. When selecting the created mapping you will recognize that the mapping makes five “prefix” resources accessible (all others not matching are blocked). You can consider this as a white list of resources (here RFC connections) that the SAPCC allows to call – important feature, isn’t it?!

But why does the list of accessible resources show three green squares while two are black RAUTE? Well, that’s because the prefix BAPI_USER already covers the other two items starting with BAPI_USER*. No worries – this should not cause any issues. Furthermore, having exactly these five items is what the official documentations asks us to do. From the screenshot above you can also tell that the order of the accessible resources seems to matter (at least for the calculation of the status column) because both items starting with PRNG have green squares.
You could have created the RFC mapping and configure the accessible resources manually from the SAPCC UI as well. In fact, this is covered my video as well, and if you follow the video carefully you’ll learn about a trial restriction: with your SAPCP trial account only two active mapping are allowed! In case you try to add a third (active) mapping the SAPCC will show you a corresponding error message. Attention: when this message gets displayed your SAPCC gets disconnected from the your SAPCP Trial account! So, make sure to reconnect your SAPCC; for details see the video at 05:45.
You may want to have a look at the excellent documentation of SAPCP Identity Provisioning Service on SAP HELPfor additional details; it served great for me!
The IPS will make RFC calls to our ABAP Backend to get the relevant SU01 users etc. This all happens depending on some rules, and we will configure them later. At this point, we want to create a Service User in SU01 on ABAP side. This user will then be used by our IPS (actually it’s the SAPCP destination which we’ll create later as well) to call the white-listed resources of our RFC mapping. As you can see in the video at 08:51, I chose to create the following user:
Make sure to assign an initial password! Don’t worry about having to reset the password after the first login; Service Users don’t have to reset password after the first logon.
Hint: ABAPers often use the term Technical User as a synonym for Service User.
The Service User we just created needs some authorizations, otherwise the IPS will fail to do its job. According to the official IPS documentation the following read-only role is everything needed: SAP_BC_JSF_COMMUNICATION_RO. This Role must be assigned to our Service User, i.e. by using the Transaction PFCG. The video at 10:10 illustrates exactly what to do, and it even shows you how to activate the profile etc and how to make sure everything is “green”.

Once again having a look at the official IPS documentation you can see that the read-only role SAP_BC_JSF_COMMUNICATION_RO should be everything needed for the IPS to work. Well, that’s not really enough! The service user must have the following Authorization Objects assigned (seems not to be documented for some reason):
We’ll create a new Role containing the mentioned Authorization Objects. The role must then be assigned to the Service User, and that’s it. The video at 11:25 illustrates everything in detail. First, you go to Transaction PFCG and create a role, i.e. ZS_RFC_SAPCPIPS. Then you assign the mentioned Authorization Objects with the values mentioned above.
Finally, you have to assign the Services User to the role:

For a better demonstration of how IPS works I’ve created a few other roles and the corresponding users as well, for details see video at 14:20:
Additional Roles via PFCG:
Additional Users with assigned Roles from above via SU01:
Later, you’ll see how these users/roles are provisioned to you SAPCP Trial Account.
The IPS allows two types of systems
In other words: we want to get our users from ABAP provisioned into our SAPCP account.
My own SAPCP account’s IPS can provision users to any SAPCP account, i.e. to yours, or even to the very same SAPCP account to which the IPS belongs. In our case, the IPS can be considered as a client that wants to access some (Authorization Management) APIs of a given SAPCP account, and thus we need credentials so that the IPS can call the APIs using a given user id with the needed authorization together with a password (“secret).
We can easily generate the credentials by generating so called OAuth Client Credentials in the SAPCP Target System (in our case this will simply be our SAPCP Trial Account), see video at 19:04:
Important: Make sure to save the generated OAuth Client Credentials (both Client ID and Client Secret, the latter one cannot be retrieved later)!!!

We will use the credentials when we create an HTTP Destination (see below). The IPS will access the SAPCP Target System using this destination and its configured credentials.
To allow the IPS accessing our NW ABAP running in Docker we have to create an RFC destination pointing exactly to our NW ABAP. In our case, this destination is used by the IPS for accessing our NW ABAP as the Source System (where the users actually come from). Check the video at 20:59 for how to create the RFC destination. For easy Copy & Paste use the following values for the RFC Destination (same as in screenshot below + my Github repo😞
The User is the Service User we created on ABAP side using SU01. It has all authorizations needed by the IPS to operate successfully. Make sure to set properties for the destination as well (see screenshot)!

To allow the IPS accessing our SAPCP account we want to create an HTTP destination pointing exactly to our SAPCP account (i.e. to a trial account). In our case, this destination is used by the IPS for accessing our SAPCP account as the Target System (where the users/identities are actually provisioned to). Check the video at 23:33 for how to create the HTTP destination. For easy Copy & Paste use the following values for the HTTP Destination (same as in screenshot below + my Github repo😞
The values for User and Password are the OAuth Client Credentials we created above. Make sure to set properties for the destination as well (see screenshot)!

ATTENTION: Back then when I created the video the URL used for OAuth2TokenServiceURL was different (see video at 25:51). SAP has chosen to change this slightly, and that initially broke lots of configurations because the old URLs (without the “api”) simply returned an HTTP 302, but the IPS could not handle that. There was not even a single note ahead of this change. In fact, I had several productive configurations for different customers, and suddenly nothing worked anymore. The values above are the correct ones, the values in the video are outdated (see video at 25:51). Make always sure to be in sync with the official docs.
Finally, it’s time to start configuring the IPS itself by creating both a Source System and a Target System. First, we’ll create a Source System (see video at 26:17).
First we go to the IPS (make sure to enable the IPS if it’s disabled, see screenshots/video):


When getting here initially, you can see you have no Source Systems (and no Target System, no Jobs). I prefer to have the left-side menu open all the time. Now let’s add a Source System by pressing Source Systems before we can press the add button:
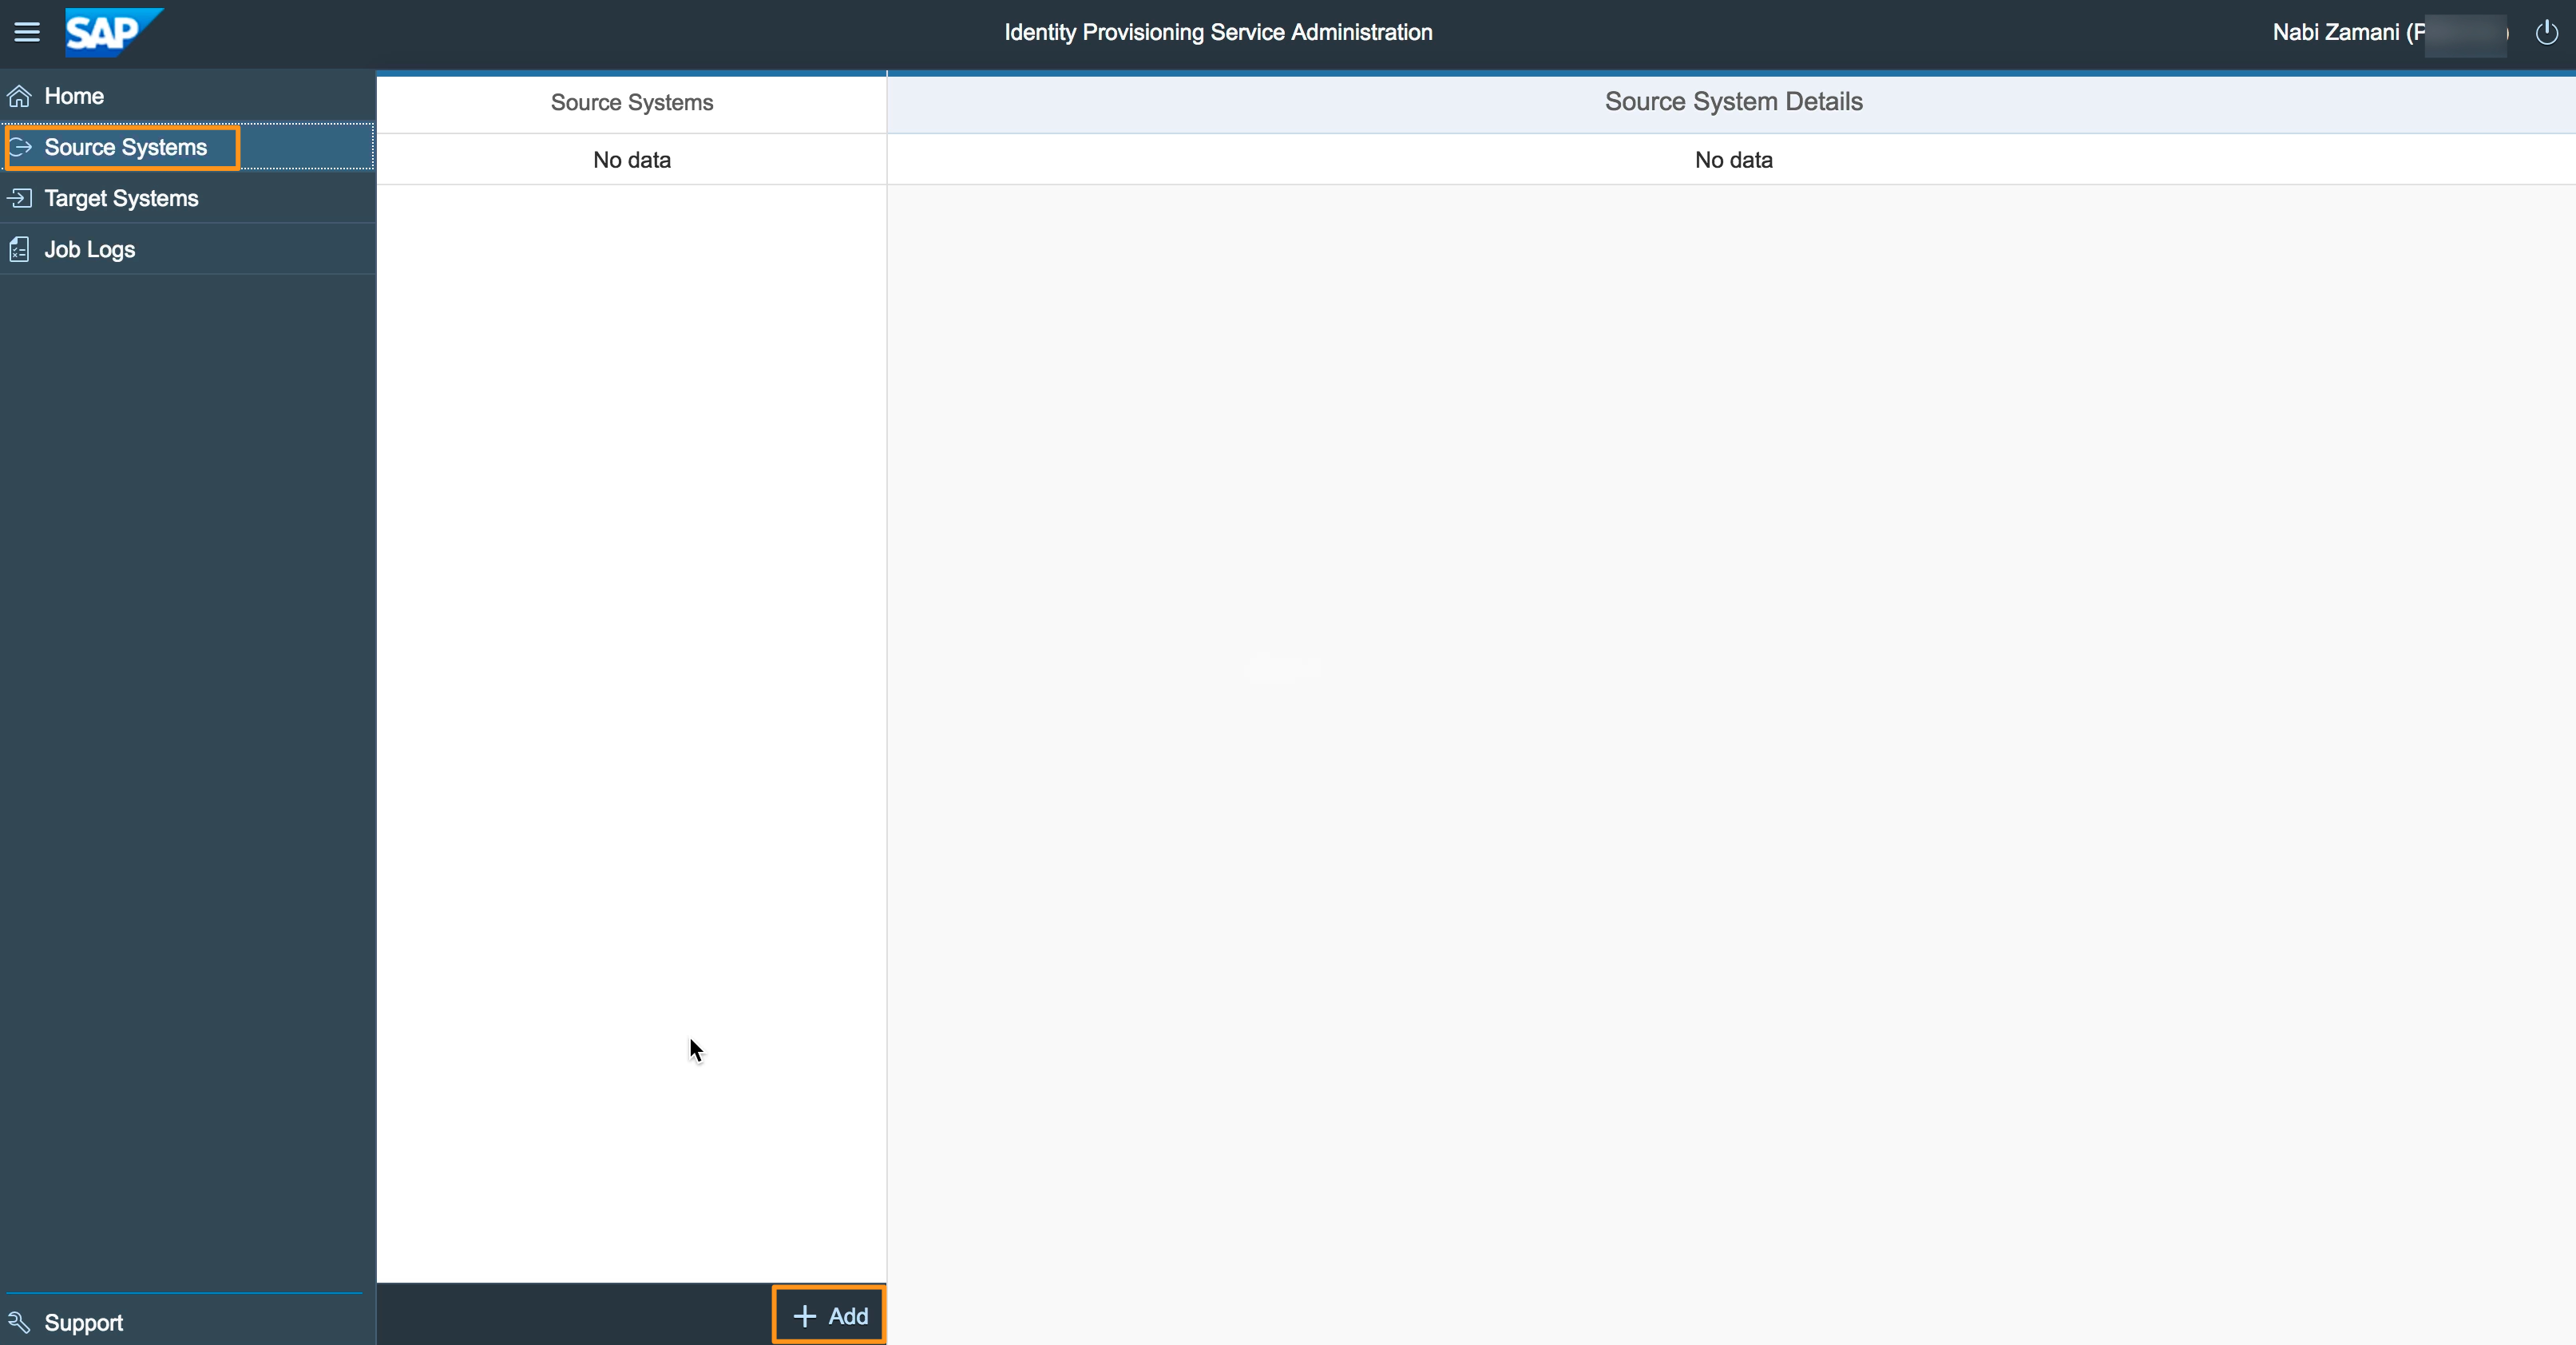
Now fill in the relevant values in the Details tab (see the video or the my Github repo😞

Since our Source System for the users is an NW ABAP we choose SAP Application Server ABAP for Type. As you can. guess, the Destination Name references the Destination we created earlier (IPS_SOURCE_NPL_001_RFC).
In the Transformation tab you can simply enter the content of the JSON file I prepared for you (see video for details). Basically, this configuration file tells the IPS to map users with certain ABAP roles to a corresponding SAPCP group. For example, users having the ABAP role ZDEMO_MANAGER will be mapped to the SAPCP group MyManagerGroup. But why groups? Well, in SAPCP you can create Groups and assign Roles to these Groups. In the end, users being part of a given Group will get all Roles assigned to the group. This approach can save time to maintain roles, and I’m sure you’ll learn to love that approach.
In the Properties tab you can add the following two properties:
The property abap.role.filter makes sure that only users with ABAP roles starting with YDEMO or ZDEMO will be considered by the IPS. The other property adds details to the logs (feel free to set it to false).
Don’t forget to hit the save button!
Now let’s create a Target System with the following configuration (see video at 31:17 and my Github repo😞

Since our Target System is an SAPCP account we choose SAP Cloud Platform Java/HTML5 App for Type. As you can. guess, the Destination Name references the Destination we created earlier: IPS_TARGET_MYTRIAL_SAPCP. It points to the SAPCP account to which the IPS will write data to (in fact, where the IPS will make changes). We select the Source System NW-ABAP-751-NPL, which is the one we just created in the previous step.
In the Transformation tab you can simply enter the content of another JSON file I prepared for you (see video for details). Basically, this configuration tells the IPS how to create the Group and who will be assigned to it. For a better understanding you can say the tansformation of the Source System decides what entities to select from the Source System (= NW ABAP in our case), while the transformation of the Target System tells how the found items and data passed over from the Source System will be handled/created on SAPCP side (= Target System in our case).
In the Properties tab you can add the following two property:
Make sure to press the save button once done!
So now we should have everything ready, let’s check the SAPCP account’s Groups:

Ooooops, it’s empty; there are no Groups! But didn’t we expect a few Groups to be available according to our Source System’s transformation? Yes, but first we have to run the corresponding IPS Read Job! This job can be considered as a “full sync” or “full read”, other prefer to call is the “initial load”. Jobs are always run from the Source System’s Jobs tab by simply pressing the Run Now button (from here you can also schedule the job, i.e. to run it once an hour):

After running the job you can check Job Logs for checking its status (press the Refresh button to see the latest data):


Once the job is done you can check the details by selecting the corresponding row in the table. In our case we can see that three entities of type group were read (I prefer to say “calculated”) from the Source System, while (these) three entities of type group were created in the Target System.

You can verify everything worked as expected by checking your SAPCP account’s Groups once again:
This time you can see we have three Groups, and each of them has one or more users mapped, i.e. the user manager is a member of the Group MyManagerGroup, the Group MyPurchaserGroup currently has two members which are the users manager and purchaser. And as you can see in this example a user can be mapped to multiple groups as well (in our case the manager user in in two Groups). The users come from SU01 in ABAP:

For demonstration purposes, now let’s remove the role ZDEMO_PURCHASER from the user manager in SU01and see what happens:

In order to see a change in the SAPCP account’s Groups we can simply “re-sync” the users by pressing the Run Now button of the Source System’s Resync Job:

After the job has finished our SAPCP Group MyPurchaserGroup does not contain the user manager anymore:

Isn’t this amazing? This tells us we can do all our authorization management stuff in our central user store – in our case on ABAP side! How cool is that? And that’s not all, because next we want to use this approach for assigning SAPCP roles (to the SAPCP Groups) used by the SAPCP FLP! In other words: as you can see in the screenshot above the roles table is empty; let’s create SAPCP roles and add them to our SAPCP Groups.
There are multiple ways to achieve what we want, and I’ll show some of them. First, let’s go to the Portal Service and create new Roles:


We’ll add three roles: Manager, SalesRep, Purchaser. After that, we want to assign them to the corresponding groups. This we can achieve by pressing the Assign button right now (in the video I do it this way as an example only for one of the roles):

But we could do it also from the other view (again, in the video you’ll see both options):

From the screenshot above you can tell everybody assigned to the Group MyPurchaserGroup will get Role Purchaser.
Go to your Fiori Configuration Cockpit and create three Catalogs, one for each Role. Then create three Groups, again one for each Role. See the video at 39:40 for all the steps (this post is already to big):


The Catalogs and Groups are currently empty. Make sure to add one or more apps now. In the video I chose to add the Manage Products UI5 app, and I assigned it to both the Manager Catalog and Group (see video for details).

Once you’re done publish your site as mentioned on the video. After opening your FLP you can see the app. But why can you see the app? Does you user have the Manager suddenly? Nope. The reason is simple: it’s your SAPCP trial account, you are the admin, and as such you can see all the apps. In the video you can see I verify what I just claimed by signing in with a different user, and guess what: the app that shall be visible only to the Manager (Manage Products) is not visible in the SAPCP FLP anymore.
But how do I allow the users to see the FLP app? Well, by assigning the required roles to the user in SU01 on ABAP. You already know how that works, if you don’t then check then continue watching the video. Just like I did in the video, you can invite any of your friends by sharing the link to the FLP. Just make sure to add the User ID of the person you want to invite to SU01. Then give that user let’s say the Manager role in SU01. Finally, resync the job and that’s it. Now ask the user to close the browser and open the link again. Here we go, see the video 🙂
First of all, I’d like to thank you for following all the tutorials, and for waiting so long for this last part; work, the world cup, vacation etc. hit me really hard so I couldn’t make it earlier. I’d also like to thank you for all the comments, contact requests, and private messages here and elsewhere...
Right... actually this should be the conclusion section here:
Most importantly: ABAP is not dead, it’s more alive than ever! And keep in mind, sharing is caring!
Meanwhile, ABAP Trial 7.52 SP01 is out:
Even ABAP in the Cloud is out:
Well, it's not really the Micro Services ABAP kind of thing I anticipated, but that’s the story of another blog series. And that will only happen if SAP adds Community/Trial Versions First to the existing Cloud First strategy 🙂
Cheers, Nabi
ps sorry fo that last huge part of the series. I agree it's way to big for only one post, and that doesn't make the quality better.
However, there is one issue: everyone who accesses our SAPCP FLP will see our little UI5 app. We want to change this by assigning certain roles to users in SU01 of our NW ABAP which authorizes them to see our UI5 app in the SAPCP FLP. But wait... How the heck do the ABAP roles get into the SAPCP in a way that the SAPCP FLP understands what apps to display for a certain authenticated user? The SAPCP Identity Provisioning Service (IPS) handles the magic for us and in this blog you'll learn how to setup everything. Both as an ABAP and SAPCP developer you're going to love the IPS. For me it's one of the most important SAPCP services available and you're going to see how things are wired together!
- Part 1: ABAP is here and it stays in the DNA of SAP even in the New Age of SAP Development
- Part 2: Installing SAP Cloud Connector into Docker and connecting it to SAP Cloud Platform
- Part 3: Installing SAP NW ABAP into Docker
- Part 4: Configure SAPCC + NW ABAP for Principal Propagation + Docker Network config for both Containers
- Part 5: SAPCC, NW ABAP, SAPCP config for the Identity Provisioning Service to sync users from ABAP to SAPCP
1. Resources
- YouTube: https://www.youtube.com/watch?v=IaDS0kcQnhY
- GitHub: https://github.com/nzamani/sap-cloud-connector-docker/tree/master/ips
2. What will you have at the end of this blog?
Having read the previous parts, you should see the difference of the image above compared to the image of the last part of this blog series. So far, the users access our app which is deployed to the FLP. Everyone who has the link to our FLP can access the FLP after SAML authentication thanks to the SAPCP Authentication service. We didn't have to do much for that, it just worked out of the box; per default the SAP ID Service is a trusted Identity Provider (of course that's customizable, but that's worth another tutorial).
The SAPCP has its own user store which includes users, groups, and roles. Every time a new user authenticates and accesses your SAPCP account a basic user record gets created in your SAPCP's account user store containing the UserID. You can also create users manually using the SAPCP Cockpit. This user store can be used by the different SAPCP services, i.e. by the Portal Service in order to decide what apps a user can see; well, more accurately: which catalogs/groups a user can see, while apps can be assigned to multiple catalogs/groups. In other words: if a certain user has the authorization for a certain FLP catalog/group then the user is allowed to see/access the contained apps.
Our goal is to change the default behavior. In other words, while any authenticated user should be able to access our FLP, only those of them with the right authorization should be able to see our little app on the FLP. Don't mix this with backend authorization, i.e. for the OData services - in your OData services you'll still have to check the authorizations at runtime, else you might have a security issue (out of scope in this blog).
If you're familiar with the SAPCP, one option to make this happen would be specifying/creating a required role for the FLP catalog/group (our app is assigned to the catalog/group) and then assigning the users of your choice to that role manually in the SAPCP. So in our scenario that would mean certain authorizations are assigned on ABAP side (i.e. in SU01/PFCG, maybe for you OData services *Hint Hint*) while the FLP authorizations are assigned on the frontend. Raise your hands if you don't like this approach (I just raised mine)! Wouldn't it be great if we could simply handle the authorization related stuff on our backend, where we have decades of experience with ABAP authorizations as well as well established processes and tools for authorization handling? And then automatically the FLP in the SAPCP knows via telemetry how the authorizations look like? Please raise your hand again if that'S what you want! Oops, telemetry is a little difficult, but here come the magic of the IPS:
The IPS is basically basically a Java based SAPCP service which gets users from a given source system according to own rules and writes them to a configured target system, again according to own rules. In our case, the source system is NW ABAP, while our target system is our own SAPCP trial account. More precisely, in our showcase the IPS reads our users from the SU01 of our NW ABAP running in Docker (source system) according to rules which we want to define. Then, these users are written to our SAPCP trial account (target system) according to another set of rules which we define. Both the source system and target system will have an own destination in the SAPCP: for reading the users/roles from SU01 the IPS will use an RFC connection, while for writing the user identities to the SAPCP user store an HTTP destination is used. The good thing is that the IPS does not have to be triggered manually each time a new user was created in the SU01. Instead, we can configure it to run the sync as a job, i.e. let's say very 15 minutes (if you want).
I've just mentioned several strange terms without explaining why: sync, user, role, group. When talking to colleagues, I typically say the IPS is syncing the users from SU01 to the SAPCP. The techie word for that is Provisioning. All that happens based on rules we can define, i.e. "Get all users having a role starting with ZMANAGER* and assign them to the SAPCP group called Manager". Using this approach, we can simply assign all needed SAPCP roles to the group manually in the SAPCP Cockpit, while everyone assigned to the group will get all the contained roles.
All you should have understood so far is by using the IPS we can manage all User authorizations on ABAP, i.e. changes in SU01 get reflected in the SACP user store. In case I've lost you please make sure to watch the video a few times. I gave my best to add lots of details. Now let's start with the work.
Hint: When I say syncing users from ABAP to SAPCP or provisioning of ABAP users to SAPCP it's actually a 1-way direction: changes on ABAP side get reflected on SAPCP, but changes on SAPCP users (i.e. new users or changed roles) do not get synced to ABAP. In fact, at the time of writing the IPS does not support writing authorization objects to SAP NW ABAP (AFAIK this is because NW ABAP doesn't support SCIM). Furthermore, when I say syncing users I should actually say syncing identities or provisioning identities. Got curious and want to learn more about what Identity Provisioning actually means? Google for it or have a look at Identity Provisioning for Dummies (don't take the title personal). Well, and that was a little disclaimer for not being 100% scientifically correct with the terms I use 🙂
3. Create an RFC Mapping in the SAPCC
Before you continue make sure you've started both your NW ABAP Docker container as well as your SAPCC Docker container (see the previous parts of the blog series). Then login to your SAPCC and create a system mapping by choosing Cloud To On-Premisefrom the left side menu and then clicking the Access Controltab:
The already existing mapping was created in a previous step of the blog series. You can check its connection by pressing the corresponding action button. We could now add the mapping we need manually, or we could simply upload a file containing the configuration for the new mapping (both options are demonstrated in the video). We’ll use the file upload here because is faster, and for exactly that purpose I’ve prepared the following file for you (sapcc_access_control_rfc_only.json😞
[{

	"cloudHost": "nwabap751",

	"cloudPort": "sapgw00",

	"localHost": "vhcalnplci",

	"localPort": "sapgw00",

	"protocol": "RFC",

	"backendType": "abapSys",

	"sncPartnerName": "",

	"sapRouter": "",

	"authMode": "NONE",

	"description": "RFC for SAPCP Identity Provisioning Service",

	"allowedClients": [],

	"blacklistedUser": [],

	"resources": [{

		"path": "BAPI_USER",

		"enabled": true,

		"exactMatchOnly": false,

		"description": ""

	}, {

		"path": "BAPI_USER_GETLIST",

		"enabled": true,

		"exactMatchOnly": false,

		"description": ""

	}, {

		"path": "BAPI_USER_GET_DETAIL",

		"enabled": true,

		"exactMatchOnly": false,

		"description": ""

	}, {

		"path": "PRGN_ROLE_GETLIST",

		"enabled": true,

		"exactMatchOnly": false,

		"description": ""

	}, {

		"path": "PRNG",

		"enabled": true,

		"exactMatchOnly": false,

		"description": ""

	}]

}]
The SAPCC understands the JSON file from above. However, we can’t simply upload this as is because SAPCC expects a zip file which contains a JSON file called access_control.json! So let’s fulfill this requirement by creating the right zip file with the following commands (or do in manually):
# 1. Download the json file I prepared

wget https://raw.githubusercontent.com/nzamani/sap-cloud-connector-docker/ master/ips/sapcc_access_control_rfc_only.json


# 2. Rename the downloaded file

mv sapcc_access_control_rfc_only.json access_control.json


# 3. Put it into a zip file

zip access_control.zip access_control.json
Finally, we can press the upload button (see screenshot above) and choose the zip file we just created for the upload. Upon successful upload, a new RFC mapping is created and visible in the list of mappings. Now it’s the right time to check its connection by pressing the corresponding action icon/button; this should return the check result “Reachable” which means the RFC connection to your ABAP system is fine. When selecting the created mapping you will recognize that the mapping makes five “prefix” resources accessible (all others not matching are blocked). You can consider this as a white list of resources (here RFC connections) that the SAPCC allows to call – important feature, isn’t it?!
But why does the list of accessible resources show three green squares while two are black RAUTE? Well, that’s because the prefix BAPI_USER already covers the other two items starting with BAPI_USER*. No worries – this should not cause any issues. Furthermore, having exactly these five items is what the official documentations asks us to do. From the screenshot above you can also tell that the order of the accessible resources seems to matter (at least for the calculation of the status column) because both items starting with PRNG have green squares.
You could have created the RFC mapping and configure the accessible resources manually from the SAPCC UI as well. In fact, this is covered my video as well, and if you follow the video carefully you’ll learn about a trial restriction: with your SAPCP trial account only two active mapping are allowed! In case you try to add a third (active) mapping the SAPCC will show you a corresponding error message. Attention: when this message gets displayed your SAPCC gets disconnected from the your SAPCP Trial account! So, make sure to reconnect your SAPCC; for details see the video at 05:45.
You may want to have a look at the excellent documentation of SAPCP Identity Provisioning Service on SAP HELPfor additional details; it served great for me!
4. Creating a Service User on ABAP Backend (SU01) used by the IPS
The IPS will make RFC calls to our ABAP Backend to get the relevant SU01 users etc. This all happens depending on some rules, and we will configure them later. At this point, we want to create a Service User in SU01 on ABAP side. This user will then be used by our IPS (actually it’s the SAPCP destination which we’ll create later as well) to call the white-listed resources of our RFC mapping. As you can see in the video at 08:51, I chose to create the following user:
- User ID: ZSSAPCPIPS
- Password: Appl1ance
Make sure to assign an initial password! Don’t worry about having to reset the password after the first login; Service Users don’t have to reset password after the first logon.
Hint: ABAPers often use the term Technical User as a synonym for Service User.
5. Creating a Service User on ABAP Backend (SU01) used by the IPS
The Service User we just created needs some authorizations, otherwise the IPS will fail to do its job. According to the official IPS documentation the following read-only role is everything needed: SAP_BC_JSF_COMMUNICATION_RO. This Role must be assigned to our Service User, i.e. by using the Transaction PFCG. The video at 10:10 illustrates exactly what to do, and it even shows you how to activate the profile etc and how to make sure everything is “green”.
6. Creating a new ABAP Role containing some required Authorization Objects
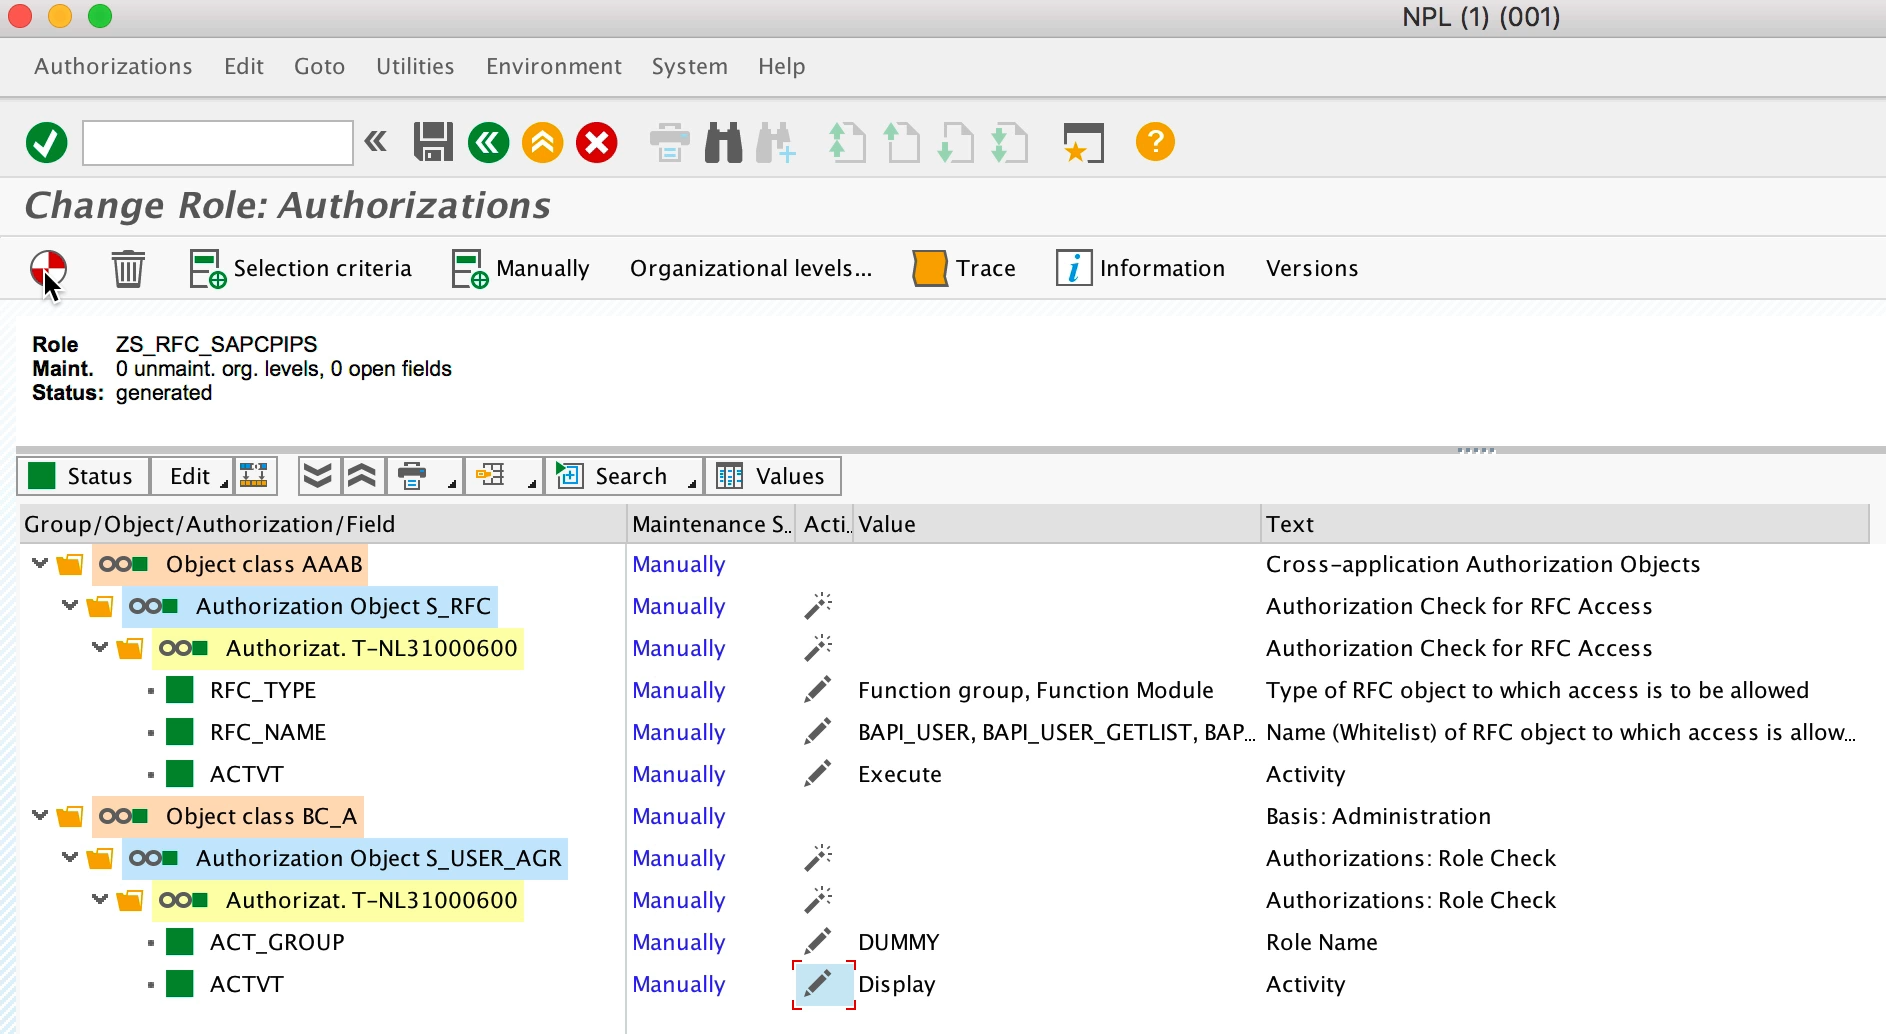
Once again having a look at the official IPS documentation you can see that the read-only role SAP_BC_JSF_COMMUNICATION_RO should be everything needed for the IPS to work. Well, that’s not really enough! The service user must have the following Authorization Objects assigned (seems not to be documented for some reason):
- S_RFC
needed because the IPS will call RFCs, thus the service user needs RFC authorization
- RFC_TYPE: Function group, Function Module
- RFC_NAME
- BAPI_USER
- BAPI_USER_GETLIST
- BAPI_USER_GET_DETAIL
- PRGN_ROLE_GETLIST
- PRNG
- ACTVT: Execute
- S_USER_AGR
needed because the function module PRGN_ROLE_GETLIST checks for it
- ACT_GROUP: DUMMY
- ACTVT: Display
We’ll create a new Role containing the mentioned Authorization Objects. The role must then be assigned to the Service User, and that’s it. The video at 11:25 illustrates everything in detail. First, you go to Transaction PFCG and create a role, i.e. ZS_RFC_SAPCPIPS. Then you assign the mentioned Authorization Objects with the values mentioned above.
Finally, you have to assign the Services User to the role:
7. Creating Demo Users with Demo Roles (ABAP)
For a better demonstration of how IPS works I’ve created a few other roles and the corresponding users as well, for details see video at 14:20:
Additional Roles via PFCG:
- ZDEMO_MANAGER
- ZDEMO_PURCHASER
- ZDEMO_SALESREP
Additional Users with assigned Roles from above via SU01:
- SALESREP
- Roles: ZDEMO_SALESREP
- PURCHASER
- Roles: ZDEMO_PURCHASER
- MANAGER
- Roles: ZDEMO_MANAGER, ZDEMO_PURCHASER
Later, you’ll see how these users/roles are provisioned to you SAPCP Trial Account.
8. Generate OAuth Client Credentials in Target SAPCP account
The IPS allows two types of systems
- Source Systems
From where the users/roles etc. are read by the IPS. This is where your users come from. In our case, our Source System is our NW ABAP running in Docker on localhost. - Target Systems
Where everything gets provisioned to. In our case, the Target System in an SAPCP Account.
In other words: we want to get our users from ABAP provisioned into our SAPCP account.
My own SAPCP account’s IPS can provision users to any SAPCP account, i.e. to yours, or even to the very same SAPCP account to which the IPS belongs. In our case, the IPS can be considered as a client that wants to access some (Authorization Management) APIs of a given SAPCP account, and thus we need credentials so that the IPS can call the APIs using a given user id with the needed authorization together with a password (“secret).
We can easily generate the credentials by generating so called OAuth Client Credentials in the SAPCP Target System (in our case this will simply be our SAPCP Trial Account), see video at 19:04:
- Go to Security-> OAuth-> Platform API and press Create API Client
- checkAuthorization Management (will add Read Authorization and Manage Authorization automatically)
- press “save”
Important: Make sure to save the generated OAuth Client Credentials (both Client ID and Client Secret, the latter one cannot be retrieved later)!!!
We will use the credentials when we create an HTTP Destination (see below). The IPS will access the SAPCP Target System using this destination and its configured credentials.
9. Create an RFC Destination in your SAPCP account
To allow the IPS accessing our NW ABAP running in Docker we have to create an RFC destination pointing exactly to our NW ABAP. In our case, this destination is used by the IPS for accessing our NW ABAP as the Source System (where the users actually come from). Check the video at 20:59 for how to create the RFC destination. For easy Copy & Paste use the following values for the RFC Destination (same as in screenshot below + my Github repo😞
- Name: IPS_SOURCE_NPL_001_RFC
- Type: RFC
- Description: IPS Read from NPL in Docker (NW ABAP Trial)
- Location ID:
- User: ZSSAPCPIPS
- Password: Appl1ance
The User is the Service User we created on ABAP side using SU01. It has all authorizations needed by the IPS to operate successfully. Make sure to set properties for the destination as well (see screenshot)!
10. Create an HTTP Destination in your SAPCP account
To allow the IPS accessing our SAPCP account we want to create an HTTP destination pointing exactly to our SAPCP account (i.e. to a trial account). In our case, this destination is used by the IPS for accessing our SAPCP account as the Target System (where the users/identities are actually provisioned to). Check the video at 23:33 for how to create the HTTP destination. For easy Copy & Paste use the following values for the HTTP Destination (same as in screenshot below + my Github repo😞
- Name: IPS_TARGET_MYTRIAL_SAPCP
- Type: HTTP
- Description: IPS Target to My SAPCP Trial
- URL: https://api.hanatrial.ondemand.com/authorization/v1/accounts/p123456trial
- User: Client ID
- Password: Client Password
The values for User and Password are the OAuth Client Credentials we created above. Make sure to set properties for the destination as well (see screenshot)!
ATTENTION: Back then when I created the video the URL used for OAuth2TokenServiceURL was different (see video at 25:51). SAP has chosen to change this slightly, and that initially broke lots of configurations because the old URLs (without the “api”) simply returned an HTTP 302, but the IPS could not handle that. There was not even a single note ahead of this change. In fact, I had several productive configurations for different customers, and suddenly nothing worked anymore. The values above are the correct ones, the values in the video are outdated (see video at 25:51). Make always sure to be in sync with the official docs.
11. Add a Source System to your SAPCP IPS
Finally, it’s time to start configuring the IPS itself by creating both a Source System and a Target System. First, we’ll create a Source System (see video at 26:17).
First we go to the IPS (make sure to enable the IPS if it’s disabled, see screenshots/video):
When getting here initially, you can see you have no Source Systems (and no Target System, no Jobs). I prefer to have the left-side menu open all the time. Now let’s add a Source System by pressing Source Systems before we can press the add button:
Now fill in the relevant values in the Details tab (see the video or the my Github repo😞
- Type: SAP Application Server ABAP
- System-Name: NW-ABAP-751-NPL
- Destination Name: IPS_SOURCE_NPL_001_RFC
- Description: NW ABAP 7.51 Trial in Docker
Since our Source System for the users is an NW ABAP we choose SAP Application Server ABAP for Type. As you can. guess, the Destination Name references the Destination we created earlier (IPS_SOURCE_NPL_001_RFC).
In the Transformation tab you can simply enter the content of the JSON file I prepared for you (see video for details). Basically, this configuration file tells the IPS to map users with certain ABAP roles to a corresponding SAPCP group. For example, users having the ABAP role ZDEMO_MANAGER will be mapped to the SAPCP group MyManagerGroup. But why groups? Well, in SAPCP you can create Groups and assign Roles to these Groups. In the end, users being part of a given Group will get all Roles assigned to the group. This approach can save time to maintain roles, and I’m sure you’ll learn to love that approach.
In the Properties tab you can add the following two properties:
- role.filter: ^(YDEMO|ZDEMO).*
- trace.failed.entity.content: true
The property abap.role.filter makes sure that only users with ABAP roles starting with YDEMO or ZDEMO will be considered by the IPS. The other property adds details to the logs (feel free to set it to false).
Don’t forget to hit the save button!
12. Add a Target System to your SAPCP IPS
Now let’s create a Target System with the following configuration (see video at 31:17 and my Github repo😞
- Type: SAP Cloud Platform Java/HTML5 App
- System Name: SAPCP-MyTrial
- Destination Name: IPS_TARGET_MYTRIAL_SAPCP
- Description: Trial SAPCP Account
- Source System: NW-ABAP-751-NPL
Since our Target System is an SAPCP account we choose SAP Cloud Platform Java/HTML5 App for Type. As you can. guess, the Destination Name references the Destination we created earlier: IPS_TARGET_MYTRIAL_SAPCP. It points to the SAPCP account to which the IPS will write data to (in fact, where the IPS will make changes). We select the Source System NW-ABAP-751-NPL, which is the one we just created in the previous step.
In the Transformation tab you can simply enter the content of another JSON file I prepared for you (see video for details). Basically, this configuration tells the IPS how to create the Group and who will be assigned to it. For a better understanding you can say the tansformation of the Source System decides what entities to select from the Source System (= NW ABAP in our case), while the transformation of the Target System tells how the found items and data passed over from the Source System will be handled/created on SAPCP side (= Target System in our case).
In the Properties tab you can add the following two property:
- trace.failed.entity.content: true
Make sure to press the save button once done!
13. Run the Read job from the Source System inside your SAPCP IPS
So now we should have everything ready, let’s check the SAPCP account’s Groups:
Ooooops, it’s empty; there are no Groups! But didn’t we expect a few Groups to be available according to our Source System’s transformation? Yes, but first we have to run the corresponding IPS Read Job! This job can be considered as a “full sync” or “full read”, other prefer to call is the “initial load”. Jobs are always run from the Source System’s Jobs tab by simply pressing the Run Now button (from here you can also schedule the job, i.e. to run it once an hour):
After running the job you can check Job Logs for checking its status (press the Refresh button to see the latest data):
Once the job is done you can check the details by selecting the corresponding row in the table. In our case we can see that three entities of type group were read (I prefer to say “calculated”) from the Source System, while (these) three entities of type group were created in the Target System.
You can verify everything worked as expected by checking your SAPCP account’s Groups once again:
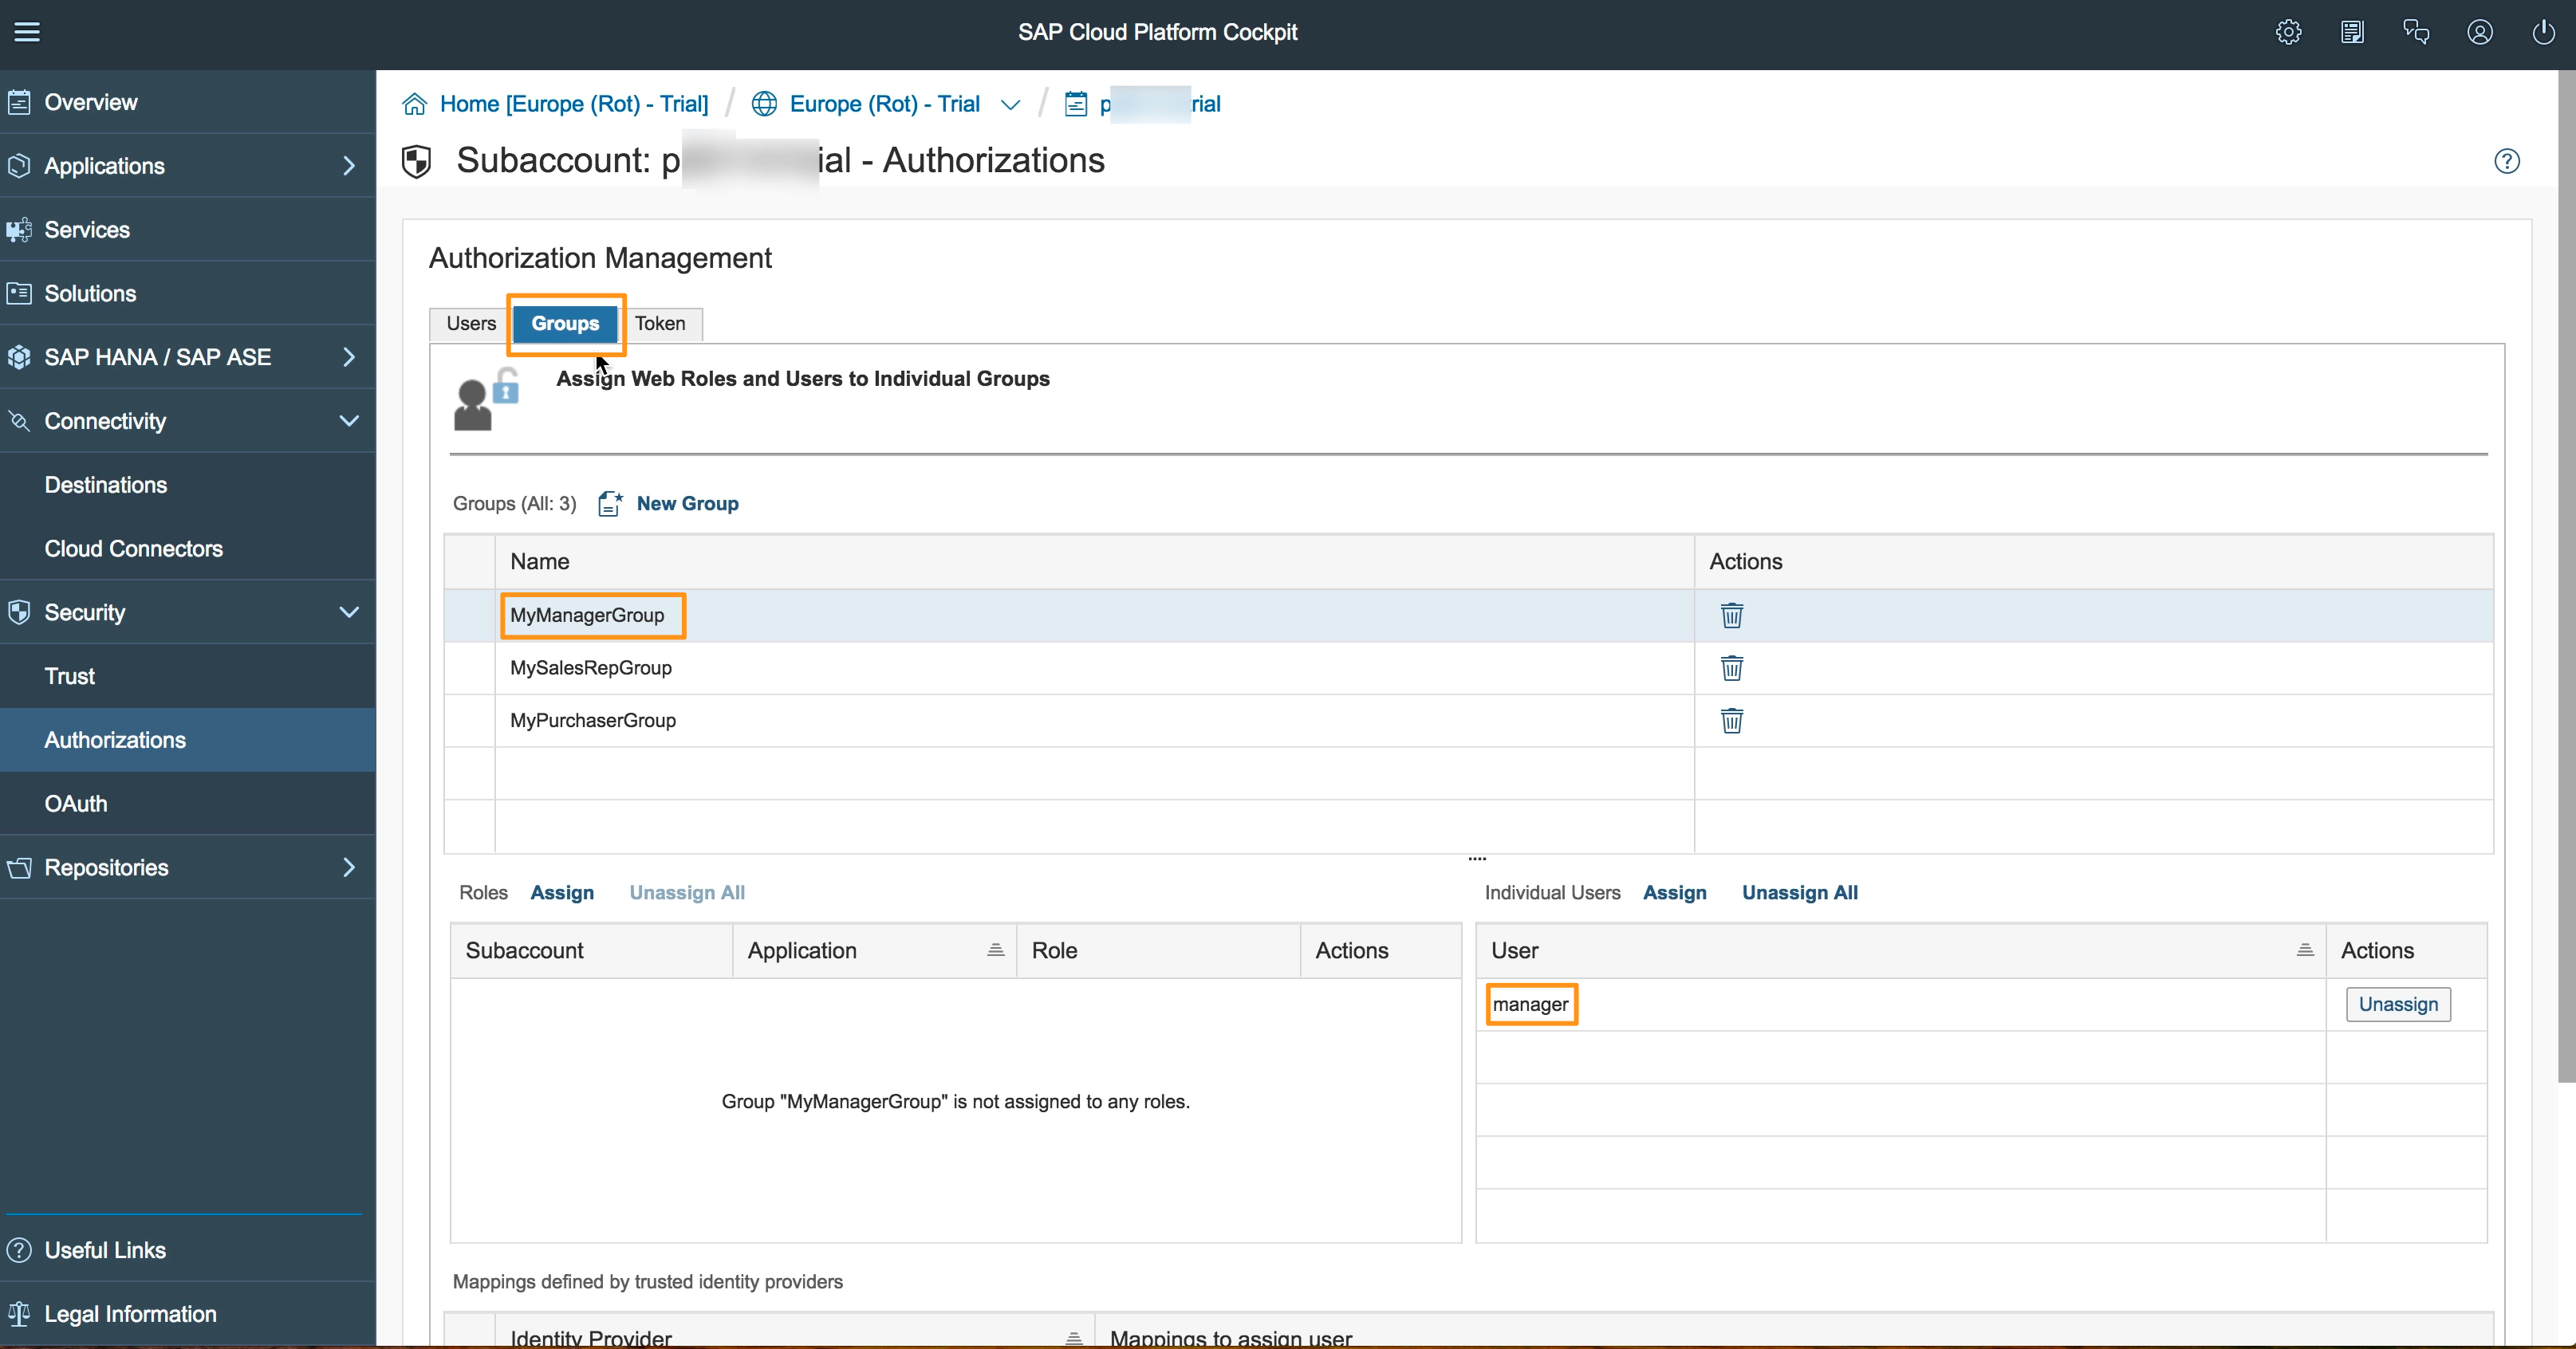
This time you can see we have three Groups, and each of them has one or more users mapped, i.e. the user manager is a member of the Group MyManagerGroup, the Group MyPurchaserGroup currently has two members which are the users manager and purchaser. And as you can see in this example a user can be mapped to multiple groups as well (in our case the manager user in in two Groups). The users come from SU01 in ABAP:
For demonstration purposes, now let’s remove the role ZDEMO_PURCHASER from the user manager in SU01and see what happens:
In order to see a change in the SAPCP account’s Groups we can simply “re-sync” the users by pressing the Run Now button of the Source System’s Resync Job:
After the job has finished our SAPCP Group MyPurchaserGroup does not contain the user manager anymore:
Isn’t this amazing? This tells us we can do all our authorization management stuff in our central user store – in our case on ABAP side! How cool is that? And that’s not all, because next we want to use this approach for assigning SAPCP roles (to the SAPCP Groups) used by the SAPCP FLP! In other words: as you can see in the screenshot above the roles table is empty; let’s create SAPCP roles and add them to our SAPCP Groups.
14. Create SAPCP Roles and assign them to SAPCP Groups
There are multiple ways to achieve what we want, and I’ll show some of them. First, let’s go to the Portal Service and create new Roles:
We’ll add three roles: Manager, SalesRep, Purchaser. After that, we want to assign them to the corresponding groups. This we can achieve by pressing the Assign button right now (in the video I do it this way as an example only for one of the roles):
But we could do it also from the other view (again, in the video you’ll see both options):
From the screenshot above you can tell everybody assigned to the Group MyPurchaserGroup will get Role Purchaser.
15. Assigning Roles to SAPCP FLP Catalogs and Groups
Go to your Fiori Configuration Cockpit and create three Catalogs, one for each Role. Then create three Groups, again one for each Role. See the video at 39:40 for all the steps (this post is already to big):
The Catalogs and Groups are currently empty. Make sure to add one or more apps now. In the video I chose to add the Manage Products UI5 app, and I assigned it to both the Manager Catalog and Group (see video for details).
Once you’re done publish your site as mentioned on the video. After opening your FLP you can see the app. But why can you see the app? Does you user have the Manager suddenly? Nope. The reason is simple: it’s your SAPCP trial account, you are the admin, and as such you can see all the apps. In the video you can see I verify what I just claimed by signing in with a different user, and guess what: the app that shall be visible only to the Manager (Manage Products) is not visible in the SAPCP FLP anymore.
But how do I allow the users to see the FLP app? Well, by assigning the required roles to the user in SU01 on ABAP. You already know how that works, if you don’t then check then continue watching the video. Just like I did in the video, you can invite any of your friends by sharing the link to the FLP. Just make sure to add the User ID of the person you want to invite to SU01. Then give that user let’s say the Manager role in SU01. Finally, resync the job and that’s it. Now ask the user to close the browser and open the link again. Here we go, see the video 🙂
16. Conclusion
First of all, I’d like to thank you for following all the tutorials, and for waiting so long for this last part; work, the world cup, vacation etc. hit me really hard so I couldn’t make it earlier. I’d also like to thank you for all the comments, contact requests, and private messages here and elsewhere...
Right... actually this should be the conclusion section here:
- In the whole series we’ve seen several technologies in action
- The On-Premise SAP stuff works just fine with the SAP Cloud Platform
- Your users can stay where they are: behind your firewall, i.e. in your NW ABAP!
- You can still keep your existing Authorization Management tools and processes
- The SAPCC and IPS can be key for your companies cloud strategy going hand in hand with you On-Premise "strategy"
- …
Most importantly: ABAP is not dead, it’s more alive than ever! And keep in mind, sharing is caring!
Meanwhile, ABAP Trial 7.52 SP01 is out:
- AS ABAP 752 SP01, developer edition, to download
- AS ABAP 7.52 SP01, developer edition: Concise installation guide
- AS ABAP 7.5x : ASE License available
Even ABAP in the Cloud is out:
Well, it's not really the Micro Services ABAP kind of thing I anticipated, but that’s the story of another blog series. And that will only happen if SAP adds Community/Trial Versions First to the existing Cloud First strategy 🙂
Cheers, Nabi
ps sorry fo that last huge part of the series. I agree it's way to big for only one post, and that doesn't make the quality better.
3 Comments
You must be a registered user to add a comment. If you've already registered, sign in. Otherwise, register and sign in.
Labels in this area
-
"automatische backups"
1 -
"regelmäßige sicherung"
1 -
"TypeScript" "Development" "FeedBack"
1 -
505 Technology Updates 53
1 -
ABAP
19 -
ABAP API
1 -
ABAP CDS Views
4 -
ABAP CDS Views - BW Extraction
1 -
ABAP CDS Views - CDC (Change Data Capture)
1 -
ABAP class
2 -
ABAP Cloud
3 -
ABAP DDIC CDS view
1 -
ABAP Development
5 -
ABAP in Eclipse
3 -
ABAP Platform Trial
1 -
ABAP Programming
2 -
abap technical
1 -
abapGit
1 -
absl
2 -
access data from SAP Datasphere directly from Snowflake
1 -
Access data from SAP datasphere to Qliksense
1 -
Accrual
1 -
action
1 -
adapter modules
1 -
Addon
1 -
Adobe Document Services
1 -
ADS
1 -
ADS Config
1 -
ADS with ABAP
1 -
ADS with Java
1 -
ADT
2 -
Advance Shipping and Receiving
1 -
Advanced Event Mesh
3 -
Advanced formula
1 -
AEM
1 -
AI
8 -
AI Launchpad
1 -
AI Projects
1 -
AIML
10 -
Alert in Sap analytical cloud
1 -
Amazon S3
1 -
Analytic Models
1 -
Analytical Dataset
1 -
Analytical Model
1 -
Analytics
1 -
Analyze Workload Data
1 -
annotations
1 -
API
1 -
API and Integration
4 -
API Call
2 -
API security
1 -
Application Architecture
1 -
Application Development
5 -
Application Development for SAP HANA Cloud
3 -
Applications and Business Processes (AP)
1 -
Architecture
1 -
Artificial Intelligence
1 -
Artificial Intelligence (AI)
5 -
Artificial Intelligence (AI) 1 Business Trends 363 Business Trends 8 Digital Transformation with Cloud ERP (DT) 1 Event Information 462 Event Information 15 Expert Insights 114 Expert Insights 76 Life at SAP 418 Life at SAP 1 Product Updates 4
1 -
Artificial Intelligence (AI) blockchain Data & Analytics
1 -
Artificial Intelligence (AI) blockchain Data & Analytics Intelligent Enterprise
1 -
Artificial Intelligence (AI) blockchain Data & Analytics Intelligent Enterprise Oil Gas IoT Exploration Production
1 -
Artificial Intelligence (AI) blockchain Data & Analytics Intelligent Enterprise sustainability responsibility esg social compliance cybersecurity risk
1 -
AS Java
1 -
ASE
1 -
ASR
2 -
Asset Management
2 -
Associations in CDS Views
1 -
ASUG
1 -
Attachments
1 -
Authentication
1 -
Authorisations
1 -
Authorizations
1 -
Automate the Interim Account Update rule using Integration Center Job (Time Off)
1 -
Automating Processes
1 -
Automation
2 -
aws
2 -
Azure
2 -
Azure AI Studio
1 -
Azure API Center
1 -
Azure API Management
1 -
B2B Integration
1 -
Background job
1 -
Backorder Processing
1 -
Backpropagation
1 -
Backup
1 -
Backup and Recovery
1 -
Backup schedule
1 -
BADI_MATERIAL_CHECK error message
1 -
Bank
1 -
Bank Communication Management
1 -
BAS
1 -
basis
2 -
Basis Monitoring & Tcodes with Key notes
2 -
Batch Management
1 -
BDC
1 -
Best Practice
1 -
BI
1 -
bitcoin
1 -
Blockchain
3 -
bodl
1 -
BOP in aATP
1 -
BOP Segments
1 -
BOP Strategies
1 -
BOP Variant
1 -
BPC
1 -
BPC LIVE
1 -
BTP
17 -
BTP AI Launchpad
1 -
BTP Destination
2 -
BTP for Sustainability
1 -
Business AI
1 -
Business and IT Integration
1 -
Business application stu
1 -
Business Application Studio
1 -
Business Architecture
1 -
Business Communication Services
1 -
Business Continuity
2 -
Business Data Fabric
3 -
Business Fabric
1 -
Business Partner
13 -
Business Partner Master Data
11 -
Business Technology Platform
2 -
Business Trends
4 -
BW4HANA
1 -
C4C cloud root certificate
1 -
CA
1 -
calculation view
1 -
CAP
5 -
CAP development
1 -
Capgemini
1 -
CAPM
1 -
Catalyst for Efficiency: Revolutionizing SAP Integration Suite with Artificial Intelligence (AI) and
1 -
CCMS
2 -
CDQ
13 -
CDS
2 -
CDS Views
1 -
Cental Finance
1 -
Certificates
1 -
CFL
1 -
Change Management
1 -
chatbot
1 -
chatgpt
3 -
CICD
1 -
CL_SALV_TABLE
2 -
Class Runner
1 -
Classrunner
1 -
Cloud ALM Monitoring
1 -
Cloud ALM Operations
1 -
cloud connector
1 -
Cloud Extensibility
1 -
Cloud Foundry
4 -
Cloud Integration
6 -
Cloud Platform Integration
2 -
cloudalm
1 -
communication
1 -
Compensation Information Management
1 -
Compensation Management
1 -
Compliance
1 -
Compound Employee API
1 -
Configuration
1 -
Connectors
1 -
Consolidation
1 -
Consolidation Extension for SAP Analytics Cloud
3 -
Control Indicators.
1 -
Controller-Service-Repository pattern
1 -
Conversion
1 -
Corrective Maintenance
1 -
Cosine similarity
1 -
CPI
2 -
cryptocurrency
1 -
CSI
1 -
ctms
1 -
Custom chatbot
3 -
Custom Destination Service
1 -
custom fields
1 -
Custom Headers
1 -
Customer Experience
1 -
Customer Journey
1 -
Customizing
1 -
cyber security
5 -
cybersecurity
1 -
Data
1 -
Data & Analytics
1 -
Data Aging
1 -
Data Analytics
2 -
Data and Analytics (DA)
1 -
Data Archiving
1 -
Data Back-up
1 -
Data Flow
1 -
Data Governance
5 -
Data Integration
2 -
Data Quality
13 -
Data Quality Management
13 -
Data Synchronization
1 -
data transfer
1 -
Data Unleashed
1 -
Data Value
9 -
Database
1 -
Database and Data Management
1 -
database tables
1 -
Databricks
1 -
Dataframe
1 -
Datasphere
4 -
Datasphere Delta
1 -
datenbanksicherung
1 -
dba cockpit
1 -
dbacockpit
1 -
Debugging
2 -
Defender
1 -
Delimiting Pay Components
1 -
Delta Integrations
1 -
Destination
3 -
Destination Service
1 -
Developer extensibility
1 -
Developing with SAP Integration Suite
1 -
Devops
1 -
digital transformation
1 -
Disaster Recovery
1 -
Documentation
1 -
Dot Product
1 -
DQM
1 -
dump database
1 -
dump transaction
1 -
e-Invoice
1 -
E4H Conversion
1 -
Eclipse ADT ABAP Development Tools
2 -
edoc
1 -
edocument
1 -
ELA
1 -
Embedded Consolidation
1 -
Embedding
1 -
Embeddings
1 -
Emergency Maintenance
1 -
Employee Central
1 -
Employee Central Payroll
1 -
Employee Central Time Off
1 -
Employee Information
1 -
Employee Rehires
1 -
Enable Now
1 -
Enable now manager
1 -
endpoint
1 -
Enhancement Request
1 -
Enterprise Architecture
2 -
Enterprise Asset Management
2 -
Entra
1 -
ESLint
1 -
ETL Business Analytics with SAP Signavio
1 -
Euclidean distance
1 -
Event Dates
1 -
Event Driven Architecture
1 -
Event Mesh
2 -
Event Reason
1 -
EventBasedIntegration
1 -
EWM
1 -
EWM Outbound configuration
1 -
EWM-TM-Integration
1 -
Existing Event Changes
1 -
Expand
1 -
Expert
2 -
Expert Insights
2 -
Exploits
1 -
Fiori
16 -
Fiori App Extension
2 -
Fiori Elements
2 -
Fiori Launchpad
2 -
Fiori SAPUI5
13 -
first-guidance
2 -
Flask
2 -
Fragment Forms
1 -
Fragment Forms using ABA[
1 -
FTC
1 -
Full Stack
9 -
Funds Management
1 -
gCTS
1 -
GenAI hub
1 -
General
3 -
Generative AI
1 -
Getting Started
1 -
GitHub
11 -
Google cloud
1 -
Grants Management
1 -
groovy
2 -
GTP
1 -
HANA
6 -
HANA Cloud
3 -
hana cloud database
2 -
Hana Cloud Database Integration
2 -
HANA DB
2 -
Hana Vector Engine
1 -
HANA XS Advanced
1 -
HanaDB
1 -
Historical Events
1 -
home labs
1 -
HowTo
1 -
HR Data Management
1 -
html5
9 -
HTML5 Application
1 -
Identity cards validation
1 -
idm
1 -
Implementation
1 -
Improvement Maintenance
1 -
Infuse AI
1 -
input parameter
1 -
instant payments
1 -
Integration
3 -
Integration Advisor
1 -
Integration Architecture
1 -
Integration Center
1 -
Integration Suite
1 -
intelligent enterprise
1 -
Internal Table
1 -
IoT
2 -
Java
1 -
Java Script
1 -
JMS Receiver channel ping issue
1 -
job
1 -
Job Information Changes
1 -
Job-Related Events
1 -
Job_Event_Information
1 -
joule
4 -
Journal Entries
1 -
Just Ask
1 -
Kafka
1 -
Kerberos for ABAP
10 -
Kerberos for JAVA
9 -
KNN
1 -
Launch Wizard
1 -
Learning Content
3 -
Life at SAP
4 -
lightning
1 -
Linear Regression SAP HANA Cloud
1 -
Live Sessions
1 -
Loading Indicator
1 -
local tax regulations
1 -
LP
1 -
Machine Learning
4 -
Marketing
1 -
Master Data
3 -
Master Data Management
15 -
Maxdb
2 -
MDG
1 -
MDGM
1 -
MDM
1 -
Message box.
1 -
Messages on RF Device
1 -
Microservices Architecture
1 -
Microsoft
1 -
Microsoft Universal Print
1 -
Middleware Solutions
1 -
Migration
5 -
ML Model Development
1 -
MLFlow
1 -
Modeling in SAP HANA Cloud
9 -
Monitoring
3 -
MPL
1 -
MTA
1 -
Multi-factor-authentication
1 -
Multi-Record Scenarios
1 -
Multilayer Perceptron
1 -
Multiple Event Triggers
1 -
Myself Transformation
1 -
Neo
1 -
NetWeaver
1 -
Neural Networks
1 -
New Event Creation
1 -
New Feature
1 -
Newcomer
1 -
NodeJS
3 -
ODATA
2 -
OData APIs
1 -
odatav2
1 -
ODATAV4
1 -
ODBC
1 -
ODBC Connection
1 -
Onpremise
1 -
open source
2 -
OpenAI API
1 -
Optimized Story Experience
1 -
Oracle
1 -
Overhead and Operational Maintenance
1 -
PaPM
1 -
PaPM Dynamic Data Copy through Writer function
1 -
PaPM Remote Call
1 -
Partner Built Foundation Model
1 -
PAS-C01
1 -
Pay Component Management
1 -
Personal story
1 -
PGP
1 -
Pickle
1 -
PLANNING ARCHITECTURE
1 -
Plant Maintenance
2 -
Popup in Sap analytical cloud
1 -
Postgresql
1 -
PostgrSQL
1 -
POSTMAN
1 -
Practice Systems
1 -
Prettier
1 -
Proactive Maintenance
1 -
Process Automation
2 -
Product Updates
6 -
Product Updates
1 -
PSE
1 -
PSM
1 -
Public Cloud
1 -
Python
5 -
python library - Document information extraction service
1 -
Qlik
1 -
Qualtrics
1 -
RAP
3 -
RAP BO
2 -
React
1 -
Reactive Maintenance
2 -
Record Deletion
1 -
Recovery
1 -
recurring payments
1 -
redeply
1 -
Release
1 -
Remote Consumption Model
1 -
Replication Flows
1 -
Report Malfunction
1 -
report painter
1 -
research
1 -
Research and Development Custom Widgets in SAP Analytics Cloud
1 -
Resilience
1 -
REST
1 -
REST API
1 -
Retagging Required
1 -
RFID
1 -
Risk
1 -
rolandkramer
3 -
Rolling Kernel Switch
1 -
route
1 -
Route determination
1 -
Router Non-XML condition
1 -
rules
1 -
S4 HANA
2 -
S4 HANA Cloud
2 -
S4 HANA On-Premise
3 -
S4HANA
6 -
S4HANA Cloud
1 -
S4HANA_OP_2023
2 -
SAC
11 -
SAC PLANNING
10 -
SAN
1 -
SAP
4 -
SAP ABAP
1 -
SAP Advanced Event Mesh
2 -
SAP AI Core
10 -
SAP AI Launchpad
9 -
SAP Analytic Cloud
1 -
SAP Analytic Cloud Compass
1 -
Sap Analytical Cloud
1 -
SAP Analytics Cloud
6 -
SAP Analytics Cloud for Consolidation
3 -
SAP Analytics cloud planning
1 -
SAP Analytics Cloud Story
1 -
SAP analytics clouds
1 -
SAP API Management
1 -
SAP Application Logging Service
1 -
SAP BAS
1 -
SAP Basis
6 -
SAP BO FC migration
1 -
SAP BODS
1 -
SAP BODS certification.
1 -
SAP BODS migration
1 -
SAP BPC migration
1 -
SAP BTP
26 -
SAP BTP Build Work Zone
2 -
SAP BTP Cloud Foundry
8 -
SAP BTP Costing
1 -
SAP BTP CTMS
1 -
SAP BTP Generative AI
1 -
SAP BTP Innovation
1 -
SAP BTP Migration Tool
1 -
SAP BTP SDK IOS
1 -
SAP BTPEA
1 -
SAP Build
12 -
SAP Build App
1 -
SAP Build apps
1 -
SAP Build CodeJam
1 -
SAP Build Process Automation
3 -
SAP Build work zone
11 -
SAP Business Objects Platform
1 -
SAP Business Technology
2 -
SAP Business Technology Platform (XP)
1 -
sap bw
1 -
SAP CAP
2 -
SAP CDC
1 -
SAP CDP
1 -
SAP CDS VIEW
1 -
SAP Certification
1 -
SAP Cloud ALM
4 -
SAP Cloud Application Programming Model
2 -
SAP Cloud Integration
1 -
SAP Cloud Integration for Data Services
1 -
SAP cloud platform
9 -
SAP Companion
1 -
SAP CPI
3 -
SAP CPI (Cloud Platform Integration)
2 -
SAP CPI Discover tab
1 -
sap credential store
1 -
SAP Customer Data Cloud
1 -
SAP Customer Data Platform
1 -
SAP Data Intelligence
1 -
SAP Data Migration in Retail Industry
1 -
SAP Data Services
1 -
SAP DATABASE
1 -
SAP Dataspher to Non SAP BI tools
1 -
SAP Datasphere
10 -
SAP DRC
1 -
SAP EWM
1 -
SAP Fiori
3 -
SAP Fiori App Embedding
1 -
Sap Fiori Extension Project Using BAS
1 -
SAP GRC
1 -
SAP HANA
1 -
SAP HANA PAL
1 -
SAP HANA Vector
1 -
SAP HCM (Human Capital Management)
1 -
SAP HR Solutions
1 -
SAP IDM
1 -
SAP Integration Suite
10 -
SAP Integrations
4 -
SAP iRPA
2 -
SAP LAGGING AND SLOW
1 -
SAP Learning Class
2 -
SAP Learning Hub
1 -
SAP Master Data
1 -
SAP Odata
3 -
SAP on Azure
2 -
SAP PAL
1 -
SAP PartnerEdge
1 -
sap partners
1 -
SAP Password Reset
1 -
SAP PO Migration
1 -
SAP Prepackaged Content
1 -
sap print
1 -
SAP Process Automation
2 -
SAP Process Integration
2 -
SAP Process Orchestration
1 -
SAP Router
1 -
SAP S4HANA
2 -
SAP S4HANA Cloud
3 -
SAP S4HANA Cloud for Finance
1 -
SAP S4HANA Cloud private edition
1 -
SAP Sandbox
1 -
SAP STMS
1 -
SAP successfactors
3 -
SAP SuccessFactors HXM Core
1 -
SAP Time
1 -
SAP TM
2 -
SAP Trading Partner Management
1 -
SAP UI5
1 -
SAP Upgrade
1 -
SAP Utilities
1 -
SAP-GUI
9 -
SAP_COM_0276
1 -
SAPBTP
1 -
SAPCPI
1 -
SAPEWM
1 -
sapfirstguidance
4 -
SAPHANAService
1 -
SAPIQ
2 -
sapmentors
1 -
saponaws
2 -
saprouter
1 -
SAPRouter installation
1 -
SAPS4HANA
1 -
SAPUI5
5 -
schedule
1 -
Script Operator
1 -
Secure Login Client Setup
9 -
security
11 -
Selenium Testing
1 -
Self Transformation
1 -
Self-Transformation
1 -
SEN
1 -
SEN Manager
1 -
Sender
1 -
service
2 -
SET_CELL_TYPE
1 -
SET_CELL_TYPE_COLUMN
1 -
SFTP scenario
2 -
Simplex
1 -
Single Sign On
9 -
Singlesource
1 -
SKLearn
1 -
Slow loading
1 -
SOAP
2 -
Software Development
1 -
SOLMAN
1 -
solman 7.2
2 -
Solution Manager
3 -
sp_dumpdb
1 -
sp_dumptrans
1 -
SQL
1 -
sql script
1 -
SSL
10 -
SSO
9 -
Story2
1 -
Substring function
1 -
SuccessFactors
1 -
SuccessFactors Platform
1 -
SuccessFactors Time Tracking
1 -
Sybase
1 -
Synthetic User Monitoring
1 -
system copy method
1 -
System owner
1 -
Table splitting
1 -
Tax Integration
1 -
Technical article
1 -
Technical articles
1 -
Technology Updates
15 -
Technology Updates
1 -
Technology_Updates
1 -
terraform
1 -
Testing
1 -
Threats
2 -
Time Collectors
1 -
Time Off
2 -
Time Sheet
1 -
Time Sheet SAP SuccessFactors Time Tracking
1 -
Tips and tricks
2 -
toggle button
1 -
Tools
1 -
Trainings & Certifications
1 -
Transformation Flow
1 -
Transport in SAP BODS
1 -
Transport Management
1 -
TypeScript
3 -
ui designer
1 -
unbind
1 -
Unified Customer Profile
1 -
UPB
1 -
Use of Parameters for Data Copy in PaPM
1 -
User Unlock
1 -
VA02
1 -
Validations
1 -
Vector Database
2 -
Vector Engine
1 -
Vectorization
1 -
Visual Studio Code
1 -
VSCode
2 -
VSCode extenions
1 -
Vulnerabilities
1 -
Web SDK
1 -
Webhook
1 -
work zone
1 -
workload
1 -
xsa
1 -
XSA Refresh
1
- « Previous
- Next »
Related Content
- SAP BTP FAQs - Part 3 (Security) in Technology Blogs by SAP
- Configuration: SAP Business Network SSO with SAP Cloud Identity Services - Identity Authentication in Technology Blogs by SAP
- How to Connect a Fieldglass System to SAP Start in Technology Blogs by SAP
- First steps to work with SAP Cloud ALM Deployment scenario for SAP ABAP systems (7.40 or higher) in Technology Blogs by SAP
- Enabling SAML Single Sign-On for SAP S/4 HANA and SAP BTP Apps using the same SAP IDP in Technology Blogs by SAP
Top kudoed authors
| User | Count |
|---|---|
| 6 | |
| 5 | |
| 5 | |
| 5 | |
| 4 | |
| 4 | |
| 3 | |
| 3 | |
| 3 | |
| 3 |