
- SAP Community
- Products and Technology
- Technology
- Technology Blogs by Members
- SAP-GUI Single Sign-On based on SSL certificates a...
Technology Blogs by Members
Explore a vibrant mix of technical expertise, industry insights, and tech buzz in member blogs covering SAP products, technology, and events. Get in the mix!
Turn on suggestions
Auto-suggest helps you quickly narrow down your search results by suggesting possible matches as you type.
Showing results for
L_Skorwider
Participant
Options
- Subscribe to RSS Feed
- Mark as New
- Mark as Read
- Bookmark
- Subscribe
- Printer Friendly Page
- Report Inappropriate Content
11-23-2023
9:47 PM
It's hard to imagine anyone using any unencrypted network communication these days. Asymmetric cryptography, with SSL being its undisputed king, gives us great opportunities to design secure access to systems. SSL offers both server and client authentication to build a relationship of trust between parties. In this text, I will try to show how secure access and certificate-based authorization can work with the SAP GUI.
SAP supports the Secure Network Communication Protocol (SNC), which is based on SSL. However, it must be explicitly configured to enable secure communication between the SAP GUI and the SAP server. I will try to explain how to do this. The first step is to prepare certificates on the SAP side. For this I need a Certification Authority (CA), which has to be built from scratch in a very simplified version. This will make it possible to encrypt the communication between the client and the server. Then I will look at the possibility of authenticating the client with a certificate, which will provide SSO functionality.
There is no denying that this is a very broad topic, so expect some simplifications, especially in the CA build area. Certain topics and detailed descriptions are simply beyond the scope of the blog post. But it is also a fully functional end-to-end setup with all the necessary configuration elements.
I have prepared a completely fresh setup to ensure that all steps and configurations are included in this text. I used the ABAP Platform Trial, which provides a docker image with S/4HANA 1909, which is more than enough for this exercise. In fact, I have experience with the same configuration on many older and newer versions of SAP Netweaver/ABAP Platform, and I see no major differences in this part of the system.
I also installed a fresh SAP GUI 8.0 with two options selected:
Later I will install an additional component, but this is not required to enable SNC, so we'll do it in the SSO-related part.
What is PSE? It is a kind of a local repository that can store a private key and trusted certificates. It is used in various scenarios involving secure communication protocols such as SSL. PSE management is essential for the security of SAP systems. There are several default PSEs used by SAP system for various purposes. SNC SAPCryptolib PSE is valid for SSO.
Let's create the PSE in edit mode of STRUST transaction.
There are some details I need to fill in. The first part is related to your organization and the future subject of the certificate. The second part is more security related. It's not the place to discuss details, but today a 4096-bit RSA key seems to be a good choice.
As a result, I get the PSE, which contains a private key and a self-signed certificate.
Of course, I like to show real life scenario, so self-signed certificate is not what is expected. I need to prepare a Certificate Signing Request that can be sent to my professional CA to establish trust in my organization. Let's generate the CSR.
Then the system asks for the signature algorithm, but the PSE algorithm is fine. I don't want any alternative names either, so I just accept the defaults. The result is a certificate request that can be saved to a file or copied to a text file.
I can check how the PSE is visible at the operating system level. This is a file that can be maintained with the sapgenpse command. I can get the main certificate details, including a subject, issuer, and expiration date. The subject is the same as the issuer, so this is a self-signed certificate.
Now I need to focus on the non-SAP part of the exercise. The CSR is already in place, so the CA needs to do the signing. But I don't have a CA yet, so I need to build one.
Please note that even though I try to build the correct structure of the CA, there are simplifications in the setup. I build the CA for our exercise purposes only, without following all the security rules related to CA separation, full key management, CRL process, etc.
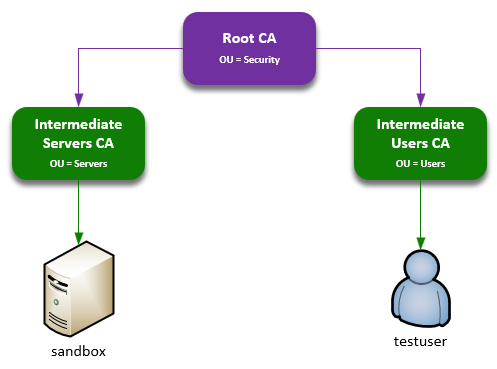
Let's start with the structure. We need a Root CA, which will be trusted in our organization. The root CA certificate is always self-signed and trust is established by explicitly adding the authority to the trusted list. This can be done by the administrator or by the system/software vendor. In this case, the administrator is responsible.
Then I will create two intermediate CAs: one for servers and one for users. Finally, I'll sign the sandbox server certificate with the first CA. The second CA will generate and sign a client certificate for a test user.
Once the layout is known, then the creation process can be started from the root CA. The directory structure below can help you keep things organized.
Root CA is like any other certificate, so a private key is required.
The command created a file with the key. Remember, this is the most secret file in your entire CA infrastructure. It must be kept private. Let's create a self-signed certificate based on the key.
Some option must be provided to build the subject of the certificate:
Country Name (2 letter code) [AU]:PL
State or Province Name (full name) [Some-State]:kuj-pom
Locality Name (eg, city) []:
Organization Name (eg, company) [Internet Widgits Pty Ltd]:MyCompany
Organizational Unit Name (eg, section) []:Security
Common Name (e.g. server FQDN or YOUR name) []:
Email Address []:
In real life, you'll probably add a human-readable common name, but this is not mandatory. We'll differentiate the root CA by organizational unit, which is Security.
Now I have two files - one with private key, which is secret. The second one is certificate, so public part of the pair. As I mentioned earlier, the root CA is always self-signed, so there is no need to generate a CSR. Therefore, the root CA is ready. Simple, right?
As always, my first step is the creation of a private key:
The key has been generated. Here procedure differs from the Root CA, so I need to generate signing request:
I need to provide input. Please note, that this CA is distinguished by OU: Servers.
Country Name (2 letter code) [AU]:PL
State or Province Name (full name) [Some-State]:kuj-pom
Locality Name (eg, city) []:
Organization Name (eg, company) [Internet Widgits Pty Ltd]:MyCompany
Organizational Unit Name (eg, section) []:Servers
Common Name (e.g. server FQDN or YOUR name) []:
Email Address []:
The interServers.csr.pem CSR file is located in the intermediateServersCA directory. It needs to be signed by our Root CA. We have everything on one server, so only one command is required:
As you probably noticed, in addition to the CSR, the root CA key and certificate were also required to complete the process. The most important thing is that I now have a signed certificate for the intermediate CA. This CA will be used to sign leaf server certificates.
You can verify that the new CA (OU=Servers) is signed by the root CA (OU=Security):
In the same way, without further comment, I will create a CA for users, which will be highlighted by OU: Users.
Key generation:
CSR creation:
Parameters:
Country Name (2 letter code) [AU]:PL
State or Province Name (full name) [Some-State]:kuj-pom
Locality Name (eg, city) []:
Organization Name (eg, company) [Internet Widgits Pty Ltd]:MyCompany
Organizational Unit Name (eg, section) []:Users
Common Name (e.g. server FQDN or YOUR name) []:
Email Address []:
Signature by Root CA:
Ok, we also have the Sandbox Server CSR that needs to be signed by the Intermediate CA. This can now be done:
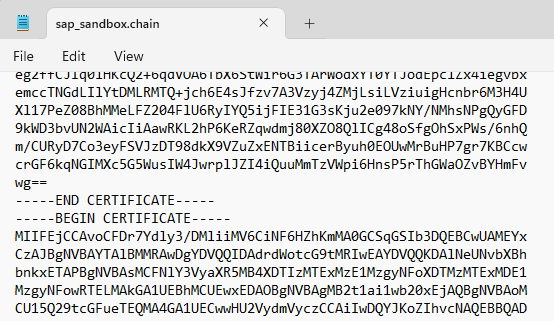
I postponed our SAPCryptolib PSE configuration process to build the CA structure. Now, the server certificate is signed, I can import it into my system. First, I'll concatenate the root CA certificate, intermediate certificate, and my server certificate into a file called sap_sandbox.chain.txt.
The next step is to import the certificate chain into the PSE in STRUST transaction:
The chain created in the txt file can be easily pasted into the window:
As a result, I see that the server certificate is no longer self-signed, but the entire certification chain is visible:
Finally the PSE must be saved.
In this step, the sandbox server officially became part of the organization. It can present itself with a certificate trusted by the company's authorization centers. However, you should be aware that it doesn't do this yet, because SNC is disabled in the system settings. In a while, though, this will be changed.
I'm not a fan of enabling SNC with this wizard, but it's fine for the first time. Next time, you'll probably configure the steps manually with full control. But for now, let's use the SNCWIZARD transaction.
Apart from setting up the certificates, which has already been done, this is the most important part of the wizard.
The most important parameters are listed below.
Enable SNC, the foundation for everything else:
snc/enable = 1
Set server SNC string, which is its identity:
snc/identity/as = p:CN=sandbox.mydomain.internal, OU=IT, O=MyCompany, C=PL
Still accept unencrypted communication at various levels:
snc/accept_insecure_cpic = 1
snc/accept_insecure_gui = 1
snc/accept_insecure_rfc = 1
snc/permit_insecure_start = 1
Set path to library for authentication, which is by default SAP CommonCryptoLib:
snc/gssapi_lib = $(SAPCRYPTOLIB)
After changing the profile parameters, a restart is required, which is visible in the next step of the wizard:
The next step has already been taken. However, I can take this opportunity to add Intermediate Users CA to the trusted list. This may not be necessary because the server trusts the Root CA, which should be sufficient. But this shows how to do it for other authorities.
The wizard opens STRUST transaction. Let's open the SNC SAPCryptolib section, switch to edit mode, import the certificate in the lower part of the window and add it to the trust list.
This should add our Intermediate Users CA (OU=Users) to the SNC SAPCryptolib trusted list. The PSE should be saved after this operation.
The wizard is now complete.
Now I can check if the encryption is working. To do this, I need to enable SNC in the system definition in my SAP GUI. The second tab contains the required settings.
But what happened? After trying to connect, I see an error: Peer certificate path not trusted.
Let's remember that trust is a two-way street. The client tries to connect to the server, the server presents its certificate, but the client doesn't know if the certificate is trusted. If the destination is really the server that is expected.
I need to trust the server certificate directly or its certificate issuers. Let's add the root certificate to the Windows repository. I need to use Manage User Certificates (certmgr) option in my Windows 11. From Trusted Root Certification Authorities I choose All Tasks / Import and select my Root CA certificate - ca.cert.pem.
The Root CA, distinguished by OU=Security should appear on the list.
Now, when I try to log in, I get a warning:
No user exists with SNC name "p:SNC ENCRYPTION ONLY (X.509 SERVER AUTH)"
But I can log in with username and password. I can also confirm that the connection is encrypted. This is the first success. SNC is enabled, the connection is secure.
As I have already demonstrated, the client trusts the server. What can be done so that the server also trusts the client and allows logging in based on the certificate? First of all, I must have the certificate! I need to return to my Linux-based CA and run some openssl commands.
Key generation is the basis of a certificate. You already know this part:
I don't want a self-signed certificate, so I need to generate a CSR:
Parameters are required as always:
Country Name (2 letter code) [AU]:PL
State or Province Name (full name) [Some-State]:kuj-pom
Locality Name (eg, city) []:
Organization Name (eg, company) [Internet Widgits Pty Ltd]:MyCompany
Organizational Unit Name (eg, section) []:
Common Name (e.g. server FQDN or YOUR name) []:TESTUSER
Email Address []:
So far it's the same as always, but now I need to have it signed by Intermediate Users CA, but as a client certificate. This requires a small additional configuration file. Let's save it as intermediateUsersCA/client.cnf:
Then I can sign it with Intermediate CA key and certificate:
The command uses several files - user certificate CSR, CA certificate, CA key, and the small config file. As a result, it produces a signed certificate named testuser.crt.pem.
But to be honest, it is not common practice to deliver unprotected certificate and key to the user. It's much better to put everything in a password-protected p12 container. Such a file consists of private key and trust list. Yes, this is similar to SAP PSE, but closer to SSL world.
The command combines user private key, user certificate, intermediate CA certificate and root CA certificate in one file named testuser.p12. Export password protects the container.
The p12 file generated in the previous step can be imported into the user's personal keystore using certmgr. It's a similar operation to the root certificate import that was done earlier.
It's worth mentioning that one of the import options allows exports from the keystore. This isn't the best idea because the key should be protected in the keystore. That's the reason why in many companies the certificates are delivered on a physical smart card, where it is not possible to extract the private keys.
Successful import activates the test user certificate, which can be checked in the Certificates tab.
Client is almost ready to use SAP Single Sign-On in SAP GUI. There are two missing parts - connection between SAP GUI and user certificate and user account configuration.
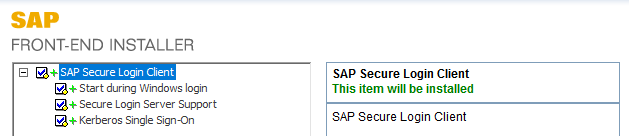
The first problem is easily solved by installing the SAP Secure Login Client 3.0, which is part of the SAP Single Sign-On 3.0 solution and can be downloaded from the SAP Portal.
When the tool is installed, you can select a previously imported certificate for SSO.
Of course, the system needs to know how to map the client to the existing user account. This mapping is defined in transaction SU01. The SNC tab contains the required options. The most important one is SNC name, where you need to enter the value copied from SAP Secure Login Client by selecting the Copy SNC name to clipboard option. The SNC string starts with p:.
You can decide if password logon is still enabled or if SSO is the only option for the user.
Finally, the user should be able to access the system without a password.
I hope this post was interesting or at least useful. Yes, it is quite long, while I wanted to show as comprehensive and logical as possible process of configuring certificate-based encryption and SSO. It could not be done without the lengthy CA-related part, which is usually beyond the responsibility of Basis administrators. However, even when you are not responsible for something, it is good to know how it works.
There seems to be no doubt that encryption is a must. On the other hand, I hope that this post will perhaps inspire someone to build a professional CA as well. Keep in mind, however, that this post can at best inspire, as it does not address many challenges in this area.
SAP supports the Secure Network Communication Protocol (SNC), which is based on SSL. However, it must be explicitly configured to enable secure communication between the SAP GUI and the SAP server. I will try to explain how to do this. The first step is to prepare certificates on the SAP side. For this I need a Certification Authority (CA), which has to be built from scratch in a very simplified version. This will make it possible to encrypt the communication between the client and the server. Then I will look at the possibility of authenticating the client with a certificate, which will provide SSO functionality.
There is no denying that this is a very broad topic, so expect some simplifications, especially in the CA build area. Certain topics and detailed descriptions are simply beyond the scope of the blog post. But it is also a fully functional end-to-end setup with all the necessary configuration elements.
Preparations
I have prepared a completely fresh setup to ensure that all steps and configurations are included in this text. I used the ABAP Platform Trial, which provides a docker image with S/4HANA 1909, which is more than enough for this exercise. In fact, I have experience with the same configuration on many older and newer versions of SAP Netweaver/ABAP Platform, and I see no major differences in this part of the system.
I also installed a fresh SAP GUI 8.0 with two options selected:
- SAP GUI for Windows
- SNC Client Encryption 2.0
Later I will install an additional component, but this is not required to enable SNC, so we'll do it in the SSO-related part.
PSE creation
What is PSE? It is a kind of a local repository that can store a private key and trusted certificates. It is used in various scenarios involving secure communication protocols such as SSL. PSE management is essential for the security of SAP systems. There are several default PSEs used by SAP system for various purposes. SNC SAPCryptolib PSE is valid for SSO.
Let's create the PSE in edit mode of STRUST transaction.

PSE creation in STRUST
There are some details I need to fill in. The first part is related to your organization and the future subject of the certificate. The second part is more security related. It's not the place to discuss details, but today a 4096-bit RSA key seems to be a good choice.

PSE details
As a result, I get the PSE, which contains a private key and a self-signed certificate.

A newly generated PSE
Of course, I like to show real life scenario, so self-signed certificate is not what is expected. I need to prepare a Certificate Signing Request that can be sent to my professional CA to establish trust in my organization. Let's generate the CSR.

CSR generation
Then the system asks for the signature algorithm, but the PSE algorithm is fine. I don't want any alternative names either, so I just accept the defaults. The result is a certificate request that can be saved to a file or copied to a text file.

Certificate request
I can check how the PSE is visible at the operating system level. This is a file that can be maintained with the sapgenpse command. I can get the main certificate details, including a subject, issuer, and expiration date. The subject is the same as the issuer, so this is a self-signed certificate.

SAPSNCS.pse
Certification Authority
Now I need to focus on the non-SAP part of the exercise. The CSR is already in place, so the CA needs to do the signing. But I don't have a CA yet, so I need to build one.
Please note that even though I try to build the correct structure of the CA, there are simplifications in the setup. I build the CA for our exercise purposes only, without following all the security rules related to CA separation, full key management, CRL process, etc.
Let's start with the structure. We need a Root CA, which will be trusted in our organization. The root CA certificate is always self-signed and trust is established by explicitly adding the authority to the trusted list. This can be done by the administrator or by the system/software vendor. In this case, the administrator is responsible.
Then I will create two intermediate CAs: one for servers and one for users. Finally, I'll sign the sandbox server certificate with the first CA. The second CA will generate and sign a client certificate for a test user.
CA structure
Once the layout is known, then the creation process can be started from the root CA. The directory structure below can help you keep things organized.
mkdir CA

mkdir CA/rootCA/

mkdir CA/intermediateServersCA/

mkdir CA/intermediateUsersCA/
Root CA
Root CA is like any other certificate, so a private key is required.
sandbox:~$ openssl genrsa -out CA/rootCA/ca.key.pem 4096The command created a file with the key. Remember, this is the most secret file in your entire CA infrastructure. It must be kept private. Let's create a self-signed certificate based on the key.
openssl req -x509 -sha256 -new -nodes -key CA/rootCA/ca.key.pem -days 3650 -out CA/rootCA/ca.cert.pemSome option must be provided to build the subject of the certificate:
Country Name (2 letter code) [AU]:PL
State or Province Name (full name) [Some-State]:kuj-pom
Locality Name (eg, city) []:
Organization Name (eg, company) [Internet Widgits Pty Ltd]:MyCompany
Organizational Unit Name (eg, section) []:Security
Common Name (e.g. server FQDN or YOUR name) []:
Email Address []:
In real life, you'll probably add a human-readable common name, but this is not mandatory. We'll differentiate the root CA by organizational unit, which is Security.
Now I have two files - one with private key, which is secret. The second one is certificate, so public part of the pair. As I mentioned earlier, the root CA is always self-signed, so there is no need to generate a CSR. Therefore, the root CA is ready. Simple, right?
Intermediate CA for Servers
As always, my first step is the creation of a private key:
openssl genrsa -out intermediateServersCA/interServers.key.pem 4096The key has been generated. Here procedure differs from the Root CA, so I need to generate signing request:
openssl req -key intermediateServersCA/interServers.key.pem -new -sha256 -out intermediateServersCA/interServers.csr.pemI need to provide input. Please note, that this CA is distinguished by OU: Servers.
Country Name (2 letter code) [AU]:PL
State or Province Name (full name) [Some-State]:kuj-pom
Locality Name (eg, city) []:
Organization Name (eg, company) [Internet Widgits Pty Ltd]:MyCompany
Organizational Unit Name (eg, section) []:Servers
Common Name (e.g. server FQDN or YOUR name) []:
Email Address []:
The interServers.csr.pem CSR file is located in the intermediateServersCA directory. It needs to be signed by our Root CA. We have everything on one server, so only one command is required:
openssl x509 -req -in intermediateServersCA/interServers.csr.pem -days 3650 -CA rootCA/ca.cert.pem -CAkey rootCA/ca.key.pem -CAcreateserial -out intermediateServersCA/interServers.cert.pemAs you probably noticed, in addition to the CSR, the root CA key and certificate were also required to complete the process. The most important thing is that I now have a signed certificate for the intermediate CA. This CA will be used to sign leaf server certificates.
You can verify that the new CA (OU=Servers) is signed by the root CA (OU=Security):

Intermediate CA for Users
In the same way, without further comment, I will create a CA for users, which will be highlighted by OU: Users.
Key generation:
openssl genrsa -out intermediateUsersCA/interUsers.key.pem 4096CSR creation:
openssl req -key intermediateUsersCA/interUsers.key.pem -new -sha256 -out intermediateUsersCA/interUsers.csr.pem
Parameters:
Country Name (2 letter code) [AU]:PL
State or Province Name (full name) [Some-State]:kuj-pom
Locality Name (eg, city) []:
Organization Name (eg, company) [Internet Widgits Pty Ltd]:MyCompany
Organizational Unit Name (eg, section) []:Users
Common Name (e.g. server FQDN or YOUR name) []:
Email Address []:
Signature by Root CA:
openssl x509 -req -in intermediateServersCA/interServers.csr.pem -days 3650 -CA rootCA/ca.cert.pem -CAkey rootCA/ca.key.pem -CAcreateserial -out intermediateServersCA/interServers.cert.pemSigning SAP server certificate
Ok, we also have the Sandbox Server CSR that needs to be signed by the Intermediate CA. This can now be done:
openssl x509 -req -in intermediateServersCA/csr/sap_sandbox_csr.pem -days 365 -CA intermediateServersCA/interServers.cert.pem -CAkey intermediateServersCA/interServers.key.pem -CAcreateserial -out intermediateServersCA/csr/sap_sandbox.cert.pemImporting CSR to SAP PSE
I postponed our SAPCryptolib PSE configuration process to build the CA structure. Now, the server certificate is signed, I can import it into my system. First, I'll concatenate the root CA certificate, intermediate certificate, and my server certificate into a file called sap_sandbox.chain.txt.
Certificate chain preparation
The next step is to import the certificate chain into the PSE in STRUST transaction:
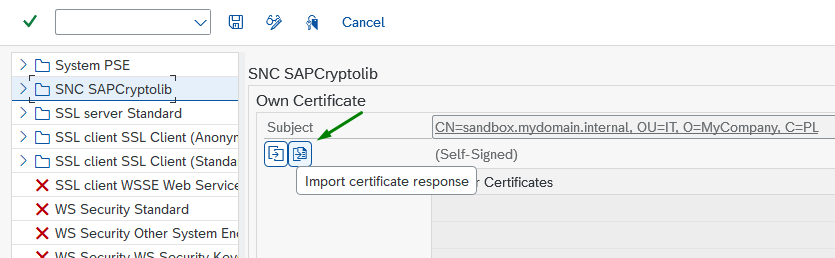
The chain created in the txt file can be easily pasted into the window:

As a result, I see that the server certificate is no longer self-signed, but the entire certification chain is visible:

Finally the PSE must be saved.
In this step, the sandbox server officially became part of the organization. It can present itself with a certificate trusted by the company's authorization centers. However, you should be aware that it doesn't do this yet, because SNC is disabled in the system settings. In a while, though, this will be changed.
SAP Single Sign-On Wizard
I'm not a fan of enabling SNC with this wizard, but it's fine for the first time. Next time, you'll probably configure the steps manually with full control. But for now, let's use the SNCWIZARD transaction.
The first step is just a short description. I'll leave out the screenshot. The second step sets some profile parameters.
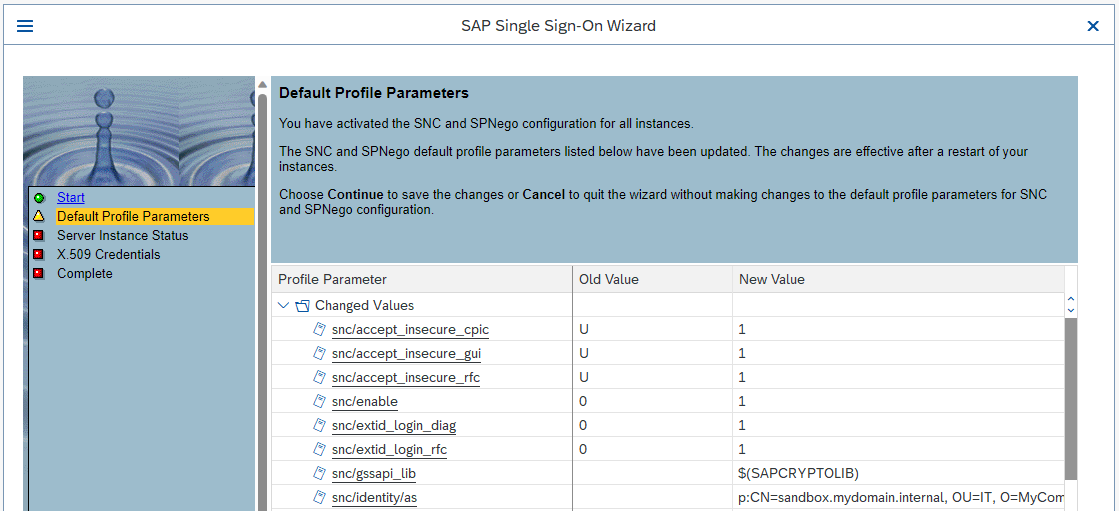
Apart from setting up the certificates, which has already been done, this is the most important part of the wizard.
The most important parameters are listed below.
Enable SNC, the foundation for everything else:
snc/enable = 1
Set server SNC string, which is its identity:
snc/identity/as = p:CN=sandbox.mydomain.internal, OU=IT, O=MyCompany, C=PL
Still accept unencrypted communication at various levels:
snc/accept_insecure_cpic = 1
snc/accept_insecure_gui = 1
snc/accept_insecure_rfc = 1
snc/permit_insecure_start = 1
Set path to library for authentication, which is by default SAP CommonCryptoLib:
snc/gssapi_lib = $(SAPCRYPTOLIB)
After changing the profile parameters, a restart is required, which is visible in the next step of the wizard:

The next step has already been taken. However, I can take this opportunity to add Intermediate Users CA to the trusted list. This may not be necessary because the server trusts the Root CA, which should be sufficient. But this shows how to do it for other authorities.

The wizard opens STRUST transaction. Let's open the SNC SAPCryptolib section, switch to edit mode, import the certificate in the lower part of the window and add it to the trust list.

This should add our Intermediate Users CA (OU=Users) to the SNC SAPCryptolib trusted list. The PSE should be saved after this operation.

The wizard is now complete.
Client configuration and test
Now I can check if the encryption is working. To do this, I need to enable SNC in the system definition in my SAP GUI. The second tab contains the required settings.

SNC in SAP GUI settings
But what happened? After trying to connect, I see an error: Peer certificate path not trusted.

Let's remember that trust is a two-way street. The client tries to connect to the server, the server presents its certificate, but the client doesn't know if the certificate is trusted. If the destination is really the server that is expected.
I need to trust the server certificate directly or its certificate issuers. Let's add the root certificate to the Windows repository. I need to use Manage User Certificates (certmgr) option in my Windows 11. From Trusted Root Certification Authorities I choose All Tasks / Import and select my Root CA certificate - ca.cert.pem.

Manage User Certificates
The Root CA, distinguished by OU=Security should appear on the list.

Now, when I try to log in, I get a warning:
No user exists with SNC name "p:SNC ENCRYPTION ONLY (X.509 SERVER AUTH)"
But I can log in with username and password. I can also confirm that the connection is encrypted. This is the first success. SNC is enabled, the connection is secure.

Client certificate generation
As I have already demonstrated, the client trusts the server. What can be done so that the server also trusts the client and allows logging in based on the certificate? First of all, I must have the certificate! I need to return to my Linux-based CA and run some openssl commands.
Key generation is the basis of a certificate. You already know this part:
openssl genrsa -out intermediateUsersCA/testuser.key.pem 4096I don't want a self-signed certificate, so I need to generate a CSR:
openssl req -key intermediateUsersCA/testuser.key.pem -new -sha256 -out intermediateUsersCA/testuser.csr.pemParameters are required as always:
Country Name (2 letter code) [AU]:PL
State or Province Name (full name) [Some-State]:kuj-pom
Locality Name (eg, city) []:
Organization Name (eg, company) [Internet Widgits Pty Ltd]:MyCompany
Organizational Unit Name (eg, section) []:
Common Name (e.g. server FQDN or YOUR name) []:TESTUSER
Email Address []:
So far it's the same as always, but now I need to have it signed by Intermediate Users CA, but as a client certificate. This requires a small additional configuration file. Let's save it as intermediateUsersCA/client.cnf:
nsCertType = client

extendedKeyUsage = clientAuth
Then I can sign it with Intermediate CA key and certificate:
openssl x509 -req -days 365 -in intermediateUsersCA/testuser.csr.pem -sha256 -CA intermediateUsersCA/interUsers.cert.pem -CAkey intermediateUsersCA/interUsers.key.pem -CAcreateserial -out intermediateUsersCA/testuser.crt.pem -extfile intermediateUsersCA/client.cnfThe command uses several files - user certificate CSR, CA certificate, CA key, and the small config file. As a result, it produces a signed certificate named testuser.crt.pem.
But to be honest, it is not common practice to deliver unprotected certificate and key to the user. It's much better to put everything in a password-protected p12 container. Such a file consists of private key and trust list. Yes, this is similar to SAP PSE, but closer to SSL world.
openssl pkcs12 -export -inkey intermediateUsersCA/testuser.key.pem -in intermediateUsersCA/testuser.crt.pem -certfile rootCA/ca.cert.pem -certfile intermediateUsersCA/interUsers.cert.pem -out testuser.p12The command combines user private key, user certificate, intermediate CA certificate and root CA certificate in one file named testuser.p12. Export password protects the container.
Importing user certificate
The p12 file generated in the previous step can be imported into the user's personal keystore using certmgr. It's a similar operation to the root certificate import that was done earlier.

Personal certificate import
It's worth mentioning that one of the import options allows exports from the keystore. This isn't the best idea because the key should be protected in the keystore. That's the reason why in many companies the certificates are delivered on a physical smart card, where it is not possible to extract the private keys.
Successful import activates the test user certificate, which can be checked in the Certificates tab.

Correctly imported certificate
Single Sign-On
Client is almost ready to use SAP Single Sign-On in SAP GUI. There are two missing parts - connection between SAP GUI and user certificate and user account configuration.
The first problem is easily solved by installing the SAP Secure Login Client 3.0, which is part of the SAP Single Sign-On 3.0 solution and can be downloaded from the SAP Portal.
SAP Secure Login Client installation
When the tool is installed, you can select a previously imported certificate for SSO.

Certificate/key selection for SSO
Of course, the system needs to know how to map the client to the existing user account. This mapping is defined in transaction SU01. The SNC tab contains the required options. The most important one is SNC name, where you need to enter the value copied from SAP Secure Login Client by selecting the Copy SNC name to clipboard option. The SNC string starts with p:.

SNC configuration in user account
You can decide if password logon is still enabled or if SSO is the only option for the user.
Finally, the user should be able to access the system without a password.

Success, certificate-based SSO is possible!
Conclusion
I hope this post was interesting or at least useful. Yes, it is quite long, while I wanted to show as comprehensive and logical as possible process of configuring certificate-based encryption and SSO. It could not be done without the lengthy CA-related part, which is usually beyond the responsibility of Basis administrators. However, even when you are not responsible for something, it is good to know how it works.
There seems to be no doubt that encryption is a must. On the other hand, I hope that this post will perhaps inspire someone to build a professional CA as well. Keep in mind, however, that this post can at best inspire, as it does not address many challenges in this area.
- SAP Managed Tags:
- SAP Single Sign-On,
- SAP Secure Login Service for SAP GUI
4 Comments
You must be a registered user to add a comment. If you've already registered, sign in. Otherwise, register and sign in.
Labels in this area
-
"automatische backups"
1 -
"regelmäßige sicherung"
1 -
"TypeScript" "Development" "FeedBack"
1 -
505 Technology Updates 53
1 -
ABAP
14 -
ABAP API
1 -
ABAP CDS Views
2 -
ABAP CDS Views - BW Extraction
1 -
ABAP CDS Views - CDC (Change Data Capture)
1 -
ABAP class
2 -
ABAP Cloud
3 -
ABAP Development
5 -
ABAP in Eclipse
1 -
ABAP Platform Trial
1 -
ABAP Programming
2 -
abap technical
1 -
abapGit
1 -
absl
2 -
access data from SAP Datasphere directly from Snowflake
1 -
Access data from SAP datasphere to Qliksense
1 -
Accrual
1 -
action
1 -
adapter modules
1 -
Addon
1 -
Adobe Document Services
1 -
ADS
1 -
ADS Config
1 -
ADS with ABAP
1 -
ADS with Java
1 -
ADT
2 -
Advance Shipping and Receiving
1 -
Advanced Event Mesh
3 -
AEM
1 -
AI
7 -
AI Launchpad
1 -
AI Projects
1 -
AIML
9 -
Alert in Sap analytical cloud
1 -
Amazon S3
1 -
Analytical Dataset
1 -
Analytical Model
1 -
Analytics
1 -
Analyze Workload Data
1 -
annotations
1 -
API
1 -
API and Integration
3 -
API Call
2 -
API security
1 -
Application Architecture
1 -
Application Development
5 -
Application Development for SAP HANA Cloud
3 -
Applications and Business Processes (AP)
1 -
Artificial Intelligence
1 -
Artificial Intelligence (AI)
5 -
Artificial Intelligence (AI) 1 Business Trends 363 Business Trends 8 Digital Transformation with Cloud ERP (DT) 1 Event Information 462 Event Information 15 Expert Insights 114 Expert Insights 76 Life at SAP 418 Life at SAP 1 Product Updates 4
1 -
Artificial Intelligence (AI) blockchain Data & Analytics
1 -
Artificial Intelligence (AI) blockchain Data & Analytics Intelligent Enterprise
1 -
Artificial Intelligence (AI) blockchain Data & Analytics Intelligent Enterprise Oil Gas IoT Exploration Production
1 -
Artificial Intelligence (AI) blockchain Data & Analytics Intelligent Enterprise sustainability responsibility esg social compliance cybersecurity risk
1 -
ASE
1 -
ASR
2 -
ASUG
1 -
Attachments
1 -
Authorisations
1 -
Automating Processes
1 -
Automation
2 -
aws
2 -
Azure
1 -
Azure AI Studio
1 -
Azure API Center
1 -
Azure API Management
1 -
B2B Integration
1 -
Backorder Processing
1 -
Backup
1 -
Backup and Recovery
1 -
Backup schedule
1 -
BADI_MATERIAL_CHECK error message
1 -
Bank
1 -
BAS
1 -
basis
2 -
Basis Monitoring & Tcodes with Key notes
2 -
Batch Management
1 -
BDC
1 -
Best Practice
1 -
bitcoin
1 -
Blockchain
3 -
bodl
1 -
BOP in aATP
1 -
BOP Segments
1 -
BOP Strategies
1 -
BOP Variant
1 -
BPC
1 -
BPC LIVE
1 -
BTP
13 -
BTP Destination
2 -
Business AI
1 -
Business and IT Integration
1 -
Business application stu
1 -
Business Application Studio
1 -
Business Architecture
1 -
Business Communication Services
1 -
Business Continuity
1 -
Business Data Fabric
3 -
Business Fabric
1 -
Business Partner
12 -
Business Partner Master Data
10 -
Business Technology Platform
2 -
Business Trends
4 -
BW4HANA
1 -
CA
1 -
calculation view
1 -
CAP
4 -
Capgemini
1 -
CAPM
1 -
Catalyst for Efficiency: Revolutionizing SAP Integration Suite with Artificial Intelligence (AI) and
1 -
CCMS
2 -
CDQ
12 -
CDS
2 -
Cental Finance
1 -
Certificates
1 -
CFL
1 -
Change Management
1 -
chatbot
1 -
chatgpt
3 -
CL_SALV_TABLE
2 -
Class Runner
1 -
Classrunner
1 -
Cloud ALM Monitoring
1 -
Cloud ALM Operations
1 -
cloud connector
1 -
Cloud Extensibility
1 -
Cloud Foundry
4 -
Cloud Integration
6 -
Cloud Platform Integration
2 -
cloudalm
1 -
communication
1 -
Compensation Information Management
1 -
Compensation Management
1 -
Compliance
1 -
Compound Employee API
1 -
Configuration
1 -
Connectors
1 -
Consolidation Extension for SAP Analytics Cloud
2 -
Control Indicators.
1 -
Controller-Service-Repository pattern
1 -
Conversion
1 -
Cosine similarity
1 -
cryptocurrency
1 -
CSI
1 -
ctms
1 -
Custom chatbot
3 -
Custom Destination Service
1 -
custom fields
1 -
Customer Experience
1 -
Customer Journey
1 -
Customizing
1 -
cyber security
3 -
cybersecurity
1 -
Data
1 -
Data & Analytics
1 -
Data Aging
1 -
Data Analytics
2 -
Data and Analytics (DA)
1 -
Data Archiving
1 -
Data Back-up
1 -
Data Flow
1 -
Data Governance
5 -
Data Integration
2 -
Data Quality
12 -
Data Quality Management
12 -
Data Synchronization
1 -
data transfer
1 -
Data Unleashed
1 -
Data Value
8 -
database tables
1 -
Datasphere
3 -
datenbanksicherung
1 -
dba cockpit
1 -
dbacockpit
1 -
Debugging
2 -
Defender
1 -
Delimiting Pay Components
1 -
Delta Integrations
1 -
Destination
3 -
Destination Service
1 -
Developer extensibility
1 -
Developing with SAP Integration Suite
1 -
Devops
1 -
digital transformation
1 -
Documentation
1 -
Dot Product
1 -
DQM
1 -
dump database
1 -
dump transaction
1 -
e-Invoice
1 -
E4H Conversion
1 -
Eclipse ADT ABAP Development Tools
2 -
edoc
1 -
edocument
1 -
ELA
1 -
Embedded Consolidation
1 -
Embedding
1 -
Embeddings
1 -
Employee Central
1 -
Employee Central Payroll
1 -
Employee Central Time Off
1 -
Employee Information
1 -
Employee Rehires
1 -
Enable Now
1 -
Enable now manager
1 -
endpoint
1 -
Enhancement Request
1 -
Enterprise Architecture
1 -
ESLint
1 -
ETL Business Analytics with SAP Signavio
1 -
Euclidean distance
1 -
Event Dates
1 -
Event Driven Architecture
1 -
Event Mesh
2 -
Event Reason
1 -
EventBasedIntegration
1 -
EWM
1 -
EWM Outbound configuration
1 -
EWM-TM-Integration
1 -
Existing Event Changes
1 -
Expand
1 -
Expert
2 -
Expert Insights
2 -
Exploits
1 -
Fiori
14 -
Fiori Elements
2 -
Fiori SAPUI5
12 -
first-guidance
1 -
Flask
1 -
FTC
1 -
Full Stack
8 -
Funds Management
1 -
gCTS
1 -
General
1 -
Generative AI
1 -
Getting Started
1 -
GitHub
9 -
Grants Management
1 -
groovy
1 -
GTP
1 -
HANA
6 -
HANA Cloud
2 -
Hana Cloud Database Integration
2 -
HANA DB
2 -
HANA XS Advanced
1 -
Historical Events
1 -
home labs
1 -
HowTo
1 -
HR Data Management
1 -
html5
8 -
HTML5 Application
1 -
Identity cards validation
1 -
idm
1 -
Implementation
1 -
input parameter
1 -
instant payments
1 -
Integration
3 -
Integration Advisor
1 -
Integration Architecture
1 -
Integration Center
1 -
Integration Suite
1 -
intelligent enterprise
1 -
iot
1 -
Java
1 -
job
1 -
Job Information Changes
1 -
Job-Related Events
1 -
Job_Event_Information
1 -
joule
4 -
Journal Entries
1 -
Just Ask
1 -
Kerberos for ABAP
8 -
Kerberos for JAVA
8 -
KNN
1 -
Launch Wizard
1 -
Learning Content
2 -
Life at SAP
5 -
lightning
1 -
Linear Regression SAP HANA Cloud
1 -
Loading Indicator
1 -
local tax regulations
1 -
LP
1 -
Machine Learning
2 -
Marketing
1 -
Master Data
3 -
Master Data Management
14 -
Maxdb
2 -
MDG
1 -
MDGM
1 -
MDM
1 -
Message box.
1 -
Messages on RF Device
1 -
Microservices Architecture
1 -
Microsoft Universal Print
1 -
Middleware Solutions
1 -
Migration
5 -
ML Model Development
1 -
Modeling in SAP HANA Cloud
8 -
Monitoring
3 -
MTA
1 -
Multi-Record Scenarios
1 -
Multiple Event Triggers
1 -
Myself Transformation
1 -
Neo
1 -
New Event Creation
1 -
New Feature
1 -
Newcomer
1 -
NodeJS
3 -
ODATA
2 -
OData APIs
1 -
odatav2
1 -
ODATAV4
1 -
ODBC
1 -
ODBC Connection
1 -
Onpremise
1 -
open source
2 -
OpenAI API
1 -
Oracle
1 -
PaPM
1 -
PaPM Dynamic Data Copy through Writer function
1 -
PaPM Remote Call
1 -
PAS-C01
1 -
Pay Component Management
1 -
PGP
1 -
Pickle
1 -
PLANNING ARCHITECTURE
1 -
Popup in Sap analytical cloud
1 -
PostgrSQL
1 -
POSTMAN
1 -
Prettier
1 -
Process Automation
2 -
Product Updates
5 -
PSM
1 -
Public Cloud
1 -
Python
4 -
python library - Document information extraction service
1 -
Qlik
1 -
Qualtrics
1 -
RAP
3 -
RAP BO
2 -
Record Deletion
1 -
Recovery
1 -
recurring payments
1 -
redeply
1 -
Release
1 -
Remote Consumption Model
1 -
Replication Flows
1 -
research
1 -
Resilience
1 -
REST
1 -
REST API
1 -
Retagging Required
1 -
Risk
1 -
Rolling Kernel Switch
1 -
route
1 -
rules
1 -
S4 HANA
1 -
S4 HANA Cloud
1 -
S4 HANA On-Premise
1 -
S4HANA
3 -
S4HANA_OP_2023
2 -
SAC
10 -
SAC PLANNING
9 -
SAP
4 -
SAP ABAP
1 -
SAP Advanced Event Mesh
1 -
SAP AI Core
8 -
SAP AI Launchpad
8 -
SAP Analytic Cloud Compass
1 -
Sap Analytical Cloud
1 -
SAP Analytics Cloud
4 -
SAP Analytics Cloud for Consolidation
3 -
SAP Analytics Cloud Story
1 -
SAP analytics clouds
1 -
SAP API Management
1 -
SAP BAS
1 -
SAP Basis
6 -
SAP BODS
1 -
SAP BODS certification.
1 -
SAP BTP
21 -
SAP BTP Build Work Zone
2 -
SAP BTP Cloud Foundry
6 -
SAP BTP Costing
1 -
SAP BTP CTMS
1 -
SAP BTP Innovation
1 -
SAP BTP Migration Tool
1 -
SAP BTP SDK IOS
1 -
SAP BTPEA
1 -
SAP Build
11 -
SAP Build App
1 -
SAP Build apps
1 -
SAP Build CodeJam
1 -
SAP Build Process Automation
3 -
SAP Build work zone
10 -
SAP Business Objects Platform
1 -
SAP Business Technology
2 -
SAP Business Technology Platform (XP)
1 -
sap bw
1 -
SAP CAP
2 -
SAP CDC
1 -
SAP CDP
1 -
SAP CDS VIEW
1 -
SAP Certification
1 -
SAP Cloud ALM
4 -
SAP Cloud Application Programming Model
1 -
SAP Cloud Integration for Data Services
1 -
SAP cloud platform
8 -
SAP Companion
1 -
SAP CPI
3 -
SAP CPI (Cloud Platform Integration)
2 -
SAP CPI Discover tab
1 -
sap credential store
1 -
SAP Customer Data Cloud
1 -
SAP Customer Data Platform
1 -
SAP Data Intelligence
1 -
SAP Data Migration in Retail Industry
1 -
SAP Data Services
1 -
SAP DATABASE
1 -
SAP Dataspher to Non SAP BI tools
1 -
SAP Datasphere
9 -
SAP DRC
1 -
SAP EWM
1 -
SAP Fiori
3 -
SAP Fiori App Embedding
1 -
Sap Fiori Extension Project Using BAS
1 -
SAP GRC
1 -
SAP HANA
1 -
SAP HCM (Human Capital Management)
1 -
SAP HR Solutions
1 -
SAP IDM
1 -
SAP Integration Suite
9 -
SAP Integrations
4 -
SAP iRPA
2 -
SAP LAGGING AND SLOW
1 -
SAP Learning Class
1 -
SAP Learning Hub
1 -
SAP Master Data
1 -
SAP Odata
2 -
SAP on Azure
2 -
SAP PartnerEdge
1 -
sap partners
1 -
SAP Password Reset
1 -
SAP PO Migration
1 -
SAP Prepackaged Content
1 -
SAP Process Automation
2 -
SAP Process Integration
2 -
SAP Process Orchestration
1 -
SAP S4HANA
2 -
SAP S4HANA Cloud
1 -
SAP S4HANA Cloud for Finance
1 -
SAP S4HANA Cloud private edition
1 -
SAP Sandbox
1 -
SAP STMS
1 -
SAP successfactors
3 -
SAP SuccessFactors HXM Core
1 -
SAP Time
1 -
SAP TM
2 -
SAP Trading Partner Management
1 -
SAP UI5
1 -
SAP Upgrade
1 -
SAP Utilities
1 -
SAP-GUI
8 -
SAP_COM_0276
1 -
SAPBTP
1 -
SAPCPI
1 -
SAPEWM
1 -
sapfirstguidance
1 -
SAPHANAService
1 -
SAPIQ
1 -
sapmentors
1 -
saponaws
2 -
SAPS4HANA
1 -
SAPUI5
5 -
schedule
1 -
Script Operator
1 -
Secure Login Client Setup
8 -
security
9 -
Selenium Testing
1 -
Self Transformation
1 -
Self-Transformation
1 -
SEN
1 -
SEN Manager
1 -
service
1 -
SET_CELL_TYPE
1 -
SET_CELL_TYPE_COLUMN
1 -
SFTP scenario
2 -
Simplex
1 -
Single Sign On
8 -
Singlesource
1 -
SKLearn
1 -
Slow loading
1 -
soap
1 -
Software Development
1 -
SOLMAN
1 -
solman 7.2
2 -
Solution Manager
3 -
sp_dumpdb
1 -
sp_dumptrans
1 -
SQL
1 -
sql script
1 -
SSL
8 -
SSO
8 -
Substring function
1 -
SuccessFactors
1 -
SuccessFactors Platform
1 -
SuccessFactors Time Tracking
1 -
Sybase
1 -
system copy method
1 -
System owner
1 -
Table splitting
1 -
Tax Integration
1 -
Technical article
1 -
Technical articles
1 -
Technology Updates
15 -
Technology Updates
1 -
Technology_Updates
1 -
terraform
1 -
Threats
2 -
Time Collectors
1 -
Time Off
2 -
Time Sheet
1 -
Time Sheet SAP SuccessFactors Time Tracking
1 -
Tips and tricks
2 -
toggle button
1 -
Tools
1 -
Trainings & Certifications
1 -
Transformation Flow
1 -
Transport in SAP BODS
1 -
Transport Management
1 -
TypeScript
3 -
ui designer
1 -
unbind
1 -
Unified Customer Profile
1 -
UPB
1 -
Use of Parameters for Data Copy in PaPM
1 -
User Unlock
1 -
VA02
1 -
Validations
1 -
Vector Database
2 -
Vector Engine
1 -
Visual Studio Code
1 -
VSCode
2 -
VSCode extenions
1 -
Vulnerabilities
1 -
Web SDK
1 -
work zone
1 -
workload
1 -
xsa
1 -
XSA Refresh
1
- « Previous
- Next »
Related Content
- App to automatically configure a new ABAP Developer System in Technology Blogs by Members
- SAP Successfactors Implementation and Maintenance in Projects in 2024 in Technology Blogs by Members
- SAP Secure Login Service for SAP GUI Now Supports Custom Certificate Authorities on AWS in Technology Blogs by SAP
- Overview: SAP Ariba SSO with SAP Cloud Identity Services - Identity Authentication in Technology Blogs by SAP
- Taking Data Federation to the Next Level: Accessing Remote ABAP CDS View Entities in SAP HANA Cloud in Technology Blogs by SAP
Top kudoed authors
| User | Count |
|---|---|
| 8 | |
| 8 | |
| 5 | |
| 4 | |
| 4 | |
| 4 | |
| 4 | |
| 4 | |
| 3 | |
| 3 |