
- SAP Community
- Products and Technology
- Technology
- Technology Blogs by Members
- How to setup NWDI with CM Services and CTS+ for Pr...
- Subscribe to RSS Feed
- Mark as New
- Mark as Read
- Bookmark
- Subscribe
- Printer Friendly Page
- Report Inappropriate Content
Challenge
At one of our customer we had to set up SAP Process Orchestration together with CTS+ for transporting both PI/SLD and BPM objects and together with NWDI for storing and administering the sources and builds. Target was to use CM Services instead of CMS.
I was looking for a proper guide, however was only successful to find the following good blog from devendrassoni. Unfortunately this blog was only covering the PI/SLD part of Process Orchestration:
Now, the challenge was how to also cover the setup for BPM. Therefor I decided to write this guide to give an overview about all required steps to get this whole thing running.
Basic Strategies for BPM transports
Basically there are two options available how BPM processes can be transported in the landscape by using CTS+:
- Source Transport (Granularity Options: Activity or SCA)
- Deployable Transport (SCAs)
The decision for transporting sources or deployables does not have any influence on what has to be configured for the development system in STMS.
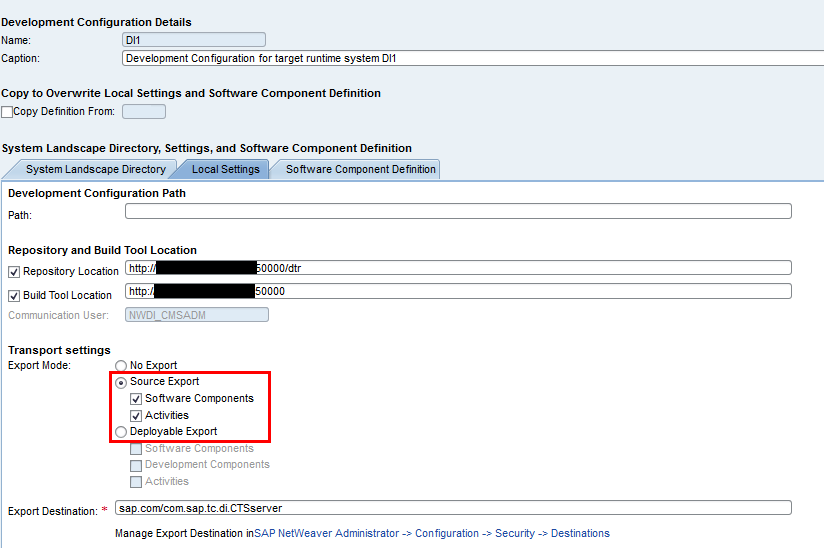
The only difference is the required settings in the CM Services UI for export mode (see screenshot below and refer to the CM services guide for further details (http://scn.sap.com/docs/DOC-16163). Advantage of the "Source Export" mode is that you can transport either sources based on activities (changed source code) or on SCAs. Both is possible. In case of mode "Deployable Export" only SCAs can be deployed and the setup of a development configuration is only required for the development system. A detailed explanation can be found in the CM services guide mentioned before.
Activity Based Transports
In our given customer project we have decided to go with the option "source export" . This decision requires that a rebuild of the sources has to be done for every system involved in the landscape (i.e. development, user-acceptance and production system).
The transport of activities is triggered directly from within the SAP NetWeaver Developer Studio via the Transport View in the Development Configuration Perspective of the NWDS. When releasing an activity the sources are exported and attached to a transport request in CTS+. The file format of the attached activity package is called *.dip (Development Infrastructure Package). Transporting sources through the system landscape requires a development configuration (with DTR workspaces and CBS buildspace) for each target system that is part of the transport route in your landscape. The import is started from the import queue of the target system on the CTS+ system. Compared to the transport of deployable units the import process for sources triggers a rebuild within each CBS buildspace.
To ensure a new build in each system, a development configuration needs to exist for every system. This means that during the creation of the TMS settings always a development configuration needs to be created. Whenever an import is started, a re-build is triggered for the SDAs which contain the changed source files and for all dependent SDAs. The sources are integrated into the respective DTR workspaces.
Main characteristics for activity-based transports:
- Each system configured in TMS (i.e. development, test and production) needs to have a development configuration
- Each system has a Java URL assigned since each system acts as a deploy target
- Workspaces in DTR and Buildspace in CBS are created for each system
- The name of the buildspace in CBS is the same as the SID of a system in TMS
Setup Overview
Important:
It is NOT recommended by SAP to have NWDI installed on the same machine as PO or Enterprise Portal (update of one usage type requires also the update of the other usage type). Unfortunately the setup at our customer is not the recommended one, since NWDI is currently on the same machine as PO dev. Therefore the guide below describes the setup based on this assumption. I added a remark in brackets where not the PO development system should be added, but rather the NWDI system on a separate machine
1. PO Development System Settings
1.1 Transport Settings
Important: This guide does not cover the setup of CTS+. In our case the Solution Manager ABAP stack (system-ID DS1, as seen in the descriptions below) was the system hosting the transport landscape (CTS+ system).
1. Start transaction STMS in Solution Manager (or in any other ABAP stack hosting the CTS+ system) and goto “System Overview”

2. Create a new “Non-ABAP System”:
3. During creation, the following information needs to be provided:
- System: Here, the development PO runtime system which should be attached to NWDI and CTS+ needs to be entered. In our case system-id was DI1
- Communication System: Here, the system needs to be added which acts as CTS+ system. In our case this was the Solution Manager (DS1)
- Development Infrastructure: This checkbox needs to be checked to ensure that a development configuration is created for the development PO system. Button SLD allows entering the URL to the SLD.
- Source System Settings: This activates the transport organizer to create transport requests for this system. This needs to be done for each system for which exports should be done (usually only required for the PO development system).
- Target System Settings: Here the PO development runtime system currently configured needs to be entered. The PO development hostname needs to be entered and the following methods need to be chosen:
- XI/PI: For the transports of PI objects (ESR and ID objects)
- SLD: For the transport of SLD objects in the landscape
- DC (Deploy Controller): This is required to ensure that a runtime system is created in the development configuration in NWDI later. This is needed for the transport of BPM processes.

4. When a non-ABAP system is saved the first time with a development configuration (“Create Development Configuration” is checked) additional data is required. In this case the following popup windows will appear:
- System Landscape Directory: Here the URL of the SLD used by NWDI has to be entered
- Set User and Password for DI SLD: Here the user of the CM Services needs to be entered which is used to communicate with the SLD entered above. This user is usually NWDI_CMSADM.
- Set User and Password for DI Service: Here the user of the CM Services needs to be entered which is used to communication with DTR/CBS. This user is usually NWDI_CMSADM.
6. After the settings are saved, the user for the XI/PI deployment needs to be entered. In our case user NWDI_CMSADM was used.
IMPORTANT:
- Please be aware of SAP Note 1688705 for the SDM/DC user and connection settings!
- Also make sure that user NWDI_CMSADM has user group “SAP_SLD_ADMINISTRATOR” assigned in IDM. Otherwise the connection to the SLD will not work properly
7. After the changes are saved and distributed, the browser with the NWDI configuration opens automatically. Here you need to enter a user which has appropriate rights to change NWDI configuration.

1.2 Creation of a development configuration
1. After login, the development configuration has automatically been created as type “CTS System”:

2. Goto the “Local Settings” tab and enter the following values:
- Repository Location: http://<NWDI hostname>:50000/dtr
Important: In our case this was the PO development system where also NWDI was installed!
This is not recommended by SAP, see comment above
- Build Tool Location: http:// <NWDI hostname>:50000
Important: In our case this was the PO development system where also NWDI was installed!
This is not recommended by SAP, see comment above
- Transport Settings: Choose “Source Export” with “Software Components” and “Activities” checked.
- Export Destination: sap.com/com.sap.tc.di.CTSserver

The Runtime System has automatically been set based on the checked DC (Deploy Controller) method in the STMS settings (see above) and cannot be changed here in edit mode. This would require the change of the TMS settings and a recreation of the development configuration.
3. To add the required software components to the configuration, go to tab Software Component Definition -> Add SC

4. The “Add Software Components” window appears. If the required SWC is not available in the SLD yet, the “Create New Software Component” wizard can be started.

5. Create the required SCs in SLD and assign those to the Development Configuration.
6. Save the Development Configuration.
1.3 Adaption of the Transport Settings
After the creation of the development configuration, the transport settings in STMS for the development PO system need to be changed in the CTS+ system (in our case this was DS1).
1. Start transaction STMS -> System Overview. Double-Click on the PO development system.
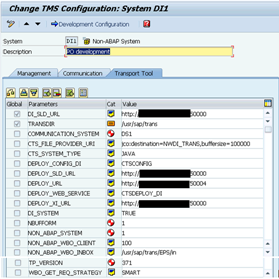
2. Goto tab “Transport Tool -> Change mode”
3. Perform the following steps:
- Change the value of parameter DEPLOY_WEB_SERVICE from value CTSDEPLOY to CTSDEPLOY_DI
- Remove parameter DEPLOY_DATA_SHARE
- Add parameter CTS_FILE_PROVIDER_URI with value jco:destination=NWDI_TRANS,buffersize=100000
- Add parameter NON_ABAP_WBO_INBOX with value /usr/sap/trans/EPS/in
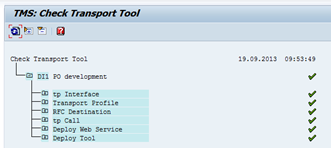
4. Make a test of the configuration afterwards. All statuses need to be green:
2. PO User-Acceptance System Settings
2.1 Transport Settings
1. Start transaction STMS and goto System Overview. Create a new system with the following settings:
- System: Here, the PO user acceptance runtime system which should be attached to NWDI and CTS+ needs to be entered.
- Communication System: Here, the system needs to be added which acts as CTS+ system (DS1 in our case).
- Development Infrastructure:
This checkbox needs to be checked to ensure that a development configuration is created for the PO user acceptance system. - Source System Settings:This activates the transport organizer to create transport requests for this system. Since no transports are exported from the PO user acceptance system this needs to be left unchecked (check is only required for the development system).
- Target System Settings:Here the PO user acceptamce hostname currently configured needs to be entered. The method DC and XI/PI needs to be chosen. SLD was not chosen in our case since the PO user-acceptance system was using the same SLD as the PO development system and therefore no SLD transports were required.

2. Enter all required users as done for the PO development system setup in STMS.
3. After saving, again automatically the browser for NWDI is opened. As for the setup for the development system, enter the login and password. The development configuration for the PO user-acceptance system is automatically created.
4. Goto Edit mode of the PO user-acceptance configuration and select the checkbox “Copy Definition From:” and select the PO development system. This copies all the local settings and software components definitions from the already existing PO development system configuration.

5. Change the settings back in STMS as follows:

3. Add the required SWCVs to the Development Configuration
For each type of development different Software Components are required. A set of the required SWCVs for each development type can be found in SAP Note 1572743.
For BPM processes the following SCs are required:
COMP_BUILDT
BPEM-BUILDT
BPEM-CONTENT
BPEM-COLLAB
BPEM-FACADE (for BPM public API usage)
BPEM_MM
CU-BASE-JAVA
CU-BASE-WD
DATA-MAPPING
ECM-CORE
ENGFACADE
ESCONF_BUILDT
ESMP_BUILDT
FP-INFRA
FRAMEWORK
MOIN_BUILDT
SAP_BUILDT
SERVICE-COMP
WD-RUNTIME
3.1 Dowload of required SCA files from SAP Marketplace
For each of the above listed SCs an SCA-file needs to be deployed to the PO system. If some of the SCAs are missing, those can be downloaded from the SAP Marketplace. To do this follows the steps below:
1. Goto SAP Marketplace -> Software Dowloads -> Search for Support Packages and Patches and enter the name of the SCA file you are looking for:

2. Download the appropriate SCA file according to the used PO version:
3. Upload all these SCA files to the inbox folder of the PO development system. The inbox folder is a folder on the PO system, standard path is /usr/sap/trans/EPS/in.
3.2 Start of the Synchronize Service
The Synchronize Service is used to compare software component versions in the runtime system with those in DTR/CBS and, if necessary, to adapt the development environment. It is no longer necessary to use an upload system and to create transport request manually to bring the required SCs into DTR and CBS (as done in older NWDI versions).
To start the Synchronize Service follow the steps below:
1. Goto NWDI -> CM Services and select the PO development system:

2. Select the PO development system from the system list. A list of all software components and its versions on the runtime system and the selected development configuration is shown:

3. Click on the Next button
4. Enter the inbox path to which the SCA files have been uploaded in step 3.1 (standard path is /usr/sap/trans/EPS/in). In this path all downloaded SCAs need to be placed which are required for a specific development. Then click on the Next button:
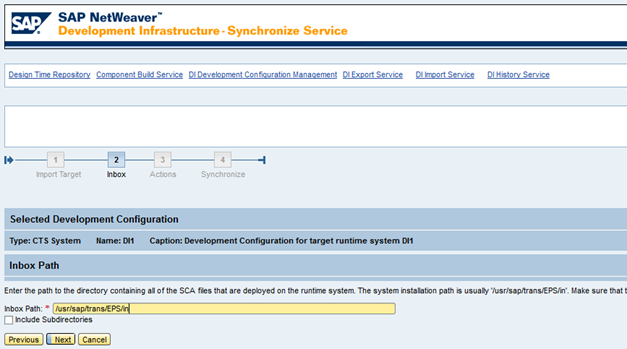
5. An overview of all available SCAs in the entered inbox folder is shown:

6. Now Select “Import Archives” as action wherever possible and select the version of the downloaded SCA.
7. Afterwards an overview is displayed:

8. Select Synchronize at the bottom of the list:
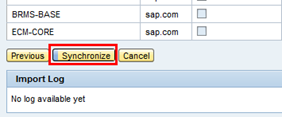
9. Wait till the synchronization is finished.

Closing Words
After completion of the above configuration steps also for all the other systems in the landscape, the development process should be business as usual:
- Configure the NWDS to connect properly to NWDI
- Import the development configuration of the PO development and finally start developing
Please let me know in case of any errors, additional required steps to be described or any other comments.
- SAP Managed Tags:
- SAP NetWeaver,
- NW Java Development Infrastructure (NWDI),
- SAP Business Process Management
You must be a registered user to add a comment. If you've already registered, sign in. Otherwise, register and sign in.
-
"automatische backups"
1 -
"regelmäßige sicherung"
1 -
"TypeScript" "Development" "FeedBack"
1 -
505 Technology Updates 53
1 -
ABAP
14 -
ABAP API
1 -
ABAP CDS Views
2 -
ABAP CDS Views - BW Extraction
1 -
ABAP CDS Views - CDC (Change Data Capture)
1 -
ABAP class
2 -
ABAP Cloud
3 -
ABAP Development
5 -
ABAP in Eclipse
1 -
ABAP Platform Trial
1 -
ABAP Programming
2 -
abap technical
1 -
abapGit
1 -
absl
2 -
access data from SAP Datasphere directly from Snowflake
1 -
Access data from SAP datasphere to Qliksense
1 -
Accrual
1 -
action
1 -
adapter modules
1 -
Addon
1 -
Adobe Document Services
1 -
ADS
1 -
ADS Config
1 -
ADS with ABAP
1 -
ADS with Java
1 -
ADT
2 -
Advance Shipping and Receiving
1 -
Advanced Event Mesh
3 -
Advanced formula
1 -
AEM
1 -
AI
8 -
AI Launchpad
1 -
AI Projects
1 -
AIML
9 -
Alert in Sap analytical cloud
1 -
Amazon S3
1 -
Analytical Dataset
1 -
Analytical Model
1 -
Analytics
1 -
Analyze Workload Data
1 -
annotations
1 -
API
1 -
API and Integration
3 -
API Call
2 -
API security
1 -
Application Architecture
1 -
Application Development
5 -
Application Development for SAP HANA Cloud
3 -
Applications and Business Processes (AP)
1 -
Artificial Intelligence
1 -
Artificial Intelligence (AI)
5 -
Artificial Intelligence (AI) 1 Business Trends 363 Business Trends 8 Digital Transformation with Cloud ERP (DT) 1 Event Information 462 Event Information 15 Expert Insights 114 Expert Insights 76 Life at SAP 418 Life at SAP 1 Product Updates 4
1 -
Artificial Intelligence (AI) blockchain Data & Analytics
1 -
Artificial Intelligence (AI) blockchain Data & Analytics Intelligent Enterprise
1 -
Artificial Intelligence (AI) blockchain Data & Analytics Intelligent Enterprise Oil Gas IoT Exploration Production
1 -
Artificial Intelligence (AI) blockchain Data & Analytics Intelligent Enterprise sustainability responsibility esg social compliance cybersecurity risk
1 -
ASE
1 -
ASR
2 -
ASUG
1 -
Attachments
1 -
Authorisations
1 -
Automating Processes
1 -
Automation
2 -
aws
2 -
Azure
1 -
Azure AI Studio
1 -
Azure API Center
1 -
Azure API Management
1 -
B2B Integration
1 -
Backorder Processing
1 -
Backup
1 -
Backup and Recovery
1 -
Backup schedule
1 -
BADI_MATERIAL_CHECK error message
1 -
Bank
1 -
Bank Communication Management
1 -
BAS
1 -
basis
2 -
Basis Monitoring & Tcodes with Key notes
2 -
Batch Management
1 -
BDC
1 -
Best Practice
1 -
bitcoin
1 -
Blockchain
3 -
bodl
1 -
BOP in aATP
1 -
BOP Segments
1 -
BOP Strategies
1 -
BOP Variant
1 -
BPC
1 -
BPC LIVE
1 -
BTP
13 -
BTP AI Launchpad
1 -
BTP Destination
2 -
Business AI
1 -
Business and IT Integration
1 -
Business application stu
1 -
Business Application Studio
1 -
Business Architecture
1 -
Business Communication Services
1 -
Business Continuity
1 -
Business Data Fabric
3 -
Business Fabric
1 -
Business Partner
12 -
Business Partner Master Data
10 -
Business Technology Platform
2 -
Business Trends
4 -
BW4HANA
1 -
CA
1 -
calculation view
1 -
CAP
4 -
Capgemini
1 -
CAPM
1 -
Catalyst for Efficiency: Revolutionizing SAP Integration Suite with Artificial Intelligence (AI) and
1 -
CCMS
2 -
CDQ
12 -
CDS
2 -
Cental Finance
1 -
Certificates
1 -
CFL
1 -
Change Management
1 -
chatbot
1 -
chatgpt
3 -
CL_SALV_TABLE
2 -
Class Runner
1 -
Classrunner
1 -
Cloud ALM Monitoring
1 -
Cloud ALM Operations
1 -
cloud connector
1 -
Cloud Extensibility
1 -
Cloud Foundry
4 -
Cloud Integration
6 -
Cloud Platform Integration
2 -
cloudalm
1 -
communication
1 -
Compensation Information Management
1 -
Compensation Management
1 -
Compliance
1 -
Compound Employee API
1 -
Configuration
1 -
Connectors
1 -
Consolidation Extension for SAP Analytics Cloud
2 -
Control Indicators.
1 -
Controller-Service-Repository pattern
1 -
Conversion
1 -
Cosine similarity
1 -
cryptocurrency
1 -
CSI
1 -
ctms
1 -
Custom chatbot
3 -
Custom Destination Service
1 -
custom fields
1 -
Customer Experience
1 -
Customer Journey
1 -
Customizing
1 -
cyber security
4 -
cybersecurity
1 -
Data
1 -
Data & Analytics
1 -
Data Aging
1 -
Data Analytics
2 -
Data and Analytics (DA)
1 -
Data Archiving
1 -
Data Back-up
1 -
Data Flow
1 -
Data Governance
5 -
Data Integration
2 -
Data Quality
12 -
Data Quality Management
12 -
Data Synchronization
1 -
data transfer
1 -
Data Unleashed
1 -
Data Value
8 -
database tables
1 -
Dataframe
1 -
Datasphere
3 -
datenbanksicherung
1 -
dba cockpit
1 -
dbacockpit
1 -
Debugging
2 -
Defender
1 -
Delimiting Pay Components
1 -
Delta Integrations
1 -
Destination
3 -
Destination Service
1 -
Developer extensibility
1 -
Developing with SAP Integration Suite
1 -
Devops
1 -
digital transformation
1 -
Documentation
1 -
Dot Product
1 -
DQM
1 -
dump database
1 -
dump transaction
1 -
e-Invoice
1 -
E4H Conversion
1 -
Eclipse ADT ABAP Development Tools
2 -
edoc
1 -
edocument
1 -
ELA
1 -
Embedded Consolidation
1 -
Embedding
1 -
Embeddings
1 -
Employee Central
1 -
Employee Central Payroll
1 -
Employee Central Time Off
1 -
Employee Information
1 -
Employee Rehires
1 -
Enable Now
1 -
Enable now manager
1 -
endpoint
1 -
Enhancement Request
1 -
Enterprise Architecture
1 -
ESLint
1 -
ETL Business Analytics with SAP Signavio
1 -
Euclidean distance
1 -
Event Dates
1 -
Event Driven Architecture
1 -
Event Mesh
2 -
Event Reason
1 -
EventBasedIntegration
1 -
EWM
1 -
EWM Outbound configuration
1 -
EWM-TM-Integration
1 -
Existing Event Changes
1 -
Expand
1 -
Expert
2 -
Expert Insights
2 -
Exploits
1 -
Fiori
14 -
Fiori Elements
2 -
Fiori SAPUI5
12 -
first-guidance
1 -
Flask
1 -
FTC
1 -
Full Stack
8 -
Funds Management
1 -
gCTS
1 -
GenAI hub
1 -
General
1 -
Generative AI
1 -
Getting Started
1 -
GitHub
9 -
Grants Management
1 -
groovy
1 -
GTP
1 -
HANA
6 -
HANA Cloud
2 -
Hana Cloud Database Integration
2 -
HANA DB
2 -
Hana Vector Engine
1 -
HANA XS Advanced
1 -
Historical Events
1 -
home labs
1 -
HowTo
1 -
HR Data Management
1 -
html5
8 -
HTML5 Application
1 -
Identity cards validation
1 -
idm
1 -
Implementation
1 -
Infuse AI
1 -
input parameter
1 -
instant payments
1 -
Integration
3 -
Integration Advisor
1 -
Integration Architecture
1 -
Integration Center
1 -
Integration Suite
1 -
intelligent enterprise
1 -
iot
1 -
Java
1 -
job
1 -
Job Information Changes
1 -
Job-Related Events
1 -
Job_Event_Information
1 -
joule
4 -
Journal Entries
1 -
Just Ask
1 -
Kerberos for ABAP
8 -
Kerberos for JAVA
8 -
KNN
1 -
Launch Wizard
1 -
Learning Content
2 -
Life at SAP
5 -
lightning
1 -
Linear Regression SAP HANA Cloud
1 -
Loading Indicator
1 -
local tax regulations
1 -
LP
1 -
Machine Learning
4 -
Marketing
1 -
Master Data
3 -
Master Data Management
14 -
Maxdb
2 -
MDG
1 -
MDGM
1 -
MDM
1 -
Message box.
1 -
Messages on RF Device
1 -
Microservices Architecture
1 -
Microsoft Universal Print
1 -
Middleware Solutions
1 -
Migration
5 -
ML Model Development
1 -
Modeling in SAP HANA Cloud
8 -
Monitoring
3 -
MTA
1 -
Multi-Record Scenarios
1 -
Multilayer Perceptron
1 -
Multiple Event Triggers
1 -
Myself Transformation
1 -
Neo
1 -
Neural Networks
1 -
New Event Creation
1 -
New Feature
1 -
Newcomer
1 -
NodeJS
3 -
ODATA
2 -
OData APIs
1 -
odatav2
1 -
ODATAV4
1 -
ODBC
1 -
ODBC Connection
1 -
Onpremise
1 -
open source
2 -
OpenAI API
1 -
Oracle
1 -
PaPM
1 -
PaPM Dynamic Data Copy through Writer function
1 -
PaPM Remote Call
1 -
Partner Built Foundation Model
1 -
PAS-C01
1 -
Pay Component Management
1 -
PGP
1 -
Pickle
1 -
PLANNING ARCHITECTURE
1 -
Popup in Sap analytical cloud
1 -
PostgrSQL
1 -
POSTMAN
1 -
Prettier
1 -
Process Automation
2 -
Product Updates
6 -
PSM
1 -
Public Cloud
1 -
Python
4 -
python library - Document information extraction service
1 -
Qlik
1 -
Qualtrics
1 -
RAP
3 -
RAP BO
2 -
Record Deletion
1 -
Recovery
1 -
recurring payments
1 -
redeply
1 -
Release
1 -
Remote Consumption Model
1 -
Replication Flows
1 -
research
1 -
Resilience
1 -
REST
1 -
REST API
1 -
Retagging Required
1 -
Risk
1 -
Rolling Kernel Switch
1 -
route
1 -
rules
1 -
S4 HANA
1 -
S4 HANA Cloud
1 -
S4 HANA On-Premise
1 -
S4HANA
4 -
S4HANA Cloud
1 -
S4HANA_OP_2023
2 -
SAC
10 -
SAC PLANNING
9 -
SAP
4 -
SAP ABAP
1 -
SAP Advanced Event Mesh
1 -
SAP AI Core
9 -
SAP AI Launchpad
8 -
SAP Analytic Cloud Compass
1 -
Sap Analytical Cloud
1 -
SAP Analytics Cloud
4 -
SAP Analytics Cloud for Consolidation
3 -
SAP Analytics Cloud Story
1 -
SAP analytics clouds
1 -
SAP API Management
1 -
SAP BAS
1 -
SAP Basis
6 -
SAP BODS
1 -
SAP BODS certification.
1 -
SAP BTP
22 -
SAP BTP Build Work Zone
2 -
SAP BTP Cloud Foundry
6 -
SAP BTP Costing
1 -
SAP BTP CTMS
1 -
SAP BTP Generative AI
1 -
SAP BTP Innovation
1 -
SAP BTP Migration Tool
1 -
SAP BTP SDK IOS
1 -
SAP BTPEA
1 -
SAP Build
11 -
SAP Build App
1 -
SAP Build apps
1 -
SAP Build CodeJam
1 -
SAP Build Process Automation
3 -
SAP Build work zone
10 -
SAP Business Objects Platform
1 -
SAP Business Technology
2 -
SAP Business Technology Platform (XP)
1 -
sap bw
1 -
SAP CAP
2 -
SAP CDC
1 -
SAP CDP
1 -
SAP CDS VIEW
1 -
SAP Certification
1 -
SAP Cloud ALM
4 -
SAP Cloud Application Programming Model
1 -
SAP Cloud Integration for Data Services
1 -
SAP cloud platform
8 -
SAP Companion
1 -
SAP CPI
3 -
SAP CPI (Cloud Platform Integration)
2 -
SAP CPI Discover tab
1 -
sap credential store
1 -
SAP Customer Data Cloud
1 -
SAP Customer Data Platform
1 -
SAP Data Intelligence
1 -
SAP Data Migration in Retail Industry
1 -
SAP Data Services
1 -
SAP DATABASE
1 -
SAP Dataspher to Non SAP BI tools
1 -
SAP Datasphere
9 -
SAP DRC
1 -
SAP EWM
1 -
SAP Fiori
3 -
SAP Fiori App Embedding
1 -
Sap Fiori Extension Project Using BAS
1 -
SAP GRC
1 -
SAP HANA
1 -
SAP HANA PAL
1 -
SAP HANA Vector
1 -
SAP HCM (Human Capital Management)
1 -
SAP HR Solutions
1 -
SAP IDM
1 -
SAP Integration Suite
9 -
SAP Integrations
4 -
SAP iRPA
2 -
SAP LAGGING AND SLOW
1 -
SAP Learning Class
1 -
SAP Learning Hub
1 -
SAP Master Data
1 -
SAP Odata
2 -
SAP on Azure
2 -
SAP PAL
1 -
SAP PartnerEdge
1 -
sap partners
1 -
SAP Password Reset
1 -
SAP PO Migration
1 -
SAP Prepackaged Content
1 -
SAP Process Automation
2 -
SAP Process Integration
2 -
SAP Process Orchestration
1 -
SAP S4HANA
2 -
SAP S4HANA Cloud
1 -
SAP S4HANA Cloud for Finance
1 -
SAP S4HANA Cloud private edition
1 -
SAP Sandbox
1 -
SAP STMS
1 -
SAP successfactors
3 -
SAP SuccessFactors HXM Core
1 -
SAP Time
1 -
SAP TM
2 -
SAP Trading Partner Management
1 -
SAP UI5
1 -
SAP Upgrade
1 -
SAP Utilities
1 -
SAP-GUI
8 -
SAP_COM_0276
1 -
SAPBTP
1 -
SAPCPI
1 -
SAPEWM
1 -
sapfirstguidance
1 -
SAPHANAService
1 -
SAPIQ
1 -
sapmentors
1 -
saponaws
2 -
SAPS4HANA
1 -
SAPUI5
5 -
schedule
1 -
Script Operator
1 -
Secure Login Client Setup
8 -
security
9 -
Selenium Testing
1 -
Self Transformation
1 -
Self-Transformation
1 -
SEN
1 -
SEN Manager
1 -
service
1 -
SET_CELL_TYPE
1 -
SET_CELL_TYPE_COLUMN
1 -
SFTP scenario
2 -
Simplex
1 -
Single Sign On
8 -
Singlesource
1 -
SKLearn
1 -
Slow loading
1 -
soap
1 -
Software Development
1 -
SOLMAN
1 -
solman 7.2
2 -
Solution Manager
3 -
sp_dumpdb
1 -
sp_dumptrans
1 -
SQL
1 -
sql script
1 -
SSL
8 -
SSO
8 -
Substring function
1 -
SuccessFactors
1 -
SuccessFactors Platform
1 -
SuccessFactors Time Tracking
1 -
Sybase
1 -
system copy method
1 -
System owner
1 -
Table splitting
1 -
Tax Integration
1 -
Technical article
1 -
Technical articles
1 -
Technology Updates
15 -
Technology Updates
1 -
Technology_Updates
1 -
terraform
1 -
Threats
2 -
Time Collectors
1 -
Time Off
2 -
Time Sheet
1 -
Time Sheet SAP SuccessFactors Time Tracking
1 -
Tips and tricks
2 -
toggle button
1 -
Tools
1 -
Trainings & Certifications
1 -
Transformation Flow
1 -
Transport in SAP BODS
1 -
Transport Management
1 -
TypeScript
3 -
ui designer
1 -
unbind
1 -
Unified Customer Profile
1 -
UPB
1 -
Use of Parameters for Data Copy in PaPM
1 -
User Unlock
1 -
VA02
1 -
Validations
1 -
Vector Database
2 -
Vector Engine
1 -
Vectorization
1 -
Visual Studio Code
1 -
VSCode
2 -
VSCode extenions
1 -
Vulnerabilities
1 -
Web SDK
1 -
work zone
1 -
workload
1 -
xsa
1 -
XSA Refresh
1
- « Previous
- Next »
- Elevate Your SAP Cloud ALM Experience: Introducing the New ‘’Launchpad’’ and ‘’Welcome App’’ in Technology Blogs by SAP
- API Management: Unlocking OAuth Strategies in Technology Blogs by SAP
- The 2024 Developer Insights Survey: The Report in Technology Blogs by SAP
- Vectorize your data for Infuse AI in to Business using Hana Vector and Generative AI in Technology Blogs by Members
- Extract blob data (PDF) from CAPM using python library of Document information extraction service. in Technology Blogs by Members
| User | Count |
|---|---|
| 10 | |
| 8 | |
| 5 | |
| 4 | |
| 4 | |
| 4 | |
| 4 | |
| 4 | |
| 3 | |
| 3 |