
- SAP Community
- Products and Technology
- Technology
- Technology Blogs by Members
- Guide to GUI access to SAP systems without VPN
Technology Blogs by Members
Explore a vibrant mix of technical expertise, industry insights, and tech buzz in member blogs covering SAP products, technology, and events. Get in the mix!
Turn on suggestions
Auto-suggest helps you quickly narrow down your search results by suggesting possible matches as you type.
Showing results for
TimWatkins
Discoverer
Options
- Subscribe to RSS Feed
- Mark as New
- Mark as Read
- Bookmark
- Subscribe
- Printer Friendly Page
- Report Inappropriate Content
11-15-2022
6:26 PM
Background
As a result of the recent Covid-19 pandemic and changing work practices, many users need access to SAP systems from remote locations (such as homes, hotels, coffee shops and such). As a result, SAP customers have realised the need to facilitate access to corporate systems from outside the corporate network. However, some customers do not want the administrative burden of VPNs.
Providing access to remote users without a VPN poses a security challenge. How do you allow flexible and easy remote access whilst still ensuring security?
This blog provides a method for this, it also goes further in that it provides a method to ensure that only the required users are able to connect, and that security is enforced by the back-end SAP system.
Assumptions
The blog assumes a scenario where SAP systems are hosted in AWS in a private subnet. However, the same general principles should still apply for other Cloud service providers.
The scenario also does not consider or allow for Single-Sign-On (SSO) access. As such, users will still require basic authentication (User ID and password) when logging in to the SAP back-end systems.
The blog needs to be concise whilst still providing adequate information for most SAP Basis consultants to follow without going into too much detail. Therefore, there will be an assumption that the reader has reasonable experience in the following topics:
- Installing and configuring SAProuter
- Setting SAP parameters
- Configuring SAP GUI connections
- AWS network load balancer configuration
- AWS EC2 instance provisioning and configuration
Overview of the architecture
The following diagrams summarize the scenario and the configuration steps required for secure access for SAP GUI clients:

Figure 1: Not configured, no access provided to SAPGui clients to SAP Backend systems hosted on AWS

Figure 2: Steps required for a fully configured scenario
Main steps for the configuration:
Refer to the above diagram for the main steps described below. Later in the blog, we will drill into each of these steps in more detail.
- A SAProuter is installed on an instance hosted in a private subnet in AWS which redirects traffic to the backend SAP systems
- An AWS network load balancer is configured with the SAProuter as its target. This will provide access to the SAProuter from the Internet, which in turn redirects traffic to the SAP backend systems
- SAP GUI clients are configured to access the SAP backend systems via the AWS load balancer & SAProuter (at this stage the connectivity is not using SNC and is not encrypted)
- SNC is enabled on both the backend and SAP GUI clients. A server SNC certificate is exported and then imported to each client machine, after which secure access to the backend systems is possible.
- Parameters are set on the SAP backend systems to enforce SNC access. No further unencrypted access is allowed.
Let’s get started then! Here follows the steps in more detail to get the combination working.
STEP 1: SAPROUTER
The first step in our configuration is to set up a SAProuter, which will act as a proxy between the SAP systems and external networks where the end users will be connecting from.
The SAProuter is especially useful in the following scenarios:
(From https://support.sap.com/en/tools/connectivity-tools/saprouter.html😞
- Establish an indirect connection if the network configuration does not allow the communicating programs to reach each other directly due to a lack of official IP addresses or firewall system restrictions.
- Improve network security by password-protecting your connection and your data from unauthorized access from beyond your network boundaries and by allowing access only from a specified SAProuter.
- Improve performance and stability by reducing the load on the SAP System within a local area network (LAN) when communicating with a wide area network (WAN).
- Control and log network connections.
The first two points above are especially relevant as they both apply in our scenario:
- We do have the need to allow indirect communication to our SAP backend systems that do not have public-facing IP addresses
- We will further protect our communication by password protecting the connections to prevent unauthorized access from beyond the network boundaries.
Just a reminder of the configuration and which step we are performing, as can be seen in the following image, we are with step 1. At this stage and after completing this step, users from outside the network will still not have access to the backend systems as we have not yet configured the Network load balancers.

Figure 3: Configuring the SAP Router
Launch the AWS SAProuter instance
For the SAProuter, I launched a t2.micro EC2 instance in a private subnet. In my case the SAProuter is created in the same subnet as the SAP backend systems although this does not have to be the case. A simplified representation of this scenario is depicted as follows:

Figure 4: New SAProuter instance launched in the same subnet as the SAP systems
The instance was configured with the following attributes:
- Operating System: SUSE Linux 15 SP4 (or latest). You may prefer to use Windows instead, however for the purposes of this blog I will explain the steps for a Linux installation
- Instance Type: t2.micro
- Network configuration: Same private subnet as the SAP instances
Download and install SAProuter
Installing SAProuter is relatively straightforward, and I assume most readers will have some experience in this area. Nonetheless, I will provide a basic list of steps required to get SAProuter installed and working for the purposes of this blog.
- Download SAProuter software:
- Login to the SAP Support Portal with your S-User ID
- On the Support Packages & Patches tab click:
A-Z Alphabetical List of Products > S > SAPROUTER > SAPROUTER (latest versions) > select OS from drop-down > select saprouter_NNN-NNNNNNNN.sar
- Download the SAPCAR executable from the SAP Software Download Center.
- On the Support Packages & Patches tab click:
A-Z Alphabetical List of Products > S > SAPCAR > SAPCAR (latest version) >your preferred O.S. version > SAPCAR_nnn-nnnnnnnn.EXE
- On the Support Packages & Patches tab click:
- Copy the SAProuter software and SAPCAR executable to the Linux instance launched previously. I would recommend creating and copying to the following location:
/usr/sap/saprouter
- Unpack the SAProuter software by executing the command SAPCAR_NNN-NNNNNNNN.EXE -xvf saprouter_NNN-NNNNNNNN.sar which will unpack the following files:
saprouter
niping
Create a Route Permission Table (saprouttab)
A route permission table is where we protect our backend environment by ensuring that only the required systems are reachable and via specific ports. We will also password protect these permissions providing further protection and ensuring that only those that have been given the password (and who know how to include a password in their route strings) will be able to connect to the backend systems.
The saprouttab file can be created in a text editor and is usually located in the same folder as the saprouter executable.
Standard entries in a route permission table have the following syntax:
P/S/D <source-IP> <dest-IP> <dest-port> <password>
P = Permit
S = Secure
D = Deny
For our purposes, we want to allow incoming connections from ay IP address. This is because our end users may be working from any number of locations, and we cannot know their IP addresses in advance.
An example saprouttab entry for a single backend system could look as follows for our purpose:

Figure 5: Example saprouttab entry
Starting SAProuter
Once the saprouter executables and the saprouttab file is in place, saprouter can be started with the following command:
/usr/sap/saprouter -r
To set the process to run in background, do the following:
Cntrl-Z
Then issue the command ‘bg’ which will place the saprouter process to run in background.
Running SAProuter manually like this allows for testing to take place, however ideally, you would want saprouter to start automatically when the Linux instance starts. The following section will provide a method for this.
Starting saprouter automatically after a reboot (SLES15):
This method is to create a system service, which will start saprouter in the background and also ensure that it starts after a system reboot.
- Create a systemd service file as follows:
/etc/systemd/system/saprouter.service
The service file should contain similar to the following:
# /etc/systemd/system/saprouter.service
#
[Unit]
Description=Start SAProuter
[Service]
Type=oneshot
ExecStart=/usr/sap/saprouter/saprouter -R /usr/sap/saprouter/saprouttab -r
[Install]
WantedBy=multi-user.target
- Once that’s saved, you can run, check and enable the service:
systemctl start saprouter.service
systemctl status saprouter.service
{if all ok}
systemctl enable saprouter.service
STEP 2: Provision AWS Network Load Balancer
It’s at this step that we need to configure an Internet-facing network load balancer. This will allow our clients access to the saprouter instance from outside the AWS private subnet. After this step, the clients still cannot yet connect as they need to be configured to use the load balancer and SAProuter with a route string. Configuring the clients is covered in Step 3: Configure SAP GUI to use a route string.
Provisioning an AWS Network Load Balancer is depicted in the diagram as follows:

Figure 6: Provisioning an AWS Network Load Balancer
Create Target Group
Before creating the load balancer, we need to create a Target Group which will route requests from the load balancer to the SAProuter host instance. In other words: the SAProuter instance will be the ‘target’ for routing requests to. Once the Target Group has been created, we will then create the Network Load Balancer and configure it to use the Target Group created in this step.
From the AWS console, access the EC2 Dashboard, and select ‘Target Groups’ under ‘Load Balancing’:

From the ‘Target groups’ window, select ‘Create target group’:

Specify the basic configuration of the target group using the below screenshot as a guide, and taking note of the following:
- The target type should be an AWS instance
- Give your target group a meaningful name
- The default port for SAProuter is 3299, specify that port unless you have configured SAProuter to listen on an alternate port
- Ensure that you create the target group in the required VPC
Leave everything else as default then click ‘Next’

In the screen that follows you are able to select the target instance. Available instances are listed, ensure that you select the SAProuter instance, and then click on the button: ‘Include as pending below’.

Once added as a target instance you will see that it is listed in the bottom pane, and in this pane you can monitor the inclusion of the instance, and determine its ‘health’ as a target instance. The instance will become ‘healthy’ once the target group has checked the port on the instance consecutively for a default of 5 times.

Create Load Balancer
Now that the target group has been created, we can now create the Network Load Balancer that will be configured to use it.
As before, from the AWS console, access the EC2 Dashboard, and select ‘Load Balancers’ under ‘Load Balancing’:

In the Load Balancers screen, click on the ‘Create Load Balancer’ button:

In the screen that follows, select the ‘Create’ button in the ‘Network Load Balancer’ section:

In the ‘Basic configuration’ section, give the load balancer an appropriate name and specify that it should be Internet-facing.
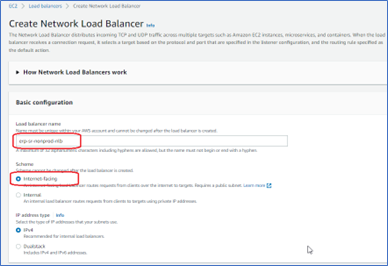
In the ‘Network mapping’ section, select the required VPC and availability zones. In each availability zone, ensure that you select public subnets (these subnets need to have route to an internet gateway).

In the ‘Listeners and routing’ section, specify the port that the load balancer will be listening on. I used port 3299, which is the same port number that the SAProuter listens on. This need not be the case, however you will need to use whatever port number specified in this step in the route string that will be explained in the step where we discuss how to configure the SAP GUI connections to use route strings.
Under ‘Default action’, select the target group that was created previously.

Leave everything else as default. Then click on the ‘Create load balancer’ button at the bottom of the screen:

Once the load balancer has been created, take note of the load balancer’s DNS name, which will be used in the route string of the SAPGui connection:

STEP 3: Configure SAP Gui to use a route string
Now that the SAProuter has been created in a private subnet, and an Internet-facing Network Load Balancer configured in a public subnet, the back-end SAP systems should now be accessible to end-users once they have the correct route strings configured in their SAP GUI connections.

Figure 7: Configuring SAPGui to use a route string to connect via the Load Balancer
To connect to your SAP instance via the new load balancer and saprouter you will need the following information:
- IP address of the SAP application server
- Instance number
- SID
- Load balancer DNS name (From Step 2: Provision AWS Network Load Balancer)
- Password set up in saprouter (From Step 1: SAPROUTER)
To create the connection you will need to insert a route string that SAP GUI will use to connect to the backend system via the load balancer.
The route string takes the following format:
/H/<load_balancer_DNS_name>/S/3299/W/<password>
For example:
- IP: 200.2.174
- Instance Number: 00
- SID: DEV
- Load Balancer DNS Name: sr-lb-nnnnnnnnnnnnnnnn.elb.eu-central-1.amazonaws.com
- Password: passdev
The route string would be as follows:
/H/ sr-lb-nnnnnnnnnnnnnnnn.elb.eu-central-1.amazonaws.com /S/3299/W/passdev
Example screenshot:

STEP 4: Enable SNC for secure access to the backend systems
Assuming the previous steps have been performed successfully, access to backend systems should have been granted to selected end-users. However, at this stage the connections to the back-end systems are not yet secure and encrypted. It is in this step where we allow for secure connectivity.
To configure secure access, the following needs to take place:
- Parameter settings need to be made on the backend system
- SAP Secure Client needs to be installed on the end-user devices
- The Backend server’s SNC certificate needs to be imported on end-user devices
Each step will now be covered in more detail.
Backend system parameters settings
Please note that SAPCRYPTOLIB needs to be installed on the ABAP application server. This guide does not cover this installation and assumes that this has already been done.
This can be checked in transaction STRUST. You will see ‘SNC SAPCryptolib’ and if you expand the item, you can confirm that it has been installed.

The following table contains the required parameters in the ABAP application server. Some of these parameters may already be set, so for those parameters this table can be used for reference purposes. However, later in the guide, we will have to change some parameters to enforce SNC logon so that the application server will reject any attempt to connect without SNC, but for now we just want to get this working, and test with and without SNC SAP GUI connections.
You can check the parameters with transaction code RZ11.
| Parameter | Value | Dynamic | Notes |
| snc/accept_insecure_cpic | 1 | No | |
| snc/accept_insecure_gui | 1 | No | Allows password login – if set to 0 if SSO is needed |
| snc/accept_insecure_rfc | 1 | No | |
| snc/only_encrypted_gui | 0 | Yes | Forces encrypted communication – set to 1 to enforce SNC connectivity |
| snc/data_protection/max | 3 | No | |
| snc/data_protection/min | 3 | No | |
| snc/data_protection/use | 3 | No | |
| snc/enable | 1 | No |
Install SAP Secure Client on end-user device
Download the SAP Secure Login Client from the SAP Marketplace
This can be accessed here:
Software Downloads – Secure Login Client
You can also navigate to the relevant area via the following path:
Support Packages and Patches -> By Category -> SAP Netweaver and Complimentary Products -> SAP Single Sign On -> SAP Single Sign-On 3.0 -> Comprised Software Component Versions -> Secure Login Client 3.0
Download the latest version for your operating system (MAC OS & WIN32 available at the time of writing)
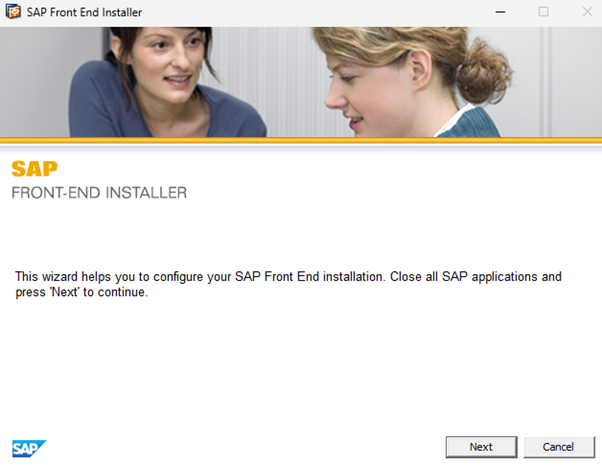
Install the Secure Login Client
The downloaded executable will usually be found in your download folder:
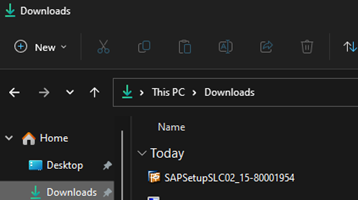
Double-click to execute it – you will need Admin permissions to continue (Windows):
Click ‘Next’
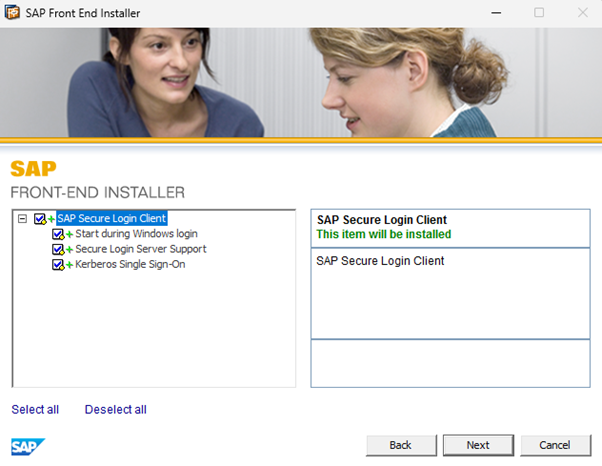
Leave the default selection in the next screen and click ‘Next’ again:


Install Backend system’s certificate on end-user device
See also KBA 2680913 which also explains this procedure:
2680913 – SNC Error Code A2200210:Peer certificate verification failed – Certificate X.509 configura...
In order to make use of SNC connectivity between the SAP GUI client on the front-end PC and the SAP backend system, the PC needs to trust the target SAP system. For this we need to install the SAP system’s SNC certificate on the PC. In our scenario, the certificate is self-signed and can be exported from the SAP system to a file which can then be used to import into the PC’s certificate manager.
This step is depicted in the following diagram:

Figure 8: Enabling SNC access
- Log on to the SAP Backend system and launch transaction STRUST. Then expand ‘SNC SAPCryptolib’ and then double-click on the instance. In the right-hand pane, you will see the ‘Subject’ field change to contain the Server’s SNC name. Double-click on the SNC name to load the certificate into the ‘Certificate’ section below:
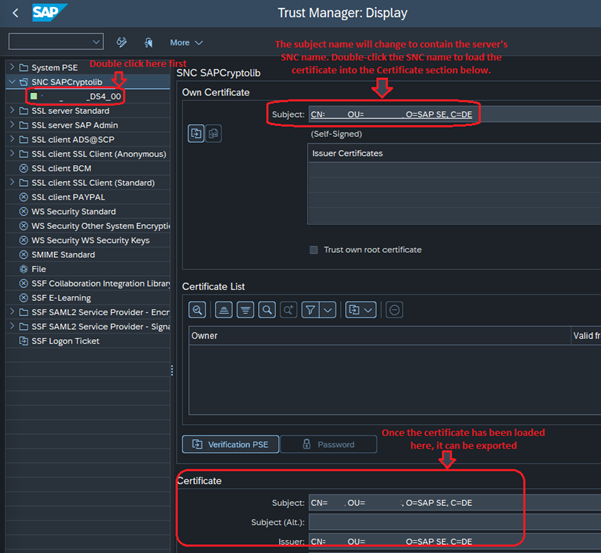
- Export the certificate to a local file. Click on the ‘Export certificate button in the ‘Certificate’ section. Specify a location and filename, leave everything else default.


- From a file manager, locate the file just downloaded and double-click on it.

- A certificate pop-up screen will appear. Click the ‘Install Certificate’ button:

- Select either the ‘Current User’ or ‘Local Machine’ options, and then click the ‘Next’ button:

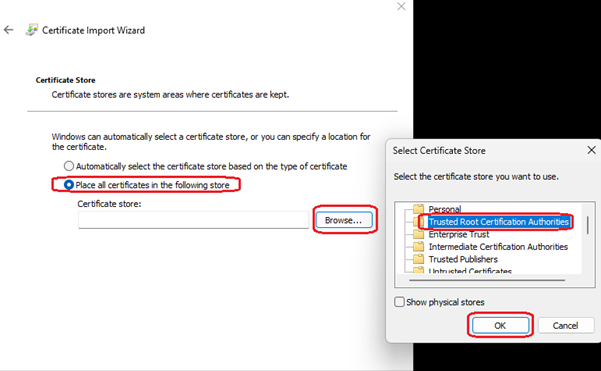
- In the next screen, select ‘Place all certificates in the following store’, and then click on the ‘Browse’ button. In the pop-up screen that appears, select the ‘Trusted Root Certification Authorities’ store, and then click the ‘OK’ button:
- You should see ‘Trusted Root Certification Authorities’ under Certificate store, click ‘Next’:

- Click ‘Finish’ in the next screen:

- Confirm the security warning in the next screen, click ‘Yes’:


- Repeat the above steps for any additional SAP backend system.
Configure end-user SAP Logon entries to use SNC
We are now in a position to test SNC access to the backend system by configuring our PC’s SAP GUI connection to use SNC for the SAP backend server. You can determine whether any logon to an SAP system is secured by SNC or not by checking the lock indicator at the top-right hand corner of a GUI screen. As of now we have not configured any connection to use SNC so any attempt to connect will indicate an un-lock icon, hovering the mouse pointer over the lock will result in a message indicating that SNC is not enabled.

To configure your SAPGui connection to the appropriate SAP backend system uses SNC you need to do the following:
- Right-click on the connection that needs configuring and select ‘Properties’:

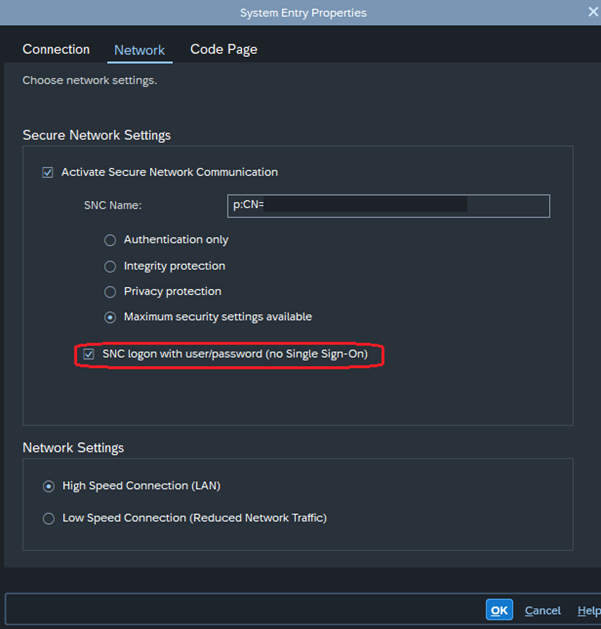
- Select the ‘Network’ tab and then select the ‘Activate Secure Network Communication’ check-box.

You need to also fill in the ‘SNC Name’. For this you use the same name that is used in the STRUST transaction you accessed previously, which will be contained in the ‘Subject’ field.
Here is a reminder (from STRUST), take note of the ‘CN=……..’ name:
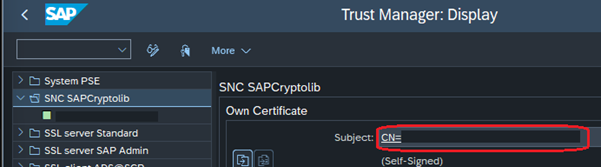
For example, if the SNC name from STRUST is ‘CN=SID, OU=AAAA, O=BBB SE=CC’ then the SNC name in the SAPGui connection will be ‘p: CN=SID, OU=AAAA, O=BBB SE=CC’.
As we are not using SSO in this scenario, select the ‘SNC logon with user/password (no Single Sign-On)’ checkbox. Once done click ‘OK’:
Test access
We should now be able to test secure access to our SAP backend system. All that needs to be done now is double-click on our SAPGui connection. If all works, a logon screen should appear, however the lock indicator on the top-right of the GUI screen should indicate that SNC is now being used for the connection. If you hover the mouse pointer over the lock you should see a message appear indicating that SNC is enabled:

Log on as you would normally.
STEP 5: Enforcing SNC
One last step is to enforce SNC connectivity. At this stage SNC access is working to our backend SAP system. However, nothing stops other users from using insecure connections to the system. Somehow, we need the SAP backend system to reject any attempt to connect to it without SNC.

Figure 9: Preventing non-SNC connection
Setting parameter to enforce SNC connectivity
This is possible with a dynamic parameter (which means that it can be set, and it takes effect immediately without having to restart the SAP system).
NOTE: Setting it dynamically is perfect for testing scenarios, however, don’t forget to make the change permanent by setting the parameter in the appropriate profile so that you don’t lose this setting after an application server reboot.
If you recall from a previous section where we discussed SAP system parameters, there was one parameter that we deliberately set to 0 for testing purposes (snc/only_encrypted_gui).
| Parameter | Value | Dynamic | Notes |
| snc/accept_insecure_cpic | 1 | No | |
| snc/accept_insecure_gui | 1 | No | Allows password login – if set to 0 if SSO is needed |
| snc/accept_insecure_rfc | 1 | No | |
| snc/only_encrypted_gui | 1 | Yes | Forces encrypted communication – set to 1 to enforce SNC connectivity |
| snc/data_protection/max | 3 | No | |
| snc/data_protection/min | 3 | No | |
| snc/data_protection/use | 3 | No | |
| snc/enable | 1 | No |
Set this parameter in transaction RZ11 on the backend system:

Select ‘Display’ after inserting the parameter name.
In the screen that appears you will see the current value, and a ‘Change Value’ button is available as it is a dynamic parameter:

Click on ‘Change Value’, you will be presented with a warning that it is a system-wide parameter, accept this by clicking on the green check button:

Set the new value to 1, and click ‘Save’


Confirm by clicking on the green check button.
Testing enforced SNC connectivity
To ensure that we cannot access the SAP system without SNC, we have to un-set the SNC configuration in our SAPGui connection. This is simple in that all we need to do is un-check the ‘Activate Secure Network Communication’ checkbox in the ‘Network’ tab for our connection:

Any attempt to connect now with a connection that does not have SNC enabled should result in a message similar to the following:

Conclusion
I hope that this blog post has been useful. I welcome any feedback you may have, even if it is to correct where I may have erred as I am sure there are experts that have more experience in this area.
Notes that may be useful:
2440692 – Central Note for SNC Client Encryption 2.0 – SAP ONE Support Launchpad
2425150 – Release Note SNC Client Encryption 2.0 – SAP ONE Support Launchpad
Other blogs with similar topics may be found here:
connectivity | SAP Blogs
saprouter | SAP Blogs
SAP Connectivity service | SAP | SAP Blogs
ABAP Connectivity | SAP | SAP Blogs
- SAP Managed Tags:
- SAP NetWeaver
2 Comments
You must be a registered user to add a comment. If you've already registered, sign in. Otherwise, register and sign in.
Labels in this area
-
"automatische backups"
1 -
"regelmäßige sicherung"
1 -
"TypeScript" "Development" "FeedBack"
1 -
505 Technology Updates 53
1 -
ABAP
14 -
ABAP API
1 -
ABAP CDS Views
2 -
ABAP CDS Views - BW Extraction
1 -
ABAP CDS Views - CDC (Change Data Capture)
1 -
ABAP class
2 -
ABAP Cloud
3 -
ABAP Development
5 -
ABAP in Eclipse
1 -
ABAP Platform Trial
1 -
ABAP Programming
2 -
abap technical
1 -
abapGit
1 -
absl
2 -
access data from SAP Datasphere directly from Snowflake
1 -
Access data from SAP datasphere to Qliksense
1 -
Accrual
1 -
action
1 -
adapter modules
1 -
Addon
1 -
Adobe Document Services
1 -
ADS
1 -
ADS Config
1 -
ADS with ABAP
1 -
ADS with Java
1 -
ADT
2 -
Advance Shipping and Receiving
1 -
Advanced Event Mesh
3 -
Advanced formula
1 -
AEM
1 -
AI
8 -
AI Launchpad
1 -
AI Projects
1 -
AIML
9 -
Alert in Sap analytical cloud
1 -
Amazon S3
1 -
Analytical Dataset
1 -
Analytical Model
1 -
Analytics
1 -
Analyze Workload Data
1 -
annotations
1 -
API
1 -
API and Integration
3 -
API Call
2 -
API security
1 -
Application Architecture
1 -
Application Development
5 -
Application Development for SAP HANA Cloud
3 -
Applications and Business Processes (AP)
1 -
Artificial Intelligence
1 -
Artificial Intelligence (AI)
5 -
Artificial Intelligence (AI) 1 Business Trends 363 Business Trends 8 Digital Transformation with Cloud ERP (DT) 1 Event Information 462 Event Information 15 Expert Insights 114 Expert Insights 76 Life at SAP 418 Life at SAP 1 Product Updates 4
1 -
Artificial Intelligence (AI) blockchain Data & Analytics
1 -
Artificial Intelligence (AI) blockchain Data & Analytics Intelligent Enterprise
1 -
Artificial Intelligence (AI) blockchain Data & Analytics Intelligent Enterprise Oil Gas IoT Exploration Production
1 -
Artificial Intelligence (AI) blockchain Data & Analytics Intelligent Enterprise sustainability responsibility esg social compliance cybersecurity risk
1 -
ASE
1 -
ASR
2 -
ASUG
1 -
Attachments
1 -
Authorisations
1 -
Automating Processes
1 -
Automation
2 -
aws
2 -
Azure
1 -
Azure AI Studio
1 -
Azure API Center
1 -
Azure API Management
1 -
B2B Integration
1 -
Backorder Processing
1 -
Backup
1 -
Backup and Recovery
1 -
Backup schedule
1 -
BADI_MATERIAL_CHECK error message
1 -
Bank
1 -
Bank Communication Management
1 -
BAS
1 -
basis
2 -
Basis Monitoring & Tcodes with Key notes
2 -
Batch Management
1 -
BDC
1 -
Best Practice
1 -
bitcoin
1 -
Blockchain
3 -
bodl
1 -
BOP in aATP
1 -
BOP Segments
1 -
BOP Strategies
1 -
BOP Variant
1 -
BPC
1 -
BPC LIVE
1 -
BTP
13 -
BTP AI Launchpad
1 -
BTP Destination
2 -
Business AI
1 -
Business and IT Integration
1 -
Business application stu
1 -
Business Application Studio
1 -
Business Architecture
1 -
Business Communication Services
1 -
Business Continuity
1 -
Business Data Fabric
3 -
Business Fabric
1 -
Business Partner
12 -
Business Partner Master Data
10 -
Business Technology Platform
2 -
Business Trends
4 -
BW4HANA
1 -
CA
1 -
calculation view
1 -
CAP
4 -
Capgemini
1 -
CAPM
1 -
Catalyst for Efficiency: Revolutionizing SAP Integration Suite with Artificial Intelligence (AI) and
1 -
CCMS
2 -
CDQ
12 -
CDS
2 -
Cental Finance
1 -
Certificates
1 -
CFL
1 -
Change Management
1 -
chatbot
1 -
chatgpt
3 -
CL_SALV_TABLE
2 -
Class Runner
1 -
Classrunner
1 -
Cloud ALM Monitoring
1 -
Cloud ALM Operations
1 -
cloud connector
1 -
Cloud Extensibility
1 -
Cloud Foundry
4 -
Cloud Integration
6 -
Cloud Platform Integration
2 -
cloudalm
1 -
communication
1 -
Compensation Information Management
1 -
Compensation Management
1 -
Compliance
1 -
Compound Employee API
1 -
Configuration
1 -
Connectors
1 -
Consolidation Extension for SAP Analytics Cloud
2 -
Control Indicators.
1 -
Controller-Service-Repository pattern
1 -
Conversion
1 -
Cosine similarity
1 -
cryptocurrency
1 -
CSI
1 -
ctms
1 -
Custom chatbot
3 -
Custom Destination Service
1 -
custom fields
1 -
Customer Experience
1 -
Customer Journey
1 -
Customizing
1 -
cyber security
4 -
cybersecurity
1 -
Data
1 -
Data & Analytics
1 -
Data Aging
1 -
Data Analytics
2 -
Data and Analytics (DA)
1 -
Data Archiving
1 -
Data Back-up
1 -
Data Flow
1 -
Data Governance
5 -
Data Integration
2 -
Data Quality
12 -
Data Quality Management
12 -
Data Synchronization
1 -
data transfer
1 -
Data Unleashed
1 -
Data Value
8 -
database tables
1 -
Dataframe
1 -
Datasphere
3 -
datenbanksicherung
1 -
dba cockpit
1 -
dbacockpit
1 -
Debugging
2 -
Defender
1 -
Delimiting Pay Components
1 -
Delta Integrations
1 -
Destination
3 -
Destination Service
1 -
Developer extensibility
1 -
Developing with SAP Integration Suite
1 -
Devops
1 -
digital transformation
1 -
Documentation
1 -
Dot Product
1 -
DQM
1 -
dump database
1 -
dump transaction
1 -
e-Invoice
1 -
E4H Conversion
1 -
Eclipse ADT ABAP Development Tools
2 -
edoc
1 -
edocument
1 -
ELA
1 -
Embedded Consolidation
1 -
Embedding
1 -
Embeddings
1 -
Employee Central
1 -
Employee Central Payroll
1 -
Employee Central Time Off
1 -
Employee Information
1 -
Employee Rehires
1 -
Enable Now
1 -
Enable now manager
1 -
endpoint
1 -
Enhancement Request
1 -
Enterprise Architecture
1 -
ESLint
1 -
ETL Business Analytics with SAP Signavio
1 -
Euclidean distance
1 -
Event Dates
1 -
Event Driven Architecture
1 -
Event Mesh
2 -
Event Reason
1 -
EventBasedIntegration
1 -
EWM
1 -
EWM Outbound configuration
1 -
EWM-TM-Integration
1 -
Existing Event Changes
1 -
Expand
1 -
Expert
2 -
Expert Insights
2 -
Exploits
1 -
Fiori
14 -
Fiori Elements
2 -
Fiori SAPUI5
12 -
first-guidance
1 -
Flask
1 -
FTC
1 -
Full Stack
8 -
Funds Management
1 -
gCTS
1 -
GenAI hub
1 -
General
1 -
Generative AI
1 -
Getting Started
1 -
GitHub
9 -
Grants Management
1 -
groovy
1 -
GTP
1 -
HANA
6 -
HANA Cloud
2 -
Hana Cloud Database Integration
2 -
HANA DB
2 -
Hana Vector Engine
1 -
HANA XS Advanced
1 -
Historical Events
1 -
home labs
1 -
HowTo
1 -
HR Data Management
1 -
html5
8 -
HTML5 Application
1 -
Identity cards validation
1 -
idm
1 -
Implementation
1 -
Infuse AI
1 -
input parameter
1 -
instant payments
1 -
Integration
3 -
Integration Advisor
1 -
Integration Architecture
1 -
Integration Center
1 -
Integration Suite
1 -
intelligent enterprise
1 -
iot
1 -
Java
1 -
job
1 -
Job Information Changes
1 -
Job-Related Events
1 -
Job_Event_Information
1 -
joule
4 -
Journal Entries
1 -
Just Ask
1 -
Kerberos for ABAP
8 -
Kerberos for JAVA
8 -
KNN
1 -
Launch Wizard
1 -
Learning Content
2 -
Life at SAP
5 -
lightning
1 -
Linear Regression SAP HANA Cloud
1 -
Loading Indicator
1 -
local tax regulations
1 -
LP
1 -
Machine Learning
4 -
Marketing
1 -
Master Data
3 -
Master Data Management
14 -
Maxdb
2 -
MDG
1 -
MDGM
1 -
MDM
1 -
Message box.
1 -
Messages on RF Device
1 -
Microservices Architecture
1 -
Microsoft Universal Print
1 -
Middleware Solutions
1 -
Migration
5 -
ML Model Development
1 -
Modeling in SAP HANA Cloud
8 -
Monitoring
3 -
MTA
1 -
Multi-Record Scenarios
1 -
Multilayer Perceptron
1 -
Multiple Event Triggers
1 -
Myself Transformation
1 -
Neo
1 -
Neural Networks
1 -
New Event Creation
1 -
New Feature
1 -
Newcomer
1 -
NodeJS
3 -
ODATA
2 -
OData APIs
1 -
odatav2
1 -
ODATAV4
1 -
ODBC
1 -
ODBC Connection
1 -
Onpremise
1 -
open source
2 -
OpenAI API
1 -
Oracle
1 -
PaPM
1 -
PaPM Dynamic Data Copy through Writer function
1 -
PaPM Remote Call
1 -
Partner Built Foundation Model
1 -
PAS-C01
1 -
Pay Component Management
1 -
PGP
1 -
Pickle
1 -
PLANNING ARCHITECTURE
1 -
Popup in Sap analytical cloud
1 -
PostgrSQL
1 -
POSTMAN
1 -
Prettier
1 -
Process Automation
2 -
Product Updates
6 -
PSM
1 -
Public Cloud
1 -
Python
4 -
python library - Document information extraction service
1 -
Qlik
1 -
Qualtrics
1 -
RAP
3 -
RAP BO
2 -
Record Deletion
1 -
Recovery
1 -
recurring payments
1 -
redeply
1 -
Release
1 -
Remote Consumption Model
1 -
Replication Flows
1 -
research
1 -
Resilience
1 -
REST
1 -
REST API
1 -
Retagging Required
1 -
Risk
1 -
Rolling Kernel Switch
1 -
route
1 -
rules
1 -
S4 HANA
1 -
S4 HANA Cloud
1 -
S4 HANA On-Premise
1 -
S4HANA
4 -
S4HANA Cloud
1 -
S4HANA_OP_2023
2 -
SAC
10 -
SAC PLANNING
9 -
SAP
4 -
SAP ABAP
1 -
SAP Advanced Event Mesh
1 -
SAP AI Core
9 -
SAP AI Launchpad
8 -
SAP Analytic Cloud Compass
1 -
Sap Analytical Cloud
1 -
SAP Analytics Cloud
4 -
SAP Analytics Cloud for Consolidation
3 -
SAP Analytics Cloud Story
1 -
SAP analytics clouds
1 -
SAP API Management
1 -
SAP BAS
1 -
SAP Basis
6 -
SAP BODS
1 -
SAP BODS certification.
1 -
SAP BTP
22 -
SAP BTP Build Work Zone
2 -
SAP BTP Cloud Foundry
6 -
SAP BTP Costing
1 -
SAP BTP CTMS
1 -
SAP BTP Generative AI
1 -
SAP BTP Innovation
1 -
SAP BTP Migration Tool
1 -
SAP BTP SDK IOS
1 -
SAP BTPEA
1 -
SAP Build
11 -
SAP Build App
1 -
SAP Build apps
1 -
SAP Build CodeJam
1 -
SAP Build Process Automation
3 -
SAP Build work zone
10 -
SAP Business Objects Platform
1 -
SAP Business Technology
2 -
SAP Business Technology Platform (XP)
1 -
sap bw
1 -
SAP CAP
2 -
SAP CDC
1 -
SAP CDP
1 -
SAP CDS VIEW
1 -
SAP Certification
1 -
SAP Cloud ALM
4 -
SAP Cloud Application Programming Model
1 -
SAP Cloud Integration for Data Services
1 -
SAP cloud platform
8 -
SAP Companion
1 -
SAP CPI
3 -
SAP CPI (Cloud Platform Integration)
2 -
SAP CPI Discover tab
1 -
sap credential store
1 -
SAP Customer Data Cloud
1 -
SAP Customer Data Platform
1 -
SAP Data Intelligence
1 -
SAP Data Migration in Retail Industry
1 -
SAP Data Services
1 -
SAP DATABASE
1 -
SAP Dataspher to Non SAP BI tools
1 -
SAP Datasphere
9 -
SAP DRC
1 -
SAP EWM
1 -
SAP Fiori
3 -
SAP Fiori App Embedding
1 -
Sap Fiori Extension Project Using BAS
1 -
SAP GRC
1 -
SAP HANA
1 -
SAP HANA PAL
1 -
SAP HANA Vector
1 -
SAP HCM (Human Capital Management)
1 -
SAP HR Solutions
1 -
SAP IDM
1 -
SAP Integration Suite
9 -
SAP Integrations
4 -
SAP iRPA
2 -
SAP LAGGING AND SLOW
1 -
SAP Learning Class
1 -
SAP Learning Hub
1 -
SAP Master Data
1 -
SAP Odata
2 -
SAP on Azure
2 -
SAP PAL
1 -
SAP PartnerEdge
1 -
sap partners
1 -
SAP Password Reset
1 -
SAP PO Migration
1 -
SAP Prepackaged Content
1 -
SAP Process Automation
2 -
SAP Process Integration
2 -
SAP Process Orchestration
1 -
SAP S4HANA
2 -
SAP S4HANA Cloud
1 -
SAP S4HANA Cloud for Finance
1 -
SAP S4HANA Cloud private edition
1 -
SAP Sandbox
1 -
SAP STMS
1 -
SAP successfactors
3 -
SAP SuccessFactors HXM Core
1 -
SAP Time
1 -
SAP TM
2 -
SAP Trading Partner Management
1 -
SAP UI5
1 -
SAP Upgrade
1 -
SAP Utilities
1 -
SAP-GUI
8 -
SAP_COM_0276
1 -
SAPBTP
1 -
SAPCPI
1 -
SAPEWM
1 -
sapfirstguidance
1 -
SAPHANAService
1 -
SAPIQ
1 -
sapmentors
1 -
saponaws
2 -
SAPS4HANA
1 -
SAPUI5
5 -
schedule
1 -
Script Operator
1 -
Secure Login Client Setup
8 -
security
9 -
Selenium Testing
1 -
Self Transformation
1 -
Self-Transformation
1 -
SEN
1 -
SEN Manager
1 -
service
1 -
SET_CELL_TYPE
1 -
SET_CELL_TYPE_COLUMN
1 -
SFTP scenario
2 -
Simplex
1 -
Single Sign On
8 -
Singlesource
1 -
SKLearn
1 -
Slow loading
1 -
soap
1 -
Software Development
1 -
SOLMAN
1 -
solman 7.2
2 -
Solution Manager
3 -
sp_dumpdb
1 -
sp_dumptrans
1 -
SQL
1 -
sql script
1 -
SSL
8 -
SSO
8 -
Substring function
1 -
SuccessFactors
1 -
SuccessFactors Platform
1 -
SuccessFactors Time Tracking
1 -
Sybase
1 -
system copy method
1 -
System owner
1 -
Table splitting
1 -
Tax Integration
1 -
Technical article
1 -
Technical articles
1 -
Technology Updates
15 -
Technology Updates
1 -
Technology_Updates
1 -
terraform
1 -
Threats
2 -
Time Collectors
1 -
Time Off
2 -
Time Sheet
1 -
Time Sheet SAP SuccessFactors Time Tracking
1 -
Tips and tricks
2 -
toggle button
1 -
Tools
1 -
Trainings & Certifications
1 -
Transformation Flow
1 -
Transport in SAP BODS
1 -
Transport Management
1 -
TypeScript
3 -
ui designer
1 -
unbind
1 -
Unified Customer Profile
1 -
UPB
1 -
Use of Parameters for Data Copy in PaPM
1 -
User Unlock
1 -
VA02
1 -
Validations
1 -
Vector Database
2 -
Vector Engine
1 -
Vectorization
1 -
Visual Studio Code
1 -
VSCode
2 -
VSCode extenions
1 -
Vulnerabilities
1 -
Web SDK
1 -
work zone
1 -
workload
1 -
xsa
1 -
XSA Refresh
1
- « Previous
- Next »
Related Content
- Adapt Clean Core Principle using SAP Cloud ALM in Technology Blogs by Members
- Access virtual tables (HANA Smart Data Access) in my CAP project in Technology Q&A
- SAP Edge Integration Cell On-Premise supported landscape in Technology Q&A
- Setting the backend OData Service Alias in a BTP Destination. Possible? in Technology Q&A
- Sign in with an Email link - New upcoming feature for SAP Concur in Q2 2024 in Technology Blogs by SAP
Top kudoed authors
| User | Count |
|---|---|
| 10 | |
| 5 | |
| 4 | |
| 4 | |
| 4 | |
| 4 | |
| 4 | |
| 3 | |
| 3 | |
| 2 |