
- SAP Community
- Products and Technology
- Supply Chain Management
- SCM Blogs by SAP
- Side-by-Side Extension of SAP Asset Performance Ma...
Supply Chain Management Blogs by SAP
Expand your SAP SCM knowledge and stay informed about supply chain management technology and solutions with blog posts by SAP. Follow and stay connected.
Turn on suggestions
Auto-suggest helps you quickly narrow down your search results by suggesting possible matches as you type.
Showing results for
Employee
Options
- Subscribe to RSS Feed
- Mark as New
- Mark as Read
- Bookmark
- Subscribe
- Printer Friendly Page
- Report Inappropriate Content
04-27-2023
1:01 PM
The blog post is part of the series Side-by-Side Extension of SAP Asset Performance Management.
In this blog post, we shall walkthrough the steps for creating a custom extension / application for SAP Asset Performance Management (hereinafter referred to as “APM“ for brevity) end users, using the SAP Business Application Studio (hereinafter referred to as “BAS“ for brevity). The custom application shall consume the OData API for Maintenance Task List from S/4HANA system connected to APM and shall be deployed on BTP.
The following diagram shows the typical solution landscape for building custom apps for APM, using BAS on BTP.
With the steps described in the blog post, we successfully developed a custom application to extend APM side-by-side, using SAP Business Application studio and deployed it into Cloud Foundry environment of BTP. We discovered the application under HTLM5 Apps section of BTP cockpit and integrated it into the custom launchpad developed previously in the blog series. This procedure can be extended to other application types supported by Business Application Studio, thereby providing broad options for development of custom applications.
Side-by-Side Extension of SAP Asset Performance Management: Overview
Build Custom Launchpad
Integrate Custom / Third-Party Applications into Launchpad
Share your feedback or thoughts in the comment section of this blog post.
Furthermore, explore our SAP Asset Performance Management Topic Page and follow the tag SAP Asset Performance Management to not miss out on more content to come! Don't forget to submit or vote for the improvement you would like to see in Customer Influence!
In this blog post, we shall walkthrough the steps for creating a custom extension / application for SAP Asset Performance Management (hereinafter referred to as “APM“ for brevity) end users, using the SAP Business Application Studio (hereinafter referred to as “BAS“ for brevity). The custom application shall consume the OData API for Maintenance Task List from S/4HANA system connected to APM and shall be deployed on BTP.
The following diagram shows the typical solution landscape for building custom apps for APM, using BAS on BTP.

Figure 1: Solution landscape to build custom application for APM users * Click to enlarge * if applicable
Prerequisites
- SAP Asset Performance Management entitlement is assigned to a subaccount and already subscribed in it.
- Custom Launchpad is already created as described in the previous blog post Build Custom Launchpad
- Entitlements to SAP Business Application Studio is already assigned to the subaccount used for APM subscription.
Procedure
Build Custom Application
- In the SAP BTP Cockpit, navigate to subaccount used for subscription of APM. On left-side menu, choose Service Marketplace. Find and create subscription of the SAP Business Application Studio, standard edition. If you are familiar with BAS and have already set it up, then proceed to step 6 directly.

- In the SAP BTP Cockpit, on left-side menu, choose Security > Role Collections. Find and open the BAS role collections (Business_Application_Studio_Administrator, Business_Application_Studio_Developer, Business_Application_Studio_Extension_Deployer) for edit. In Edit mode, under Users section, add users that should have access to capabilities of BAS. Save the changes.

- In the SAP BTP Cockpit, on left-side menu, choose Services > Instances and Subscriptions. In Subscriptions section, find and select the “SAP Business Application Studio” row. In the details page, click on “Go to Application” button. This will open the BAS.

- In case of first-time login, choose Create Dev Space button.

- In the following screen enter a name for the space (for example: apm_extension_dev), choose “Full Stack Cloud Application” and submit. This will start Dev Space creation process.

- Choose the dev space from the list and enter the development environment.

- In the BAS Dev Space, on left-side menu, choose Menu (≡) > File > New Project from Template. In the Template Wizard screen, select “SAP Fiori application” tile and click on Start button.

- In the Template Selection step of the wizard, select “List Report Page” tile and click Next button.

- In the Data Source and Service Selection step of the wizard, select “Connect to an OData Service” option in the Data Source dropdown field. Enter OData service URL in the following format to refer to S/4HANA system destination created in the subaccount and click Next button. The BAS then automatically takes the host and credential information from destination and even connects to on-premises system via cloud connector configured in subaccount.
Format:
https://<DestinationName>.dest/<ODataServiceURI>;
Example:
https://s4h_sys_ext.dest/sap/opu/odata4/sap/api_maintenancetasklist/srvd_a2x/sap/maintenancetasklist...
Hint:
• Destination configured for integration of APM with S/4HANA can be reused here.
• Destination configuration must include additional properties as described in the help documentation of BAS. (WebIDEEnabled = true ; HTML5.DynamicDestination = true ; WebIDEUsage = odata_abap)

- In the Entity Selection step of the wizard, select “MaintenanceTaskList” option in the Main Entity field. Select “_Operation” option in the Navigation Entity field. Ensure that the “Automatically add table columns to the list page and a section to the object page if none already exists?” field is set to Yes. Click Next button.

- In the Project Attributes step of the wizard, enter the name for extension project. Ensure that the “Add deployment configuration” and “Add FLP configuration” fields are set to Yes. Click Next button.

- In the Deployment Configuration step of the wizard, choose Cloud Foundry for the target environment. Select destination in the “Destination name” field. Set “Add application to managed application router” field to Yes. Click Next button.

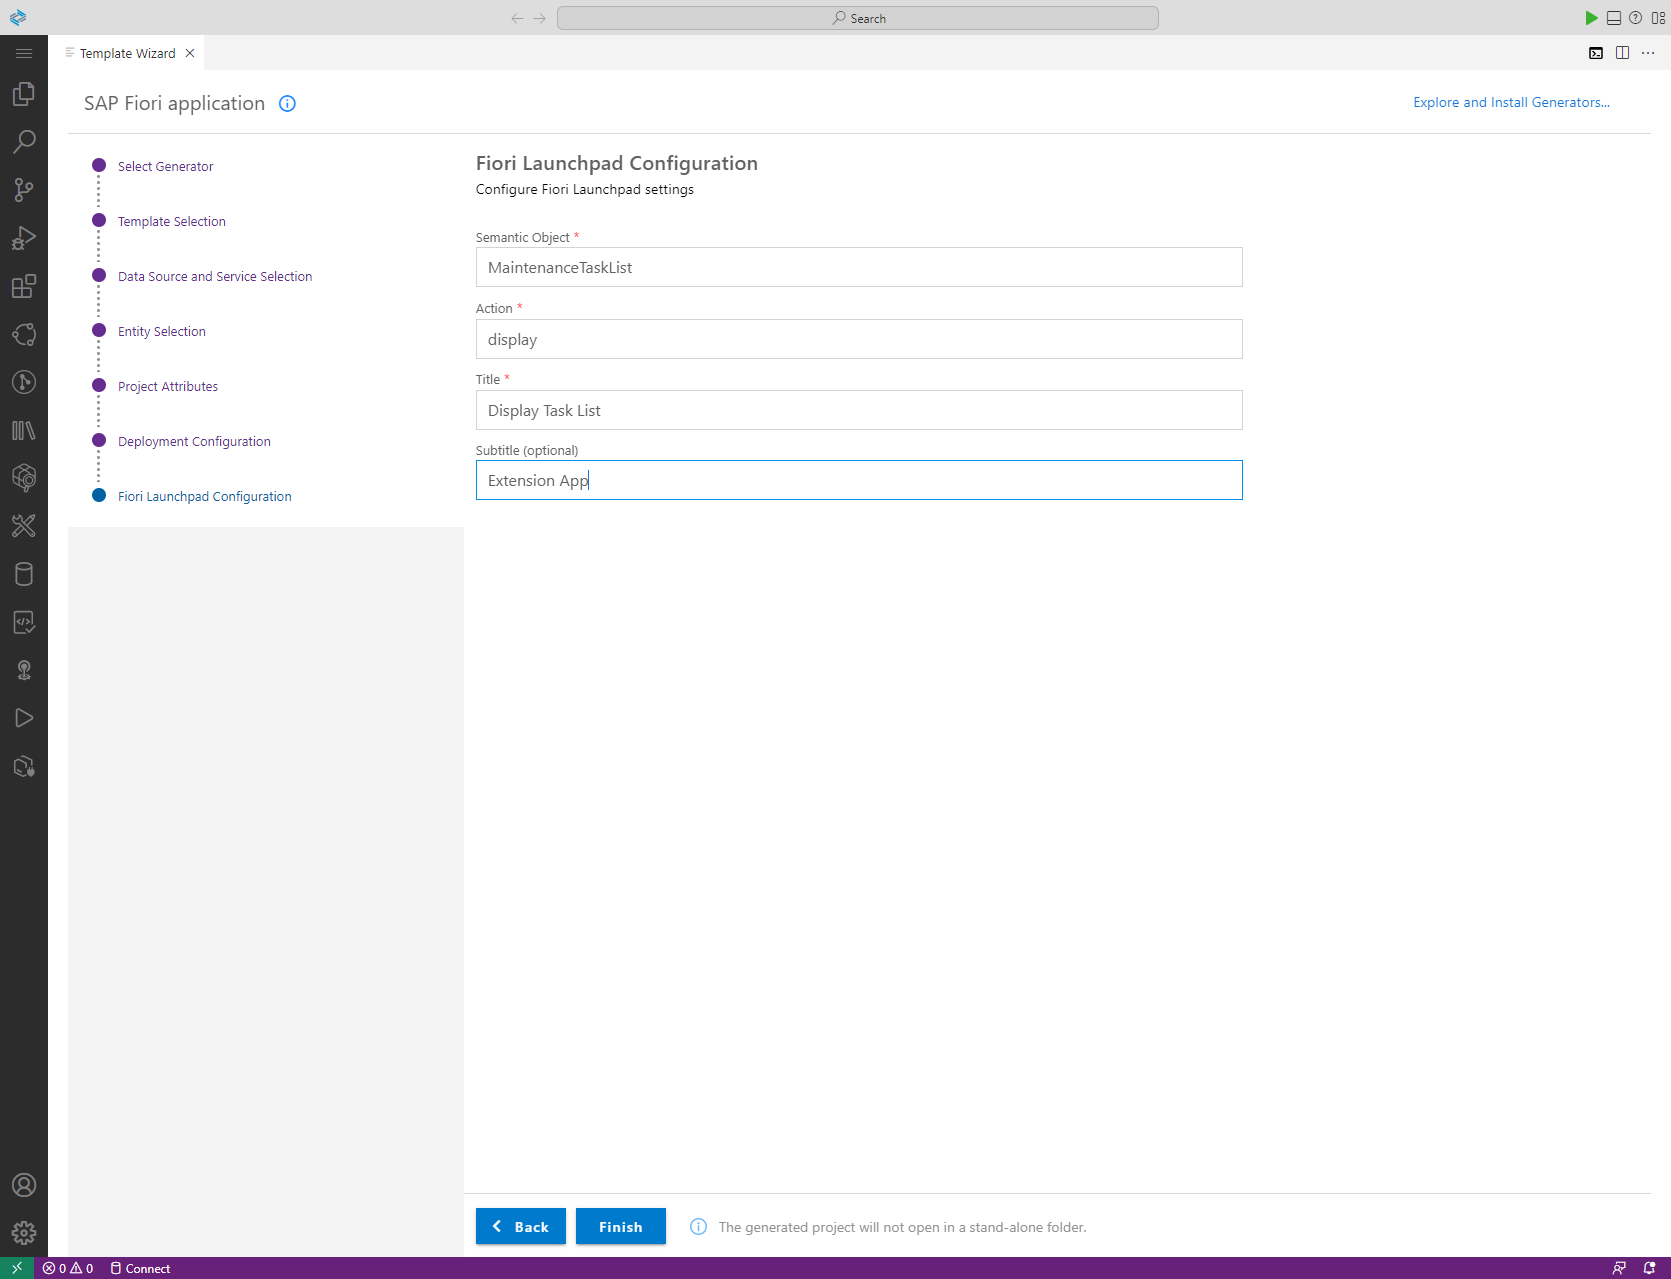
- In the Fiori Launchpad Configuration step of the wizard, enter value for Semantic Object, Action, and Title fields. This step adds the essential configuration to the expose the application to launchpads/sites created using the SAP Build Work Zone, standard edition. Click Finish button.
- Once the wizard completes processing, the BAS opens the project in Explorer view. The generated code can be seen in the Workspace on left side panel. Open Command Palette by pressing ctrl+shift+p and select “Fiori: Open Application Info”. On the Application Information page, you can see details of application and the actions that can be performed on it. Click “Preview Application” and when the service is ready, click on URL presented in console (http://localhost:8080) to access the application.

- Click on any of the page under Pages section, for example ListReport, to adjust the UI fields and navigation between pages. Once changes are complete, the application can be built and deployed.

- In the Explorer view on the left-side panel, select mta.yaml file, right click and choose Build MTA Project from the context menu. See help documentation for more details.

- After the build has succeeded (see Terminal view), click on Deploy Application tile on the Application Info to deploy the application to Cloud Foundry (CF) environment. Note that you need to login to the CF environment with organization and space permissions. See help documentation for more details.

- Test run the application in Cloud Foundry environment by navigating to SAP BTP Cockpit, select HTML5 Applications on the left-side menu, click on the deployed custom extension application name.

Check that the application opens in new tab and can load the data from S/4HANA system. In case the application doesn’t load data, check whether the destination is configured correctly in the subaccount and the target S/4HANA system is reachable.

Integrate Custom Application into Custom Launchpad
- Launch the Site Manager of SAP Build Work Zone, standard edition (see blog post Build Custom Launchpad). In Site Manager, on the left-side menu, choose Channel Manager. Click on Update Content action for HTML5 Apps channel to retrieve custom application content (if needed).

- In Site Manager, on the left-side menu, choose Content Manager and navigate to Content Explorer section. Click on HTML5 Apps card.

- Select custom applications (for example, Maintenance Task List) and click on “Add to My Content”. Now the selected content will be available in My Content section.

- Add the custom application to relevant business roles. In our example, we shall add the application to Reliability Engineer role created in previous blog posts.

- Add the custom application to relevant groups. In our example, we shall add the application to Extensions role created in previous blog posts.

- Add the custom application to relevant catalogs. In our example, we shall add the application to single catalog created in previous blog posts.

- Open the custom launchpad by navigating to the site directory and clicking “Go to site” button.

- The custom application appears under the Extensions section of the launchpad

Conclusion
With the steps described in the blog post, we successfully developed a custom application to extend APM side-by-side, using SAP Business Application studio and deployed it into Cloud Foundry environment of BTP. We discovered the application under HTLM5 Apps section of BTP cockpit and integrated it into the custom launchpad developed previously in the blog series. This procedure can be extended to other application types supported by Business Application Studio, thereby providing broad options for development of custom applications.
Related Content
Side-by-Side Extension of SAP Asset Performance Management: Overview
Build Custom Launchpad
Integrate Custom / Third-Party Applications into Launchpad
Share your feedback or thoughts in the comment section of this blog post.
Furthermore, explore our SAP Asset Performance Management Topic Page and follow the tag SAP Asset Performance Management to not miss out on more content to come! Don't forget to submit or vote for the improvement you would like to see in Customer Influence!
- SAP Managed Tags:
- SAP Asset Performance Management
Labels:
You must be a registered user to add a comment. If you've already registered, sign in. Otherwise, register and sign in.
Labels in this area
-
Business Trends
169 -
Business Trends
24 -
Catalog Enablement
1 -
Event Information
47 -
Event Information
4 -
Expert Insights
12 -
Expert Insights
41 -
intelligent asset management
1 -
Life at SAP
63 -
Product Updates
500 -
Product Updates
67 -
Release Announcement
1 -
SAP Digital Manufacturing for execution
1 -
Super Bowl
1 -
Supply Chain
1 -
Sustainability
1 -
Swifties
1 -
Technology Updates
187 -
Technology Updates
17
Related Content
- Checking capacity in picking by trolley in Supply Chain Management Q&A
- Implementing Automated Storage of TM Attachments in the SAP Document Management System in Supply Chain Management Blogs by SAP
- SAP Business Network for Logistics 2404 Release – What’s New? in Supply Chain Management Blogs by SAP
- Announcement: New integration platform in SAP Business Network for Logistics in Supply Chain Management Blogs by SAP
- Automatic E-Mail Alert when Exception in EWM MFS is fired in Supply Chain Management Blogs by Members
Top kudoed authors
| User | Count |
|---|---|
| 7 | |
| 4 | |
| 3 | |
| 2 | |
| 2 | |
| 1 | |
| 1 | |
| 1 | |
| 1 | |
| 1 |