- SAP Community
- Products and Technology
- Supply Chain Management
- SCM Blogs by SAP
- Moving data between Snowflake and SAP Integrated B...
- Subscribe to RSS Feed
- Mark as New
- Mark as Read
- Bookmark
- Subscribe
- Printer Friendly Page
- Report Inappropriate Content
Snowflake is a data warehouse that runs on top of Amazon Web Services, Google Cloud Platform or Microsoft Azure cloud infrastructure, allowing large data to be stored and compute while offering scalability. Supply chain planning in large enterprises often require data consolidation from multiple data sources. A data lake becomes handy in such situations. Snowflake is considered as a data lake by many SAP Customers. With SAP Integrated Business Planning as a de-facto industry standard tool for supply chain planning, customers often request for integration mechanisms between SAP IBP and Snowflake.
In this blog, I am presenting a mechanism to integrate SAP IBP with Snowflake using SAP Cloud Integration as a middleware. Here due to large data volumes, we use the SAP Remote Functions to extract as well as import planning data between SAP IBP and SAP Cloud Integration. SAP offers an open connectors platform which hosts a marketplace for 3rd party vendors to resell their integration artifacts. Here we use a 3rd party developed, JDBC based open connector, between SAP Cloud Integration and Snowflake.
Fig.1 High level view of the software components.
This blog is split in 2 parts.
- Reading data from Snowflake and writing to SAP IBP
- Writing forecast data from SAP IBP into Snowflake Database.
Prerequisites
Let’s start with the following prerequisites in place:
- Make sure you have access to the Open connectors platform. This can be access from the welcome page of the SAP Cloud Integration when you click on the pad – Discover Connectors.
- Create a database, schema, role and assign this to a user on Snowflake if this is applicable for your scenario. In case you want to just try out – you can use the default account admin use on your Snowflake trial account.
- SAP IBP with its 2402 release has come up with a set of helper iFlows in SAP Cloud Integration. These iFlows are for communicating with SAP IBP using web-socket RFC based interfaces – make sure you have these iFlows imported into your Cloud Integration instance.
Reading data from Snowflake and writing to SAP IBP
As a prerequisite, we need a Snowflake database user who has the right role and privilege to read a table. This user can be also configured with RSA key pair or basic authentication can be used. Details on how to do this is well documented in this security guide from Snowflake. If you have generated the RSA Key pair as documented, you can follow the steps in that guide to store the public key for a user with the ALTER USER SQL statement in your snowflake account. The Private key from the database user is then stored in the SAP Open connector platform while creating a connector instance. You can also use the SNOWSQL command line interface to test if your RSA Keys are working and valid. The following command can be used for that,
snowsql -a <Account identifier>-<Organization name> -u <DB user> --private-key-path <path to .p8>
This command would create a connection from your command line interface to the Snowflake database account. You can select a warehouse, database, and the table with the USE SQL command. You can also read some data from a table with a select statement to cross check if the user has the read roles or privileges on that table. Now we use these credentials to create a Snowflake connector instance on the SAP Open Connectors platform.
Snowflake connector instance
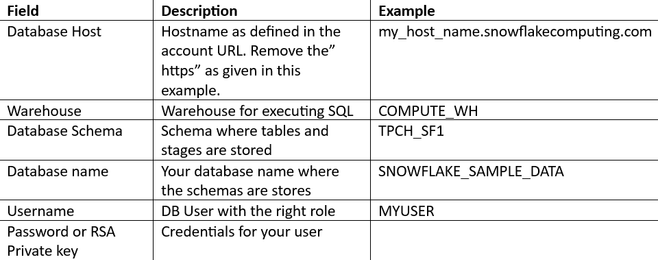
You need the following details while creating an instance of the Open Connector for Snowflake.
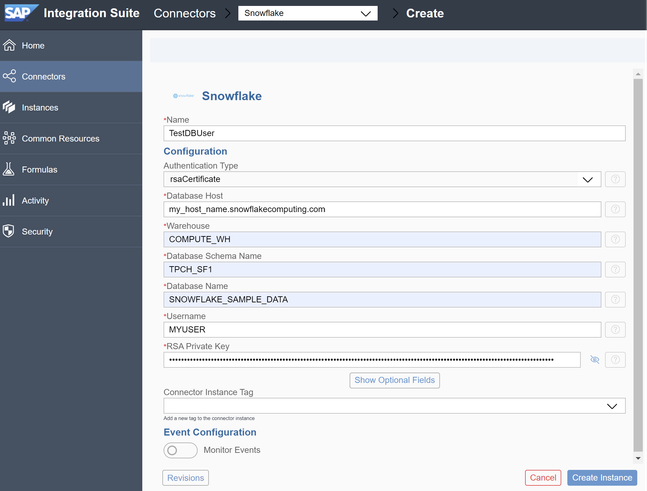
Use the Discover Connectors link on the SAP Cloud Integration welcome page. On the left corner you would see Instances. Click on it and you would see all the instances you have created. On the top right corner, you can click on the Create Instance option to create a new instance. Search for the Snowflake connector instance and fill in the above details. Below is a screen shot of how these details are configured while creating a new instance:
Fig.2 Screen shot of the Open connector instance configuration
When you are done, you can press the blue button – Create Instance. This would use the credentials you had provided on the hostname and create a new JDBC client instance. It would also generate a set of APIs which you can use as REST end points from your iFlow or test using Postman. Once the instance is created, you can see the API Docs link in a new page. Open this link to see a list of table names which are in the database you had provided to create the instance. These tables are wrapped with HTTP methods in the API docs. Use any GET call to read a table. To do this, press the “Try it” button on the top right. Then when you press the “Execute” button which is visible when you scroll down, this API call would generate a GET request and a sample cURL request can be seen in the screen. In that request you would also see the User, Element and the Organization header parameters which you would need to create a new user credentials in the security material app in SAP Cloud Integration.
Configure SAP Cloud Integration
Once you have the above step finished, you need the User, Element and Organization parameter values to create a new Security Material. For this,
- Log into the SAP Cloud Integration instance.
- Open the Security Materials pad and click on Create -> User Credentials.
- Enter the name, description, select the type as OpenConnectors.
- The User, Organization and Element details come from the previous step when you created the Open Connector instance using the Snowflake Adapter.
- Deploy this connector.
You have now created an Open Connector instance and configured this instance on SAP Cloud Integration to be consumed in an iFlow. We will need this user Credentials name and the URL of the Open Connector instance, for later usage.
Communication interfaces in SAP IBP
The 2402 IBP release comes with a set of RFC interfaces which can be used with iFlows in SAP Cloud Integration for extracting key figure and master data. These are packed under the communication scenario SAP_COM_0931. To check if this communication scenario is available in your SAP IBP instance, Log into the system as an admin and search for the Communication Arrangements application. Once you have this, choose, New. The open the value help for the scenario field and enter the scenario id as “SAP_COM_0931”. If you see this, then you can set up a new arrangement, a system, and a user for it. These function modules are intended to be used by the SAP Cloud Integration only.
Destination on BTP
You can create a BTP destination with the communication credentials for the IBP instance in your BTP sub account where the SAP Cloud Integration runtime process is instantiated.
Fig.3. BTP Destination configuration for SAP IBP using WS-RFC
Here is a screen shot of the destination configuration. In the above example, the destination name is called IBP_G5R_100. This name is then later used in the iFlows to make WS-RFC calls to SAP IBP instance which is configured in the jco.client.wshost property.
Reading from Snowflake
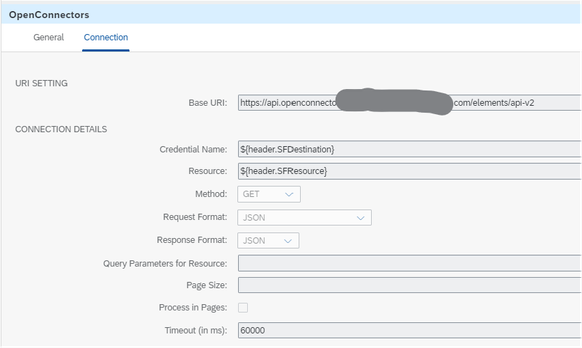
Create a simple iFlow with a request-response adapter which uses the Open Connectors as a protocol. The URL of the Open Connector instance as well as the name of the user credentials you created in step 2 are needed to configure the protocol details.
Fig.4 Open Connector protocol configuration in a request reply adapter
The resource is the name of the database table you want to read from. The Credential name is given by the header parameter SFDestination in this example. All these values can be configured as global properties. It is possible to pass on the column names, page size or where condition to this request as a parameter. When none of these are given, then the whole table is read.
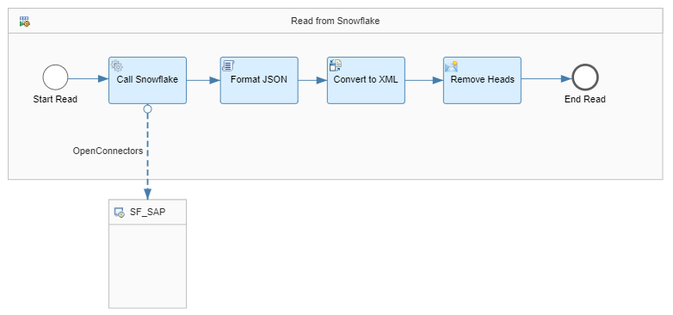
Fig. 5 Simple local process to read data from Snowflake.
The response of this request is a JSON output. If there are more records in that, then it is an array of JSON objects. These objects do not have a root attribute. We just use a simple script with JSON Slurper to add a root attribute to the incoming JSON payload. This is then converted to XML format and then the header is removed using the XML modifier adapter. Once this payload is in XML format, we use a XSLT mapper to translate the JSON keys to column names for storing key figures. Once this is done, the payload is stored in a message property to be used later.
Writing to IBP
Data is written to IBP in an asynchronous manner. Writing data to IBP is done in three steps. Here is a screen shot of the local processes which use the helper iFlows via the process direct connection.
Fig. 6 Asynchronous writing to SAP IBP using helper iFlows.
If we have a large volume of data to be written to IBP, we can do this in multiple batches. For this method, first a batch ID is created to reference the multiple POST requests to write data. This step calls the helper iFlow process direct - SAP_IBP_Write_-_Create_Batches. The XML payload to create a batch ID is as follows:
<?xml version="1.0" encoding="UTF-8" standalone="no"?>
  <IBPWriteBatches>
    <IBPWriteBatch  Key="ConsensusDemand" Name="Snowflake Planning Data"
Destination="${header.IBPDestination}"
Command="INSERT_UPDATE"
PlanningArea="${header.IBPPlanningArea}"
PlanningAreaVersion=""/>
</IBPWriteBatches>

<!--
Key = a hard coded string for your reference. Can also be used to differentiate two writes in a batch with unique values.
Destination = name of the IBP Destination configured in the BTP Sub account – destination service
Planning Area = Target planning are in the IBP instance.
 -->
The response of this payload from the backend would be either the echo of the UUID that was sent or a UUID generated by the backend. Using this UUID, we write data in batches with the below XML payload:
<multimap:Messages>
<multimap:Message1>
    <IBPWriteKeyFigures>
         <xsl:attribute name="FieldList"><xsl:value-of select="$IBPFields"></xsl:value-of></xsl:attribute>
         <xsl:attribute name="BatchKey"><xsl:value-of select="$IBPGuid"/></xsl:attribute>
          <xsl:attribute name="FileName">SnowflakeDataLoad</xsl:attribute>
          <xsl:variable name="InputPayload" select="parse-xml($SFPayload)"/>

<!—Here are the rows formed from each JSON object from a Snowflake table row  -->

          <xsl:for-each select="$InputPayload/Snowflake/values">
            <item>
              <PRDID><xsl:value-of select="./PRODUCT"></xsl:value-of></PRDID>
              <LOCID><xsl:value-of select="./LOCATION"></xsl:value-of></LOCID>
              <CUSTID><xsl:value-of select="./CUSTOMER"></xsl:value-of></CUSTID>
              <CONSENSUSDEMANDQTY><xsl:value-of select="./CONSDEMAND"></xsl:value-of></CONSENSUSDEMAND>

                   <!-- Exmaple format 2024-02-20T00:00:00 -->
               <KEYFIGUREDATE><xsl:value-of select="./CONSDEMAND"></xsl:value-of></KEYFIGUREDATE>

              </item>
           </xsl:for-each>
       </IBPWriteKeyFigures>
     </multimap:Message1>
</multimap:Messages>
The IBPWriteKeyFigures XML element contains three main attributes:
- Field list – these are the names of the fields which you want to write to IBP. Usually it is a combination of the key figure, its root attributes and the time stamp.
- Batch key – the UUID which we got from our previous step.
- File Name – referred to as the envelop for packing this data. It can be referred later. It can be defined by your use case – just a name for the envelop.
The for-each loop that you see in the middle is used to iterate thru the rows from the Snowflake database table. This loop then creates the ITEM compound element which contains the key figure values, its corresponding root attributes, and the time stamp.
The multimap envelop is considered in case you want to run POST threads in parallel. This step calls the helper iFlow process direct - SAP_IBP_Write_-_Post_Data. Once all data is posted to the backend, the post processing step is call. The help iFlow process direct connection for this is:- SAP_IBP_Write_-_Process_Posted_Data. We do not need to pass any parameters as the UUID for the entire batch post operation is stored in the internal global parameter and used by this local process in the helper iFlow. The iFlow would wait till the post processing steps are completed. If there are any error at that stage – an exception is raised. If there are no errors, then an XML message like the following structure is sent as a response:-
<Files>
<File Count="2"
                  Name="SnowflakeDataLoad"
                  PlanningArea="XPACNT2305"
                  Status="PROCESSED"
                  TypeOfData="Key Figure Data"/>
         </Files>
         <Messages/>
         <ScheduleResponse>
            <Status>OK</Status>
            <Messages/>
         </ScheduleResponse>
      </IBPWriteBatch>
This XML response tells that the file SnowflakeDataLoad was processed successfully in the backend for the planning area XPACNT2305. It contains Key figure data and the response from the backend was OK.
Conclusion
In this blog, I shared a few details on how I
- Configured the Snowflake adapter instance using the SAP Open Connectors platform.
- Reading data from Snowflake using the SAP Cloud Integration
- Writing to SAP IBP using WS-RFC adapter – which is wrapped in the helper iFlows which are part of the 2402 release of SAP IBP.
In the next blog, I would explain more about how we could read data from SAP IBP and write this data to Snowflake via a staging mechanism defined by Snowflake.
- SAP Managed Tags:
- SAP Integrated Business Planning for Supply Chain,
- SAP Integration Suite,
- Cloud Integration
You must be a registered user to add a comment. If you've already registered, sign in. Otherwise, register and sign in.
-
Business Trends
169 -
Business Trends
24 -
Catalog Enablement
1 -
Event Information
47 -
Event Information
4 -
Expert Insights
12 -
Expert Insights
39 -
intelligent asset management
1 -
Life at SAP
63 -
Product Updates
500 -
Product Updates
66 -
Release Announcement
1 -
SAP Digital Manufacturing for execution
1 -
Super Bowl
1 -
Supply Chain
1 -
Sustainability
1 -
Swifties
1 -
Technology Updates
187 -
Technology Updates
17
- SAP Business Network for Logistics 2404 Release – What’s New? in Supply Chain Management Blogs by SAP
- SAP IBP Real-Time Integration: Empowering Businesses for Smarter, Faster Decisions in Supply Chain Management Blogs by SAP
- “Mind the Gap” – Improves ROI, Cost & Margin by Merging Planning Processes in Supply Chain Management Blogs by SAP
- RISE with SAP Advanced Logistics Package in Supply Chain Management Blogs by SAP
- SAP Field Logistics: Centralized Supplier Item Repository for an Optimized Rental Process in Supply Chain Management Blogs by SAP
| User | Count |
|---|---|
| 8 | |
| 7 | |
| 6 | |
| 4 | |
| 4 | |
| 4 | |
| 3 | |
| 3 | |
| 3 | |
| 3 |


