
- SAP Community
- Products and Technology
- Supply Chain Management
- SCM Blogs by Members
- 2 Step Stock Transfer in EWM Kanban
Supply Chain Management Blogs by Members
Learn about SAP SCM software from firsthand experiences of community members. Share your own post and join the conversation about supply chain management.
Turn on suggestions
Auto-suggest helps you quickly narrow down your search results by suggesting possible matches as you type.
Showing results for
prasan_desi
Participant
Options
- Subscribe to RSS Feed
- Mark as New
- Mark as Read
- Bookmark
- Subscribe
- Printer Friendly Page
- Report Inappropriate Content
08-24-2023
9:43 PM
It is always true that, when observed, the overall solution and the concepts used in all Warehouses will be the same. But there are always variations in which the process executed on the Warehouse floor. It is one such variation that I would like to share in this blog.
Through this blog, one will be able to understand the below:
This blog is with the assumption that you have setup the Warehouse to function already. Steps below will be concentrated only towards Kanban process related setup.
Note – In my process, both the Source and Destination Slocs are EWM managed.
Process Flow that will be explained in this blog:
Step – 1: I have configured the 2 step Kanban Process using the “Delivery Option”. There is a new method that SAP has introduced, not long back, using Warehouse Task. The use of this method, technically called as the Control Type, is defined in the below configuration node.
As noticed in the screenshot above, the Control Type – 7 is used. Type – 8 can be used for Warehouse Task Option (I haven’t tried that option though, yet). Movement Type is 313, which is triggered during the Step – 1 of the 2-Step Kanban Cycle. Now comes the question on the 2nd Step and defining that in our configuration.
Step – 2: The system is now informed of the Movement Types and the ERP Document Type to be used for Outbound and Inbound Deliveries.
Step – 3: This is where the little deviation that I had to do in specific for my client. I had to auto create the WT at both Inbound and Outbound automatically including the auto post of GR and GI. This is in conflict to the other configuration in place for the regular Vendor GR and Customer GI, which will use the same Document Type in ERP and EWM.
This made it difficult for me to play around with PPF to automate WT/ GR and GI creations only for Kanban and to leave out other GR and GI processes for manual execution by the Warehouse Operator.
This left me with no option but to use a different Document Type in both ERP and in EWM. I had an unused Document Type that I havent used in any of my processes - HID and HOD.
Also, in the EWM side, I had 2 Standard Document Types that I haven’t used for any of my other processes, which is IPS and OUTS.
Respective configurations for HID/ HOD and its link with EWM Document Types are as below:
SCM Extended Warehouse Management --> Interfaces --> ERP Integration --> Delivery Processing --> Map Document Types from ERP System to EWM
SCM EWM --> Interfaces --> ERP Integration --> Delivery Processing --> Map Item Types from ERP System to EWM
Standard EWM Document Types used are shown below. I havent changed anything other than its description and hence I don’t see a need to show the details inside the Document Types.
SCM Extended Warehouse Management --> Goods Receipt Process --> Inbound Delivery --> Define Document Types for Inbound Delivery Process
SCM Extended Warehouse Management --> Goods Issue Process --> Outbound Delivery --> Define Document Types for Outbound Delivery Process
Step – 4: All the configuration that is done till now will manage the IBD and OBD creation separately but the trigger of IBD once the GI is done is for OBD is not managed yet. For this we will have to activate a Workflow in the system. Below are the details.
T-Code: SWE2
Above are the configurations needed to be in place for Kanban to work. When the Kanban Control Cycle is setup, one will have to maintain the Container Qty that needs refilling by the WH Operator.
When the Container is marked as Empty, WT is generated for the Container Qty as in the Control Cycle.
In an ideal world, it will work when the stock is present in the source bin, but this is not always the case in the real world. If the stock is less than the Container Qty in the source Storage Bin, the WT will be created for the Qty that is available. When this is the case, GI cannot be posted as the pick Qty is less than the OBD Qty.
Hence, we will have to use the concept called “Pick Denial”. When the WT creation Qty is less than the Available Qty, the Pick Denial which was set during WT creation is triggered. This will reduce the OBD Qty in EWM and in ERP to the WT Qty. This will now allow auto GI in hence the 2nd Step of Kanban is continued.
When the above is configured, it will allow the WH Operator to continue with his pick Qty and the Production will not have to stop their process due to stock non availability.
Step – 5: Below are the steps to configure Pick Denial
SCM Extended Warehouse Management --> Goods Issue Process --> Pick Denial --> Activate Pick Denial at Warehouse Number Level
SCM Extended Warehouse Management --> Goods Issue Process --> Pick Denial --> Specify Pick Denial at Warehouse Process Type Level
Activate this for the WPT that you are planning to use for Kanban Goods Issue.
SCM Extended Warehouse Management --> Goods Issue Process --> Pick Denial à Assign Internal Exception Codes to Exception Codes
Cross verify the configurations of Exception Code PD01 assignment to your Warehouse along with the below values (though should be present by default).
Now, in the WF above, SAP has provided it to work as a Dialog Step. So once the WT is created with less Qty, this WF will be triggered in the backend but will NOT get completed unless there is some manual intervention, which will NOT happen. Hence the WF needs to be updated as below.
Once all the above configurations are done, you will be able to complete the 2 Step Kanban Pick Cycle with Pick Denial.
Process Steps:
As mentioned above on the assumption that the Warehouse is already setup to work, I will NOT be showing the Master Data used other than that is in specific for Kanban.
Kanban Control Cycle:
Once the Control Cycle is setup and the Kanban Board is updated with status as WAIT for the Container. Based on Status configuration, the status sequence may vary. Am going with the standard flow here, where the status will change from WAIT --> EMPTY --> IN TRANSIT --> FULL. If it’s a 1 step Kanban, IN TRANSIT status will be skipped.
Let’s work with Container 32.
Step – 1:
Mark the Bin as Empty either using the App – Set Kanban Container Status (Can be used in any supported HHD) or using the Transaction PK13N, if executed using desktop or tab. As an alternative, if your Warehouse uses RFUI application, you can try mapping the standard program provided by SAP for Container Status Change – TCODE: PKRFBC.
The behaviour is however the same way whichever way you choose to perform the action.
The Kanban Container once marked Empty, an OBD is generated automatically to pick the items. Since I have used a different OBD Doc Type along with a WPT that is specifically configured for this, I have maintained PPF condition to generate WT at once it gets distributed.
As noticed above, OBD is now created for the 2 Qty as mentioned in the Control Cycle. However, I currently hold only 1 Qty as stock in the Warehouse. Since I have also configured Pick Denial, WT would have been created for 1 Qty and the OBD in EWM and ERP is should also be reduced to 1 Qty. Can be noticed in the screenshots below:
EWM OBD:
ERP OBD:
WF triggered:
PPFs triggered:
Once the Pick is confirmed and the GI posted (via PPF trigger as the WH Operator cannot come to the PC to do a PGI for this OBD, all should happen either on the WH Floor or automatically), the Container status will now turn to IN TRANSIT and an IBD is created automatically to place the item in the PSA.
Once the above WT is confirmed, the stock is placed in the PSA and the status of the Container is changed to FULL automatically.
References:
https://help.sap.com/docs/SAP_S4HANA_ON-PREMISE/49d0972a760b4646918ce9fddb034d64/bfd0f863bb1c4598a26...
https://help.sap.com/docs/SAP_S4HANA_ON-PREMISE/49d0972a760b4646918ce9fddb034d64/e75ebd534f22b44ce10...
https://help.sap.com/docs/SAP_S4HANA_ON-PREMISE/2d95c3180a974e0aad07556ee4d28e94/a6a50a0b6aa54e338ba...
Appreciate feedback and happy to correct.
Thanks,
Prasan
Through this blog, one will be able to understand the below:
- 2 Steps Stock Transfer in EWM Kanban– Configuration Steps and Execution
- The need for a New Document Type and New WPT
- Partial Pick during Kanban
This blog is with the assumption that you have setup the Warehouse to function already. Steps below will be concentrated only towards Kanban process related setup.
Note – In my process, both the Source and Destination Slocs are EWM managed.
Process Flow that will be explained in this blog:

Overall Process
Step – 1: I have configured the 2 step Kanban Process using the “Delivery Option”. There is a new method that SAP has introduced, not long back, using Warehouse Task. The use of this method, technically called as the Control Type, is defined in the below configuration node.

Control Type Menu Path

Control Type Config
As noticed in the screenshot above, the Control Type – 7 is used. Type – 8 can be used for Warehouse Task Option (I haven’t tried that option though, yet). Movement Type is 313, which is triggered during the Step – 1 of the 2-Step Kanban Cycle. Now comes the question on the 2nd Step and defining that in our configuration.
Step – 2: The system is now informed of the Movement Types and the ERP Document Type to be used for Outbound and Inbound Deliveries.

Delivery Type Determination

Delivery Type Determination Config
Step – 3: This is where the little deviation that I had to do in specific for my client. I had to auto create the WT at both Inbound and Outbound automatically including the auto post of GR and GI. This is in conflict to the other configuration in place for the regular Vendor GR and Customer GI, which will use the same Document Type in ERP and EWM.
This made it difficult for me to play around with PPF to automate WT/ GR and GI creations only for Kanban and to leave out other GR and GI processes for manual execution by the Warehouse Operator.
This left me with no option but to use a different Document Type in both ERP and in EWM. I had an unused Document Type that I havent used in any of my processes - HID and HOD.
Also, in the EWM side, I had 2 Standard Document Types that I haven’t used for any of my other processes, which is IPS and OUTS.
Respective configurations for HID/ HOD and its link with EWM Document Types are as below:
SCM Extended Warehouse Management --> Interfaces --> ERP Integration --> Delivery Processing --> Map Document Types from ERP System to EWM

Doc Type Mapping
SCM EWM --> Interfaces --> ERP Integration --> Delivery Processing --> Map Item Types from ERP System to EWM

Item Type Mapping
Standard EWM Document Types used are shown below. I havent changed anything other than its description and hence I don’t see a need to show the details inside the Document Types.
SCM Extended Warehouse Management --> Goods Receipt Process --> Inbound Delivery --> Define Document Types for Inbound Delivery Process

Defining Doc Types for IBD
SCM Extended Warehouse Management --> Goods Issue Process --> Outbound Delivery --> Define Document Types for Outbound Delivery Process

Defining Doc Types for OBD
Step – 4: All the configuration that is done till now will manage the IBD and OBD creation separately but the trigger of IBD once the GI is done is for OBD is not managed yet. For this we will have to activate a Workflow in the system. Below are the details.
T-Code: SWE2

IBD Creation WF
Above are the configurations needed to be in place for Kanban to work. When the Kanban Control Cycle is setup, one will have to maintain the Container Qty that needs refilling by the WH Operator.
When the Container is marked as Empty, WT is generated for the Container Qty as in the Control Cycle.
In an ideal world, it will work when the stock is present in the source bin, but this is not always the case in the real world. If the stock is less than the Container Qty in the source Storage Bin, the WT will be created for the Qty that is available. When this is the case, GI cannot be posted as the pick Qty is less than the OBD Qty.
Hence, we will have to use the concept called “Pick Denial”. When the WT creation Qty is less than the Available Qty, the Pick Denial which was set during WT creation is triggered. This will reduce the OBD Qty in EWM and in ERP to the WT Qty. This will now allow auto GI in hence the 2nd Step of Kanban is continued.
When the above is configured, it will allow the WH Operator to continue with his pick Qty and the Production will not have to stop their process due to stock non availability.
Step – 5: Below are the steps to configure Pick Denial
SCM Extended Warehouse Management --> Goods Issue Process --> Pick Denial --> Activate Pick Denial at Warehouse Number Level

Pick Denial Activation at WH Level
SCM Extended Warehouse Management --> Goods Issue Process --> Pick Denial --> Specify Pick Denial at Warehouse Process Type Level
Activate this for the WPT that you are planning to use for Kanban Goods Issue.

Pick Denial Activation at WPT Level
SCM Extended Warehouse Management --> Goods Issue Process --> Pick Denial à Assign Internal Exception Codes to Exception Codes

Assigning Internal Exception Codes
Cross verify the configurations of Exception Code PD01 assignment to your Warehouse along with the below values (though should be present by default).

Exception Code Check 1
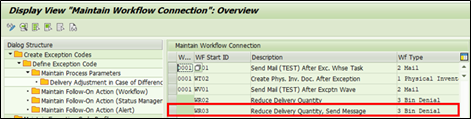
Exception Code Check 2

Exception Code Check 3
Now, in the WF above, SAP has provided it to work as a Dialog Step. So once the WT is created with less Qty, this WF will be triggered in the backend but will NOT get completed unless there is some manual intervention, which will NOT happen. Hence the WF needs to be updated as below.

WF Automation
Once all the above configurations are done, you will be able to complete the 2 Step Kanban Pick Cycle with Pick Denial.
Process Steps:
As mentioned above on the assumption that the Warehouse is already setup to work, I will NOT be showing the Master Data used other than that is in specific for Kanban.
Kanban Control Cycle:

Kanban Control Cycle
Once the Control Cycle is setup and the Kanban Board is updated with status as WAIT for the Container. Based on Status configuration, the status sequence may vary. Am going with the standard flow here, where the status will change from WAIT --> EMPTY --> IN TRANSIT --> FULL. If it’s a 1 step Kanban, IN TRANSIT status will be skipped.

Kanban Board
Let’s work with Container 32.
Step – 1:
Mark the Bin as Empty either using the App – Set Kanban Container Status (Can be used in any supported HHD) or using the Transaction PK13N, if executed using desktop or tab. As an alternative, if your Warehouse uses RFUI application, you can try mapping the standard program provided by SAP for Container Status Change – TCODE: PKRFBC.
The behaviour is however the same way whichever way you choose to perform the action.
The Kanban Container once marked Empty, an OBD is generated automatically to pick the items. Since I have used a different OBD Doc Type along with a WPT that is specifically configured for this, I have maintained PPF condition to generate WT at once it gets distributed.

Kanban Container Info
As noticed above, OBD is now created for the 2 Qty as mentioned in the Control Cycle. However, I currently hold only 1 Qty as stock in the Warehouse. Since I have also configured Pick Denial, WT would have been created for 1 Qty and the OBD in EWM and ERP is should also be reduced to 1 Qty. Can be noticed in the screenshots below:
EWM OBD:
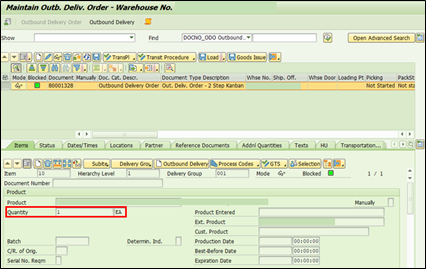
EWM OBD
ERP OBD:

ERP OBD
WF triggered:

Pick Denial WF Trigger
PPFs triggered:

PPFs Triggered
Once the Pick is confirmed and the GI posted (via PPF trigger as the WH Operator cannot come to the PC to do a PGI for this OBD, all should happen either on the WH Floor or automatically), the Container status will now turn to IN TRANSIT and an IBD is created automatically to place the item in the PSA.
![]()
In Transit Status

IBD Doc Number in Container Info

WT Info
Once the above WT is confirmed, the stock is placed in the PSA and the status of the Container is changed to FULL automatically.

FULL Status
References:
https://help.sap.com/docs/SAP_S4HANA_ON-PREMISE/49d0972a760b4646918ce9fddb034d64/bfd0f863bb1c4598a26...
https://help.sap.com/docs/SAP_S4HANA_ON-PREMISE/49d0972a760b4646918ce9fddb034d64/e75ebd534f22b44ce10...
https://help.sap.com/docs/SAP_S4HANA_ON-PREMISE/2d95c3180a974e0aad07556ee4d28e94/a6a50a0b6aa54e338ba...
Appreciate feedback and happy to correct.
Thanks,
Prasan
1 Comment
You must be a registered user to add a comment. If you've already registered, sign in. Otherwise, register and sign in.
Labels in this area
-
aATP
1 -
ABAP Programming
1 -
Activate Credit Management Basic Steps
1 -
Adverse media monitoring
1 -
Alerts
1 -
Ausnahmehandling
1 -
bank statements
1 -
Bin Sorting sequence deletion
1 -
Bin Sorting upload
1 -
BP NUMBER RANGE
1 -
Brazil
1 -
Business partner creation failed for organizational unit
1 -
Business Technology Platform
1 -
Central Purchasing
1 -
Change History
1 -
Charge Calculation
2 -
Cloud Extensibility
1 -
Compliance
1 -
Controlling
1 -
Controlling Area
1 -
Data Enrichment
1 -
DIGITAL MANUFACTURING
1 -
digital transformation
1 -
Dimensional Weight
1 -
Direct Outbound Delivery
1 -
E-Mail
1 -
ETA
1 -
EWM
6 -
EWM - Delivery Processing
2 -
EWM - Goods Movement
4 -
EWM Monitor
1 -
EWM Outbound configuration
1 -
EWM-RF
1 -
EWM-TM-Integration
1 -
Extended Warehouse Management (EWM)
3 -
Extended Warehouse Management(EWM)
7 -
Finance
1 -
Freight Settlement
1 -
FUB_Strategy
1 -
FUBR
1 -
Geo-coordinates
1 -
Geo-routing
1 -
Geocoding
1 -
Geographic Information System
1 -
GIS
1 -
Goods Issue
2 -
GTT
2 -
IBP inventory optimization
1 -
inbound delivery printing
1 -
Incoterm
1 -
Innovation
1 -
Inspection lot
1 -
intraday
1 -
Introduction
1 -
Inventory Management
1 -
Localization
1 -
Logistics Optimization
1 -
Map Integration
1 -
Material Management
1 -
Material Master changes
1 -
Materials Management
1 -
MFS
1 -
New Feature
1 -
Outbound with LOSC and POSC
1 -
Packaging
1 -
PPF
1 -
PPOCE
1 -
PPOME
1 -
print profile
1 -
Process Controllers
1 -
Production process
1 -
QM
1 -
QM in procurement
1 -
Real-time Geopositioning
1 -
Risk management
1 -
S4 HANA
1 -
S4 HANA 2022
1 -
S4-FSCM-Custom Credit Check Rule and Custom Credit Check Step
1 -
S4SCSD
1 -
Sales and Distribution
1 -
SAP DMC
1 -
SAP ERP
1 -
SAP Extended Warehouse Management
2 -
SAP Hana Spatial Services
1 -
SAP IBP IO
1 -
SAP MM
1 -
sap production planning
1 -
SAP QM
1 -
SAP REM
1 -
SAP repetiative
1 -
SAP S4HANA
1 -
SAP TM
1 -
SAP Transportation Management
3 -
SAP Variant configuration (LO-VC)
1 -
SAPTM
1 -
SD (Sales and Distribution)
1 -
Shotcut_Scenario
1 -
Source inspection
1 -
Storage bin Capacity
1 -
Supply Chain
1 -
Supply Chain Disruption
1 -
Supply Chain for Secondary Distribution
1 -
Technology Updates
1 -
TMS
1 -
Transportation Cockpit
1 -
Transportation Management
2 -
Visibility
2 -
warehouse door
1 -
WOCR
1
- « Previous
- Next »
Related Content
- EWM posting change with a EWM-WCU connected system leads to stock balance discrepancies in Supply Chain Management Q&A
- How to Mass Upload Stock Transfer Order in Supply Chain Management Q&A
- SAP IBP Real-Time Integration: Empowering Businesses for Smarter, Faster Decisions in Supply Chain Management Blogs by SAP
- MIGO transaction transfer plant to plant movement type 301 in Supply Chain Management Q&A
- Practical Insights into New Features of SAP EWM in S/4HANA 2023 in Supply Chain Management Blogs by Members
Top kudoed authors
| User | Count |
|---|---|
| 9 | |
| 5 | |
| 4 | |
| 3 | |
| 1 | |
| 1 | |
| 1 | |
| 1 | |
| 1 | |
| 1 |