
- SAP Community
- Products and Technology
- Spend Management
- Spend Management Blogs by SAP
- SAP Fiori Application To Display SAP Ariba Requisi...
Spend Management Blogs by SAP
Stay current on SAP Ariba for direct and indirect spend, SAP Fieldglass for workforce management, and SAP Concur for travel and expense with blog posts by SAP.
Turn on suggestions
Auto-suggest helps you quickly narrow down your search results by suggesting possible matches as you type.
Showing results for
former_member68
Participant
Options
- Subscribe to RSS Feed
- Mark as New
- Mark as Read
- Bookmark
- Subscribe
- Printer Friendly Page
- Report Inappropriate Content
09-10-2022
3:12 AM
This is part 5 of the 6 series blog. Please start with Part 1: Introduction to understand the Use case, Solution Architecture, High-Level functionality, and context of this blog series.
This blog series is divided into 6 parts:
Part 1: Introduction
Part 2: SAP Ariba – API Setup
Part 3: SAP Integration Suite – Integration Flows Build
Part 4: Ariba Requisitions Service Application
Part 5: Ariba Requisitions Fiori Application
Part 6: Central Fiori Launchpad Setup
Note: Fiori application built in this blog is ArbaReqsFA4-router. It is the same as the Ariba Requisitions Fiori Application depicted in the architecture diagram.
On SAP Business Application Studio,
On the Command finder, type Fiori: Open CF Application Router Generator and Click on enter to display the Application Router Generator screen.
On the Application Router Generator screen, provide values as specified in the below tables and Click on Finish.
Note: ArbaReqsFA4 appears in the Projects pane. Wait for the notification The files has been generated appears at the right bottom of the screen.
On SAP Business Application Studio,
On the Command finder, type SAP Business Application Studio: New Project from Template and Click on enter to display New Project From Template screen.
On New Project From Template Screen,
On the Floorplan Selection screen, provide values as specified in the below tables and Click on Next.
On Data Source and Service Selection screen, provide values as specified in the below tables and Click on Next.
On the Entity Selection screen, provide values as specified in the below tables and click on Next.
On the Project Attributes screen, provide values as specified in the below tables and click on Next.
On the Deployment Configuration screen, provide values as specified in the below tables and click on Next.
On the Fiori Launchpad Configuration screen, provide values as specified in the below tables and click on Finish.
Note: Wait until dependencies are generated and a message The project has been generated appears at the right bottom of the screen.
In SAP Business Application Studio, perform the below steps in same sequenece.
On Layout Editor, perform the below steps in the same sequence
On Explorer --> Projects pane,
On Explorer --> Projects pane,
At this point, the SAP Ariba Requisitions Fiori is deployed as an application in your BTP SubAccount --> Space with the name ArbaReqsFA4-router.
Go to the SubAccount and then to the Space where you deployed the ArbaReqsFA4-router application.
On ArbaReqsFA4-router – Overview screen,
You should see a new browser window with contents as below.
Part 6: Central Fiori Launchpad Setup
This blog series is divided into 6 parts:
Part 1: Introduction
Part 2: SAP Ariba – API Setup
Part 3: SAP Integration Suite – Integration Flows Build
Part 4: Ariba Requisitions Service Application
Part 5: Ariba Requisitions Fiori Application
Part 6: Central Fiori Launchpad Setup
Part 5: Ariba Requisitions Fiori Application
Note: Fiori application built in this blog is ArbaReqsFA4-router. It is the same as the Ariba Requisitions Fiori Application depicted in the architecture diagram.
Build Ariba Requisitions Fiori Application (ArbaReqsFA4-router) Using SAP Business Application Studio
Create Multitarget Application Project
On SAP Business Application Studio,
- Click on the View menu
- Select Find Command… to bring up the command finder.

Picture 48
On the Command finder, type Fiori: Open CF Application Router Generator and Click on enter to display the Application Router Generator screen.

Picture 49
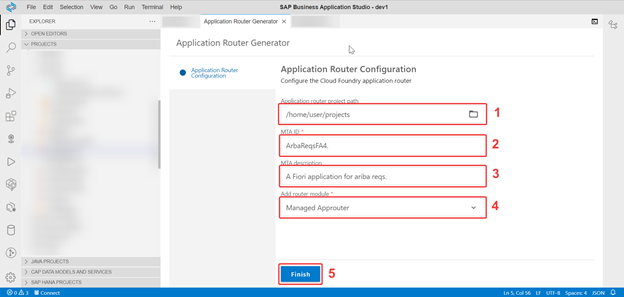
On the Application Router Generator screen, provide values as specified in the below tables and Click on Finish.
| Step | Field Name | Value |
| 1 | Application router project path | Leave the default value as shown |
| 2 | MTA ID | ArbaReqFA4 |
| 3 | MTA description | A Fiori application for ariba reqs. |
| 4 | Add router module | Managed Approuter |
| 5 | Finish | Click on Finish button |
Picture 50
Note: ArbaReqsFA4 appears in the Projects pane. Wait for the notification The files has been generated appears at the right bottom of the screen.
Generate SAPUI5 Template-Based Application
On SAP Business Application Studio,
- Click on the View menu.
- Select Find Command… to bring up the command finder.

Picture 51
On the Command finder, type SAP Business Application Studio: New Project from Template and Click on enter to display New Project From Template screen.
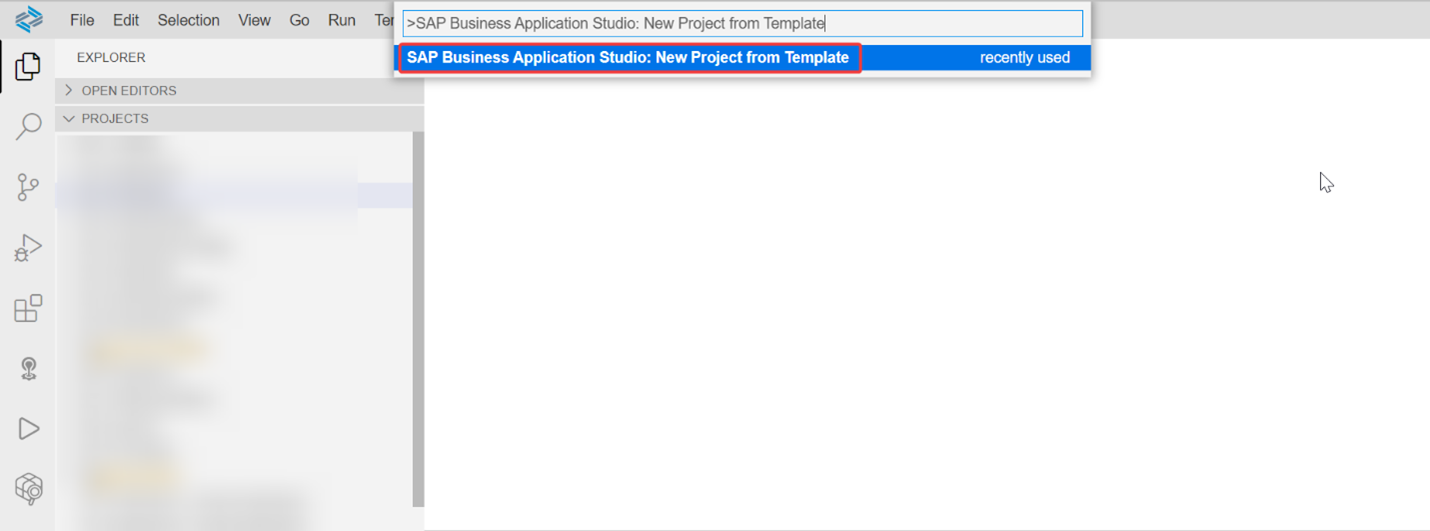
Picture 52
On New Project From Template Screen,
- Select SAP Fiori application
- Click on Start to go to the Floorplan Selection screen
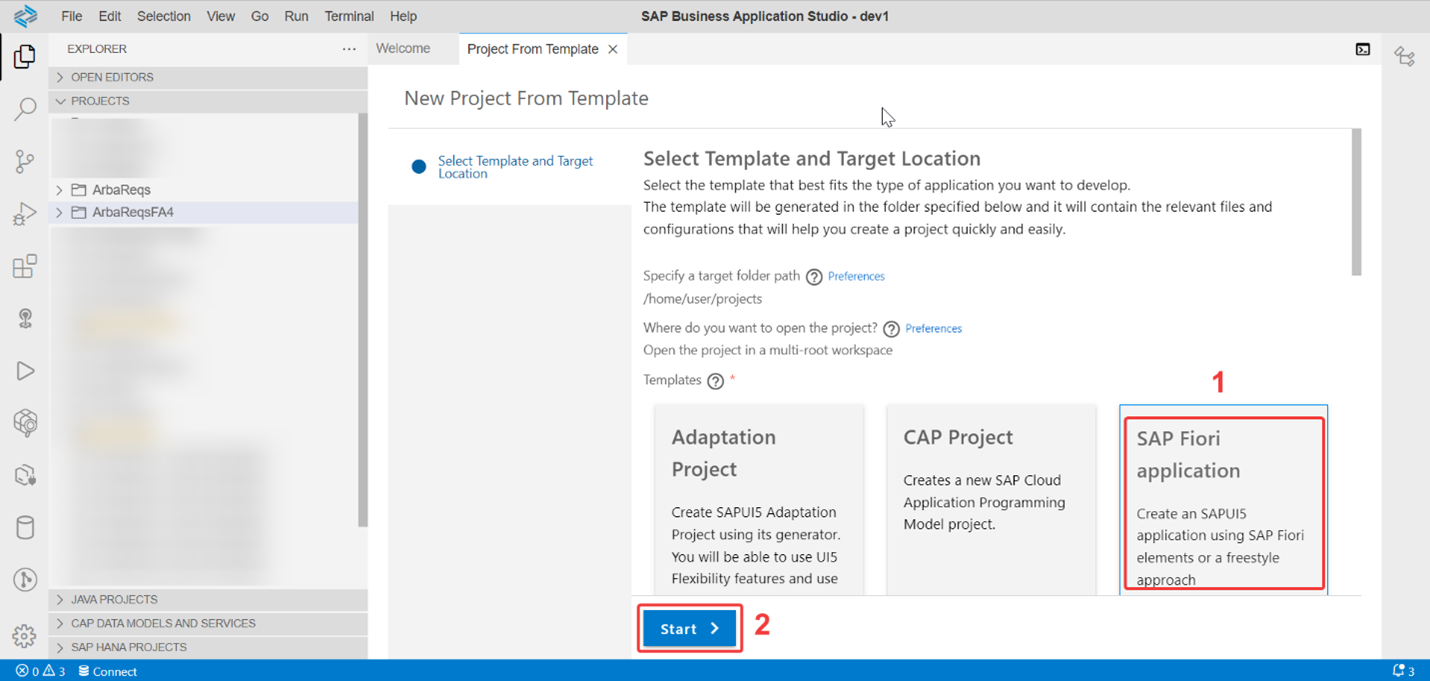
Picture 53
On the Floorplan Selection screen, provide values as specified in the below tables and Click on Next.
| Field Name | Value |
| Application Type | SAPUI5 freestyle |
| Which floorplan do you want to use? | SAPUI5 Application |
| Next | Click on Next button to display Data Source and Service Selection screen |

Picture 54
On Data Source and Service Selection screen, provide values as specified in the below tables and Click on Next.
| Step | Field Name | Value |
| 1 | Data Source | Connect to an OData Service |
| 2 | OData service URL | This is the URL of the BTP Service you deployed in BTP Service section. https://<your value>-dev-arbareqs-srv.cfapps.us10.hana.ondemand.com/v2/catalog Note: URL without the entity. |
| 3 | Next | Click on Next button to display Entity Selection screen |

Picture 55
On the Entity Selection screen, provide values as specified in the below tables and click on Next.
| Step | Field Name | Value |
| 1 | View Name | arbarequisitions |
| 2 | Next | Click on the Next button to display the Project Attributes screen |

Picture 56
On the Project Attributes screen, provide values as specified in the below tables and click on Next.
| Step | Field Name | Value |
| 1 | Module Name | arbarequisitions |
| 2 | Application Title | Ariba Requisitions |
| 3 | Description | A Fiori app for ariba reqs |
| 4 | Project folder path | /home/user/projects/ArbaReqsFA4 Note: This is the path to the ArbaReqsFA4 application router project created in the previous section |
| 5 | Add deployment configuration to MTA project | Yes |
| 6 | Add FLP configuration | Yes |
| 7 | Configure advanced options | No |
| 8 | Next | Click on the Next button to display the Deployment Configuration screen |

Picture 57
On the Deployment Configuration screen, provide values as specified in the below tables and click on Next.
| Step | Field Name | Value |
| 1 | Please choose the target | Cloud Foundry |
| 2 | Destination Name | CAPArbaReqsDest Note: This is the destination created earlier in the BTP Destination section |
| 3 | Next | Click on the Next button to display the Fiori Launchpad Configuration screen |

Picture 58
On the Fiori Launchpad Configuration screen, provide values as specified in the below tables and click on Finish.
| Step | Field Name | Value |
| 1 | Semantic Object | Object |
| 2 | Action | display |
| 3 | Title | Ariba Requisitions |
| 4 | Next | Click on the Finish button to generate the Fiori project files in the ArbaReqFA4 directory |

Picture 59
Note: Wait until dependencies are generated and a message The project has been generated appears at the right bottom of the screen.
Layout Editor and UI Changes
In SAP Business Application Studio, perform the below steps in same sequenece.
- In the Projects panel, click on the ArbaReqsFA4 project to display the full project structure.
- Navigate to AribaRequisitions.view.xml file under ArbaReqsFA4 --> arbarequisitions --> webapp --> view directory.
- Right click on the AribaRequisitions.view.xml file
- Select Open With…
- Select Layout Editor
- Displays Layout Editor showing the empty canvas.

Picture 60
On Layout Editor, perform the below steps in the same sequence
- Type "list" and press enter to get search results in the Controls pane.
- Select List from the search results.
- Drag and drop in the AribaRequisitions.view.xml canvas.
- Select Entity Set as /Requisition
- Bind Title to field UniqueName
- Bind Description to field Name

Picture 61
Build and Deploy Ariba Requisitions Fiori Application Using SAP Business Technology Platform
On Explorer --> Projects pane,
- Select the ArbaReqsFA4 project to show the complete structure.
- Right click on mta.yaml file.
- Select Build MTA Project to start the build process. The build process creates a .mtar file that packages the project for deployment. Wait for the build process to complete and show a message saying MTA archive generated.
- ArbaReqsFA4_0.0.1.mtar file is created and saved in ArbaReqsFA4/mta_archives

Picture 62
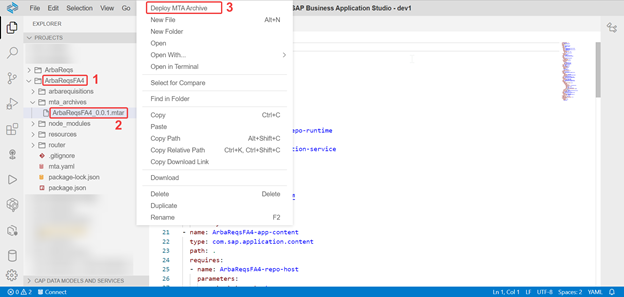
On Explorer --> Projects pane,
- Select the ArbaReqsFA4 project to show the complete project structure.
- Right click on ArbaReqsFA4_0.0.1.mtar file.
- Select Deploy MTA Archive to start the deployment process. Wait for the ‘Process finished’ message to appear in the Task: Deploy MTA Archive panel
At this point, the SAP Ariba Requisitions Fiori is deployed as an application in your BTP SubAccount --> Space with the name ArbaReqsFA4-router.
Picture 63
Testing Ariba Requisitions Fiori Application (ArbaReqsFA4-router)
Go to the SubAccount and then to the Space where you deployed the ArbaReqsFA4-router application.
- Shows the list of all applications deployed to your SubbAccount --> Space
- Click on the ArbaReqsFA4-router to show ArbaReqsFA4-router – Overview screen

Picture 64
On ArbaReqsFA4-router – Overview screen,
- Make sure the application is in Started status. (If not, use the Start button to start the application)
- Click on the Application Route link to open the application in a new browser window.

Picture 65
You should see a new browser window with contents as below.
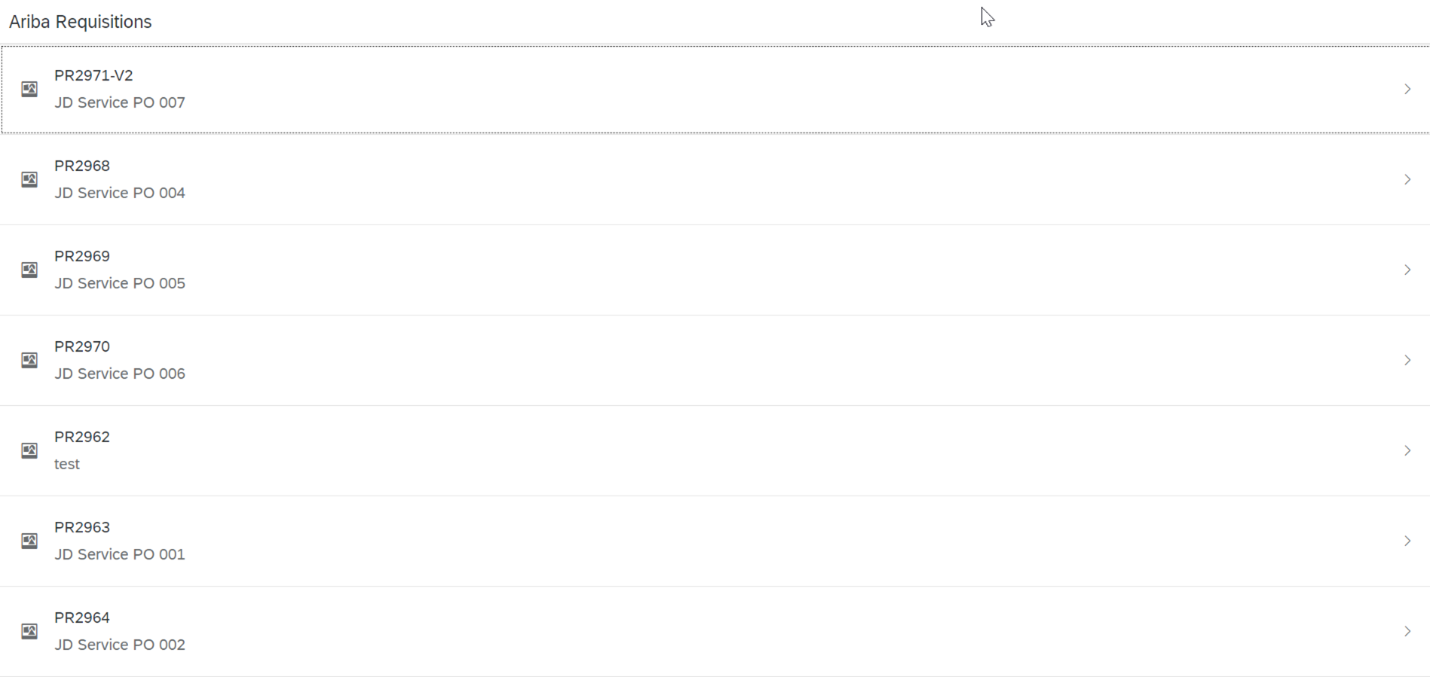
Picture 66
Next In Series
Part 6: Central Fiori Launchpad Setup
Labels:
1 Comment
You must be a registered user to add a comment. If you've already registered, sign in. Otherwise, register and sign in.
Labels in this area
-
Business Trends
113 -
Business Trends
12 -
Event Information
44 -
Event Information
3 -
Expert Insights
18 -
Expert Insights
25 -
Life at SAP
32 -
Product Updates
253 -
Product Updates
27 -
Technology Updates
82 -
Technology Updates
14
Related Content
- SAP Ariba Procure to Order 2405 Release Key Innovations in Spend Management Blogs by SAP
- SAP SRM Technical Scenarios – Decision Matrix (2010 re-print) in Spend Management Blogs by Members
- Is Application.Discovery.Integration.Enabled applicable to only collaborative requisition, non-colla in Spend Management Q&A
- Set up of note panel for Catalog home page in SAP Ariba in Spend Management Blogs by SAP
- User Management and DSC – Tips as Ariba Connect migrates to SAP for Me for SAP Support. in Spend Management Blogs by SAP
Top kudoed authors
| User | Count |
|---|---|
| 2 | |
| 1 | |
| 1 | |
| 1 | |
| 1 | |
| 1 | |
| 1 | |
| 1 | |
| 1 | |
| 1 |