
- SAP Community
- Products and Technology
- Spend Management
- Spend Management Blogs by SAP
- SAP Fiori Application To Display SAP Ariba Requisi...
Spend Management Blogs by SAP
Stay current on SAP Ariba for direct and indirect spend, SAP Fieldglass for workforce management, and SAP Concur for travel and expense with blog posts by SAP.
Turn on suggestions
Auto-suggest helps you quickly narrow down your search results by suggesting possible matches as you type.
Showing results for
former_member68
Participant
Options
- Subscribe to RSS Feed
- Mark as New
- Mark as Read
- Bookmark
- Subscribe
- Printer Friendly Page
- Report Inappropriate Content
09-10-2022
3:10 AM
This is part 3 of the 6 series blog. Please start with Part 1: Introduction to understand the Use case, Solution Architecture, High-Level functionality, and context of this blog series.
This blog series is divided into 6 parts:
Part 1: Introduction
Part 2: SAP Ariba – API Setup
Part 3: SAP Integration Suite – Integration Flows Build
Part 4: Ariba Requisitions Service Application
Part 5: Ariba Requisitions Fiori Application
Part 6: Central Fiori Launchpad Setup
On the Integration Suite Home page, perform the below steps in the same sequence
On SAP Ariba Integration with SAP Ariba APIs page, click on Copy link. Select OK and the package gets copied over to the Design --> Packages section.
On SAP Ariba Integration with SAP Ariba APIs screen:
On Connect SAP Ariba to the SAP Ariba API integration flow screen, click on Configure to display Configure screen.
On Configure “Connect SAP Ariba to the SPA Ariba APIs” screen:
On the More tab, provide values as specified in the below tables and Click on Save.
On Connect SAP Ariba to the SAP Ariba APIs screen, click on the Edit button to activate the edit mode and then perform the below steps in the same sequence.
On SAP Ariba Integration with SAP Ariba APIs screen, select the Artifacts tab and click on Edit.
On Add Integration Flow screen, provide values as specified in the below table and Click on OK.
Select the Get Requisitions artifact to go to Get Requisitons screen where integration flow will be built.
On the Get Requisitions screen, click on the Edit button to activate edit mode and continue the creation of the integration flow.
On Get Requisitions screen,
On the Adapter Type screen, select HTTPS
On the HTTPS property sheet, perform the following:
Leave the rest of the fields with default values.
Connect Request Reply to Receiver and select Adapter Type as ProcessDirect.
On the ProcessDirect property sheet, perform the following:
Leave the rest of the fields with default values.
On XML To JSON Converter property sheet,
Leave the rest of the fields with default values.
Repeat steps 3 and 4 for Get Requisitions artifact to deploy the same.
All the deployed Integrations flows are displayed here along with their Status. Wait till your integration flow changes to Started status.
On BTP Subaccount home screen:
On the Credentials screen, click on the Form tab. Save values in clientid and clientsecret. They will be required later.
Postman is used to test the Get Requisitions integration flow.
Part 4: Ariba Requisitions Service Application
Part 5: Ariba Requisitions Fiori Application
Part 6: Central Fiori Launchpad Setup
This blog series is divided into 6 parts:
Part 1: Introduction
Part 2: SAP Ariba – API Setup
Part 3: SAP Integration Suite – Integration Flows Build
Part 4: Ariba Requisitions Service Application
Part 5: Ariba Requisitions Fiori Application
Part 6: Central Fiori Launchpad Setup
Part 3: SAP Integration Suite – Integration Flows Build
Build Integration Flow for SAP Ariba API
On the Integration Suite Home page, perform the below steps in the same sequence
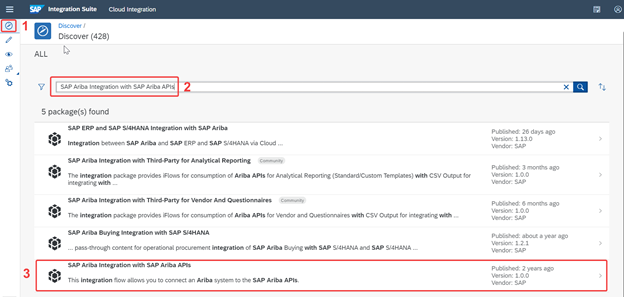
- Click on the Discover icon to display the Discover page
- Type SAP Ariba Integration with SAP Ariba APIs in the Search box and click Enter or on the Search icon.
- Select SAP Ariba Integration with SAP Ariba APIs in search results to display the details page.
Picture 6
On SAP Ariba Integration with SAP Ariba APIs page, click on Copy link. Select OK and the package gets copied over to the Design --> Packages section.

Picture 7
- Click on the Design icon to display the Design screen with the list of all Packages you are working on.
- Select the package you copied in the previous step i.e., SAP Ariba Integration with SAP Ariba APIs to display the details of the package.

Picture 8
On SAP Ariba Integration with SAP Ariba APIs screen:
- Click on the Artifacts tab
- Select Connect SAP Ariba to the SAP Ariba APIs artifact to display the integration flow screen.

Picture 9
On Connect SAP Ariba to the SAP Ariba API integration flow screen, click on Configure to display Configure screen.

Picture 10
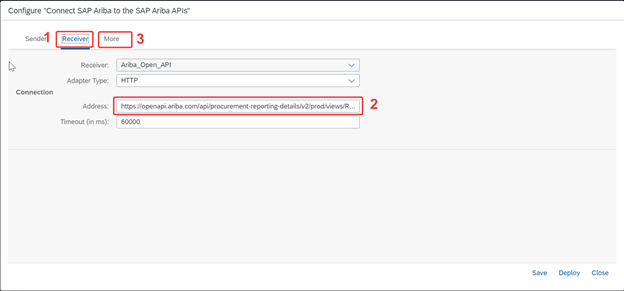
On Configure “Connect SAP Ariba to the SPA Ariba APIs” screen:
- Click on the Receiver tab
- Provide Address as https://openapi.ariba.com/api/procurement-reporting-details/v2/prod/views/KC_GetRequisitions (This is the URL of the Ariba Custom View Template created in <TBD>)
- Click on the More tab
Picture 11
On the More tab, provide values as specified in the below tables and Click on Save.
| Step No. | Field Name | Value |
| 1 | apiKey | You would have got it as part of Pre-requisite steps |
| 2 | Authorization | You would have got it as part of Pre-requisite and used it in Get Bearer Token section |
| 3 | Realm | You would have used it in Create Custom ViewTemplate section |
| 4 | Save | Click on Save button |

Picture 12
On Connect SAP Ariba to the SAP Ariba APIs screen, click on the Edit button to activate the edit mode and then perform the below steps in the same sequence.
- Select the Parameters box in the integration flow.
- On the Content Modifier panel, select the Exchange Property tab.
- Provide the Value as &filters={"createdDateFrom":"2022-05-01T00:00:00Z","createdDateTo":"2022-05-20T00:00:00Z"}
- Filter is hard coded here for prototype purposes. In production scenarios, this should be passed on from the filters of the Ariba Requisitions Fiori application.
- This value is carried on from the previous step where you configured the value for Realm. You don’t need to change the value now.
- Click on Save.

Picture 13
Build Get Requisitions Integration Flow
On SAP Ariba Integration with SAP Ariba APIs screen, select the Artifacts tab and click on Edit.

Picture 14
- Click on Add dropdown
- Select Integration Flow to pop up Add Integration Flow screen

Picture 15
On Add Integration Flow screen, provide values as specified in the below table and Click on OK.
| Step No. | Field Name | Value |
| 1 | Create | Select Create |
| 2 | Name | Get Requisitions |
| 3 | ID | Auto populated |
| 4 | Description | Get Requisitions |
| 5 | OK | Click on the OK button |

Picture 16
Select the Get Requisitions artifact to go to Get Requisitons screen where integration flow will be built.

Picture 17
On the Get Requisitions screen, click on the Edit button to activate edit mode and continue the creation of the integration flow.

Picture 18
On Get Requisitions screen,
- Click on Sender to display the small circles to the right of Sender.
- Click on circle with "-->".
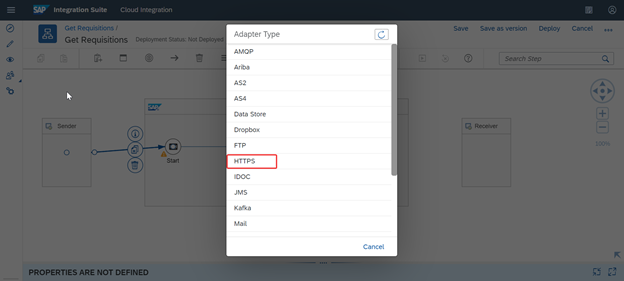
- Drag and drop into Start. Adapter Type screen is displayed.

Picture 19
On the Adapter Type screen, select HTTPS
Picture 20
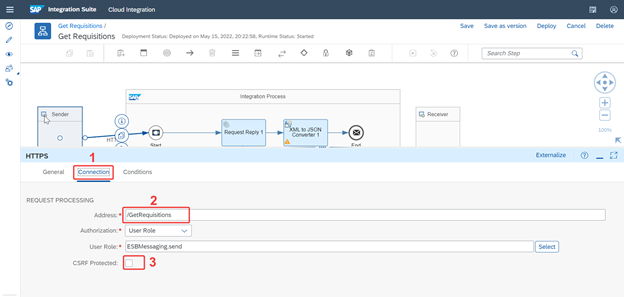
On the HTTPS property sheet, perform the following:
- Click on the Connection tab
- Provide the Address as /GetRequisitions.
- Address should start with a “/”.
- Uncheck CSRF Protected
Leave the rest of the fields with default values.
Picture 21
- On the palette, click on Call
- Select External Call
- Select Request Reply

Picture 22
- On the palette, click on Participant
- Select Receiver

Picture 23
Connect Request Reply to Receiver and select Adapter Type as ProcessDirect.

Picture 24
On the ProcessDirect property sheet, perform the following:
- Click on the Connection tab
- Provide the Address as /Ariba/OpenAPI
Leave the rest of the fields with default values.

Picture 25
- On the palette, click on Message Transformers
- Select Converter
- Select XML to JSON Converter

Picture 26
On XML To JSON Converter property sheet,
- Click on the Processing tab
- Uncheck Suppress JSON Root Element
- Click on Save
- Click on Build and develop Integration Content
Leave the rest of the fields with default values.

Picture 27
Deploy Integration Flows
- On the Design screen, Select SAP Ariba Integration with SAP Ariba APIs package
- Click on the Artifacts tab
- Click on Actions for Connect SAP Ariba to the SAP Ariba APIs artifact
- Select Deploy
Repeat steps 3 and 4 for Get Requisitions artifact to deploy the same.

Picture 28
Get URL and Authentication Details of Integration Flow
- Select Operate and monitor integration scenarios
- Select Manage Integration Content --> All to display Integration Content screen

Picture 29
All the deployed Integrations flows are displayed here along with their Status. Wait till your integration flow changes to Started status.
- Select your integration flow to display its details on the right half of the screen.
- On the Endpoints tab, copy the integration flow full URL and note it down. This will be required later.

Picture 30
On BTP Subaccount home screen:
- Select Instances and Subscriptions
- Select Instances tab
- Click on 1 key link to open the Credentials for integration flows

Picture 31
On the Credentials screen, click on the Form tab. Save values in clientid and clientsecret. They will be required later.

Picture 32
Testing Integration Flow
Postman is used to test the Get Requisitions integration flow.
- Select method as GET
- Provide the URL of Get Requisitions EndPoint that you noted down in Get URL and Authentication Details of Integration Flow section
- Click on the Authorizations tab
- Provide the clientid that you noted down in Get URL and Authentication Details of Integration Flow section
- Provide the clientsecret that you noted down in Get URL and Authentication Details of Integration Flow section
- Click on the Send button to test the Get Requisitions integration flow
- If you receive the response with JSON data from your Ariba realm as shown in the screenshot then your testing was successful.

Picture 33
Next In Series
Part 4: Ariba Requisitions Service Application
Part 5: Ariba Requisitions Fiori Application
Part 6: Central Fiori Launchpad Setup
Labels:
You must be a registered user to add a comment. If you've already registered, sign in. Otherwise, register and sign in.
Labels in this area
-
Business Trends
113 -
Business Trends
13 -
Event Information
44 -
Event Information
3 -
Expert Insights
18 -
Expert Insights
25 -
Life at SAP
32 -
Product Updates
253 -
Product Updates
28 -
Technology Updates
82 -
Technology Updates
14
Related Content
- SAP Ariba Procure to Order 2405 Release Key Innovations in Spend Management Blogs by SAP
- SAP SRM Technical Scenarios – Decision Matrix (2010 re-print) in Spend Management Blogs by Members
- Is Application.Discovery.Integration.Enabled applicable to only collaborative requisition, non-colla in Spend Management Q&A
- Set up of note panel for Catalog home page in SAP Ariba in Spend Management Blogs by SAP
- User Management and DSC – Tips as Ariba Connect migrates to SAP for Me for SAP Support. in Spend Management Blogs by SAP
Top kudoed authors
| User | Count |
|---|---|
| 22 | |
| 2 | |
| 1 | |
| 1 | |
| 1 | |
| 1 | |
| 1 | |
| 1 | |
| 1 |