
- SAP Community
- Products and Technology
- Spend Management
- Spend Management Blogs by SAP
- Ariba SCC Forecast with Native IBP Integration
Spend Management Blogs by SAP
Stay current on SAP Ariba for direct and indirect spend, SAP Fieldglass for workforce management, and SAP Concur for travel and expense with blog posts by SAP.
Turn on suggestions
Auto-suggest helps you quickly narrow down your search results by suggesting possible matches as you type.
Showing results for
Advisor
Options
- Subscribe to RSS Feed
- Mark as New
- Mark as Read
- Bookmark
- Subscribe
- Printer Friendly Page
- Report Inappropriate Content
08-06-2020
11:26 AM

In this blog post, I am sharing my knowledge on the native integration between IBP and Ariba Supply Chain Collaboration, you should be able to configure such integration just following the steps detailed here; It is required to have some knowledge of IBP, cXML and Ariba Network integration.
Take advantage of the hyperlinks, which directly navigate the page to the selected section.
What means native IBP integration with Ariba Supply Chain Collaboration?
The current integration model recommended by SAP Ariba is to use Cloud Integration Gateway, also known as CIG, to integrate SAP S/4 or ECC with the Ariba Network.
As IBP has native integration with Ariba SCC, it is not required to have CIG for such integration, which is an advantage for those who are using other middleware like customer adapter, CI-9 and etc.
You can find details about such integration architecture on IBP – Ariba SCC integration blog post created by our colleague alecsandraghita.
Which cXML messages are included with IBP native integration?
- Product Activity Notification/Message as outbound from IBP, which sends the forecast data to Ariba SCC.
- Product Replenishment as inbound to IBP, which receives supplier forecast commit from Ariba SCC.

Steps to Configure Ariba SCC with IBP
 | Main Step 1 - IBP Configuration
|
 | Main Step 2 - Ariba Network Configuration on Buyer Account
|
 | Troubleshooting the integration
|
Main Step 1 - IBP Configuration
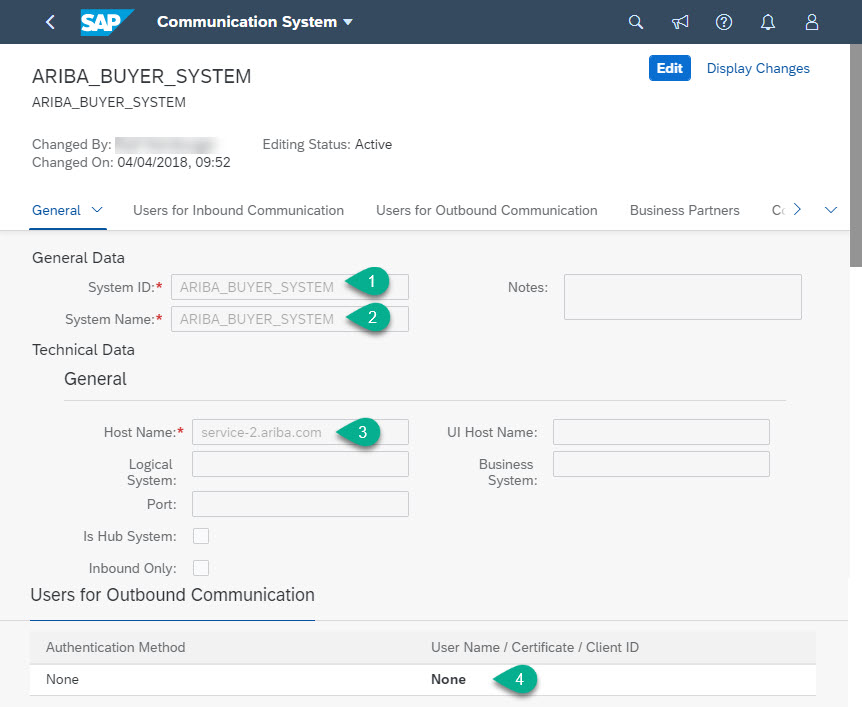
1. Set-up the communication system
1.1. Open the communication systems app, and create a new one and define the following settings
- System ID
- System Name
- Host Name = service-2.ariba.com
- Outbound communication = None
2. Configure the communication arrangement
2.1 Choose SAP_COM_0201 as the communication scenario and maintain the following data
- Communication System = the one that was created above (ARIBA_BUYER_SYSTEM)
- Outbound Services will be automatically filled by the system; however, the path is available to be changed if needed.
- Job Execution Details = Polling job details, which captures the data from Ariba; the suggested execution frequency is 2 minutes, and you can change it according to your business scenario.
- Keep note of your IBP System ID, which will be needed in the future.

3. Define the authentication method
There are two options as described below; this guide will illustrate the details of the second option.
a. Client certificate
b. Shared secret (Ariba password for cXML communication)
3.1 Open the app "Manage Ariba Network Credentials and End Points"
3.2 Maintain the following data:
- Buyer ANID
- Enable End Points = X
- Shared Secret
- Transfer and Deviating System ID = blank
- Test Account = X (if it is the buyer Test ANID)
3.3 Maintain Ariba End Points (optional if you have only IBP system sending data to your Ariba Network ID, ANID; check details on Ariba Network steps)
- SAP Internal Key = Your IBP System ID
- Ariba End Point ID = Define a name to be configured in the second main step, which is on Ariba Network.

4. Create a data sharing plan as a provider to send forecast to Ariba SCC
A planning area will be selected and a "view" through mapping will be defined on how IBP will share forecast data to Ariba Network.
Currently, there is a limitation of 10 custom key figures in the native integration.
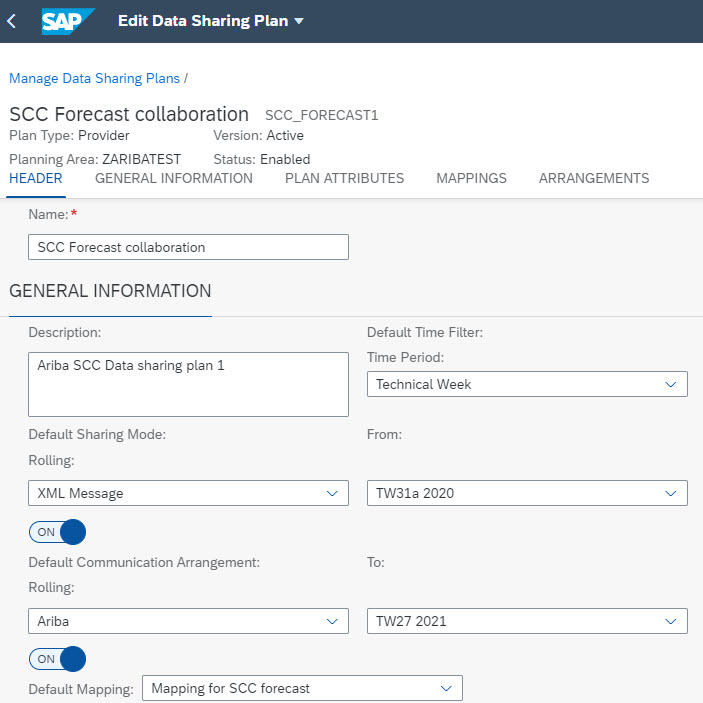
4.1. Open the app "Manage Data Sharing Plans", and create a new one and maintain the following configuration.
![]()
4.1.1 General Information
- Plan Type = Provider
- Default Sharing Mode = XML Message
- Default Communication Arrangement = Ariba
- Default Mapping = <The one the are you created in the mapping section, which will be done in the next step>
- Planning Area with its default time filter
General Information
4.1.2 Plan Attributes
Following alecsandraghita suggestion, I maintained the following two attributes:
- SUPPLIERID = Empty, which will be defined in the communication arrangement
- FREETEXT = Buyer ANID, which should be the same entered in the Ariba credentials

4.1.3 Maintain Mapping
This section is going to define how the data from your IBP planning area will be converted to Ariba SCC.
Define the name and the source and target as CXML_PROACT (Ariba Product Activity cXML) on the Header area
For this guide, I am mapping fields that are relevants to my base planning level, for example, the forecast quantity is the SUPPLIERFORECAST, the plan attributes going to its corresponding fields on the CXML_PROACT.
- check another example on IBP – Ariba SCC integration.

4.1.3 Maintain Arrangement
The arrangement will work like a "filter" to share the data to Ariba, which is the place that you maintain the Supplier ID from your IBP system.

4.1.4 Include Default Mapping, Preview the Data, and Enable the Data Sharing
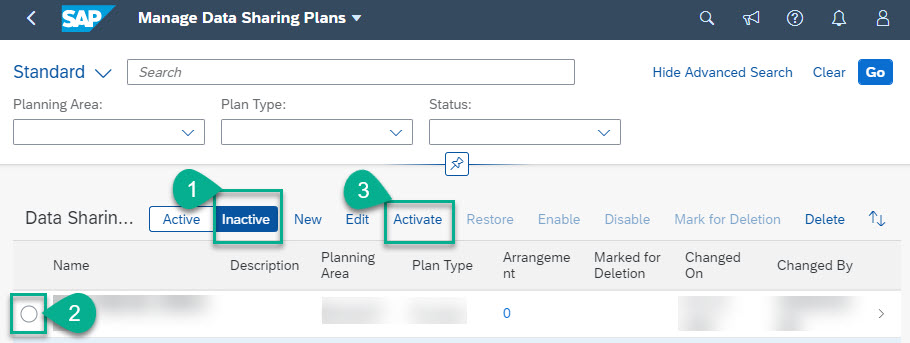
- These are the final steps to complete the provider sharing data.

- To make it active, go the initial screen of the data sharing app, and activate it.
5. Create a data sharing plan as a consumer to receive supplier forecast commit from Ariba SCC
A new data sharing plan as a consumer should be created in order to receive the supplier forecast commits, the process is almost the same as provider but with the opposite direction of the mapping; check the final result.

- Make sure to enable both data sharing plans in order to be able to send and receive data.
Main Step 2 - Ariba Network Configuration on Buyer Account
1. Activate multi-ERP integration (optional)
If you only have IBP sending documents to Ariba, the steps 1, 2 and 3 are not mandatory.
In a scenario that you have multiple systems sending data to Ariba Network, such as S/4 + IBP, the Multi-ERP feature should be activated as described below as well as steps 2 and 3.
If you don't see the option highlighted on your buyer administration page, please open an Ariba SR to activate Multi-ERP feature to your ANID.

2. Create the IBP System ID (optional)
Create the IBP System ID, it doesn't need to be the default system. However, should be the same as highlighted on Ariba Network Credentials section.

3. Configure IBP End Points (optional)
Create the IBP End Point, under the IBP System ID and make it default.
Maintain the same data of Ariba Network Credentials section.

4. Configure IBP Document Routing
Configure the document routing for IBP System ID to use its relevant end point for forecast messages.

5. Map Supplier ID from IBP to AN
Go to Supplier Enablement -> Active Relationship -> Select the supplier and hit on <edit>
- Make sure to have the Supply Chain Collaboration feature active for such supplier.

Maintain the Vendor ID for the IBP System ID, hence Ariba Network will use it to identify which supplier to send the forecast data.

Troubleshooting the integration
1. Preview the outbound data on IBP
If a field is empty or not with the desired data on Ariba Network , you need to review the mapping and the data can be reviewed on excel using the "Prevew" button on the data sharing plan under the arrangement section.

2. IBP Interface Log
The interface log can be checked on the message dashboard app.

As mentioned before, Product Replenishment and Product Activity Notification are for Inbound and Outbound messages.

Selecting the namespace/interface, a new screen with interface details will appear and you can to the following activities.
- Reprocess messages
- Download the message content (cXML)
- Check the error log
- View and edit the data directly on the UI

Monitoring and Error Handling
I hope this blog post was useful to assist you with the configuration between IBP and Ariba Network.
Please share your thoughts and experience in the comments; raise your questions on SAP Ariba Supply Chain Community.
Regards,
Andre Miranda
Labels:
18 Comments
You must be a registered user to add a comment. If you've already registered, sign in. Otherwise, register and sign in.
Labels in this area
-
Business Trends
113 -
Business Trends
12 -
Event Information
44 -
Event Information
3 -
Expert Insights
18 -
Expert Insights
25 -
Life at SAP
32 -
Product Updates
253 -
Product Updates
27 -
Technology Updates
82 -
Technology Updates
14
Related Content
- How to Automate Buyer material parts Active or Inactive on Planning Collaboration in Spend Management Blogs by SAP
- Supplier Collaboration: Organizational Persona Perspectives Differ but All Roads Lead to Automation in Spend Management Blogs by SAP
- On the fence about attending Spend Connect Live in Vienna? Here are some “must-see” sessions to help you decide! in Spend Management Blogs by SAP
- SAP ISBN Customer Success Day in Johannesburg in Spend Management Blogs by SAP
- What is SAP Business Network Inventory Collaboration ? in Spend Management Blogs by SAP
Top kudoed authors
| User | Count |
|---|---|
| 2 | |
| 1 | |
| 1 | |
| 1 | |
| 1 | |
| 1 | |
| 1 | |
| 1 |