
- SAP Community
- Products and Technology
- Human Capital Management
- HCM Blogs by SAP
- Job Rotation Solution Using MDF and Integration Ce...
Human Capital Management Blogs by SAP
Get insider info on HCM solutions for core HR and payroll, time and attendance, talent management, employee experience management, and more in this SAP blog.
Turn on suggestions
Auto-suggest helps you quickly narrow down your search results by suggesting possible matches as you type.
Showing results for
Product and Topic Expert
Options
- Subscribe to RSS Feed
- Mark as New
- Mark as Read
- Bookmark
- Subscribe
- Printer Friendly Page
- Report Inappropriate Content
12-07-2023
6:01 PM
Business Scenario
Some organizations adopt job rotation as a common practice for the professional development of their employees.
The main objective of this process is to provide their employees the opportunity to work on other areas beyond their responsibility.
A job rotation process usually involves multiple employees at the same time, where an employee moves to the position of another one in a sequential order, forming a cycle. For instance, if we have 3 employees involved in a job rotation process as detailed below, before the job rotation:
- Employee A occupying Position A
- Employee B occupying Position B
- Employee C occupying Position C
The job rotation would result in the following scenario:
- Employee A occupying Position B
- Employee B occupying Position C
- Employee C occupying Position A
The Figure 1 below shows this scenario in a visual manner:
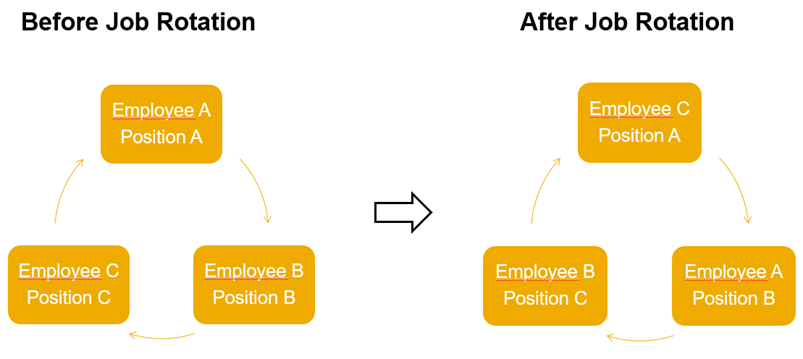
Figure 1: Before and After Job Rotation
Depending on the volume of job rotations during a period and the number of employees involved on each process, the system maintenance can be very challenging, especially if the company uses a 1 to 1 relationship between employee and position.
Solution Overview and Concepts
The solution proposed in this blog considers the following steps:
- The manager requests a job rotation providing details of the positions involved in the process. The selected positions should be occupied by employees. Note: It is also possible to create an alternative solution where the manager selects the employee, rather than the position, but here we will consider the position as the selection entity for the job rotation.
- An HR administrator reviews the request and approves or sends back the job rotation proposal to the manager for any necessary updates.
- A scheduled job in Integration Center runs to update the job rotation data for the involved employees.
The solution presented here will consider that a maximum of 5 positions (occupied by employees) can be included in a single job rotation process. However, the solution can be extended to allow a greater number of positions.
A high-level process diagram is depicted in Figure 2:
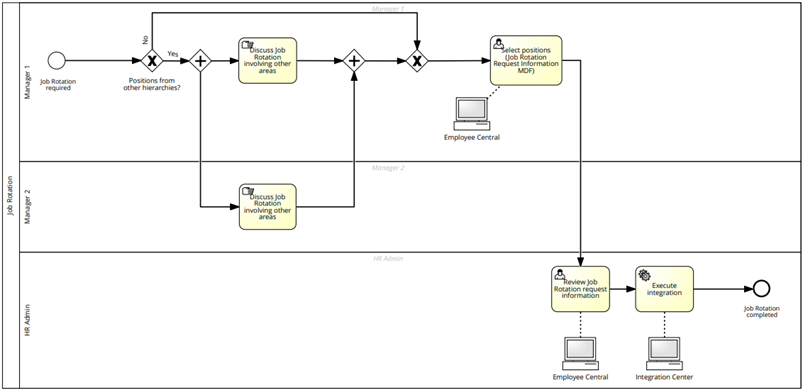
Figure 2: High-Level Job Rotation Process Diagram
Detailed Solution
Solution Configuration Steps
This solution will require a couple of configuration steps:
- Create a custom Job Rotation MDF object, which will be used by managers to request the job rotation.
- Create business rules for validations and to bring additional information on Job Rotation MDF object to help managers when they are providing the data of the positions involved in the process.
- Create an optional workflow for Job Rotation MDF approval.
- Create the UI for the Job Rotation MDF object.
- Create a new section for People Profile and add supporting links for the manager.
- Create an Event Reason for the job rotation process to be used when the Job Information records of the selected employees are updated.
- Create multiple integrations in Integration Center, depending on the possible variations on the number of positions involved in the job rotation.
- Schedule the integrations configured in Integration Center.
Step1: Create an MDF Object for the Job Rotation Requisition by Managers
This MDF object will have the following fields:
- externalCode:
- Data Type = User
- effectiveStartDate:
- Data Type = Date
- cust_Z_instructions, containing instructions on the job rotation process for the managers. The instructions are defaulted by a Business Rule, which populates the text based on another custom MDF object. The reason why the solution was designed this way is because the Default Value attribute of a field has a limit of 255 characters in length. Another advantage using another object to add the instructions is because it is possible to add Line Feed and Carriage Returns, making the text easier to read:
- Data Type = String, with Maximum Length = 4,000. It cannot be a Translatable Data Type, because, on Manage Configuration UI, at least as of b2211, it is not possible to configure the attribute “Display As” for the field (to configure as Large Input Field), like in the Figure 3 below:

Figure 3: “Display As” Attribute in Manage Configuration UI
- Sample content for the Instructions:
(1) Select the number of employees involved in Job Rotation.
(2) In Position 1, select the position of the employee who will be moved to Position 2.
(3) In Position 2, select the position of the employee who will be moved to Position 3, and so on.
(4) In the last Position, select the position of the employee who will be moved to Position 1, closing the cycle.
- cust_Z_numberOfEmployees, for the number of employees that will be involved in the job rotation request:
- Data Type = Picklist
- Valid Values Source = Z_numberOfEmployees
- cust_Z_position1, for the position of the first employee involved in Job Rotation:
- Data Type = Generic Object
- Valid Values Source = Position
- cust_Z_employeeName1, for the name of the first employee involved in Job Rotation:
- Data Type = User
- cust_Z_department1, for the department of the first employee involved in Job Rotation:
- Data Type = Generic Object
- Valid Values Source = Department
- cust_Z_userId1, for the userId of the first employee involved in Job Rotation. This field can be hidden from the UI, but is important for the actual update of the Job Information entity:
- Data Type = String
- cust_Z_position2, for the position of the second employee involved in Job Rotation:
- Data Type = Generic Object
- Valid Values Source = Position
- cust_Z_employeeName2, for the name of the second employee involved in Job Rotation:
- Data Type = User
- cust_Z_department2, for the department of the second employee involved in Job Rotation:
- Data Type = Generic Object
- Valid Values Source = Department
- cust_Z_userId2, for the userId of the second employee involved in Job Rotation. This field can be hidden from the UI, but is important for the actual update of the Job Information entity:
- Data Type = String
- Note: create similar fields for 3, 4 and 5 positions.
The solution detailed here considers the possibility of selecting up until 5 positions in a single job rotation request. However, it is possible to have more positions by just adding more fields in the MDF object.
The object should be created with Effective Dating = Basic, to keep the historical data of job rotation requisitions by the managers.
For the Security section, at the bottom of the object definition, set Permission Category = Miscellaneous Permissions.
The Figure 4 shows the definition of Job Rotation MDF object.


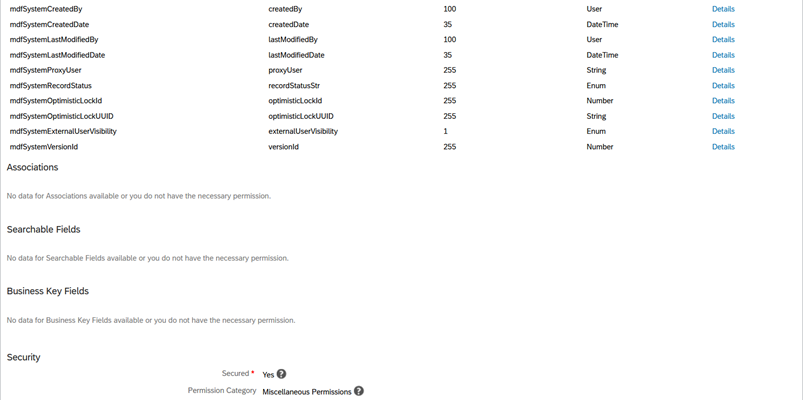

Figure 4: MDF Object for Job Rotation Request
To improve the user experience, the visibility of the fields "Position X”, “Employee Name X”, “Department X” and “UserId X” can be controlled using the Conditional Fields feature of MDF objects. So, for instance, if the manager selects 2 as the number of employees for job rotation, only the "Position 1”, “Employee Name 1”, “Department 1”, “UserId 1”, “Position 2”, “Employee Name 2”, “Department 2” and “UserId 2” should be displayed. This feature can be accomplished with a configuration like the one in Figure 5 below for each of those fields:

Figure 5: Condition Fields Configuration Example
Permission should be granted to this object through: Manage Permission Roles --> <select the relevant Permission Role> --> Permission --> Miscellaneous Permissions (Figure 6).

Figure 6: Permissions for the Job Rotation MDF Object
The picklist values for Z_numberOfEmployees can be defined as in Figure 7 below:

Figure 7: Picklist Values for Z_numberOfEmployees
Step 2: Create Business Rules for Data Propagation, Validation and Approval Workflow
In order to populate the “Instructions” field, an MDF object should be created:
- externalCode:
- Data Type = Auto Number
- externalName, to define the language (for instance, en_US and pt_BR). With this, the object can be used to define Instructions in multiple languages:
- Data Type = String
- cust_Z_instructionsForJobRotation, for the content of Instructions:
- Data Type = String
- Maximum Length = 4,000
Figure 8 shows the contents of the Instructions MDF object in English and Portuguese as an example:

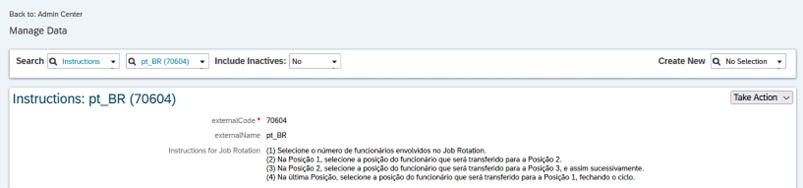
Figure 8: Example of Instructions in English and Portuguese
The instructions can be defaulted through a Business Rule assigned to Effective Start Date field of Job Rotation MDF object (Figure 9):

Figure 9: Business Rule to Default Instructions in English and Portuguese
It is also important to have a Business Rule to initialize the fields for job rotation, because multiple requests can be created over time by a manager (Figure 10):


Figure 10: Business Rule to Initialize Job Rotation Fields for a New Request
For each Position field (1 through 5 in our example), create a Business Rule to default the other attributes, Employee Name, Department and User Id (Figure 11):


Figure 11: Sample Business Rule to Default Employee 1 Attributes Based on Position 1
Another interesting Business Rule that can be created is one to raise a warning message to the manager in the case the selected position is from another hierarchy. Depending on the customer scenario, it can be configured as an error message to prevent the manager to move forward with the job rotation request if he/she selects a position out of his/her own hierarchy. This Business Rule should also be assigned to the corresponding Position field (Figure 12):

Figure 12: Business Rule to Raise a Warning Message if the Selected Position is From Another Hierarchy
Note: If the customer wants the manager to be able to access positions only under his/her hierarchy, there is a setting in Provisioning to restrict the Value Help of the Position to his/her own structure (Figure 13). However, this setting applies for all Generic Object type fields, which might be inconvenient for the customer.

Figure 13: Optional Provisioning Setting to Restrict the Positions on Value Help
Another Business Rule proposed with this solution is one to trigger a workflow for the validation of the job rotation request, e.g., by an HR person (Figure 14):

Figure 14: Business Rule to Trigger a Workflow for the Job Rotation Request
Step 3: Create the UI for Job Rotation MDF Object
Use the “Manage Configuration UI” tool to create the UI for Job Rotation MDF object created before. It is recommended to use Groups to have the screen presented in a more structured way for the end-user. The “Last Modified By” and “Last Modified Date” fields were added for validation and auditing purposes (Figure 15):


Figure 15: UI for Job Rotation Object
The “Flow” Layout was used for each of the Groups created before (Figure 16):

Figure 16: “Flow” Layout for Each of the Groups
Step 4: Create a New Section on People Profile and Add Supporting Links
Create a new section on People Profile and add links to provide support/help for the end-user (Figure 17). The links can be used, for instance, to direct the user to a detailed guide (not included in this blog) on how to use the Job Rotation section and also to open another page with the Position Org Chart (Figures 18, 19 and 20):

Figure 17: New Section for Job Rotation Request Information on People Profile

Figure 18: Links for the Manager on Job Rotation Request Information Section
Figure 19: Sample Link to a User’s Guide (Not Covered in this Blog)

Figure 20: Link to the Manager’s Position Org Chart
Step 5: Create an Event Reason for the Job Rotation Process
Create an Event Reason to be used for the job rotation process through “Manage Organization, Pay and Job Structures” tool (Figure 21):

Figure 21: Event Reason for Job Rotation Process
Step 6: Create and Schedule the Integrations Configured with Integration Center Tool
In this step, the integrations to effectively rotate the employees will be created through Integration Center tool:
- For each number of employees involved in job rotation process, an integration should be configured in Integration Center.
- In this blog, we are considering a maximum of 5 employees taking part in a job rotation process simultaneously. So, 4 integrations should be configured (one for 2 employees, one for 3 employees, one for 4 employees and one for 5 employees).
- The integrations will basically do the following:
- Change “Mass Position” attribute of the selected positions to “Yes”.
- Change “FTE” attribute of the selected positions to “2”.
- Update the Job Information record of the employees included in job rotation.
- Change “Mass Position” attribute of the selected positions back to “No”.
- Change “FTE” attribute of the selected positions back to “1”.
- Schedule the integrations
As an example, let’s see the screen shots related to the integration configuration considering 3 employees:
General information of the integration (Figure 22):

Figure 22: General Information of the Integration for 3 Employees
Field mapping (Figure 23):


Figure 23: Field Mapping
Detailed field mapping for Position object – changing “Mass Position” to “Yes” and “FTE” to “2” (Figure 24):

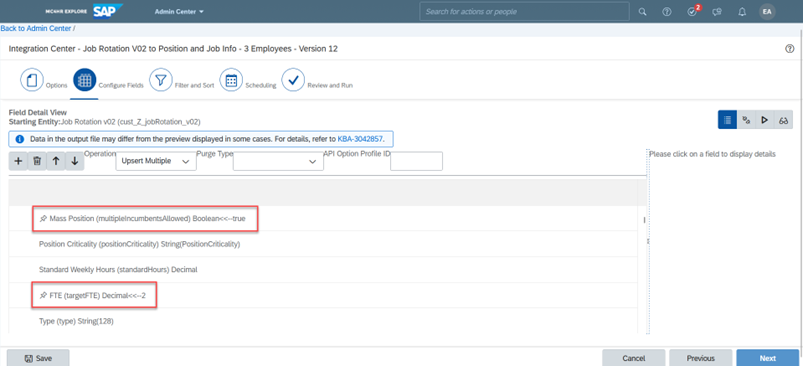
Figure 24: Field Mapping for Position Object – “Mass Position” = “Yes" and “FTE” = “2”
Detailed Field Mapping for Job Information (Figure 25):


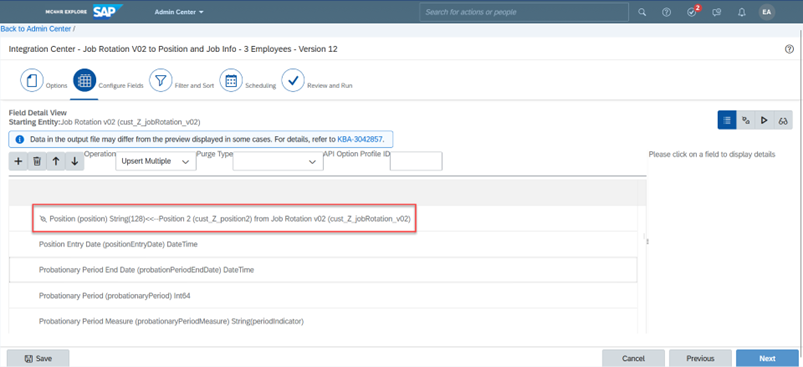
Figure 25: Field Mapping for Job Information
Detailed field mapping for Position object – changing back “Mass Position” to “No” and “FTE” to “1” (Figure 26):
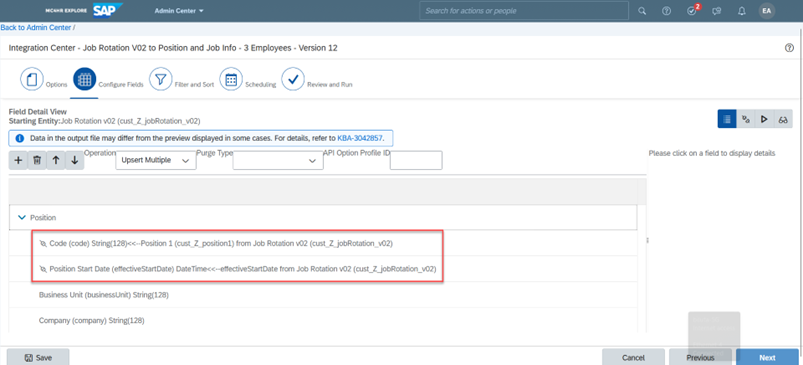

Figure 26: Field Mapping for Position Object – “Mass Position” = “No” and “FTE” = “1”
Filter settings (Figure 27):
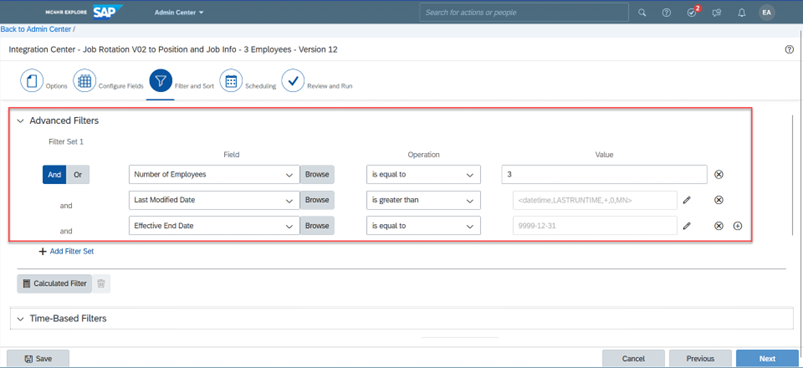
Figure 27: Filter Settings for Integration Considering 3 Employees
Scheduling example (Figure 28):
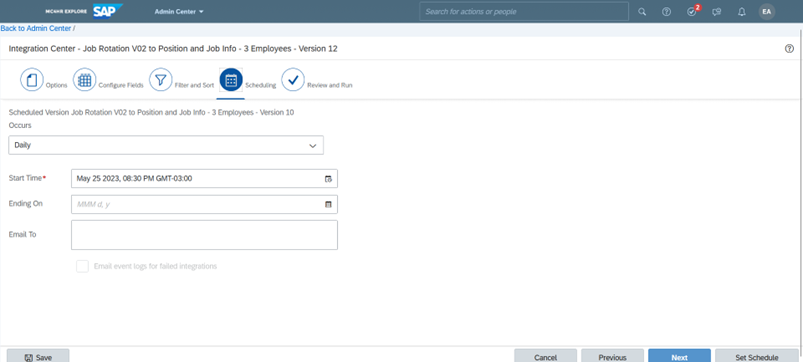
Figure 28: Scheduling Example
Integration Configuration Summary Page (Figure 29):

Figure 29: Summary of Integration Configuration
End-User Experience
Once the solution is configured as explained before, the Manager will be the main role for the job rotation process. Let’s take an example, considering a job rotation consisting of 3 employees.
Manager: Claire James (Position1526)
Employees/Positions for Job Rotation:
- Fiona Marston (Position1533)
- Aurie Cooper (Position1527)
- Thomas Soames (Position1530) à other hierarchy
Effective Start Date for Job Rotation: 05/25/2023
Position Org Chart before the job rotation process (Figure 30):

Figure 30: Position Org Chart Before the Job Rotation
Job Rotation Request Information content for this scenario (Figure 31):


Figure 31: Job Rotation Request Information
Position Org Chart after the job rotation process (Figure 32):
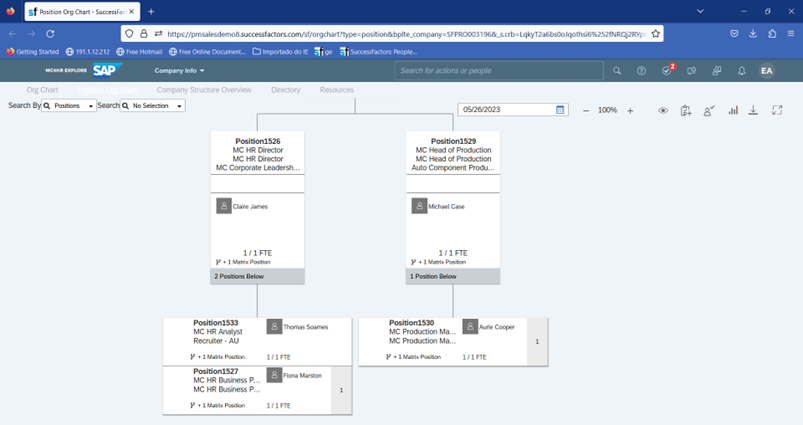
Figure 32: Position Org Chart After the Job Rotation
Conclusions
Metadata Framework and Integration Center are powerful tools to create solutions for processes that are not available out of the box in our standard product.
This job rotation solution can be used to reduce manual work, such as moving each employee individually to the future position and changing position attributes (Mass Position and FTE) manually when you have a 1:1 relationship between position and employee.
It can also improve the user experience, as the manager can enter all the data related to a job rotation request at once.
You may find some limitations to this solution, like, to revert an already completed job rotation, another request should be created to return each of the employees back to their original positions. However, I believe the benefits it may bring to the customer justify the effort to implement it.
Labels:
1 Comment
You must be a registered user to add a comment. If you've already registered, sign in. Otherwise, register and sign in.
Labels in this area
-
1H 2023 Product Release
3 -
2H 2023 Product Release
3 -
Business Trends
104 -
Business Trends
4 -
Cross-Products
13 -
Event Information
75 -
Event Information
9 -
Events
5 -
Expert Insights
26 -
Expert Insights
19 -
Feature Highlights
16 -
Hot Topics
20 -
Innovation Alert
8 -
Leadership Insights
4 -
Life at SAP
67 -
Life at SAP
1 -
Product Advisory
5 -
Product Updates
499 -
Product Updates
40 -
Release
6 -
Technology Updates
408 -
Technology Updates
10
Related Content
- New 1H 2024 SAP Successfactors Time (Tracking) Features in Human Capital Management Blogs by SAP
- First Half 2024 Release: What’s New for Work Tech? in Human Capital Management Blogs by SAP
- First Half 2024 Release: What’s New in SAP SuccessFactors HCM in Human Capital Management Blogs by SAP
- Standard integration templates in Talent Intelligence Hub in Human Capital Management Blogs by SAP
- Off in Lieu Time Account to be created only when Timesheets are approved in Human Capital Management Q&A
Top kudoed authors
| User | Count |
|---|---|
| 12 | |
| 3 | |
| 3 | |
| 3 | |
| 2 | |
| 2 | |
| 2 | |
| 2 | |
| 2 | |
| 2 |