Disclaimer: This is an exhaustive guide to help beginners with the creation of an LSMW.
LSMW stands for
Legacy System Migration Workbench. This document comprises a step-by-step approach to creating an LSMW.
As the name suggests, this program is used for migrating legacy data (say via a text file) into SAP. Hence, for instance, we shall consider the case of bringing over Organization data (Org. units/Positions) into SAP.
Technical Details:
- Use t-code ‘lsmw’ to proceed.
- In the LSMW screen, firstly a Project, then the Subproject, and the Object must be created. These fields hold free text, and it is recommended to have business-relevant names in the same so that they can be identifiable at a later point in time.

- Click ‘Create’ once the above are filled.
- In the next screen, a list of process steps is shown (ref. below)

- By default, ‘Define Object Attributes’ is selected. Click ‘Execute’ and a screen to capture the recording is shown.
- 1. Here, click ‘Display-Change’, select ‘Batch Input Recording’, and then click on ‘Recordings: Overview’ to create a recording.
 2. Click the ‘Create Recording’ button on the next screen and name the recording along with a related Description then click ‘Continue’. Later, the ‘Transaction Code’ must be entered to begin the recording.
Note: Recording Name should be the table name itself. Ex: In this case PP02 transaction will hit the table ‘HRP1000’ so, enter the Recording Name as ‘HRP1000’
3. In this case, we enter ‘PP02’ and click Continue.

4. In the PP02 screen, key in the relevant data (ref. below) and click ‘Create Infotype’. In the next screen, enter the Object Abbreviation (free text) and click Save. A message ‘Record created’ is displayed.

5. In the next screen, click ‘Default All’ to map all the fields with the respective technical objects/names and click ‘Save’.

6. Now, exit this screen, and the initial recording screen is shown. Ensure, the Recording created is populated under ‘Batch Input Recording’, then click Save.

- Next, ‘Source Structures’ must be defined as shown below.

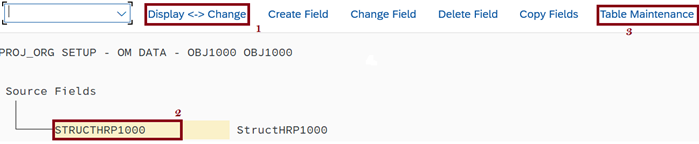
- Now, in the main LSMW screen, click on ‘Object Overview’ and ‘Table’ on the pop-up.

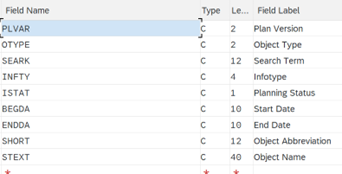
- This shows the list of fields including technical names. It can help in listing Source Fields and also in preparing the data template.

- Next, ‘Source Fields’ are to be defined. Follow the below and list all the mandatory/desired fields related to the Tcode used earlier for recording, then click Save & Exit.
- Further, the ‘Structure Relations’ must be defined following the below steps.

- Now, enter ‘Define Field Mapping and Conversion Rules’ related screen.
- Click ‘Display <-> Change’ and expand the ‘Extras’ menu to click on ‘Auto-Field Mapping’

- Continue in the pop-up (Auto Field Mapping: Settings). All the fields listed shall be prompted with respective source field names for mapping. Ensure the fields are rightly auto-mapped and Save.
Note: Any field(s) mapped manually might corrupt the conversion program. It is best to go with the above option.
- Next, the Fixed Values/Translations/User-Defined Routines can be defined. This is optional and must be created only when needed.
- For instance, based on the above field list, if the requirement is to pass ‘1000’ in the Infotype field, a Fixed Value for the same can be defined as below and the system shall default this field with the value set during the LSMW run. Refer below for creating a Fixed Value.


- In the next few steps, data files need to be specified, read; and converted using the following options

- In ‘Specify Files’, the path to fetch the data from must be selected as shown (usually from a file on the computer).
Note: Usually, a .txt that is Tabulator delimited is used
- Now, to assign the files to the structure, follow the below steps

- Now, execute ‘Read Data’ and the number of transactions read thru the data file is displayed. Verify the same and proceed to the next step.
- Execute ‘Display Read Data’ to see the records in the data file mapped to the structure/source fields. Ensure the correctness of the values mapped to source fields as the same is inserted into the PP02.

- Next, execute ‘Convert Data’ to see the total records converted.
- Further, the same can be viewed by executing ‘Display Converted Data’. Ensure the correctness of the values/fields mapped.
- Finally, the following steps must be run to insert data into the system.

- Post creation of ‘Batch Input Session’, the same must be run. The processing starts by selecting the batch input record and clicking on the ‘Process’ button.

- Next, the session can be processed in one of the 3 different modes.
- 1. Foreground Processing – Runs record by record and field by field.
- 2.Display Errors only – Runs in the background and breaks/pauses whenever an error is encountered.
- 3. Background (most used) – Runs in the background completely and shows the total processed transactions/errors as part of the batch summary.
 4. In conjunction with the Processing Mode, the desired Additional Function(s) can be selected.
- The above steps need to be repeated in case of errors to ensure the successful creation of Organization objects.
Tip: In case of errors and the data in the file is modified, the lsmw execution flow can be repeated from the step ‘Specify Files’ when a new data file is selected else, it can be done from the step ‘Read Data’ itself.
- Post-processing, the data is inserted into the table HRP1000, and here is a snapshot. This can be accessed thru t-code ‘se16’.

- The same can alternatively be viewed on screens PP02 and PPOME, as shown below.
PP02 screen:

PPOME screen:
- LSMW Migration – This section details the actions to be taken to copy an LSMW configuration from a given source to target.
In the Source System:
- Export – From the LSMW screen, expand the Extras menu and click ‘ExportProject’ and ‘Export’ on the next screen. This creates a .txt file.

 2. Change Request – From the LSMW screen, expand the Extras menu and click ‘Create Change Request’.
Now click ‘Create Request’, name the Transport Request, and save it.
In the Target System:
3.
Import – From the LSMW screen, expand the Extras menu and click ‘ImportProject’ and the LSMW setup file (.txt) must be selected.

4.
Transport Request – The Change Request created earlier can be imported/deployed to the target system via the usual Transport process.
With these we can successfully load legacy/historical data in SAP.
Appreciate you to like this post, provide valuable comments and suggestions.
