
- SAP Community
- Products and Technology
- Enterprise Resource Planning
- ERP Blogs by SAP
- Guide for numbering of HCM business partners - wha...
Enterprise Resource Planning Blogs by SAP
Get insights and updates about cloud ERP and RISE with SAP, SAP S/4HANA and SAP S/4HANA Cloud, and more enterprise management capabilities with SAP blog posts.
Turn on suggestions
Auto-suggest helps you quickly narrow down your search results by suggesting possible matches as you type.
Showing results for
former_member84
Member
Options
- Subscribe to RSS Feed
- Mark as New
- Mark as Read
- Bookmark
- Subscribe
- Printer Friendly Page
- Report Inappropriate Content
06-07-2023
10:51 PM
Introduction
There are a lot of possibilities to configure numbering of the business partners and the vendors which are created during the synchronization from HCM. Therefore, there are some pitfalls along the way for wrong adjustment and invalid customizing. To prevent this, I created this all-in-one guide so that everyone should be able to configure the Number Range needed and solve some common issues.
Please enjoy.
General
If you synchronize an employee whose personnel number (PERNR) has no corresponding Business Partner (BP) (and vendor) a new Business Partner will be created. Therefore, you have the possibility to configure which number the BP (and Vendor) have. The central table to configure this, is the System table T77S0 which can be maintained via transaction SM30. The Corresponding switches are all part of the group HRALX.
The Switch PNUMB allows you to configure the mode by which the number of the BP with role Employee (BUP003) is determined. PSUBG determines the Business Partner Group which is used for the creation process of Business Partner with role Employee (BUP003).
The Switches ENUMB and ESUBG behave like PNUMB and PSUBG but allow the configuration of the numbering for the Business Partner with role Employment (BUP010). Or in VMODE 1/VMODE2 the numbering of the BP with (only) the Vendor role. Since this role is only available in the new data model for employee business partners (Business Function /SHCM/SFWS_SC_EE_BP_01) it is not relevant if you still use one of the old models (VMODE1/VMODE2).
In addition to these 4 switches in table T77S0 there are also configurations which need to be done in transaction SPRO. In this blog, I will list them according to their functionality. A cheat sheet where the customizing functions can be found in the IMG hierarchy can be found later in this document.
First, we have the customizing function that allows you to define BP number ranges which can be assigned to the BP grouping. Further named as Customizing Function BP Number Range. The possibilities you have for the Number Ranges depend on the mode you selected via Switch HRALX PNUMB (ENUMB) and will be further described in the mode section of this document. In general, it is recommended that the number ranges start with XX00000000 and ending with XX99999999. The X can be any letter or number you like. For example, DE00000000 – DE99999999 or 0100000000 - 0999999999. A negative example which is possible in some modes, but highly not recommended, is 0000000010-A1000099999 or AABBCC003399-ZZZZZZZZZZ.
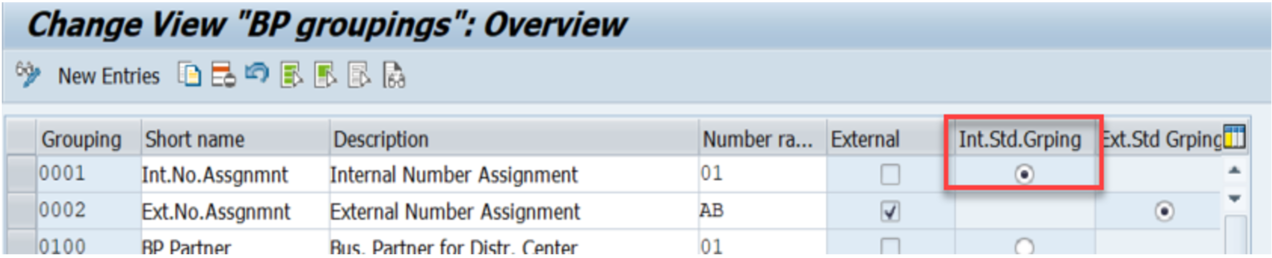
The second customizing function allows you to define and assign BP groupings. Further named as Customizing Function BP Grouping. Here you can create a grouping for the Business Partner and assign a Business Partner Number Range to the grouping. It is recommended that every group has its own number range. If you use a grouping for number range assignment it must have the same name as the number range assigned. So, you can in fact only do groupings with 2-character signs length. By default, you need to configure only one grouping for the Business Partner with role Employee (BUP003) which matches the configuration in switch HRALX PSUBG. If you use the new model, a second group should be created for the Business Partner in role Employment (BUP010) which matches your entry in Switch HRALX ESUBG. By default, these two groupings should be enough for a successful system configuration, but in some advanced cases you may want to further classify Employee and Employment Business Partner in multiple groupings at your own responsibility. Therefore, you can create for example a further grouping especially for Employee BP with home address in Germany. If you want to use these additional groupings, you must implement a BAdI implementation for BADI_FITV_VENDOR_SYNC->MODIFY_COMPLETE_DATA or /SHCM/B_EE_BP_SYNC->MODIFY_GROUPING_NUMBER if you are on release 2022 or further. In this BAdI implementation you can overwrite the grouping used for the creation according to your needs. Please be aware that the grouping of a BP could not be changed once the BP is created. So, be careful.
During the first synchronization of a PERNR to a Business Partner, not only the Business Partner is created. According to your customizing also a Vendor (Supplier) will be created. It is also possible to configure the numbering of newly created vendors. Therefore, you can define number ranges for vendor via the Customizing Function Vendor Number Range. These Number Ranges need to be assigned to a Vendor Grouping via Customizing Function Vendor Grouping.
At last, you need to assign the Vendor Grouping to a Business Partner grouping via Customizing Function Mapping BP to Vendor. For example, if a business Partner of grouping AA is created the vendor Group BBBB is used for creating the according vendor.
In general, there are two possibilities how the vendor number can be determined. If you use an internal number range for the vendor number range, the next free number of this range will be used for the vendor. It is recommended that the vendor and the Business Partner range have the same range. Which is easy, if you followed the advice for number ranges, I gave for the Customizing Function BP Number Range. That number range is starting with XX00000000 and ending with XX99999999. The X can be any letter or number you like.
The second option is that you want to use the same number for the Vendor than the one which is used for the Business Partner. In this case the used Vendor Number Range must be identical to the number range used for the Business Partner, so that every number of the Business Partner Grouping can be mapped to the assigned Vendor grouping. Additionally, the number range for the vendor should be set to external, so that it receives the number from the Business Partner instead of creating an own. At least you need to set the flag “same number” via the Customizing Function Mapping BP to Vendor which allows the Business Partner to share its number with the vendor.
For both Vendor Number Range assignment internal and external (same number) a step-by-step example can be found in the example section of this document.

Modes
Currently we have 4 different modes to determine the number for a new Business Partner. The mode can be configured in system table T77S0 via switches HRALX PNUMB (Employee BP) and HRALX ENUMB (Employment BP – only new model). I recommend reading the documentation of the switches (F1 Help) for further details. A step-by-step guide of an example configuration can be found at the examples section of this document.
Mode 1:
If the mode is set to 1 the default grouping is used, and the next free number is used from the default (BPEE & BPEP) internal Number Range. If the BP groupings BPEE or BPEP are not found on the system, the BP grouping marked as standard grouping will be used instead. There is no further configuration possible. The entries in HRALX PSUBG and HRALX ESUBG are ignored.
Mode 2:
If the mode is set to 2 the grouping at HRALX PSUBG (ESUBG) is used and the next free number is used from the assigned individual number range. The assigned number range has therefore to be internal.
Mode 3:
The corresponding PERNR is used as the number of the Business Partner. Since the PERNR is only 8 character long and the Business Partner ID is 10 character long, a prefix (a constant value for the first 2 character) has to be defined. The assigned Number Range must be external and need to start with XX00000000 and ending with XX99999999. The X can be any letter or number you like. For Example, DE00000000 – DE99999999 or 0100000000 - 0199999999. This makes sure that all the 99999999 possible PERNRs can be mapped into this number range.
Mode 4:
The Central Person ID (CP) of the corresponding PERNR is used to as the number of the Business Partner. This mode can only be used for the Employee Business Partner(PNUMB/PSUBG), since in a concurrent employment scenario the Central Person would be the same for multiple PERNR. Since the Central Person ID is only 8 character long and the Business Partner ID is 10 character long, a prefix (a constant value for the first 2 character) has to be defined. As in Mode 3 the assigned number range must be external and has to start with XX00000000 and ending with XX99999999. The X can be any letter or number you like. For Example, DE00000000 – DE99999999 or 0100000000 - 0199999999. This makes sure that all the 99999999 possible Central Person can be mapped into this number range. This mode is only available for the new BP model.
Examples
Settings for default (internal) numbering (Mode1)
- STEP 1: Check that a standard internal BP grouping is set. The hierarchical steps in IMG to the Customizing Function BP Grouping can be found in the "Cheat Sheet for SPRO Customizing BP Number Range"
- STEP 2: Set the switches HRALX PNUMB and HRALX ENUMB to '1'. You can maintain the corresponding system table T77S0 via transaction SM30.

Settings for individual numbering (Mode2)
- STEP 1: Create two BP Number Ranges which are internal. The hierarchical steps in IMG to the Customizing Function BP Number Range can be found in the "Cheat Sheet for SPRO Customizing BP Number Range" section of this Document. In this example I create a BP Number Range for the Employee Business Partner from EE00000000 to EE99999999 with the ID 'EE' and a Number Range for the Employment Business Partner from EP00000000 to EP99999999 with the ID 'EP'.

- STEP 2: Create a BP Grouping for the new number ranges created. The hierarchical steps in IMG to the Customizing Function BP Grouping can be found in the "Cheat Sheet for SPRO Customizing BP Number Range" section of this document. In this example, I create a BP Grouping with the name 'EE' for the number range 'EE' and a BP Grouping with the name 'EP' for the Number Range 'EP'.

- STEP 3: Set the switches HRALX PSUBG and HRALX ESUBG to the configured BP Grouping. You can maintain the corresponding system table T77S0 at transaction SM30. In this example PSUBG = 'EE' and ESUBG = 'EP'.
- STEP 4: Set the switches HRALX PNUMB and HRALX ENUMB to '2'. You can maintain the corresponding system table T77S0 at transaction SM30.

Settings for CP/PERNR related numbering (Mode3/4)
- STEP 1: Create two BP Number Ranges that are external and start with XX00000000 and ending with XX99999999. The X can be any letter or number you like. The hierarchical steps in IMG to the Customizing Function BP Number Range can be found in the "Cheat Sheet for SPRO Customizing BP Number Range" section of this document. In this example, I create a BP Number Range for the Employee Business Partner from CP00000000 to CP99999999 with the ID 'CP' and a Number Range for the Employment Business Partner from E200000000 to E299999999 with the ID 'E2'. Both number ranges are External

- STEP 2: Create two BP Groupings for the new number ranges created. The hierarchical steps in IMG to the Customizing Function BP Grouping can be found in the "Cheat Sheet for SPRO Customizing BP Number Range" section of this document. In this example I create a BP Grouping with the name 'CP' for the Number Range 'CP' and a BP Grouping with the name 'E2' for the Number Range 'E2'.

- STEP 3: Set the switches HRALX PSUBG and HRALX ESUBG to the configured BP Grouping. You can maintain the corresponding system table T77S0 at transaction SM30. In this example PSUBG = 'CP' and ESUBG = 'E2'.
- STEP 4: Set the switch HRALX PNUMB to '4' and HRALX ENUMB to '3'. You can maintain the corresponding system table T77S0 using transaction SM30.

Switch from internal numbering to external numbering
It is not possible to change the number of an existing Business Partner, but it is possible to change the numbering for all Business Partner that are created in the future. Especially if you want to change from mode 1 or 2 to mode 3 or 4 there are a view steps to recognize.
- STEP 1 Create two new BP Number Range which is external and must start with XX00000000 and ending with XX99999999. The X can be any letter or number you like. The hierarchical steps in IMG to the Customizing Function BP Number Range can be found in the "Cheat Sheet for SPRO Customizing BP Number Range" section of this document. In this example I create a BP Number Range for the Employee Business Partner from CP00000000 to CP99999999 with the ID 'CP' and a Number Range for the Employment Business Partner from E200000000 to E299999999 with the ID 'E2'.
- STEP 2: Create two new BP Groupings for the new number ranges created. The hierarchical steps in IMG to the Customizing Function BP Grouping can be found in the "Cheat Sheet for SPRO Customizing BP Number Range" section of this document. In this example, I create a BP Grouping with the name 'CP' for the Number Range 'CP' and a BP Grouping with the name 'EP' for the Number Range 'E2'.
- STEP 3: Set the switches HRALX PSUBG and HRALX ESUBG to the configured BP Grouping. You can maintain the corresponding system table T77S0 at transaction SM30. In this example PSUBG = 'CP' and ESUBG = 'EP'.
- STEP 4: Set the switch HRALX PNUMB to '4' and HRALX ENUMB to '3'. You can maintain the corresponding system table T77S0 at transaction SM30.
Vendor with own number (internal)
This example assumes that the BP Number Ranges are already completely customized. As basis I use the example from "Settings for CP/PERNR related numbering".
- STEP 1: Create a Vendor Number Range which is internal. The hierarchical steps in IMG to the Customizing Function Vendor Number Range can be found in the "Cheat Sheet for SPRO Customizing BP Number Range" section of this Document. In this example, I create a Vendor Number Range for the Business Partner from VE00000000 to VE99999999 with the ID 'V1'.

- STEP 2: Create a Vendor Groupings for the new Number Ranges created. The hierarchical steps in IMG to the Customizing Function Vendor Grouping can be found in the "Cheat Sheet for SPRO Customizing BP Number Range" section of this Document. In this example I create a BP Grouping with the name 'VEN1' for the Number Range 'V1'
- STEP 3: Link the Vendor Grouping to the Business Partner Grouping. Make sure the flag "same numbers" is not The hierarchical steps in IMG to the Customizing Function Mapping BP to Vendor can be found in the "Cheat Sheet for SPRO Customizing BP Number Range" section of this Document. In this example, I add a new line or BP Grouping 'E2' and Vendor Grouping 'VEN1'.

- Attention: This Step must be completed for all BP Groups that contains BP with Vendor roles. So, you need to do this step for at least the BP Group maintained in ESUBG. If you are using VMODE 1 you also have to additionally do this step for the BP Group in PSUBG.
Vendor with same number (external)
This example assumes that the BP Number Ranges are already completely customized. As basis I use the example from "Settings for CP/PERNR related numbering".
- STEP 1: Create a Vendor Number Range which is external and is identical to the Business Partner Number Range used. The hierarchical steps in IMG to the Customizing Function Vendor Number Range can be found in the "Cheat Sheet for SPRO Customizing BP Number Range" section of this document. In this example, I create a Vendor Number Range for the Business Partner Number Range 'E2' which is connected to the BP Grouping 'E2'. Like the BP Number Range the Vendor Number Range is from E200000000 to E299999999 and receive the ID 'V2'.

- STEP 2: Create a Vendor Groupings for the new Number Ranges created. The hierarchical steps in IMG to the Customizing Function Vendor Grouping can be found in the "Cheat Sheet for SPRO Customizing BP Number Range" section of this document. In this example, I create a BP Grouping with the name 'VEN2' for the Number Range 'V2'
- STEP 3: Link the Vendor Grouping to the Business Partner Grouping. Make sure the flag "same numbers" is set. The hierarchical steps in IMG to the Customizing Function Mapping BP to Vendor can be found in the "Cheat Sheet for SPRO Customizing BP Number Range" section of this Document. In this example I add a new line or BP Grouping 'E2' and Vendor Grouping 'VEN2'.

- Attention: This Step must be completed for all BP Groups that contains BP with Vendor roles. So, you need to do this step for at least the BP Group maintained in ESUBG. If you are using VMODE 1 you also have to additionally do this step for the BP Group in PSUBG.
Cheat Sheet for SPRO Customizing
The following section shows where the different customizing functions can be found in the IMG hierarchy.
BP Grouping:
Cross-Application Components
>SAP Business Partner
>>Business Partner
>>>Basic Settings
>>>>Number Ranges and Groupings
>>>>>Define Groupings and Assign Number Ranges
BP Number Range:
Cross-Application Components
>SAP Business Partner
>>Business Partner
>>>Basic Settings
>>>>Number Ranges and Groupings
>>>>>Define Number Ranges
Mapping BP to Vendor:
Cross-Application Components
>Master Data Synchronization
>>Customer/Vendor Integration
>>>Business Partner Settings
>>>>Settings for Vendor Integration
>>>>>Field Assignment for Vendor Integration
>>>>>>Assign Keys
>>>>>>>Define Number Assignment for Direction BP to Vendor
Vendor Grouping:
Logistics - General
>Business Partner
>>Supplier
>>>Control
>>>>Define Account Groups and Field Selection (Supplier) -> Create Group
>>>>Define and Assign Customer Number Ranges (Number Range) -> Assign NR
Vendor Number Range:
Logistics - General
>Business Partner
>>Supplier
>>>Control
>>>>Define and Assign Customer Number Ranges (Intervals)
- SAP Managed Tags:
- SAP S/4HANA business partner,
- SAP S/4HANA,
- HCM (Human Capital Management)
Labels:
You must be a registered user to add a comment. If you've already registered, sign in. Otherwise, register and sign in.
Labels in this area
-
Artificial Intelligence (AI)
1 -
Business Trends
363 -
Business Trends
29 -
Customer COE Basics and Fundamentals
1 -
Digital Transformation with Cloud ERP (DT)
1 -
Event Information
461 -
Event Information
28 -
Expert Insights
114 -
Expert Insights
188 -
General
1 -
Governance and Organization
1 -
Introduction
1 -
Life at SAP
414 -
Life at SAP
2 -
Product Updates
4,679 -
Product Updates
274 -
Roadmap and Strategy
1 -
Technology Updates
1,499 -
Technology Updates
100
Related Content
- Custom Analytical Queries as an alternative for LIS in SAP S/4HANA Production Planning (PP) in Enterprise Resource Planning Blogs by SAP
- SAP Business ByDesign – What’s New 24.05 in Enterprise Resource Planning Blogs by SAP
- Streamlining Customer Business Partner Creation in SAP Using BAPIs in Enterprise Resource Planning Q&A
- Expenses for retail customers who purchase products and expenses for people who provide services in Enterprise Resource Planning Q&A
- Dunning for CardCode not consolidating business partner in Enterprise Resource Planning Q&A
Top kudoed authors
| User | Count |
|---|---|
| 7 | |
| 6 | |
| 4 | |
| 4 | |
| 4 | |
| 3 | |
| 3 | |
| 3 | |
| 3 | |
| 3 |