SAP offers the Test Automation Tool for SAP S/4HANA Cloud. The test tool is natively part of the SAP S/4HANA Cloud Quality System. It comes with predefined automatic Test Processes for most of standard business processes. However, sometimes it is necessary to adapt these standard test processes. This was needed in my project experience because of reasons which included, certain part of test process was not needed in customer context, update was needed due to changes UI or additional input data needed to be provided.
In this blog, I will explain how the standard test processes can be adapted. This is based on my experience with the tool. I will also provide reference to other existing blogs where specific topic is explained in further details.
1. Access the Application
All the steps mentioned further are performed in app 'Manage Your Test Processes'. To access this application, you need to have business role SAP_BR_ADMIN_TEST_AUTOMATION.
2. Copy Test Process and Process Steps
2.1 Copy Test Process
Standard Test Processes cannot be edited, they need to be copied to be able to modify. To do this, search for the Test Process to be adapted and then click the 'Copy' button, in the menu.

Provide the name of target Test Process and Save. The new Test Process will be available in the list.
'Adapt Test Process' option has more features than just making copy. It is a 2-step guided procedure which first makes a copy of the Test Process and then creates a Test Plan for the test execution. Here, while providing name of target Test Process you can choose Process Steps you want to be part of copied Test Process.
The Custom Tesp Process provides menu options which you can use to modify it further.

2.2 Convert Process Steps
Like for Test Process, standard Process Step cannot be modified. To be able to modify it, you need to change type from 'Standard' to 'Custom'. To do this open the Test Process in Edit mode. Select the Process Steps you want to modify and click on 'Change Type'.

That changes 'Type' of Process Step to 'Custom'.

Note that once type is changed you cannot change it back to 'Standard'. However, you can insert again the Standard Process Step, if needed.
3. Adapt Process Step
You may want to include additional Actions to the existing ones in the Process Step. If these actions does not exist already in any other Process Steps, then you will have to add it by doing recording.
3.1 Launch the Application
First step for doing recording is to launch the app on which the actions need to be performed. For this open the Process Step and switch to Edit mode. Select the Action ID below or above whose you want to add the actions. Click on 'Add above' or 'Add below' as needed. This will launch the relevant application for this Process Step, in the another tab of browser.

It may be the case that the actions you want to record occurs after the actions already exist in the Process Step, means you don't want to record actions from the beginning. In such cases, perform the actions in the actions in the tab opened, until you reach a point from where the recording should be started.
3.2 Start Recording
Once you reach that point, go back to a tab where Process Step is opened and click on 'Record'.

This will show the status on this screen as 'Recording In Progress' and remain that until you do not either stop the recording or close the tab having application open. On the application screen you should see the Recording Panel now.

All the actions performed here, for example clicking on fields, providing input, pressing Keys, will be recorded. You can pause the recording with 'Pause Recording' button and resume it with 'Play Recording'.

3.3 Check Operation
If you want to verify value of certain field as part of test, you can do this with Check option. Click on button 'Check' and click on on the field where the value needs to be checked. The field should be highlighted with red border when cursor is moved over.

Next, there will be small pop-up where you can provide expected correct value. If the value may have variable text, then that part of string can be replaced with (.*). This can be useful when there are some document numbers in the field.

3.4 Read Operation
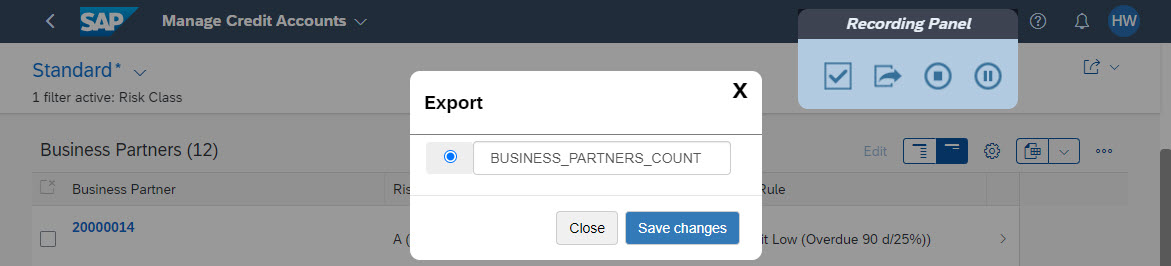
You can use Read option to capture the results during the test. For example, the document number created during the test needs to be captured. In this example, I will read the count of Business Partners returned. Click on button 'Read' and click on on the field from where the value needs to be read. The field should be highlighted with red border when cursor is moved over.

Next, there will be small pop-up where you can define the parameter which will hold the value captured. The parameter will be available for selection in further steps if it needs to be used as input.
3.5 Stop Recording
Finally, when all actions are performed you can click on 'Stop recording'. The application tab gets closed and on the Process Step screen, you will get the newly added actions listed and selected. You will see all the actions that have been performed. For Check and Read actions, you should put wildcard as (.*) where necessary. For example, here from the text "Business Partners (12)", I would like the parameter 'BUSINESS_PARTNER_COUNT' to get value 12.

3.6 Save Process Step
After all modification are completed, you can Save the Process Step. You will get the summary of modification being saved.

4. Reuse Existing Actions
It is typical to have same application in multiple Test Processes and many steps are repeated in there. So, if you have created actions in one Process Step, you can use then in another Process Step. For this open the Process Step and switch to Edit mode. Select the Action ID below or above whose you want to add the actions. Click on 'Copy Actions' and select 'Copy Actions Above' or 'Copy Actions Below' as needed.

On the pop-up that opens, first the Test Process and then select the Process Step. Further select the actions you want to add.

Using this option, you can also add standard actions to any other custom Process Step or fill empty custom Process Step with all the actions from any standard Process Step.
5. Replace Custom Process Step with Standard
As mentioned earlier, it is not possible to change type of Process Step from 'Custom' to 'Standard'. The equivalent option for this is to replace the custom Process Step with respective standard Process Step to the Test Process.
To do this, search the Test Process and switch to Edit mode. Open the search-help, search and select the standard Test Process first and then select the standard Process Step.

The Process Step will be replaced by the standard one.

Finally, you can Save the Test Process.
