
- SAP Community
- Products and Technology
- Enterprise Resource Planning
- ERP Blogs by Members
- SAP on Azure : Highly Available File Share Cluster...
Enterprise Resource Planning Blogs by Members
Gain new perspectives and knowledge about enterprise resource planning in blog posts from community members. Share your own comments and ERP insights today!
Turn on suggestions
Auto-suggest helps you quickly narrow down your search results by suggesting possible matches as you type.
Showing results for
former_member64
Participant
Options
- Subscribe to RSS Feed
- Mark as New
- Mark as Read
- Bookmark
- Subscribe
- Printer Friendly Page
- Report Inappropriate Content
08-04-2020
9:37 AM
Introduction
This blog provides step by step guide for Highly Available (HA) File Share cluster on Windows Operating System using SIOS Datakeeper which will provide ‘sapmnt’ and ‘trans’ individual/separate fileshare for multiple SAP environments in the landscape. This will cover all the aspects of single of failure (SPOF) for SAP Application layer. Blog will skip the setup of Database layer of SAP environment.
Purpose
To build HA environment for deploying SAP landscape in Azure we need to have SMB/NFS HA Fileshare environment which will host the common filesystems(like ‘sapmnt’ and ‘trans’) for all the environments. This will help to achieve the availability SLA and optimization of the landscape design. We can either use availability set or availability zone to deploy the Fileshare cluster based on the availability requirements. This blog covers one of the multiple approaches for deploying the fileshare for SAP systems in Windows environment.
System Design
Below is the example scenario design of the Production SAP landscape for an organization. Windows fileshare cluster is the central location for hosting the common filesystems for all/multiple SIDs and they are hosted (and can be maintained) independent of each other.
In this blog, as an example lets us consider that we have four SAP SID in our landscape which have HA setup for ASCS and database. There is one common SMB File share cluster which will hosting four separate SMB fileshare, each of which have separate virtual hostname and separate storage associated with it. Only specific mountpoints can be mounted to the relevant ASCS and application servers.
File share names:
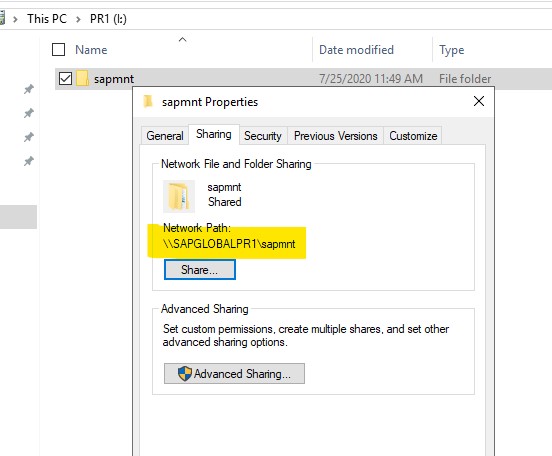
- \\sapglobalPR1\sapmnt
- \\sapglobalPR2\sapmnt
- \\sapglobalC01\sapmnt
- \\sapglobalC02\sapmnt
Each fileshare will have separate role in WFSC cluster and separate drive for the share. Drives are replicated(sync) between the cluster nodes using SIOS Datakeeper. Internal Load balancers are used to create virtual IPs of the fileshares.
Solution meets the requirements of SAP Fileshare as described in SAP Note 2492395 (example 2) in which it states that we can’t change the name ‘sapmnt’ for SAP Fileshare.
Following the details of the reference setup which are described in the blog:
| Hostname | Description | OS Version | Drive Letters |
| azwinfileshare1 | SMB Fileshare Node1 | Windows 2019 | I: (PR1), J: (PR2), M: (C01), N: (C02) |
| azwinfileshare2 | SMB Fileshare Node2 | Windows 2019 | I: (PR1), J: (PR2), M: (C01), N: (C02) |
| sapglobalPR1 | Virtual hostname for PR1 fileshare | - | - |
| sapglobalPR2 | Virtual hostname for PR2 fileshare | - | - |
| sapglobalC01 | Virtual hostname for C01 fileshare | - | - |
| sapglobalC02 | Virtual hostname for C02 fileshare | - | - |
The setup has used Azure Zone features which provides 99.99% of VM availability. Same setup can be used for Availability Set based deployment which provides 99.95% of availability for the cluster VMs.
Solution can be extended to other Azure region for Disaster Recovery(DR) setup by setting up Azure Site Recovery (ASR) of the Fileshare VMs.
Overview of the Installation Steps
Overall steps for the deployment of the Fileshare cluster for SAP Application layer HA setup are :
- Preform the preparatory steps.
- Define the Internal Load balancer.
- Deploy the WFSC Failover Cluster.
- Setup and configure the SIOS DataKeeper Replication.
- Setup the Fileshare as Failover Cluster Roles.
- Setup SAP ASCS/ERS Cluster using Fileshare.
- Utilize the Fileshare for SAP PAS Installations.
- Optimization steps for SAP Environment using Fileshare.
- Test the Cluster Setup
Preparations
- Read the required Installation Guide, SAP Notes, SAP on Azure docs and download the installation media.
- Deploy the VM in Availability Zones as per the system architecture and Choose Operating System as Windows Server for Application Layer.
- Add equal number & size of disks to SMB File share VMs.
- Join the VMs to the Domain.
- Define Page File in Temp Disk (D Drive).
- Check that necessary Ports are open in Windows firewall.
- Disable the Continuous Availability Feature in Windows using the instructions in this link.
Define the Internal Load Balancer
Create a standard Internal load balancer and define the setup as below:
| Front-end IP | Backend Pool | Health probe port | Load balancing rule |
10.20.10.15 (virtual IP for sapglobalPR1) | azwinfileshare1 and azwinfileshare2 | 62200 | Enable HA Port, Enable Floating IP, Idle Timeout (30 Minutes) |
10.20.10.16 (virtual IP for sapglobalPR2) | 62205 | Enable HA Port, Enable Floating IP, Idle Timeout (30 Minutes) | |
10.20.10.17 (virtual IP for sapglobalC01) | 62210 | Enable HA Port, Enable Floating IP, Idle Timeout (30 Minutes) | |
10.20.10.18 (virtual IP for sapglobalC02) | 62215 | Enable HA Port, Enable Floating IP, Idle Timeout (30 Minutes) |
In case of using a Basic Load balancer in Availability Set based deployment, load balancing rules needs to created for port 445 and 5985.
Setup Windows Cluster
- Login to the fileshare VMs as administrator
- In the Add Role and Features Wizard, Install the .NET Framework 3.5 and Failover Clustering for both the nodes.

- Set up the failover cluster by using Failover Cluster Manager. In Failover Cluster Manager, select Create Cluster, and then add only the name of the first cluster (node A). Do not add the second node yet; you add the second node in a later step.

- Enter the network name (virtual host name) of the cluster.

- Continue with next steps to create the cluster.
Note : If we are using Windows Server 2016, once cluster is created then we need to update the IP of the cluster (which also needs to be defined as A-record in AD/DNS) and then start the cluster.
- Add Note2 to the cluster


Uncheck ‘Add all eligible storage to the cluster’
- Continue with the steps to add the Node 2 to the cluster. Once Node2 is successfully added. Check that both the Nodes are showing status as ‘Up’.
- Configure the cloud share witness by selecting the option to add quorum to cluster.


Enter the storage account details for the cloud witness.
- Check the status of the cluster and cloud Witness as ‘Online’.

- Change below cluster parameters thresholds so they adapt failover detection to conditions in Azure.
SameSubNetDelay = 2000
SameSubNetThreshold = 15
RouteHistoryLength = 30
We can see further details about these setting in the link.
Setup SIOS Datakeeper Replication
- Create Domain User ‘DataKeeperSvc’ and add it in local admin group of both cluster nodes.
- Use the dism.exe command-line tool on both nodes. For this type of installation, you need to access the SxS directory on the Windows installation media. At an elevated command prompt, enter this command:
Dism /online /enable-feature /featurename:NetFx3 /All /Source:installation_media_drive:\sources\sxs /LimitAccess
- Start the Installation of the latest version of SIOS Datakeeper in both cluster nodes.

- Note the information about Ports to be opened for SIOS Datakeeper.

- Maintain the Service Account details


- Enter license details of SIOS DataKeeper
 Restart the fileshare VMs before starting the SIOS Datakeeper configuration.
- Enter license details of SIOS DataKeeper
- Configure SIOS DataKeeper
- Open SIOS Datakeeper in Node 1, click on ‘connect’.

- Enter the IP Address of Fileshare Cluster Node 1


- Repeat the step to connect to Node 2.
- Check the server overview which shows four drives on both nodes.

- Create the Replication Job

- Select the source server and volume for replication

- Select the target server and volume

- Choose the mode of replication as ‘Synchornus’

- Add the shared volume to Windows cluster.

- Repeat the above steps to Create jobs for all the volumes.
- Check the status of replication.

- Check the shared volume status in the Failover Cluster

- Open SIOS Datakeeper in Node 1, click on ‘connect’.
Configure Fileshares
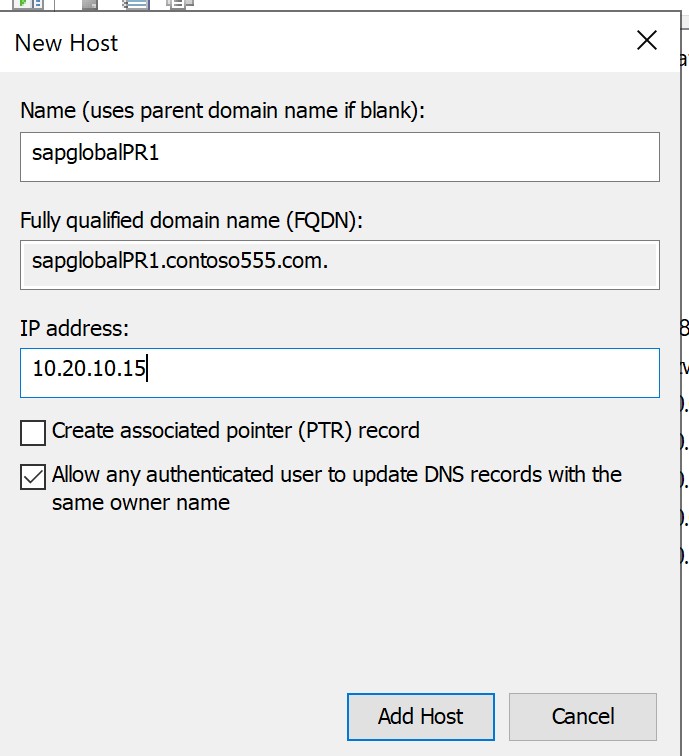
- Create New A Record in AD/DNS for all the virtual hostnames of Fileshare. IP address will be same as its defined as front-end IP of ILB.
- Create Role in Failover cluster.

- Select the Role Type as ‘File Server’.

- Choose ‘File Server for General Use’

- Define the name same as virtual hostname.

- Choose the storage volume to be used for this fileshare. ‘sapmnt’ folder needs to be created as folder in this drive.

- Role creation successfully completed.

- Update the IP Address and Start the Role.

- Update the probe port for the Cluster Role
- Check the current probe port (using powershell command) which will be ‘0’ as its yet to be defined.
Get-ClusterResource "IP Address 10.20.10.15" | Get-ClusterParameter
- Run the powershell commands to set the probe port
$ClusterNetworkName = “Cluster Network 1"


$IPResourceName = "IP Address 10.20.10.15"


$ILBIP = "10.20.10.15"


Import-Module FailoverClusters


Get-ClusterResource $IPResourceName | Set-ClusterParameter -Multiple @{Address=$ILBIP;ProbePort=62200;SubnetMask="255.255.255.255";Network=$ClusterNetworkName;EnableDhcp=0}
- Restart the Role to activate configuration
- Check the ProbePort configuration
Get-ClusterResource "IP Address 10.20.10.15" | Get-ClusterParameter
- Repeat the above steps to create the Failover cluster roles for other Fileshares.
\\sapglobalPR2\sapmnt


\\sapglobalC01\sapmnt


\\sapglobalC02\sapmnt
- Check the status of the Roles.

- Create the ‘sapmnt’ share for each path.

SAP ASCS/ERS HA Setup with Fileshare
Below are the high level steps for setting up SAP ASCS/ERS HA setup on Windows Server using Fileshare. Please refer to reference section for links with more details.
- Perform all preparations steps as described in the “prepare” section.
- Create the loadbalancer for ASCS and ERS (e.g. for S/4 HANA).
Create front-end IP, backend-pool, health probe, and loadbalancing rule for ASCS/ERS cluster.
As an example, following will be ILB details for PR1 (which is S/4 HANA environment)
| Front-end IP | Backend Pool | Health probe port | Load balancing rule |
10.20.10.25 (ASCS Virtual IP) | azwinpr1ascs1 and azwinpr1ascs2 | 62300 | Enable HA Port, Enable Floating IP, Idle Timeout (30 Minutes) |
10.20.10.26 (ERS Virtual IP) | 62302 | Enable HA Port, Enable Floating IP, Idle Timeout (30 Minutes) |
In case of Basic loadbalancer, we need to define load balancing rule for all the allowed ports.
For ASCS : 32xx, 36xx, 39xx, 81xx, 5xx13, 5xx14, 5xx16
For ERS : 33xx, 5xx13, 5xx14, 5xx16
Windows-specific ports for every SAP system: 5985
For SAP Java environment, please refer to port requirement in SAP documentation.
- Add A-record in AD/DNS for virtual hostname of ASCS and ERS (e.g. for S/4 HANA) virtual hostnames and assign the front-end IP defined in the ILB.
- Login to ASCS/ERS VMs as administrator user.
- Add registry entries on both cluster nodes of the SAP ASCS/SCS instance
- Entry 1
Path : HKLM\SYSTEM\CurrentControlSet\Services\Tcpip\Parameters


Variable name : KeepAliveTime


Variable type : REG_DWORD (Decimal)


Value : 120000
- Entry 2
Path : HKLM\SYSTEM\CurrentControlSet\Services\Tcpip\Parameters


Variable name : KeepAliveInterval


Variable type : REG_DWORD (Decimal)


Value : 120000
- In the Add Role and Features Wizard, add “failover clustering” to both cluster nodes.
- Create the Failover cluster by adding Node1. If OS is Windows 2016, update the IP of the cluster and then start the cluster. IP needs to be defined against the cluster name in the AD/DNS.
- Add Node2 to the cluster.
- Add the cloud witness to the cluster.
- Change cluster thresholds so they adapt failover detection to conditions in Azure.
SameSubNetDelay = 2000
SameSubNetThreshold = 15
RouteHistoryLength = 30
We can see further details about these setting in the link.
- Start the SWPM to install the ASCS First Cluster Node.
- While Installing ASCS First Cluster Node, Select the Cluster share configuration as ‘File Share Cluster’

- Enter the hostname of file share cluster, in this case we use ‘sapglobalPR1’ for PR1 setup.

- Add following parameters in Instance profile
enque/encni/set_so_keepalive = true


service/ha_check_node = 1
- Configure the probe port for the Cluster role using the powershell.
Get-ClusterResource "SAP PR1 IP" | Get-ClusterParameter


$ClusterNetworkName = “Cluster Network 1”


$IPResourceName = "SAP PR1 IP"


$ILBIP = "<Virtual IP>"


Import-Module FailoverClusters


Get-ClusterResource $IPResourceName | Set-ClusterParameter  -Multiple @{Address=$ILBIP;ProbePort=<probePort>;SubnetMask="255.255.255.255";Network=$ClusterNetworkName;EnableDhcp=0}
For ERS Role (e.g. in S/4 Hana)
Get-ClusterResource "SAP PR1 ERS IP" | Get-ClusterParameter


$ClusterNetworkName = “Cluster Network 1”


$IPResourceName = "SAP PR1 ERS IP"


$ILBIP = "<Virtual IP>"


Import-Module FailoverClusters


Get-ClusterResource $IPResourceName | Set-ClusterParameter  -Multiple @{Address=$ILBIP;ProbePort=<probePort>;SubnetMask="255.255.255.255";Network=$ClusterNetworkName;EnableDhcp=0}
Restart the Cluster Roles to activate the changes.
- Run SWPM on Node2, to install the ‘Additional Cluster Node’.
Using Fileshare in SAP PAS Setup
Following are the some relevant entries for Fileshare location while installing SAP PAS instance using SWPM.
- Select the Profile directory which is in the File share cluster

- Select the Fileshare virtual hostname for transport Directory. Transport directory hostname can be same as ‘sapmnt’ virtual host. Otherwise we can create a separate virtual host, ILB front-end IP, Cluster Role, storage volume for transport host in the Fileshare Cluster.

Optimization Steps for SAP Setup using Fileshare
There are several recommendations and SAP Notes available to tune the SAP deployment using fileshare.
- SAP Note 1823833 - Accessing shares via SMB3.x will result in long waiting times
Make sure Continuous availability is disabled in all the SAP and fileshare VMs as described in the link.
- SAP Note 2802770 - AL11 running slow on Windows
Specially Check the setting of your drives NTFS configuration with "Fsutil 8Dot3Name query" as described in SAP Note 662452
- SAP Note 1911507 - Background Jobs canceled during failover of (A)SCS instance in windows failover cluster
SMB 3.0 must be active in all the VMs.
- File Server Resource Manager – We can use quota management to set limits on the fileshare and define rules & alerts.
Failover Cluster Testing
Failover testing needs to be performed for Fileshare cluster, ASCS Cluster and Database cluster of the SAP environment.
There are mainly 2 kinds of HA testing needs to be performed:
- Planned – In case of planned unavailability of the one the node of the cluster pair. This can be tested by stopping the services on the node and verifying that SAP services are available to users.
- Unplanned – This can be tested by crashing the VMs and removing the storage from VMs. In windows environment, VM crashing can be achieved by the tool ‘notmyfault’.
References
- SAP on Azure: Planning and Deployment Checklist
- SAP on Azure: Deployment for SAP Netweaver
- SAP ASCS/ERS Cluster Setup on Windows Environment
- SAP Note 1928533 - SAP Applications on Azure: Supported Products and Azure VM types
- SAP Note 2492395 - Can the share name sapmnt be changed
- SAP Note 2802770 - AL11 running slow on Windows
- SAP Note 662452 - Poor file system performance/errors during data accesses
- SAP Note 1823833 - Accessing shares via SMB3.x will result in long waiting times
- SAP Managed Tags:
- SAP NetWeaver,
- SAP S/4HANA
10 Comments
You must be a registered user to add a comment. If you've already registered, sign in. Otherwise, register and sign in.
Labels in this area
-
"mm02"
1 -
A_PurchaseOrderItem additional fields
1 -
ABAP
1 -
ABAP Extensibility
1 -
ACCOSTRATE
1 -
ACDOCP
1 -
Adding your country in SPRO - Project Administration
1 -
Advance Return Management
1 -
AI and RPA in SAP Upgrades
1 -
Approval Workflows
1 -
Ariba
1 -
ARM
1 -
ASN
1 -
Asset Management
1 -
Associations in CDS Views
1 -
auditlog
1 -
Authorization
1 -
Availability date
1 -
Azure Center for SAP Solutions
1 -
AzureSentinel
2 -
Bank
1 -
BAPI_SALESORDER_CREATEFROMDAT2
1 -
BRF+
1 -
BRFPLUS
1 -
Bundled Cloud Services
1 -
business participation
1 -
Business Processes
1 -
CAPM
1 -
Carbon
1 -
Cental Finance
1 -
CFIN
1 -
CFIN Document Splitting
1 -
Cloud ALM
1 -
Cloud Integration
1 -
condition contract management
1 -
Connection - The default connection string cannot be used.
1 -
Custom Table Creation
1 -
Customer Screen in Production Order
1 -
Data Quality Management
1 -
Date required
1 -
Decisions
1 -
desafios4hana
1 -
Developing with SAP Integration Suite
1 -
Direct Outbound Delivery
1 -
DMOVE2S4
1 -
EAM
1 -
EDI
3 -
EDI 850
1 -
EDI 856
1 -
edocument
1 -
EHS Product Structure
1 -
Emergency Access Management
1 -
Energy
1 -
EPC
1 -
Financial Operations
1 -
Find
1 -
FINSSKF
1 -
Fiori
1 -
Flexible Workflow
1 -
Gas
1 -
Gen AI enabled SAP Upgrades
1 -
General
1 -
generate_xlsx_file
1 -
Getting Started
1 -
HomogeneousDMO
1 -
How to add new Fields in the Selection Screen Parameter in FBL1H Tcode
1 -
IDOC
2 -
Integration
1 -
Learning Content
2 -
LogicApps
2 -
low touchproject
1 -
Maintenance
1 -
management
1 -
Material creation
1 -
Material Management
1 -
MD04
1 -
MD61
1 -
methodology
1 -
Microsoft
2 -
MicrosoftSentinel
2 -
Migration
1 -
mm purchasing
1 -
MRP
1 -
MS Teams
2 -
MT940
1 -
Newcomer
1 -
Notifications
1 -
Oil
1 -
open connectors
1 -
Order Change Log
1 -
ORDERS
2 -
OSS Note 390635
1 -
outbound delivery
1 -
outsourcing
1 -
PCE
1 -
Permit to Work
1 -
PIR Consumption Mode
1 -
PIR's
1 -
PIRs
1 -
PIRs Consumption
1 -
PIRs Reduction
1 -
Plan Independent Requirement
1 -
Premium Plus
1 -
pricing
1 -
Primavera P6
1 -
Process Excellence
1 -
Process Management
1 -
Process Order Change Log
1 -
Process purchase requisitions
1 -
Product Information
1 -
Production Order Change Log
1 -
purchase order
1 -
Purchase requisition
1 -
Purchasing Lead Time
1 -
Redwood for SAP Job execution Setup
1 -
RISE with SAP
1 -
RisewithSAP
1 -
Rizing
1 -
S4 Cost Center Planning
1 -
S4 HANA
1 -
S4HANA
3 -
Sales and Distribution
1 -
Sales Commission
1 -
sales order
1 -
SAP
2 -
SAP Best Practices
1 -
SAP Build
1 -
SAP Build apps
1 -
SAP Cloud ALM
1 -
SAP Data Quality Management
1 -
SAP Maintenance resource scheduling
2 -
SAP Note 390635
1 -
SAP S4HANA
2 -
SAP S4HANA Cloud private edition
1 -
SAP Upgrade Automation
1 -
SAP WCM
1 -
SAP Work Clearance Management
1 -
Schedule Agreement
1 -
SDM
1 -
security
2 -
Settlement Management
1 -
soar
2 -
Sourcing and Procurement
1 -
SSIS
1 -
SU01
1 -
SUM2.0SP17
1 -
SUMDMO
1 -
Teams
2 -
User Administration
1 -
User Participation
1 -
Utilities
1 -
va01
1 -
vendor
1 -
vl01n
1 -
vl02n
1 -
WCM
1 -
X12 850
1 -
xlsx_file_abap
1 -
YTD|MTD|QTD in CDs views using Date Function
1
- « Previous
- Next »
Related Content
- SAP S/4HANA Cloud, public edition, ABAP Environment Case 8: Material Shelf Life Management in Enterprise Resource Planning Blogs by SAP
- CDS View in ABAP Development Environment Eclipse is showing authorizationerror in test system Public in Enterprise Resource Planning Q&A
- Introducing the GROW with SAP, core HR add-on in Enterprise Resource Planning Blogs by SAP
- What are the best ways to integrate SAP S/4HANA in a large-scale company environment? in Enterprise Resource Planning Q&A
- SAP S/4HANA Cloud Extensions with SAP Build Best Practices: An Expert Roundtable in Enterprise Resource Planning Blogs by SAP
Top kudoed authors
| User | Count |
|---|---|
| 9 | |
| 4 | |
| 2 | |
| 2 | |
| 1 | |
| 1 | |
| 1 | |
| 1 | |
| 1 | |
| 1 |