
- SAP Community
- Products and Technology
- Enterprise Resource Planning
- ERP Blogs by Members
- How To Embed an ERP Mash-Ups to the Sales&Service ...
Enterprise Resource Planning Blogs by Members
Gain new perspectives and knowledge about enterprise resource planning in blog posts from community members. Share your own comments and ERP insights today!
Turn on suggestions
Auto-suggest helps you quickly narrow down your search results by suggesting possible matches as you type.
Showing results for
burakbiber
Explorer
Options
- Subscribe to RSS Feed
- Mark as New
- Mark as Read
- Bookmark
- Subscribe
- Printer Friendly Page
- Report Inappropriate Content
01-03-2024
2:32 PM
Hello everyone,
I am writing this blog to offer a radical and permanent solution to the problem of "How to install ERP Mash-Up on Sales Cloud (C4C) system?" which I have researched a lot. most of the time, but I could not find the clarity I wanted.
I promise you, you can master the whole process and install your ERP mashup screens in the Cloud system yourself, one by one, as an expert. a single SAP Consultant without any support.
While getting the information I gained, from the transaction codes between the screens to the implementation, maybe - this is not bigger than the sky - but I felt MasterMind😊
Anyway...
With reference to the screenshots below, you will be able to integrate any ERP Mash-Up screens you want into your own Sales & Service Cloud screens.
I have a very nice hint surprise marked with a * icon at the beginning of the blog.
Have a pleasant reading!
Before we start, we are going to start with WebGui activating process and then we need the URL and IP addresses with http/https extension used by the organization whose project we are doing or whose ERP system we are using.

*Step 1:Go to SICF transaction code in your ERP System and execute them.

Note: You do not necessarily have to have the input screen of the transaction code here the key point in this step is that whichever screen we want to implampent to Sales Cloud; we need the screen field name for it. (Screen Field:VBAK-VBELN)

If the Mash-Up is to be created only for a specific object (lead, opp., quote, etc.), we can connect the relevant port to these objects and access the Mash-Ups we create only in those objects.
But if we create it without connecting a port, we can implement our Mash-Ups on every object screen we want. Without limitations. Like a Getaway Car…
We have give a name to the Mash-Up we created and continue to fill in the field information.
Then we add the plugin that should be entered as standard for WEBGUI access via link (URL) to the end of the URL. /sap/bc/gui/sap/its/webgui/
Then; The information such as client, username, password required to call the relevant link should be entered in the parameter section as a list as follows.
And lastly and most importantly;
We need to enter a transaction information as below.
This transaction parameter has a specific standard format and at the same time, the area I highlighted in the screen area section I mentioned in Step 5 is added to the parameter list by adding it next to the text format below.
Then select the parameter value for the port we have selected specific to the object where we will install the mash-up. Here, it is diagnosed over which value Mash-Up will go to the screen.
By giving the External ID Parameter in the relevant example. It is ensured to go to the screen related to the Offer External ID.
~transaction=*VA22%20VBAK-VBELN
Then we add the plugin that should be entered as standard for WEBGUI access via the link (URL) to the end of the URL. /sap/bc/gui/sap/its/webgui Then; The information such as client, username, password required to call the relevant link should be entered in the parameter section as a list as follows.
And lastly and most importantly;
We need to enter a transaction information as below. This transaction parameter has a specific standard format and at the same time, the area I highlighted in the screen area section I mentioned in Step 5 is added to the parameter list by adding the following text format next to it.
PLEASE DONT FORGET THE “ ~ ” ICON BEFORE WRITE THE TRANSACTION.
~transaction=*VA22%20VBAK-VBELN
The asterisk * icon in front of the operation code is placed to execute the operation code.
20% means a space before the parameter display field is entered.
VBAK-VBELN: As shown in Step 5, it refers to the screen area opened with the corresponding fn+f1 command.


Step 8: The URL we select from the list is impalemated on the screen as mashup link based.
I am writing this blog to offer a radical and permanent solution to the problem of "How to install ERP Mash-Up on Sales Cloud (C4C) system?" which I have researched a lot. most of the time, but I could not find the clarity I wanted.
I promise you, you can master the whole process and install your ERP mashup screens in the Cloud system yourself, one by one, as an expert. a single SAP Consultant without any support.
While getting the information I gained, from the transaction codes between the screens to the implementation, maybe - this is not bigger than the sky - but I felt MasterMind😊
Anyway...
With reference to the screenshots below, you will be able to integrate any ERP Mash-Up screens you want into your own Sales & Service Cloud screens.
I have a very nice hint surprise marked with a * icon at the beginning of the blog.
Have a pleasant reading!
Before we start, we are going to start with WebGui activating process and then we need the URL and IP addresses with http/https extension used by the organization whose project we are doing or whose ERP system we are using.
*Step 1:Go to SICF transaction code in your ERP System and execute them.
*Step 2: Follow the /sap/bc/gui/sap/its/webgui/ sets one by one

*Step 3: Lastly, Find the /sap/bc/gui/sap/its/webgui/ service and “Activate” via right click.

Step 4: First go to SMICM T-Code in your ERP system.
Then, either with FN+F1 or with Goto-Services, open the "Performance Assistant" screen below.
 Step 5:Then click on the "Technical Information" button in the window.

Step 6: Focus on the lines with http and https extensions on the ICM Monitor screen,
take a quick note of the service name/port and host name columns respectively.
(Note: The information we get here is so important. Because this link extension forms the basis of the link (URL) or embedded screen that we will call from the Cloud system. The link extension mentioned here can be as in the example. https://xxxtrail.examplecompany.

Step 7: Navigate to the transaction code you want to add and then to the input screen of the transaction code. (VA22)
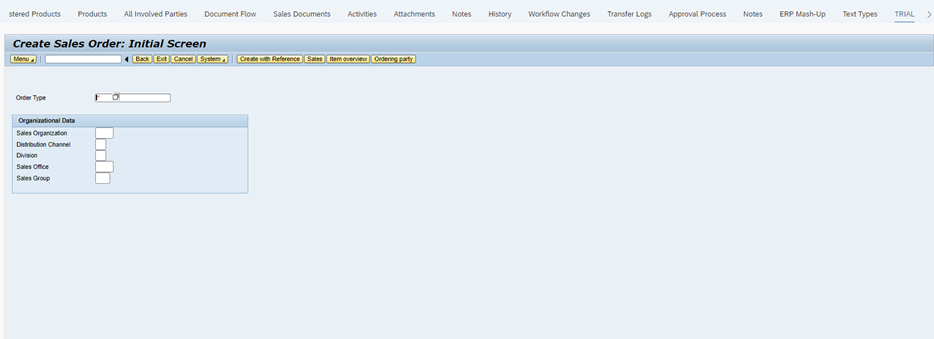
Step 8: On the input screen, use the keyboard command FN+F1 to write down the screen field name marked with a red field.
You can see an example of the screen field of transaction code “VA22” on the relevant screen.
Note: You do not necessarily have to have the input screen of the transaction code here the key point in this step is that whichever screen we want to implampent to Sales Cloud; we need the screen field name for it. (Screen Field:VBAK-VBELN)
From this point on, we have actually received all the information we need to set up HTML and URL Mash-Up from ERP screens. From now on, we will only work with Cloud system screens and integrate the relevant Mash-Up screens into our Cloud system.
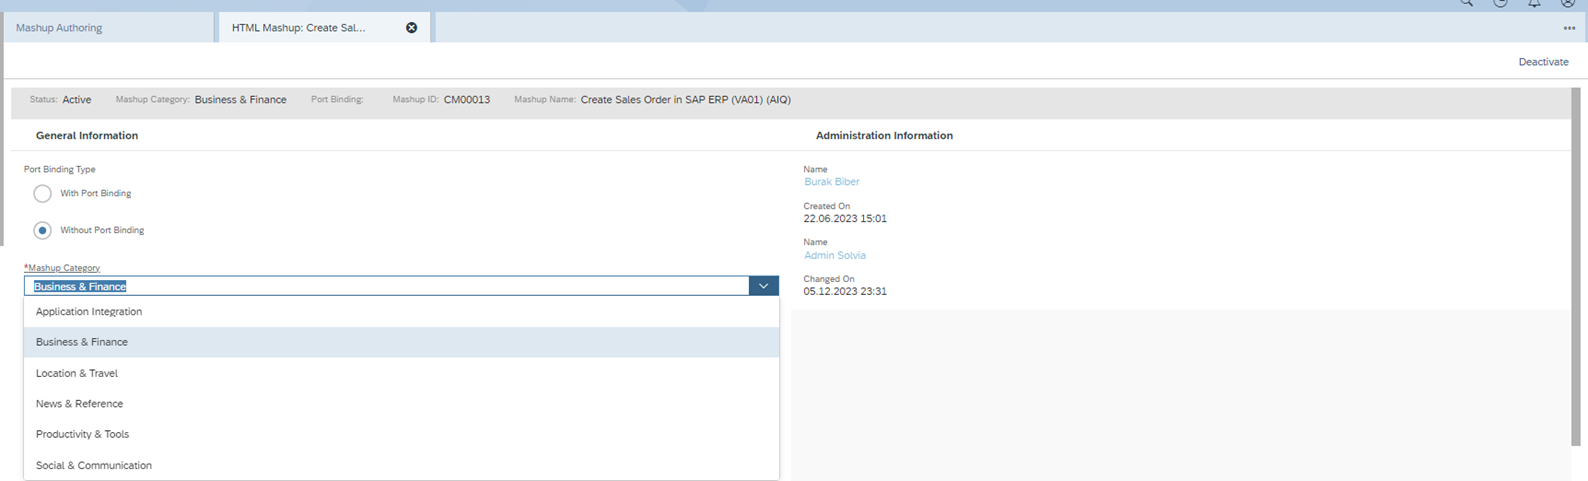
Step 9:For this, we go to WorkCenter Administrator---Mashup Authoring respectively.
Select New-URL Mashup and go to the creation screen.

Step 10: Here we are primarily presented with two options:
With Port Binding
Without Port Binding
If the Mash-Up is to be created only for a specific object (lead, opp., quote, etc.), we can connect the relevant port to these objects and access the Mash-Ups we create only in those objects.
But if we create it without connecting a port, we can implement our Mash-Ups on every object screen we want. Without limitations. Like a Getaway Car…
We have give a name to the Mash-Up we created and continue to fill in the field information.

Step 11: When we come to the URL section; We write the URL we received from the SMICM transaction code in this field and then add the port number of the link we received (http, https...) to the URL as in the following format (:).
(Further Info---Step 3)
https://xxxtrail.examplecompany.com.tr:8001
Then we add the plugin that should be entered as standard for WEBGUI access via link (URL) to the end of the URL. /sap/bc/gui/sap/its/webgui/
Then; The information such as client, username, password required to call the relevant link should be entered in the parameter section as a list as follows.
| sap client: | 500 (You will get this info from ERP System) |
| sap user: | Login Username |
| sap password: | Login Username Password |
| sap language: | ERP System Language Preference |
| ~transaction=*VA22%20VBAK VBELN | ExtObjectID |
And lastly and most importantly;
We need to enter a transaction information as below.
This transaction parameter has a specific standard format and at the same time, the area I highlighted in the screen area section I mentioned in Step 5 is added to the parameter list by adding it next to the text format below.
Then select the parameter value for the port we have selected specific to the object where we will install the mash-up. Here, it is diagnosed over which value Mash-Up will go to the screen.
By giving the External ID Parameter in the relevant example. It is ensured to go to the screen related to the Offer External ID.
~transaction=*VA22%20VBAK-VBELN
- The * icon in front of the operation code is placed to execute the operation code.
-20% means a space before the parameter display field is entered.
VBAK-VBELN: As shown in Step 5, it refers to the screen area opened with the corresponding FN+F1 command.
How To Set Up ERP HTML Mash-Ups In Cloud Systems

Step 1: If we want to install an ERP HTML Mashup in the system, we go to Administrator-Mashup Authoring from the work-center respectively. Select New-HTML Mashup and go to the creation screen.
Step 2: Here again, we are presented with two options.
With Port Binding
Without Port Binding
I have shown the "With Port Binding" example in URL Mash-Up in the example above,
but the HTML I would like to continue with the "Without Port Binding"
example for diversity in our Mash-Up example.
If we want to set up a Mash-Up without Port Binding, the important point here is that we can select and add the Mash-Up we have set up on any object.
The related HTML Mash-Up is also HTML-based and HTML code-typed, and in addition, if desired, Mashups can also be created by writing operations code directory from the code writing screen.
But in this example, we will continue with the URL type example based on HTML Mash-Up.
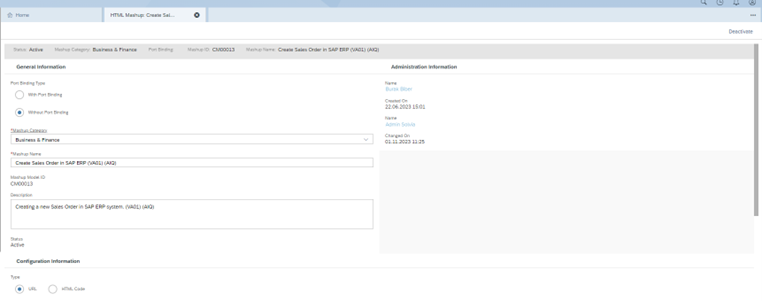
In Without Port Binding Mash-Up selection, we need to select a category.
Since I want to set up this Mash-Up on the offer object in the related example, and the offer object is a transactional data (sales data),
I continue my transaction through the "Business&Finance" category.
Step 3: When we come to the URL section; We write the URL we get from the SMICM transaction code in this field and then add the port number of whatever link we received (http, https...) to the URL as in the following format (:). https://xxxtrail.examplecompany.com.tr:8001
(Further Info---Step 3)
Then we add the plugin that should be entered as standard for WEBGUI access via the link (URL) to the end of the URL. /sap/bc/gui/sap/its/webgui Then; The information such as client, username, password required to call the relevant link should be entered in the parameter section as a list as follows.
| sap client: | 500 (You will get this info from ERP System) |
| sap user: | Login Username |
| sap password: | Login Username Password |
| sap language: | ERP System Language Preference |
| ~transaction=*VA22%20VBAK VBELN |
And lastly and most importantly;
We need to enter a transaction information as below. This transaction parameter has a specific standard format and at the same time, the area I highlighted in the screen area section I mentioned in Step 5 is added to the parameter list by adding the following text format next to it.
PLEASE DONT FORGET THE “ ~ ” ICON BEFORE WRITE THE TRANSACTION.
~transaction=*VA22%20VBAK-VBELN
The asterisk * icon in front of the operation code is placed to execute the operation code.
20% means a space before the parameter display field is entered.
VBAK-VBELN: As shown in Step 5, it refers to the screen area opened with the corresponding fn+f1 command.

Step 4: Since we do not bind a port to this HTML type Mash-Up, we do not need to bind any object's parameter extension. The Height value determines the mash-up view size, then,
Click on the "Preview" button to preview the relevant Mash-Up and check the screen.
- Important Note: If we want to design a Mash-Up screen that will automatically open the ERP screen without taking the action of clicking on the URL link to any work center or tab, we must enter the URL link we provide as "https" extension for such mashups!

Step 5: When we save the Mash-Up we created, we are directed to the "Mashup Authoring" screen again, then we click on the item of the Mash-Up we want to activate and click on the "Activate" button. Thus, the Mash-Up becomes "Active".
Step 6: When we want to add the Mash-Up we created as a link in the "Tab" on the related object, open the adaptation mode, first create the tab and click on "Mashup" with the "Add" button in the "Overview".
Step 7: The list view of all ERP Mash-Up we created should be like this. Select the Mash-Up we created from the list.

Step 8: The URL we select from the list is impalemated on the screen as mashup link based.
Thank you for reading my blog. Don't forget to leave a comment and give a like! ♥
BURAK®
May the force be with you!
- SAP Managed Tags:
- SAP ERP,
- C4C Extensibility,
- C4C Sales,
- C4C Service,
- User Experience
2 Comments
You must be a registered user to add a comment. If you've already registered, sign in. Otherwise, register and sign in.
Labels in this area
-
"mm02"
1 -
A_PurchaseOrderItem additional fields
1 -
ABAP
1 -
ABAP Extensibility
1 -
ACCOSTRATE
1 -
ACDOCP
1 -
Adding your country in SPRO - Project Administration
1 -
Advance Return Management
1 -
AI and RPA in SAP Upgrades
1 -
Approval Workflows
1 -
Ariba
1 -
ARM
1 -
ASN
1 -
Asset Management
1 -
Associations in CDS Views
1 -
auditlog
1 -
Authorization
1 -
Availability date
1 -
Azure Center for SAP Solutions
1 -
AzureSentinel
2 -
Bank
1 -
BAPI_SALESORDER_CREATEFROMDAT2
1 -
BRF+
1 -
BRFPLUS
1 -
Bundled Cloud Services
1 -
business participation
1 -
Business Processes
1 -
CAPM
1 -
Carbon
1 -
Cental Finance
1 -
CFIN
1 -
CFIN Document Splitting
1 -
Cloud ALM
1 -
Cloud Integration
1 -
condition contract management
1 -
Connection - The default connection string cannot be used.
1 -
Custom Table Creation
1 -
Customer Screen in Production Order
1 -
Data Quality Management
1 -
Date required
1 -
Decisions
1 -
desafios4hana
1 -
Developing with SAP Integration Suite
1 -
Direct Outbound Delivery
1 -
DMOVE2S4
1 -
EAM
1 -
EDI
3 -
EDI 850
1 -
EDI 856
1 -
edocument
1 -
EHS Product Structure
1 -
Emergency Access Management
1 -
Energy
1 -
EPC
1 -
Financial Operations
1 -
Find
1 -
FINSSKF
1 -
Fiori
1 -
Flexible Workflow
1 -
Gas
1 -
Gen AI enabled SAP Upgrades
1 -
General
1 -
generate_xlsx_file
1 -
Getting Started
1 -
HomogeneousDMO
1 -
How to add new Fields in the Selection Screen Parameter in FBL1H Tcode
1 -
IDOC
2 -
Integration
1 -
Learning Content
2 -
LogicApps
2 -
low touchproject
1 -
Maintenance
1 -
management
1 -
Material creation
1 -
Material Management
1 -
MD04
1 -
MD61
1 -
methodology
1 -
Microsoft
2 -
MicrosoftSentinel
2 -
Migration
1 -
mm purchasing
1 -
MRP
1 -
MS Teams
2 -
MT940
1 -
Newcomer
1 -
Notifications
1 -
Oil
1 -
open connectors
1 -
Order Change Log
1 -
ORDERS
2 -
OSS Note 390635
1 -
outbound delivery
1 -
outsourcing
1 -
PCE
1 -
Permit to Work
1 -
PIR Consumption Mode
1 -
PIR's
1 -
PIRs
1 -
PIRs Consumption
1 -
PIRs Reduction
1 -
Plan Independent Requirement
1 -
Premium Plus
1 -
pricing
1 -
Primavera P6
1 -
Process Excellence
1 -
Process Management
1 -
Process Order Change Log
1 -
Process purchase requisitions
1 -
Product Information
1 -
Production Order Change Log
1 -
purchase order
1 -
Purchase requisition
1 -
Purchasing Lead Time
1 -
Redwood for SAP Job execution Setup
1 -
RISE with SAP
1 -
RisewithSAP
1 -
Rizing
1 -
S4 Cost Center Planning
1 -
S4 HANA
1 -
S4HANA
3 -
Sales and Distribution
1 -
Sales Commission
1 -
sales order
1 -
SAP
2 -
SAP Best Practices
1 -
SAP Build
1 -
SAP Build apps
1 -
SAP Cloud ALM
1 -
SAP Data Quality Management
1 -
SAP Maintenance resource scheduling
2 -
SAP Note 390635
1 -
SAP S4HANA
2 -
SAP S4HANA Cloud private edition
1 -
SAP Upgrade Automation
1 -
SAP WCM
1 -
SAP Work Clearance Management
1 -
Schedule Agreement
1 -
SDM
1 -
security
2 -
Settlement Management
1 -
soar
2 -
Sourcing and Procurement
1 -
SSIS
1 -
SU01
1 -
SUM2.0SP17
1 -
SUMDMO
1 -
Teams
2 -
User Administration
1 -
User Participation
1 -
Utilities
1 -
va01
1 -
vendor
1 -
vl01n
1 -
vl02n
1 -
WCM
1 -
X12 850
1 -
xlsx_file_abap
1 -
YTD|MTD|QTD in CDs views using Date Function
1
- « Previous
- Next »
Related Content
- Mashups- between SAP ECC for Payroll and SuccessFactors Employee Central (EC)? in Enterprise Resource Planning Q&A
- SAP Business ByDesign for Microsoft Teams (Beta) in Enterprise Resource Planning Blogs by SAP
- SAP Business ByDesign - API Overview in Enterprise Resource Planning Blogs by SAP
- Changing UIs in SAP HCM for UX in Enterprise Resource Planning Blogs by Members
Top kudoed authors
| User | Count |
|---|---|
| 5 | |
| 2 | |
| 2 | |
| 2 | |
| 2 | |
| 2 | |
| 2 | |
| 1 | |
| 1 | |
| 1 |