
- SAP Community
- Products and Technology
- CRM and Customer Experience
- CRM and CX Blogs by SAP
- Download Request Scenario with Interaction Attribu...
CRM and CX Blogs by SAP
Stay up-to-date on the latest developments and product news about intelligent customer experience and CRM technologies through blog posts from SAP experts.
Turn on suggestions
Auto-suggest helps you quickly narrow down your search results by suggesting possible matches as you type.
Showing results for
Advisor
Options
- Subscribe to RSS Feed
- Mark as New
- Mark as Read
- Bookmark
- Subscribe
- Printer Friendly Page
- Report Inappropriate Content
04-30-2020
7:04 AM
 Introduction
Interaction Attributes for Forms
In the form editor in the Content Studio of SAP Marketing Cloud there is the option to create interactions for some time now. However, you could not add data which is form-specific to those interactions. With release 2005 this has changed. In the Input element we have added 'Interaction' as another mapping object (in addition to Contact and Account). If you choose the Interaction mapping object, you can specify 2 related settings:
- The interaction element(s) for which this Input field is relevant. When the form is submitted the input field value is written to all interactions you selected.
- The interaction attribute - similar to the Contact attribute, the type of attribute might influence the input field. For example, a dropdown is offered if the field is a code list.
We have also added the possibility to specify a default value for normal text fields. Before 2005 this was only possible for dropdown fields. This feature is also available for all Contact attributes.

See also the following help pages:
- Input Fields (Section 'Interaction Mapping Object')
- Mapping Interaction Attributes to Interactions
Scenario Description
Gallo d'Oro is my favourite model company which offers a wide range of coffee, chocolate and coffee-making equipment. Recently, two new documents had been prepared: A guide with a lot of tips from the company's master barista and a new sustainability report explaining all the efforts the company is doing to help fight climate change. The marketing department wants to set up a new form where customers can request either of those documents in exchange for their data. SAP Marketing Cloud forms do have a Download element available but unfortunately the download would start immediately after submitting the data. This is not optimal since this would also happen when a fake email address is entered.
The solution is to use the new feature of adding interaction attributes to form interactions and then sending emails with the download link in a trigger-based campaign. The interaction attribute used for this will be an ID of the download. Then a live target group will be used as a filter for the trigger-based campaign to make sure that the correct email is sent.
Setup Summary
In the next section I will explain the complete scenario in detail. As a cheat sheet I give you the summary of steps here:
- Preparation - Configuration
- Create custom interaction type
- Activate campaign trigger
- Preparation - Extensibility
- Create custom interaction field
- Add custom field in Segmentation
- Setup of Main Process
- Create form
- Create landing page with that form
- Create an interaction segmentation model to create a filter for the trigger-based campaign
- Create an email with the download link
- Create and start a trigger-based campaign
Download Request Scenario
Preparation - Configuration
 | If you have not already created an interaction type which you can use, then you need to do some configuration steps first. |
Custom Interaction Type
In the app 'Manage your Solution' select 'Configure your Solution' and filter on the application area 'Marketing'. Then select the item 'Contacts and Profiles'. Then choose 'Configure' for the step 'Manage Interaction Content':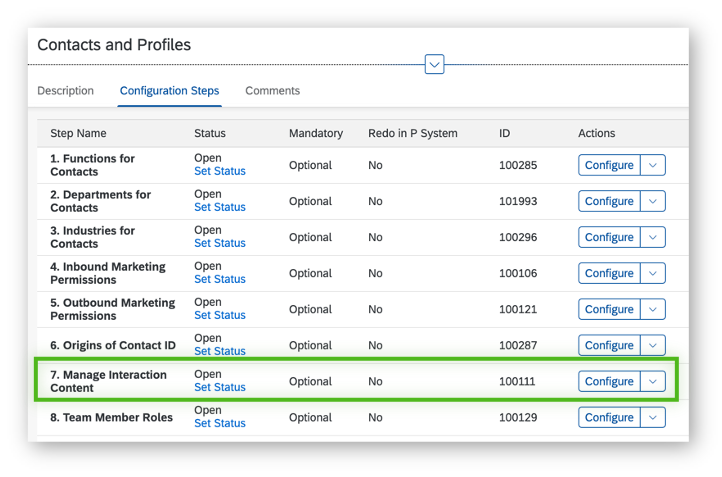
Then select 'Interaction Types' and add a new interaction type by pressing the '+' button.
 Finally you need to give your new interaction type a label, an ID and set the direction to 'Inbound'. Additionally, you assign the new interaction type to the channel 'WEB' and the communication media 'WEB'. Then save the new interaction type.
Activate Campaign Trigger
To use interactions of the new interaction type as triggers in a trigger-based campaign, that interaction type must be activated. In the app 'Manage your Solution' select 'Configure your Solution' and filter on the application area 'Marketing'. Then select the item 'Campaigns'. Then choose 'Configure' for the step 'Activate Campaign Trigger':
 In the next screen press 'Add' to add a new interaction type activation:
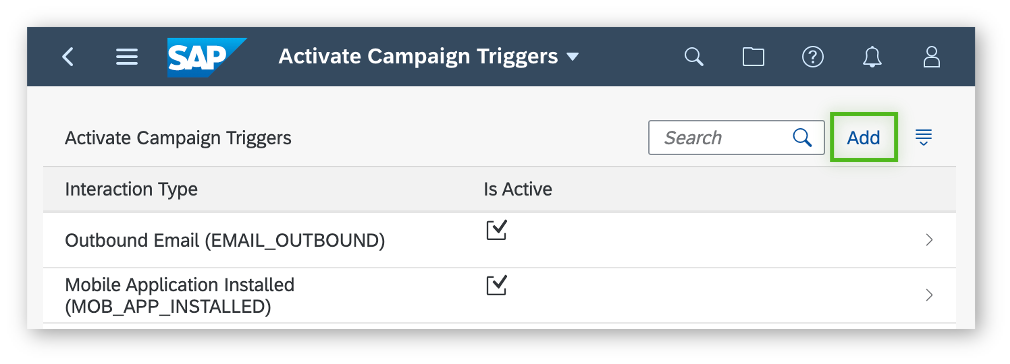 In the final screen choose your previously created interaction type and select 'Is Active' and then save.
Preparation - Extensibility
Now you need to add a new field to the interaction in the app 'Marketing Extensibility'. This app is very useful if you do anything around extensibility because it groups many other apps into one app.

Custom Interaction Field
To create the new field you need to select the app 'Create Custom Fields':
 Then you press the '+' button to create the field:
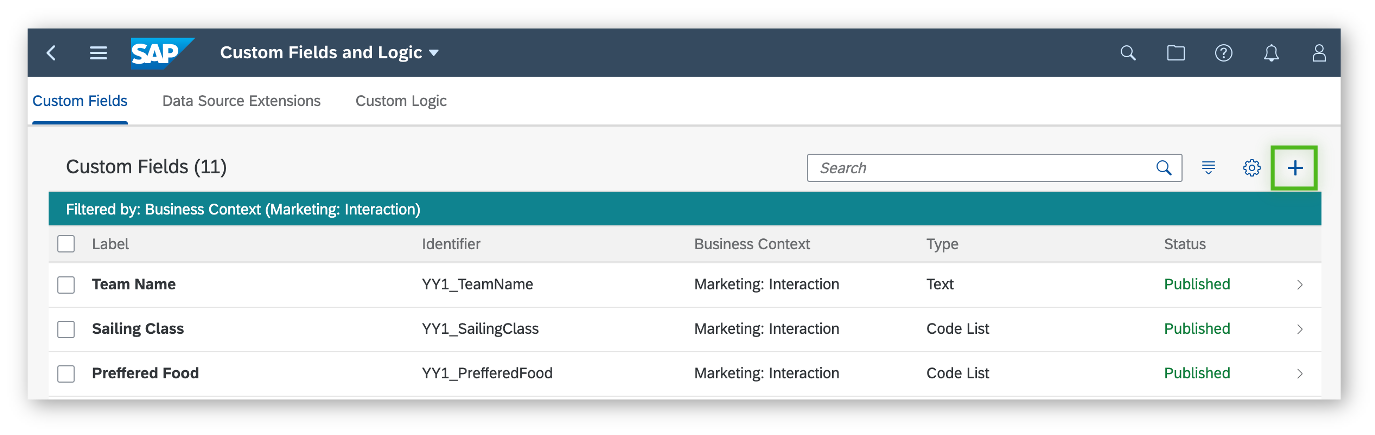 In the field properties you need to specify the business context 'Marketing: Interaction'. Give your field a nice label and a technical identifier. For my scenario I have chosen to use the type 'Text' - this leaves the value open for the business user to choose. An alternative would be to use a code list for which you could pre-define the values for all of your downloads. The downside is that your business users will still be dependent on an administrator to change that code list if any new downloads have to be offered. On the positive side this eliminates user errors and you could even offer that field on the form to your customers to choose the download from a dropdown list. In that case of course only one download can be chosen. As you will see further on, my scenario allows multiple simultaneous downloads.
 After pressing 'Create and Edit' you need to switch to the tab 'UIs and Reports' to enable the new field in multiple applications and UIs. The settings below worked for me so you should also be good with the same settings (I might have enabled too many though). Basically, the new field needs to be enabled in the following contexts:
- Form: To be able to select the new field for a form input field
- Contact Profile: You might want to be able to also see the new field in the Interaction detail view in the Contact Profile (You can use the 'Adapt UI' feature from the user menu to add the field).
- Segmentation Model: This is explained in the next section.

Finally save the new field and publish it:

Add Custom Fields in Segmentation
One of the later process steps will be the creation of a segmentation model for interactions which includes the new field. Therefore, you need to select the next app 'Assign to Segmentation':
 Next you need to select the entry with the following (NOTE: It's important to select the right combination here!):
- Business Context: Marketing: Interaction
- Segmentation Object: Interactions
In that view you need to find and select your new field and press button 'Set Visible':
 In the end it should look like this:
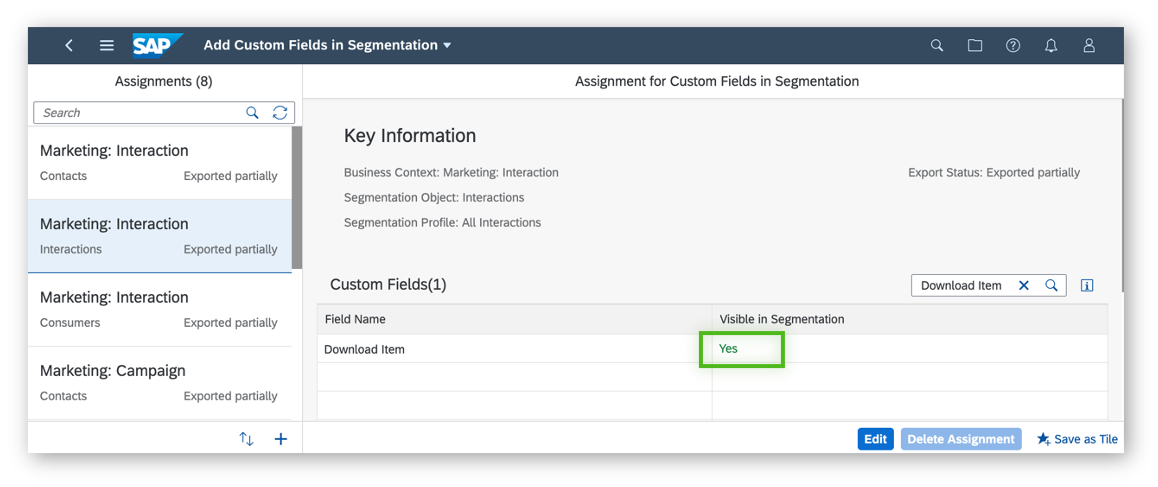
Setup of the Main Process
The previous steps are only needed once for this scenario. The following steps might need to be done multiple times (for multiple downloads / download forms).
Form with Interaction Attributes
One of the central pieces of this scenario is the form which will start the entire process. As a basis you need to start with your usual contact fields, like first name, last name and email address. Also, a confirm button is needed obviously. In addition, you need to create one Interaction element for each download item you want to offer in your form. In my example I created two - one for the 'Barista Tips' and one for the 'Sustainability Report'.
For each of these interactions I used my newly-created interaction type 'Download Request'. To distinguish one interaction from another I added one input field for each of the interactions. I set the 'Relevant For' setting so that every input field points to one of the interactions. The interaction attribute I chose for each of these input fields is the newly-created interaction field 'Download Item'. Then I used the default value to set a different identifier value for each interaction. 'Barista_Tips' for the interaction responsible for the download of the barista tips document and 'Sustainability_Report' for the other. Finally, I set both input fields to hidden because the user of the form does not need to see it.

Landing Page with Form
Of course, you want to embed your form in a nice landing page like the one below. If you are interested in how to make a landing page look like this using a CSS stylesheet, please check out this post.

Segmentation Model for Interactions
In this step you need to prepare the live target groups that are needed in the trigger-based campaigns to be able to send an email with a link to a specific download item. For this you need to create a segmentation model for interactions (Segmentation profile 'All Interactions').
In my example below, I first filtered for the Gallo d'Oro marketing area, which is not essential for the process. Then I added a filter for the new interaction type 'DOWNLOAD_REQUEST'. At the end I added filters for each available download. Throughout the remaining document I will concentrate only on the barista tips download. The filter for the barista tips download is 'Barista_Tips' for the field 'Download_Item'.
 For each final segment you need to create a new live target group. Remember to use the right marketing area and the category 'Live'!
 Save and open the new live target group and release it:
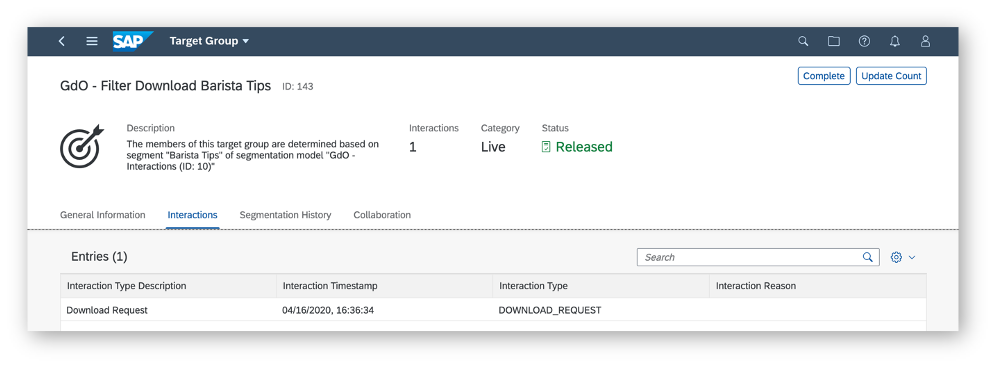 Note that you can actually see all interactions that meet the filter criteria. You should now do your first test by opening the landing page and create the download requests. The new interactions should appear in the new live target group.
Email with Download Link
Now you need to create and release an email for each download which includes the download link. In my example below I used the new email lite editor with a thumbnail of the download and a button element with the link to the PDF document:

Trigger-Based Campaign
The last step is the creation and activation of a trigger-based campaign for each download. Since the new interaction type had been activated as a campaign trigger in the preparation step described above you can now select this interaction type as trigger:

Normally every campaign will respect marketing permissions for each contact. However, in this case I would consider the email with a requested download link as an operational email. Therefore I suggest that you set the flag 'Ignore Marketing Permission':
 Next, you need to assign the previously created live target group as a filter condition:
 Now you assign the email with the download link:
 Finally, you need to release and start the trigger-based campaign for each download. If you need to change the email you can pause the campaign to do the changes. You cannot change the trigger or the trigger filter though - therefore make sure to get this right from the beginning.
Execution and Trouble-Shooting
Once the campaign is running you should receive a download email after submitting the download request in the form. If this does not work, I suggest the following steps to test and trouble shoot. I show this below in more detail but here is a quick summary:
- Enter data in the form and submit it
- Check that the interaction has been created correctly
- Check that the live target group is picking up the interaction
- Check that there has not been an issue in the campaign (permission or execution failure)
- Check your spam folder
Submit the Form
Open the published landing page or form, enter your data and submit. There should be a success message - if not check your integration setup or create a ticket using component
CEC-MKT-LPC.

Check the Interaction
Now you should check if the correct interaction had been written. To do so, you open the Contact Profile for the contact that has been created (or updated) and check if the new interaction is visible in the Interaction tab. Recently a detailed view of the interaction has been added as a new feature. In that view you can check the time of the interaction. Also, you can probably adapt the UI to add the new custom interaction field (Download Item). This UI adaptability might need some more authorisation for your user if you cannot do it.

Check the Live Target Group
Next, you could also check if the new interaction is also visible in the live target group which serves as a filter for the campaign trigger. You can update the list using the 'Update Count' button. Then you should sort the interactions by time to show the newest interaction on top. The latest interaction should be the one you just created.

Check the Campaign
In the campaign you can check the Performance tab to see any issues with permissions or bounces. Also check out the logs to see whether there are some technical issues reported.

Check for the Email Outbound Interaction and Spam Folder
Once the campaign shows that the email has been sent, the email outbound interaction should appear in the Contact Profile of the contact. This is the expected behaviour, but you can check it anyways. One final thing you should also check is if there is some problem with your email inbox. Spam classification might be a common issue so please check your spam folder.
Conclusion
After reading this article you should be capable of setting up this scenario on your own. It might also give you some inspiration for other similar scenarios.
- SAP Managed Tags:
- SAP Marketing Cloud
Labels:
9 Comments
You must be a registered user to add a comment. If you've already registered, sign in. Otherwise, register and sign in.
Labels in this area
-
Business Trends
270 -
Business Trends
12 -
chitchat
1 -
customerexperience
1 -
Event Information
256 -
Event Information
18 -
Expert Insights
30 -
Expert Insights
51 -
Life at SAP
133 -
Life at SAP
1 -
Product Updates
666 -
Product Updates
26 -
SAP HANA Service
1 -
SAPHANACloud
1 -
SAPHANAService
1 -
Technology Updates
453 -
Technology Updates
15
Related Content
- Campaign Build - Segmentation Best Practice in CRM and CX Blogs by SAP
- Pop Up to get triggerred once User enters a Value in a Field in Web UI in CRM and CX Blogs by Members
- SAP Commerce Cloud Q4 ‘23 Release Highlights in CRM and CX Blogs by SAP
- Update Custom CBO from BAdi or Custom logic using in CRM and CX Questions
- SAP Marketing Cloud Release 2402 is Here! in CRM and CX Blogs by SAP
Top kudoed authors
| User | Count |
|---|---|
| 9 | |
| 2 | |
| 1 | |
| 1 | |
| 1 | |
| 1 | |
| 1 | |
| 1 | |
| 1 |