
- SAP Community
- Products and Technology
- CRM and Customer Experience
- CRM and CX Blogs by Members
- Working with Autoflows
CRM and CX Blogs by Members
Find insights on SAP customer relationship management and customer experience products in blog posts from community members. Post your own perspective today!
Turn on suggestions
Auto-suggest helps you quickly narrow down your search results by suggesting possible matches as you type.
Showing results for
S0024940409
Discoverer
Options
- Subscribe to RSS Feed
- Mark as New
- Mark as Read
- Bookmark
- Subscribe
- Printer Friendly Page
- Report Inappropriate Content
01-25-2023
2:45 PM
Objective – creating a notification using autoflows.
SAP Service Cloud Version 2 or also known as SAP Intelligent Service Cloud helps service agents with easily maintained and accessible customer information. Access to knowledge base and other collaborative tools helps the service agents to resolve customer issues more efficiently. SAP Service Cloud V2 provides a centralized platform for managing customer interactions, which allow service agents to access customer data, history of the customer and details of the case swiftly and easily. This helps the agents to understand the customer needs in a better way and provide them with a more effective solution. SAP Service Cloud V2 also has a knowledge management system that allows agents to access and share the information with other service agents and customers which helps them to resolve the issue quickly. Overall, SAP Service Cloud V2 helps service agents to provide better service to the customer and support them by providing them with the information and tools they need.
A business process can be automated using autoflows. An autoflow can be defined by creating rules that trigger actions like sending information notification, event notification or emails pertaining business objects to the in-app users, integrated solutions. As an administrator, autoflows can be maintained in ‘Settings’. Autoflow actions can be triggered by defining the entity, event and conditions if satisfied, triggers the autoflow action. Go to your user profile and select Settings -> All Settings -> Business Flow -> Autoflow. You can see a list of autoflows that are available. SAP Rules are the standard autoflows provided by SAP which can only be viewed. Select custom rules from where we can create custom autoflows. Choose (+) New.

SAP Custom Autoflow
For an example, when the case priority is set to urgent, an information notification shall be sent to the service manager notifying (informing) him/her about the change in the priority of a particular case.
Steps to create an autoflow –
Step 1: -
Write a description in the “Enter the Autoflow Description” tab. The description can be written in multiple languages by selecting a language of choice in the language drop-down towards the right of the screen. It is required that the description must be maintained in at least one language for the autoflow to be saved.

Autoflow Description
Step 2: -
Select an entity for which the notification is to be created by clicking on the Entity drop-down list.
With reference to the above example, Case is selected as an entity.

Autoflow Entity
Step 3: -
Select an event type for which an email, event notification or information notification is to be sent. The event varies for each entity. The events common for all entities are Create and Update. There is an additional event for Case entity – Implicit call. There are other events – Release and Complete for entity – ServiceOrder.
For the above example, events update and create are selected.

Autoflow Event Type
Step 4: -
Select the condition for which the autoflow will trigger once it is satisfied. The condition can be written using OR statement or AND statement or a combination of both. Using the + symbol will add the AND condition. There is a separate button for adding OR condition. In the "Enter" field drop down list, there will be fields related to the entity for which a condition is to be written. The field can be equal to or not equal to a value or a filed.
The condition selected here is the priority status is equal to value urgent.

Autoflow Condition
Step 5: -
An action is to be selected – an event notification, information notification or email notification. Multiple actions can be selected using the (+) symbol.
For the example, information notification is selected. We can select the language in which the notification is to be sent. Write a subject and description for the notification. Select either or both role-based recipients and employee recipients to whom the notification is to be sent.

Autoflow Action
Once all the steps are completed, Save the autoflow.
The result can be seen in the notification icon in service manager’s profile once the autoflow is triggered.
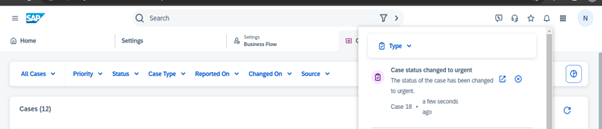
Autoflow Notification
The autoflow configured hence informs the service manager regarding the change in status of the case.
I hope you found the blog useful! Do like and share the blog with anyone who is on the SAP Service Cloud V2 learning journey. If there are any queries regarding automation or recommendations on how the automation can be more efficient, feel free to comment. Also, do follow me for more content on SAP CX.
- SAP Managed Tags:
- Machine Learning,
- SAP Cloud Portal service,
- SAP CRM Service Manager,
- SAP Field Service,
- SAP Service Cloud,
- CRM Service
2 Comments
You must be a registered user to add a comment. If you've already registered, sign in. Otherwise, register and sign in.
Labels in this area
-
ABAP
1 -
API Rules
1 -
c4c
1 -
CAP development
1 -
clean-core
1 -
CRM
1 -
Custom Key Metrics
1 -
Customer Data
1 -
Determination
1 -
Determinations
1 -
Introduction
1 -
KYMA
1 -
Kyma Functions
1 -
open SAP
1 -
RAP development
1 -
Sales and Service Cloud Version 2
1 -
Sales Cloud
1 -
Sales Cloud v2
1 -
SAP
1 -
SAP Community
1 -
SAP CPQ
1 -
SAP CRM Web UI
1 -
SAP Customer Data Cloud
1 -
SAP Customer Experience
1 -
SAP CX
1 -
SAP CX extensions
1 -
SAP Integration Suite
1 -
SAP Sales Cloud v1
1 -
SAP Sales Cloud v2
1 -
SAP Service Cloud
1 -
SAP Service Cloud v2
1 -
SAP Service Cloud Version 2
1 -
SAP Utilities
1 -
Service and Social ticket configuration
1 -
Service Cloud v2
1 -
side-by-side extensions
1 -
Ticket configuration in SAP C4C
1 -
Validation
1 -
Validations
1
Related Content
- Backoffice User Restrictions not working for Components in CRM and CX Questions
- Upload Pre OptIn for Marketing Permission (MKT_PERM_OPTIN_PRE) does not work in CRM and CX Questions
- Clean Core within SAP Sales and Service Cloud extensions in CRM and CX Blogs by Members
- Explore the newly uploaded videos on the Sales Cloud Version 2 channel. in CRM and CX Blogs by SAP
- When is the right time to compose? in CRM and CX Blogs by SAP
Top kudoed authors
| User | Count |
|---|---|
| 5 | |
| 1 | |
| 1 | |
| 1 | |
| 1 |