- SAP Community
- Products and Technology
- Technology
- Technology Blogs by SAP
- Deploying SAP S/4HANA Containers with Kubernetes
- Subscribe to RSS Feed
- Mark as New
- Mark as Read
- Bookmark
- Subscribe
- Printer Friendly Page
- Report Inappropriate Content
This blog post is the second part in a series around using SAP S/4HANA with containers. I would encourage you to read Part 1: Containerizing SAP S/4HANA Systems with Docker first, where we discussed what Docker is and how we can use it in conjunction with SAP S/4HANA to solve some problems related to N + M landscape. I have been working on this project alongside my colleagues Maxim Shmyrev and Griffin McMann. Let’s dive right in!
Overview
Here is an overview of the topics I will cover in this blog post:
- What is Kubernetes?
- Configuring the pod
- Configuring the service
- Configuring the NGINX Reverse Proxy
- Creating additional pods
- Conclusion
What is Kubernetes?
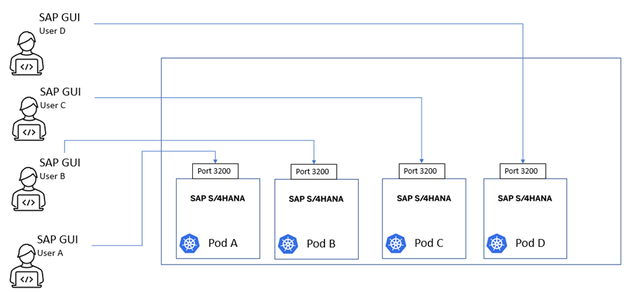
Now that we have learned how to build a docker image of a SAP S/4HANA system, we need to deploy containers for our ABAP developers to make use of them! We will use Kubernetes (or K8s) to deploy multiple containers. Kubernetes is an open-source technology used to deploy containerized applications. We can also utilize it to manage the incoming connections from the SAP GUI. We will be using Kubernetes Pods to run the container of our SAP S/4HANA that we built in the previous tutorial. The great thing about Kubernetes is that we can use simple yaml files to define our container orchestration parameters and with one command we can deploy as many pods as we want.
In theory, different ABAP developers and other users will ask for their own SAP S/4HANA system to connect to. The diagram above depicts users connecting to their own SAP S/4HANA systems that were deployed with Kubernetes and are all running on the same server. This infrastructure allows you to deploy many pods on-demand where developers can pull their code into these isolated S/4HANA systems via gCTS or abapGit. The changes made in these S/4HANA systems can then be committed to a centralized repository, merged and then pulled back into a DEV, QA, or production system. This solution can speed up the development process by circumventing object lock and can be used as a solution for N+M landscapes.
Configuring the Pod
In production situations, it is best practice to create a yaml file that defines a deployment. A deployment is a Kubernetes object that manages a set of identical pods. For our simple use case, however, we will create yaml file which will define pod A:
apiVersion: v1
kind: Pod
metadata:
  name: s4hana2023a
  labels:
    app: s4-2023a
spec:
  hostname: veuxci
  containers:
  - args:
    - infinity
    command:
    - sleep
    name: s4hana2023-a
    image: your_image_repo.com/s4hana:2023
    imagePullPolicy: IfNotPresent
    ports:
      - containerPort: 4237
        protocol: TCP
      - containerPort: 3200
        protocol: TCP
      - containerPort: 3300
        protocol: TCP
      - containerPort: 8000
        protocol: TCP
      - containerPort: 50000
        protocol: TCP
      - containerPort: 44300
        protocol: TCP
      - containerPort: 1129
        protocol: TCP
      - containerPort: 1128
        protocol: TCP
    resources:
      limits:
        cpu: '2'
        memory: 48Gi
      requests:
        cpu: '2'
        memory: 48Gi
From this yaml file you can see that we are defining a pod with the name: s4hana2023a, app: s4-2023a, the image we are using (s4hana:2023), exposing some ports necessary for connecting to the system and then finally resource limits and requests. The resource limits parameter defines the maximum amount of a resource that a container can use, in this case the container can only use 2 CPUs and 45Gi of memory. If the container exceeds this amount it will throttle or terminate it to prevent it from impacting the performance of other containers. The resource requests parameter specifies the amount of a resource that the containers guaranteed to receive.
Save the yaml file as pod_a.yaml and deploy the pod by running the command:
Kubectl apply -f pod_a.yaml -n <name_of_namespace>
You can run this command any time you make changes to this yaml file and you want those changes to reflect in the pod currently running. The –n denotes which namespace you want to deploy/apply the changes of the pod to. A namespace is a way to organize the objects in your Kubernetes cluster. For our scenario, all of the objects will exist in the same namespace.
Configuring the Service
Now that we have deployed our pod we will need to create a Kubernetes service to manage the connection from the outside world to the pod. We can create this service by defining some parameters to the bottom of our existing yaml file. Your pod_a.yaml file should now look like this:
apiVersion: v1
kind: Pod
metadata:
  name: s4hana2023a
  labels:
    app: s4-2023a
spec:
  hostname: veuxci
  containers:
  - args:
    - infinity
    command:
    - sleep
    name: s4hana2023-a
    image: your_image_repo.com/s4hana:2023
    imagePullPolicy: IfNotPresent
    ports:
      - containerPort: 4237
        protocol: TCP
      - containerPort: 3200
        protocol: TCP
      - containerPort: 3300
        protocol: TCP
      - containerPort: 8000
        protocol: TCP
      - containerPort: 50000
        protocol: TCP
      - containerPort: 44300
        protocol: TCP
      - containerPort: 1129
        protocol: TCP
      - containerPort: 1128
        protocol: TCP
    resources:
      limits:
        cpu: '2'
        memory: 48Gi
      requests:
        cpu: '2'
        memory: 48Gi
---
apiVersion: v1
kind: Service
metadata:
  name: s4hana2023-combined-service-a
spec:
  selector:
    app: s4-2023a
  ports:
    - name: servicea-sapgui #Service for SAPGUI
      protocol: TCP
      port: 3200
      targetPort: 3200
      nodePort: 30000
    - name: servicea-fiori #Service for Fiori
      protocol: TCP
      port: 44300
      targetPort: 44300
      nodePort: 31001
    - name: servicea-eclipse #Service for Eclipse
      protocol: TCP
      port: 3300
      targetPort: 3300
      nodePort: 30301
  type: NodePort
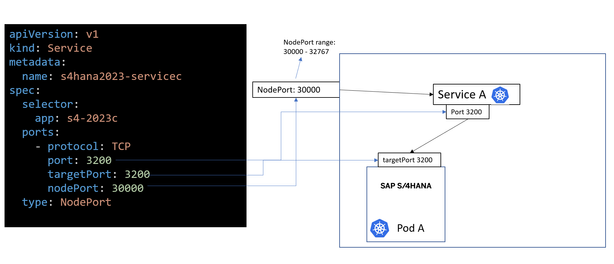
At the bottom of our yaml file you can see that we are defining a Kubernetes Service with the name of s4hana2023-combined-serivce-a, and notice that the ‘app’ parameter is the same name as the ‘app’ parameter for our pod: s4-2023a. This tells Kubernetes that the networking rules for this service should be applied to pod a. Within this combined service we have three services for three different connections: SAP GUI, Fiori, and Eclipse. Within each of these services we have defined the protocol (TCP) as well as these other parameters:
Port: 3200
targetPort: 3200
nodePort:30000
type: nodePort
The NodePort is what exposes our S/4HANA system running inside a Kubernetes pod to the outside world. From there, the service will route the connection to the targetPort of 3200 of pod A.
From the diagram below you can see what these different port parameters correspond to in the yaml file.
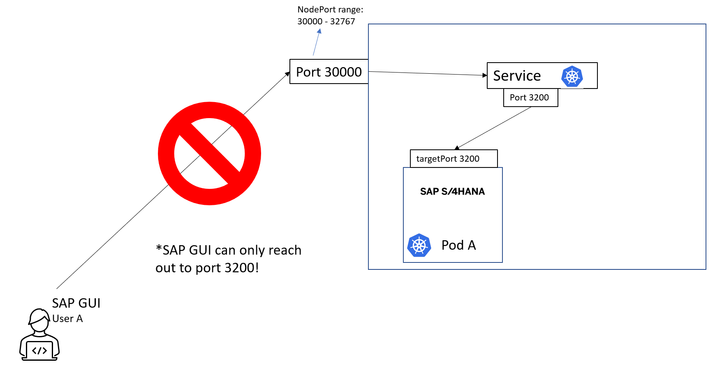
There is only one glaring issue with trying to connect through the NodePort we just created. The NodePort range is 30000 – 32767 and the SAPGUI can only connect via port 3200 (3200-3299). We solve this problem by deploying a NGINX Reverse Proxy to handle the incoming requests coming from port 3200 (or 32XX) and forwarding them to our NodePort.
Configuring the NGINX Reverse Proxy
It is important to note that instead of NGINX, it could be any other reverse proxy solution, such as Traefik. For our tutorial we will run our NGINX reverse proxy in a docker container. From the command below you can see we are running the latest version of nginx and we are exposing ports 3200, 3201, 3202 and 3203. The last two digits in the port 3200 refer to the instance number, for example instance number 00 will connect to port 3200, instance number 01 will connect to port 3201, instance 02 port 3202. We will be able to load balance our users to their designated pods based on what instance number they chose but when they connect to the Kubernetes service their traffic will be routed back to the correct instance number of 00. Feel free to expose more ports based on the number of pods you would like to run in parallel. If this seems confusing, it will become clearer as you continue reading.
Running a NGINX docker container:
sudo docker run -d --name nginx-base -p 3200:3200 -p 3201:3201 -p 3202:3202 -p 3203:3203 nginx:latest
The next step we need to do is to copy the nginx.conf file to our local directory with the following command:
sudo docker cp [container-id]:/etc/nginx/nginx.conf /your/local/dir/nginx.conf
We then want to add these lines to the bottom of the nginx.conf file:
stream {
    server {
        listen 3200;

        proxy_pass my-server.com:30000;
        proxy_connect_timeout 300s;
        proxy_timeout 600s;
    }
    server {
        listen 3201;

        proxy_pass my-server.com:30001;
        proxy_connect_timeout 300s;
        proxy_timeout 600s;
    }

    server {
        listen 3202;

        proxy_pass my-server.com:30002;
        proxy_connect_timeout 300s;
        proxy_timeout 600s;
    }
    server {
        listen 3203;

        proxy_pass my-server.com:30003;
        proxy_connect_timeout 300s;
        proxy_timeout 600s;
    }
}
Here you can see that NGINX is listening on port 3200 and if it receives a request on this port, it will pass the request off to port 30000, where our Kubernetes NodePort service is exposed. From there it will forward the request to the pod. In this nginx.conf file we are also listening on other ports in case we decide to spin up extra pods:
3201 to 30001
3202 to 30002
3203 to 30003
Once you have added these lines to the nginx.conf file and added any additional ports that you have also exposed when creating the nginx container, this file can be copied back to the /etc/nginx/ dir in the container with the following command:
sudo docker cp /hana/data/bootcamp/ngin2/nginx.conf [container-id]:/etc/nginx/
Reload the nginx service so that the changes in the nginx.conf file take place:
sudo docker exec [container-id] nginx -s reload
Creating additional pods
Now, all of the infrastructure has been setup and if we want to create a “pod-b” all we need to do is copy our pod-a yaml file and change each “a” to “b” and assign it a different NodePort for our SAPGUI, Eclipse, and Fiori connections, in this case 30001, 31001, and 30301.
apiVersion: v1
kind: Pod
metadata:
  name: s4hana2023b
  labels:
    app: s4-2023b
spec:
  hostname: veuxci
  containers:
  - args:
    - infinity
    command:
    - sleep
    name: s4hana2023-b
    image: your_image_repo.com/s4hana:2023
    imagePullPolicy: IfNotPresent
    ports:
      - containerPort: 4237
        protocol: TCP
      - containerPort: 3200
        protocol: TCP
      - containerPort: 3300
        protocol: TCP
      - containerPort: 8000
        protocol: TCP
      - containerPort: 50000
        protocol: TCP
      - containerPort: 44300
        protocol: TCP
      - containerPort: 1129
        protocol: TCP
      - containerPort: 1128
        protocol: TCP
    resources:
      limits:
        cpu: '2'
        memory: 48Gi
      requests:
        cpu: '2'
        memory: 48Gi
---

apiVersion: v1
kind: Service
metadata:
  name: s4hana2023-combined-service-b
spec:
  selector:
    app: s4-2023b
  ports:
    - name: serviceb-sapgui #Service for SAPGUI
      protocol: TCP
      port: 3200
      targetPort: 3200
      nodePort: 30001
    - name: serviceb-fiori #Service for Fiori
      protocol: TCP
      port: 44300
      targetPort: 44300
      nodePort: 31001
    - name: serviceb-eclipse #Service for Eclipse
      protocol: TCP
      port: 3300
      targetPort: 3300
      nodePort: 30301
  type: NodePort
Then run the same command to start up pod b:
Kubectl apply -f pod-b.yaml
Repeat this step to create as many pods as you would like!
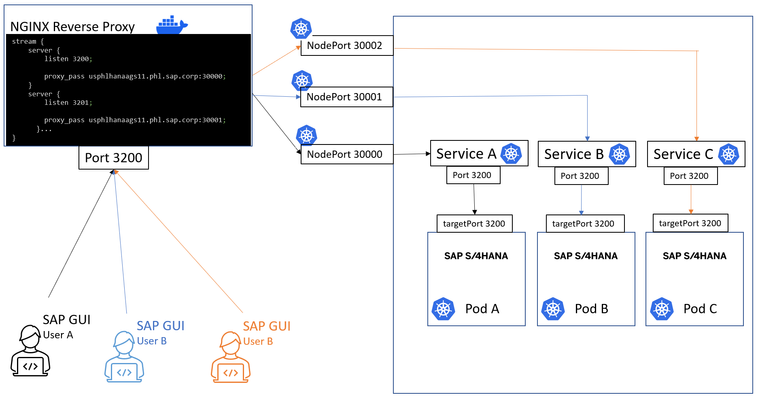
In the image above, you can see the infrastructure that we have now created. If user A wants to connect to pod A they can use instance 00 which connects them to the nginx reverse proxy on port 3200 and this will forward them to port 30000 which is the NodePort for Service A that then passes the request to Pod A. User B will connect via instance 01 which means they will use port 3201 and NGINX will pass the request to the NodePort for service B (30001). The benefit of this architecture is that if you need another S/4HANA system, you don’t need to provision another server or VM. One can simply edit a few lines of code in the yaml file to create a new K8s pod and service eliminating the time and effort for provisioning a new sandbox system. Please note that this diagram only displays the services defined for our SAPGUI connections (NodePorts 30000, 30001, and 30002), and does not show the services we defined for Eclipse and Fiori.
Conclusion
In this blog post we walked through the steps to deploy containerized SAP S/4HANA systems using Kubernetes. We discussed how this architecture allows for the on-demand provisioning of isolated S/4HANA systems, accelerating the development process by being a solution for N+M landscapes. We demonstrated how to deploy Kubernetes pods and services using an Infrastructure as Code (IaC) approach, utilizing simple yaml files. If you enjoyed this blog post, please stay tuned for other topics my team members and I will be covering next, including how to install ABAPGit and gCTS in these containerized systems S/4HANA systems. This is a project that my colleagues Maxim Shmyrev, Griffin McMann, and I have been working on for a little while now and we are excited about the possibilities this creates for our customers. If you have questions about this blog post or the tutorial, let me know in the comments below!
- SAP Managed Tags:
- DevOps,
- SAP S/4HANA,
- Research and Development
You must be a registered user to add a comment. If you've already registered, sign in. Otherwise, register and sign in.
-
ABAP CDS Views - CDC (Change Data Capture)
2 -
AI
1 -
Analyze Workload Data
1 -
BTP
1 -
Business and IT Integration
2 -
Business application stu
1 -
Business Technology Platform
1 -
Business Trends
1,658 -
Business Trends
94 -
CAP
1 -
cf
1 -
Cloud Foundry
1 -
Confluent
1 -
Customer COE Basics and Fundamentals
1 -
Customer COE Latest and Greatest
3 -
Customer Data Browser app
1 -
Data Analysis Tool
1 -
data migration
1 -
data transfer
1 -
Datasphere
2 -
Event Information
1,400 -
Event Information
67 -
Expert
1 -
Expert Insights
177 -
Expert Insights
305 -
General
1 -
Google cloud
1 -
Google Next'24
1 -
GraphQL
1 -
Kafka
1 -
Life at SAP
780 -
Life at SAP
13 -
Migrate your Data App
1 -
MTA
1 -
Network Performance Analysis
1 -
NodeJS
1 -
PDF
1 -
POC
1 -
Product Updates
4,576 -
Product Updates
348 -
Replication Flow
1 -
REST API
1 -
RisewithSAP
1 -
SAP BTP
1 -
SAP BTP Cloud Foundry
1 -
SAP Cloud ALM
1 -
SAP Cloud Application Programming Model
1 -
SAP Datasphere
2 -
SAP S4HANA Cloud
1 -
SAP S4HANA Migration Cockpit
1 -
Technology Updates
6,873 -
Technology Updates
434 -
Workload Fluctuations
1
- Deployment of Seamless M4T v2 models on SAP AI Core in Technology Blogs by SAP
- Configure Custom SAP IAS tenant with SAP BTP Kyma runtime environment in Technology Blogs by SAP
- SAP Build Code blog series: 4 – Adding a SAPUI5 application and deploying to SAP BTP in Technology Blogs by Members
- Kyma Integration with SAP Cloud Logging. Part 1: Introduction and shipping Logs in Technology Blogs by SAP
| User | Count |
|---|---|
| 27 | |
| 19 | |
| 12 | |
| 11 | |
| 9 | |
| 9 | |
| 9 | |
| 8 | |
| 8 | |
| 7 |


